Submersible Pond Pump 1000 - Bermuda
Submersible Pond Pump 1000 - Bermuda
Submersible Pond Pump 1000 - Bermuda

Create successful ePaper yourself
Turn your PDF publications into a flip-book with our unique Google optimized e-Paper software.
▼ LIMITED WARRANTY<br />
This product is guaranteed for a period of 3 years from the date of purchase<br />
for material or manufacturing defects, with the exception of the impellor and<br />
shaft which carries a 1 year guarantee. The guarantee covers the<br />
substitution of defective parts. However, the guarantee is considered void in<br />
the case of improper use, improper handling or negligence on the part of the<br />
buyer. If your pump fails please return it to the retail outlet where you<br />
purchased the product. Please note, you must take your proof of purchase<br />
with you.<br />
▼ SPARES<br />
Replacement impellors and shafts and other components are available.<br />
Please contact our Customer Services Department on 01905 798666 quoting<br />
code BER0163 for replacement impellors and shafts.<br />
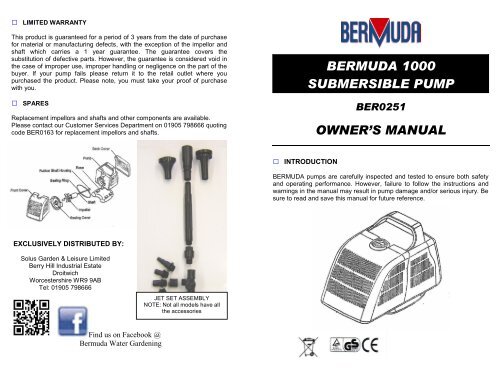
BERMUDA <strong>1000</strong><br />
SUBMERSIBLE PUMP<br />
BER0251<br />
OWNER’S MANUAL<br />
▼ INTRODUCTION<br />
BERMUDA pumps are carefully inspected and tested to ensure both safety<br />
and operating performance. However, failure to follow the instructions and<br />
warnings in the manual may result in pump damage and/or serious injury. Be<br />
sure to read and save this manual for future reference.<br />
EXCLUSIVELY DISTRIBUTED BY:<br />
Solus Garden & Leisure Limited<br />
Berry Hill Industrial Estate<br />
Droitwich<br />
Worcestershire WR9 9AB<br />
Tel: 01905 798666<br />
JET SET ASSEMBLY<br />
NOTE: Not all models have all<br />
the accessories<br />
Find us on Facebook @<br />
<strong>Bermuda</strong> Water Gardening
▼ PERFORMANCE<br />
A clogged or dirty intake grill will greatly reduce performance. If the pump is<br />
used in dirty water, raise it slightly to reduce the amount of debris contacting<br />
the intake.<br />
On initial installation, there may be air in the pump and tubing. To disperse<br />
the air pocket, turn on and off several times.<br />
N<br />
E<br />
L<br />
IMPORTANT<br />
The wires in the mains lead are<br />
coloured in accordance with the<br />
following code:<br />
Green-and-yellow: Earth (E)<br />
Blue: Neutral (N)<br />
Brown: Live (L)<br />
▼ MAINTENANCE<br />
NOTE: Before starting any maintenance, always disconnect from the<br />
electrical supply.<br />
To clean the pump, remove the front cover and the impeller. Use a small<br />
brush or stream of water to remove any debris.<br />
Caution: If the pump fails to operate, check the following:-<br />
• Check the circuit breaker to ensure the pump is getting electrical power.<br />
• Check the pump discharge and tubing for kinks and obstructions. Algae<br />
build up can be flushed out with a garden hose.<br />
• Check the inlet grill to ensure it is not clogged with debris.<br />
• Remove the pump inlet to access the impeller area. Turn the rotor to<br />
ensure it is not broken or jammed.<br />
• Monthly maintenance will add to your pump’s life.<br />
NOTE: Ensure that the electrical cord loops below the electrical outlet<br />
to form a ‘Drip Loop’. This will prevent water from running down the<br />
cord into the electrical outlet.<br />
YOU MUST ALWAYS CONSULT A QUALIFIED ELECTRICIAN<br />
OR LOCAL ELECTRICITY AUTHORITY IF YOU HAVE<br />
ANY DOUBTS ABOUT WIRING TO THE MAINS SUPPLY.<br />
WARNING: This appliance must be earthed and it is essential that all<br />
connections are securely made using the following code.<br />
This product is designed to be permanently wired to a mains supply.<br />
The wire which is coloured green-and-yellow must be connected to the<br />
terminal which is marked with letter E, the earth symbol, or coloured green or<br />
green-and-yellow.<br />
The wire which is coloured blue must be connected to the terminal which is<br />
marked with the letter N or coloured black.<br />
The wire which is coloured brown must be connected to the terminal which<br />
is marked with the letter L or coloured red.<br />
▼ WARNING: SAFETY AND ELECTRICAL CONNECTIONS<br />
1. The pump is supplied complete with 10M of 3-core electrical cable, which<br />
is permanently connected and sealed to the motor. The supply cable of<br />
this pump cannot be replaced; if the cable is damaged, the pump should<br />
be discarded. The installation must conform to the regulations of the local<br />
electrical authority.<br />
2. A 10MA or 30MA residual current device (RCD) must be fitted to the<br />
mains supply.<br />
3. If an extension cable is required, this should be connected to the end of<br />
the pump cable using a weatherproof cable connector. The joint must be<br />
positioned outside the water in a suitable dry housing. The extension<br />
cable should be of 3-core, 0.75mm² PVC insulated cable (ref HO3VVF)<br />
and permanently wired to the mains supply with a 3 AMP fuse.<br />
4. The pump cable (and extension cable) should be adequately protected<br />
from damage.<br />
IMPORTANT – WARNING<br />
Always disconnect all appliances in the display from the electrical<br />
supply before putting your hands in the water whilst the equipment is<br />
being installed, repaired, maintained or handled. If the supply cable is<br />
damaged it cannot be replaced and the appliance should be destroyed.<br />
• Do not use the supply cable to lift the pump as this may cause damage.<br />
We recommend fitting a lifting cord when the pump is installed in deep<br />
water.<br />
• Do not operate or leave the pump in freezing conditions.<br />
• Do not allow the pump to run dry.<br />
• Check that the voltage marked on the pump corresponds to the mains<br />
supply.<br />
• Do not pump flammable liquids.<br />
• Operate in fresh water only.<br />
• Only operate the pump when it is fully submerged.