wachsfolien 2 en
wachsfolien 2 en
wachsfolien 2 en

You also want an ePaper? Increase the reach of your titles
YUMPU automatically turns print PDFs into web optimized ePapers that Google loves.
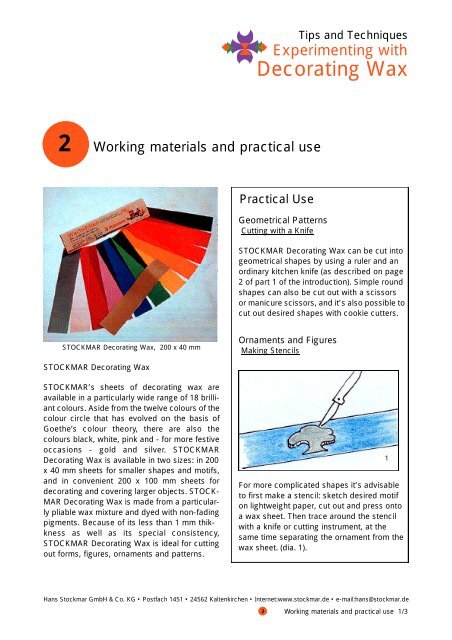
2 Working materials and practical use<br />
STOCKMAR Decorating Wax, 200 x 40 mm<br />
STOCKMAR Decorating Wax<br />
STOCKMAR’s sheets of decorating wax are<br />
available in a particularly wide range of 18 brilliant<br />
colours. Aside from the twelve colours of the<br />
colour circle that has evolved on the basis of<br />
G o e t h e ’s colour theory, there are also the<br />
colours black, white, pink and - for more festive<br />
occasions - gold and silver. STOCKMAR<br />
Decorating Wax is available in two sizes: in 200<br />
x 40 mm sheets for smaller shapes and motifs,<br />
and in conv<strong>en</strong>i<strong>en</strong>t 200 x 100 mm sheets for<br />
decorating and covering larger objects. STOCK-<br />
MAR Decorating Wax is made from a particularly<br />
pliable wax mixture and dyed with non-fading<br />
pigm<strong>en</strong>ts. Because of its less than 1 mm thikkness<br />
as well as its special consist<strong>en</strong>cy,<br />
STOCKMAR Decorating Wax is ideal for cutting<br />
out forms, figures, ornam<strong>en</strong>ts and patterns.<br />
Tips and Techniques<br />
Experim<strong>en</strong>ting with<br />
Decorating Wax<br />
Practical Use<br />
Geometrical Patterns<br />
Cutting with a Knife<br />
STOCKMAR Decorating Wax can be cut into<br />
geometrical shapes by using a ruler and an<br />
ordinary kitch<strong>en</strong> knife (as described on page<br />
2 of part 1 of the introduction). Simple round<br />
shapes can also be cut out with a scissors<br />
or manicure scissors, and it’s also possible to<br />
cut out desired shapes with cookie cutters.<br />
Ornam<strong>en</strong>ts and Figures<br />
Making St<strong>en</strong>cils<br />
For more complicated shapes it’s advisable<br />
to first make a st<strong>en</strong>cil: sketch desired motif<br />
on lightweight paper, cut out and press onto<br />
a wax sheet. Th<strong>en</strong> trace around the st<strong>en</strong>cil<br />
with a knife or cutting instrum<strong>en</strong>t, at the<br />
same time separating the ornam<strong>en</strong>t from the<br />
wax sheet. (dia. 1).<br />
Hans Stockmar GmbH & Co. KG • Postfach 1451 • 24562 Kalt<strong>en</strong>kirch<strong>en</strong> • Internet:www.stockmar.de • e-mail:hans@stockmar.de<br />
2<br />
Working materials and practical use 1/3<br />
1
2<br />
STOCKMAR Decorating Wax, 200 x 100 mm<br />
How to Cover Objects<br />
Wrap a wax sheet around the object, press on<br />
lightly and cut off along the seam with a knife. At<br />
the seam, press both edges of the wax together<br />
well with your finger and smooth over (dia.<br />
below).<br />
You can cover whole objects using<br />
STOCKMAR Decorating Wax<br />
The top edge can <strong>en</strong>d at the edge of the object<br />
by cutting it off there, or you can let it overlap 1<br />
cm and fold it in over the edge; th<strong>en</strong> the ornam<strong>en</strong>tation<br />
can be added.<br />
TIP<br />
1- STOCKMAR Decorating Wax should be<br />
stored at room temperature prior to use.<br />
Material that is too cold won’t stick well.<br />
2- Before fixation with hairspray, the sheet<br />
wax can easily be removed from any surface<br />
by using a kitch<strong>en</strong> knife.<br />
Hans Stockmar GmbH & Co. KG • Postfach 1451 • 24562 Kalt<strong>en</strong>kirch<strong>en</strong> • Internet:www.stockmar.de • e-mail:hans@stockmar.de<br />
2<br />
1<br />
Cut into the side edges<br />
with a scissors so that<br />
the sheet wax better<br />
conforms to the curve of<br />
the ball.<br />
Tips and Techniques<br />
Experim<strong>en</strong>ting with<br />
Decorating Wax<br />
Covering Round Objects<br />
If you want to cover a ball or sphere with sheet<br />
wax, you should proceed as follows: wrap a<br />
sheet of the decorating wax around the ball, cut<br />
off overhanging strips and firmly press the seam<br />
edges together. Using a scissors, cut into the<br />
side edges (dia. 1) so that the sheet wax better<br />
conforms to the curve. Cut out squares from the<br />
remaining wax strips, round off the corners with<br />
a scissors and apply to the sides of the ball that<br />
are not yet covered (2). Warm up the ball in the<br />
palms of your hands; th<strong>en</strong> smooth out the<br />
unev<strong>en</strong> spots with your fingers.<br />
Working materials and practical use 2/3<br />
2
2<br />
How to Preserve Objects<br />
After completion, objects can be sprayed with<br />
hairspray or clear varnish; let this dry, th<strong>en</strong><br />
repeat a second time. You can attain ev<strong>en</strong><br />
more durability by using boat varnish. Objects<br />
that have be<strong>en</strong> treated in this way are not<br />
s<strong>en</strong>sitive to warmth, but should nevertheless<br />
not be exposed to direct sunlight or heat.<br />
Through the varnish, the objects attain more<br />
durability and an attractive shine.<br />
The cover of this jar has be<strong>en</strong> coated with blue<br />
sheet wax and decorated<br />
with coloured paperclips and tiny beads<br />
A Lot More Things You Can Make<br />
Decorating with other Materials<br />
Sheet wax can be decorated with all sorts of differ<strong>en</strong>t<br />
objects such as beads, eyelets, beans,<br />
pumpkin seeds, scales of pine cones, tiny stones,<br />
coins, glass chips, wire or string. Applying<br />
these decorative materials to the wax is much<br />
easier if you work with two or three sheet layers<br />
placed on top of each other, which also creates<br />
a greater bas-relief effect. The same holds true<br />
for imprinting patterns, which can be done with<br />
objects like nails, matches, p<strong>en</strong>s or the back of<br />
a knife. There really no limit to the possibilities<br />
you can imagine.<br />
Tips and Techniques<br />
Experim<strong>en</strong>ting with<br />
Decorating Wax<br />
TIP<br />
This can easily be removed by washing well<br />
Wh<strong>en</strong> you work with wax, your hands and<br />
working ut<strong>en</strong>sils like scissors, rulers, nails,<br />
etc. get coated with a very fine layer of wax.<br />
in warm water to which a few drops of<br />
liquid deterg<strong>en</strong>t have be<strong>en</strong> added. Th<strong>en</strong> dry<br />
off with paper towel.<br />
SUGGESTION<br />
Combining with STOCKMAR Sticking Wax<br />
Leftover pieces of STOCKMAR Modeling<br />
Beeswax or Modeling Wax can be combined<br />
with Decorating Wax to create a decorating<br />
material excell<strong>en</strong>t for candles and other<br />
objects. Very small shapes and figures are<br />
easier and less complicated to form with<br />
Modeling Wax than with sheet wax. Tiny<br />
dots, ovals, leaves, etc., can be made, for<br />
instance, by pressing a tiny ball of Modeling<br />
Wax flat with your finger and th<strong>en</strong> modeling<br />
it into the desired shape (see dia. below).<br />
Candle decorated with Modeling Wax<br />
Hans Stockmar GmbH & Co. KG • Postfach 1451 • 24562 Kalt<strong>en</strong>kirch<strong>en</strong> • Internet:www.stockmar.de • e-mail:hans@stockmar.de<br />
2<br />
Working materials and practical use 3/3