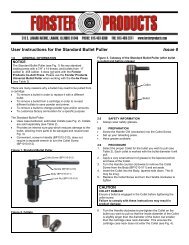
User Instructions for the Ultra⢠Micrometer Seater ... - Forster Products
User Instructions for the Ultra⢠Micrometer Seater ... - Forster Products
User Instructions for the Ultra⢠Micrometer Seater ... - Forster Products
- No tags were found...

Create successful ePaper yourself
Turn your PDF publications into a flip-book with our unique Google optimized e-Paper software.
<strong>User</strong> <strong>Instructions</strong> <strong>for</strong> <strong>the</strong> Ultra <strong>Micrometer</strong> <strong>Seater</strong> Die Issue 5<br />
1.0 GENERAL INFORMATION<br />
The Ultra <strong>Micrometer</strong> <strong>Seater</strong> Die is a non-crimping style seater<br />
die (except <strong>for</strong> <strong>the</strong> 30-30) that holds <strong>the</strong> bullet and case in perfect<br />
alignment while <strong>the</strong> bullet is press-fit seated. A handy micrometer<br />
adjusts <strong>the</strong> bullet seating depth to 0.001" or even finer<br />
increments. Complete die nomenclature is given in Figure 2 on<br />
<strong>the</strong> back page.<br />
A close-fitting, sliding Die Chamber (P-30) holds <strong>the</strong> bullet<br />
and case <strong>for</strong> <strong>the</strong>ir entire length, as well as holds <strong>the</strong> bullet,<br />
case and Bullet Seating Stem (J-30 ULTRA) in a common<br />
axis during <strong>the</strong> bullet seating operation to ensure match-grade<br />
alignment.<br />
The sliding Die Chamber has a concentric bullet channel that<br />
is just slightly larger (per side) than <strong>the</strong> bullet diameter. This<br />
tight fit ensures straight line (co-axial) seating.<br />
The Bullet Seating Stem contacts <strong>the</strong> bullet ogive as far away<br />
from <strong>the</strong> bullet's tip as possible.<br />
2.0 SAFETY INFORMATION<br />
Always wear safety glasses.<br />
Keep complete, chronological records of your reloads. This<br />
data is useful <strong>for</strong> future load development. Label each batch<br />
of cartridges with:<br />
Primer (manufacturer, type, lot)<br />
Case (manufacturer, overall length, neck wall<br />
thickness, number of times fired, comments)<br />
Powder (type, manufacturer, lot, charge)<br />
Bullet (manufacturer, type, weight, lot)<br />
Cartridge (overall length, comments)<br />
Brass from oversize or o<strong>the</strong>rwise out-of-tolerance chambers<br />
that has not been full-length sized may not fit in this Die. A<br />
custom sliding Die Chamber may be required. See Section<br />
6.0.<br />
The half-inch yellow square tab is an anti-rust agent. Keep<br />
this tab with <strong>the</strong> Dies.<br />
3.0 PREPARATION<br />
3.1 Have a 7/64 short arm hex key (Allen wrench) available.<br />
3.2 Prepare <strong>the</strong> cases<br />
Inconsistent or extremely light bullet tension can be a root cause<br />
of bullet seating variation. Ensure your cases are properly<br />
prepared <strong>for</strong> accurate bullet seating:<br />
If <strong>the</strong> case neck walls vary in thickness, turn <strong>the</strong> outside neck<br />
to a consistent thickness using a <strong>Forster</strong> Outside Neck<br />
Turner (part numbers OT1010 or HOT100).<br />
If <strong>the</strong> cases need sizing, use a <strong>Forster</strong> Bench-Rest® Full<br />
Length Sizing Die, Bushing Bump Sizing Die or a Bench<br />
Rest® Neck Sizing Die to properly size <strong>the</strong> cases.<br />
As cases are repeatedly fired, neck walls can become work<br />
hardened (and hence less ductile). When this occurs, brass<br />
has a tendency to spring back more and not hold <strong>the</strong> shape of<br />
<strong>the</strong> sizing die. Annealing <strong>the</strong> case necks can extend <strong>the</strong>ir<br />
useful life and greatly enhance accurate loading. (For more<br />
in<strong>for</strong>mation on case annealing, see Chapter 4 of Designing<br />
and Forming Custom Cartridges <strong>for</strong> Rifles and Handguns by<br />
Dr. Ken Howell.)<br />
3.3 Prepare <strong>the</strong> Die as Follows:<br />
3.31 Clean <strong>the</strong> Die<br />
Clean <strong>the</strong> inside of P-30 die surfaces using a cloth patch<br />
saturated with gun-cleaning solvent.<br />
3.32 Fine Tune <strong>the</strong> Die<br />
NOTICE<br />
Because <strong>the</strong> Die holds <strong>the</strong> bullet, case and Bullet Seating Stem<br />
in perfect alignment <strong>for</strong> straight line seating, even minor<br />
variations (0.005") in bullet seating depth may cause significant<br />
changes in accuracy.<br />
To increase accuracy, position <strong>the</strong><br />
bullet as close to <strong>the</strong> rifling as<br />
possible. The overall length measured<br />
from <strong>the</strong> case head to <strong>the</strong> tip of <strong>the</strong><br />
bullet is not as critical as <strong>the</strong> distance<br />
from <strong>the</strong> case head to <strong>the</strong> ogive (point<br />
at which <strong>the</strong> bullet contacts <strong>the</strong> lands<br />
of <strong>the</strong> rifling) as shown in Figure. 1.<br />
Use a C.O.L. gauge to measure this<br />
dimension. Refer to Table 1 <strong>for</strong> seating<br />
depth adjustment in<strong>for</strong>mation.<br />
Figure 1. Critical<br />
Cartridge Dimension<br />
Bullet<br />
Ogive<br />
Case<br />
Case<br />
Head<br />
Critical<br />
Dimension<br />
Table 1. Seating Depth Adjustment In<strong>for</strong>mation<br />
Bullet Seating<br />
Bullet Movement<br />
Stem (J-30)<br />
Adjustment<br />
17-243 Caliber<br />
<strong>Seater</strong> Dies<br />
257-375 Caliber<br />
<strong>Seater</strong> Dies<br />
1/8 turn 0.004" 0.0045"<br />
¼ turn 0.008" 0.009"<br />
½ turn 0.016" 0.018"<br />
3.33 Set Seating Depth Style<br />
The Micro Head (Q-30SM, Q-30LG) is adjustable in 0.001"<br />
increments:<br />
For coarse bullet seating depth: Loosen <strong>the</strong> Lock Nut (A-10M,<br />
K-30SM) and move <strong>the</strong> Bullet Seating Stem (J-30 ULTRA).<br />
For fine bullet seating depth: Tighten <strong>the</strong> Lock Nut and simply<br />
turn <strong>the</strong> Micro Head.
4.0 BULLET SEATING PROCEDURE<br />
1. Create a prototype dummy round using <strong>the</strong> following<br />
procedure:<br />
A. Ensure <strong>the</strong> Micro Body (MODL-30SM, MODL-30LG) is<br />
securely threaded to <strong>the</strong> Sleeve (O-30).<br />
B. With <strong>the</strong> press ram and shell holder at <strong>the</strong>ir highest<br />
points, screw <strong>the</strong> die in <strong>the</strong> press until <strong>the</strong> bottom of <strong>the</strong><br />
sliding Die Chamber touches <strong>the</strong> shell holder.<br />
C. Continue screwing <strong>the</strong> die clockwise until you have fully<br />
compressed <strong>the</strong> sliding Die Chamber. Next, back it off at<br />
least one full turn because <strong>the</strong> Die Chamber should<br />
never be fully compressed when seating bullets.<br />
D. Tighten <strong>the</strong> Cross Bolt Die Lock Ring (DIE-G-10) by<br />
using a 7/64 short arm hex key on <strong>the</strong> Die Lock Ring<br />
Screw (6-32 X ½ ").<br />
E. Loosen <strong>the</strong> Lock Nut and adjust <strong>the</strong> Bullet Seating Stem<br />
up or down until <strong>the</strong> approximate seating depth is<br />
obtained. Tighten <strong>the</strong> Lock Nut against <strong>the</strong> Micro Body.<br />
F. Seat <strong>the</strong> bullet by inserting it in <strong>the</strong> resized, primed,<br />
charged case mouth and slowly running it up in <strong>the</strong> Die.<br />
G. Check <strong>the</strong> cartridge <strong>for</strong> proper length. Turn <strong>the</strong><br />
micrometer setting to fine-adjust to <strong>the</strong> desired bullet<br />
seating depth. The micro head will adjust in 0.001”<br />
increments <strong>for</strong> very precise bullet depth alterations. Each<br />
full revolution of <strong>the</strong> Micro Head equals 0.025".<br />
2. The die is now ready to reliably seat bullets to consistently<br />
accurate depths. Create live rounds following steps A through<br />
G.<br />
NOTICE<br />
To ensure <strong>the</strong> die will hold <strong>the</strong> proper setting so that it may be<br />
reused without readjustment, tighten <strong>the</strong> Cross Bolt Die Lock<br />
Ring. Use a table like that shown in Table 2 to keep track of<br />
optimal bullet depth settings <strong>for</strong> future loading.<br />
Figure 2. Die Nomenclature<br />
Die with Empty<br />
Die Chamber (P-30)<br />
Bullet Seating Stem (J-30 ULTRA)<br />
Lock Nut (A-10M, K-30M))<br />
Micro Head (Q-30SM, Q-30LG)<br />
O-RING <strong>for</strong> MODL-30 (O-RING)<br />
Return Spring (M-30)<br />
Micro Body (MODL-30SM, MODL-30LG)<br />
Steel Retainer Ring (N-30)<br />
Sleeve<br />
(O-30-SH, O-30M1, O-30-M2, O-30-L)<br />
Cross Bolt Die Lock Ring (G-10)<br />
Die Lock Ring Screw<br />
(6-32 X ½ ”)<br />
Die Chamber (P-30)<br />
Die Ready to Seat<br />
Bullet<br />
Bullet<br />
Case<br />
Table 2. Optimal Bullet Depth Setting In<strong>for</strong>mation<br />
Bullet<br />
Manufacturer<br />
Bullet<br />
Caliber<br />
Bullet<br />
Style<br />
Bullet<br />
Weight<br />
<strong>Micrometer</strong><br />
Setting<br />
5.0 AFTER USE<br />
Oil <strong>the</strong> die with a good quality gun oil be<strong>for</strong>e storing die until <strong>the</strong><br />
next use.<br />
6.0 CUSTOM MACHINING SERVICES<br />
6.1 Custom-Fitted Bullet Seating Stem (J-30 ULTRA)<br />
May be required in rare instances due to <strong>the</strong> many types of<br />
bullets on <strong>the</strong> market.<br />
6.2 Custom sliding Die Chamber (P-30)<br />
If available, <strong>Forster</strong> can use <strong>the</strong> reamer that was used to cut <strong>the</strong><br />
manufacturer’s rifle to make a customized <strong>Seater</strong> Die.<br />
A complete list of services, including prices and lead times, is<br />
available on our website. Go to <strong>for</strong>sterproducts.com, <strong>the</strong>n click on<br />
Custom Machining Services.<br />
7.0 REPLACEMENT PARTS<br />
Every product component is available individually. A complete list<br />
of component order numbers and prices is available on our<br />
website. Go to <strong>for</strong>sterproducts.com, <strong>the</strong>n click on<br />
Components/Parts Price List.<br />
We recommend using our Resellers when ordering our products.<br />
Their experience and knowledge will help you select <strong>the</strong> best<br />
products that meet your specific requirements. In addition, <strong>the</strong>y<br />
usually offer <strong>the</strong> best prices and convenient delivery options.<br />
To find a Reseller, go to <strong>for</strong>sterproducts.com, <strong>the</strong>n click on<br />
Locate a Reseller. If your Reseller cannot supply you, please<br />
contact <strong>Forster</strong> <strong>Products</strong> directly.<br />
Name Number Size Used<br />
With<br />
Lock Nut A-10M 10-40 thread 243 and<br />
smaller<br />
K-30M ¼-40 thread 257 and<br />
larger<br />
Micro Head Q-30SM ¼-40 thread 243 and<br />
smaller<br />
Q-30LG 10-40 thread 257 and<br />
larger<br />
Micro Body MODL-30SM ¼-40 thread 243 and<br />
smaller<br />
MODL-30LG 10-40 thread 257 and<br />
larger<br />
Sleeve 0-30-SH 2.375" length caliberspecific<br />
0-30-M1 2.625" length<br />
0-30-M2 2.875" length<br />
0-30-L 3.125" length<br />
WARRANTY<br />
All <strong>Forster</strong> <strong>Products</strong> are warranted against defects in materials and workmanship <strong>for</strong> <strong>the</strong> life of <strong>the</strong> product. Parts which, by nature of <strong>the</strong>ir function,<br />
are subject to normal wear (such as springs, pins, etc.) and parts which have been altered, abused or neglected, are excluded from <strong>the</strong> warranty. If<br />
<strong>the</strong> product is deemed defective by workmanship or materials, it will be repaired, reconditioned or replaced (at <strong>Forster</strong> Product’s option). This<br />
warranty supersedes all o<strong>the</strong>r warranties <strong>for</strong> <strong>Forster</strong> <strong>Products</strong> whe<strong>the</strong>r written or oral.<br />
www.<strong>for</strong>sterproducts.com<br />
DIE-0004 Issue 5, March 2012