Operator's Maintenance Manual - BlueMoment
Operator's Maintenance Manual - BlueMoment
Operator's Maintenance Manual - BlueMoment
- No tags were found...

You also want an ePaper? Increase the reach of your titles
YUMPU automatically turns print PDFs into web optimized ePapers that Google loves.
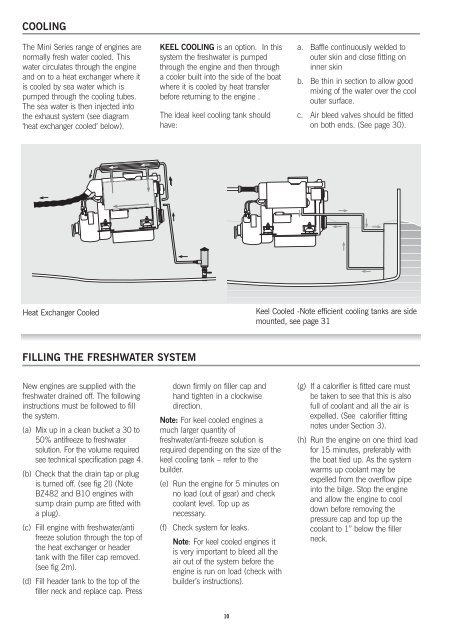
COOLING<br />
The Mini Series range of engines are<br />
normally fresh water cooled. This<br />
water circulates through the engine<br />
and on to a heat exchanger where it<br />
is cooled by sea water which is<br />
pumped through the cooling tubes.<br />
The sea water is then injected into<br />
the exhaust system (see diagram<br />
‘heat exchanger cooled’ below).<br />
KEEL COOLING is an option. In this<br />
system the freshwater is pumped<br />
through the engine and then through<br />
a cooler built into the side of the boat<br />
where it is cooled by heat transfer<br />
before returning to the engine .<br />
The ideal keel cooling tank should<br />
have:<br />
a. Baffle continuously welded to<br />
outer skin and close fitting on<br />
inner skin<br />
b. Be thin in section to allow good<br />
mixing of the water over the cool<br />
outer surface.<br />
c. Air bleed valves should be fitted<br />
on both ends. (See page 30).<br />
Heat Exchanger Cooled<br />
Keel Cooled -Note efficient cooling tanks are side<br />
mounted, see page 31<br />
FILLING THE FRESHWATER SYSTEM<br />
New engines are supplied with the<br />
freshwater drained off. The following<br />
instructions must be followed to fill<br />
the system.<br />
(a) Mix up in a clean bucket a 30 to<br />
50% antifreeze to freshwater<br />
solution. For the volume required<br />
see technical specification page 4.<br />
(b) Check that the drain tap or plug<br />
is turned off. (see fig 2l) (Note<br />
BZ482 and B10 engines with<br />
sump drain pump are fitted with<br />
a plug).<br />
(c) Fill engine with freshwater/anti<br />
freeze solution through the top of<br />
the heat exchanger or header<br />
tank with the filler cap removed.<br />
(see fig 2m).<br />
(d) Fill header tank to the top of the<br />
filler neck and replace cap. Press<br />
down firmly on filler cap and<br />
hand tighten in a clockwise<br />
direction.<br />
Note: For keel cooled engines a<br />
much larger quantity of<br />
freshwater/anti-freeze solution is<br />
required depending on the size of the<br />
keel cooling tank – refer to the<br />
builder.<br />
(e) Run the engine for 5 minutes on<br />
no load (out of gear) and check<br />
coolant level. Top up as<br />
necessary.<br />
(f) Check system for leaks.<br />
Note: For keel cooled engines it<br />
is very important to bleed all the<br />
air out of the system before the<br />
engine is run on load (check with<br />
builder’s instructions).<br />
(g) If a calorifier is fitted care must<br />
be taken to see that this is also<br />
full of coolant and all the air is<br />
expelled. (See calorifier fitting<br />
notes under Section 3).<br />
(h) Run the engine on one third load<br />
for 15 minutes, preferably with<br />
the boat tied up. As the system<br />
warms up coolant may be<br />
expelled from the overflow pipe<br />
into the bilge. Stop the engine<br />
and allow the engine to cool<br />
down before removing the<br />
pressure cap and top up the<br />
coolant to 1” below the filler<br />
neck.<br />
10