Servicing #3 Gibb winches - BlueMoment
Servicing #3 Gibb winches - BlueMoment
Servicing #3 Gibb winches - BlueMoment

You also want an ePaper? Increase the reach of your titles
YUMPU automatically turns print PDFs into web optimized ePapers that Google loves.
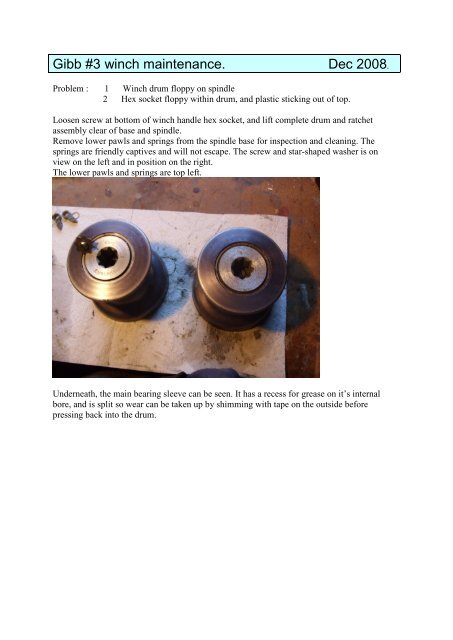
<strong>Gibb</strong> <strong>#3</strong> winch maintenance. Dec 2008.<br />
Problem : 1 Winch drum floppy on spindle<br />
2 Hex socket floppy within drum, and plastic sticking out of top.<br />
Loosen screw at bottom of winch handle hex socket, and lift complete drum and ratchet<br />
assembly clear of base and spindle.<br />
Remove lower pawls and springs from the spindle base for inspection and cleaning. The<br />
springs are friendly captives and will not escape. The screw and star-shaped washer is on<br />
view on the left and in position on the right.<br />
The lower pawls and springs are top left.<br />
Underneath, the main bearing sleeve can be seen. It has a recess for grease on it’s internal<br />
bore, and is split so wear can be taken up by shimming with tape on the outside before<br />
pressing back into the drum.
The stainless steel circlip needs to be prised out of it’s groove and “wound “out completely.<br />
And the top half of the plastic bearing for the hex drive prised out.
The stainless steel circlip needs to be.
And lift out the pawls and springs - not so captive this time!<br />
The upper plastic ring pre-greased,<br />
And lift out the pawls and springs - not so captive this time!
So that’s it in bits,<br />
Top left: upper pawls and springs, lower pawls with springs. circlip, upper and lower plastic<br />
sleeve.<br />
Bottom left: Drum, hex drive ratchet, screw and star-washer, main sleeve bearing .<br />
The solution was to swap upper and lower halves during re-assembly, there being enough of<br />
the flange left to secure both the upper pawls. The inner bearing surface was intact on all four<br />
parts.(two per winch)
After cleaning with paraffin, or citronella lamp oil if you prefer a fragrant winch, the unit is<br />
reassembled with lightly lubricated parts, in the reverse order to the above procedure.<br />
There are few “gotchas” : The upper pawl springs are a little fiddly and it is slightly<br />
unnerving having to press so hard to bed the upper plastic ratchet bearing, otherwise it’s a<br />
doddle.<br />
The upper plastic ring pre-greased,<br />
And the last bearing being persuaded to go home before fitting the circlip.
The batteries are camera-fodder - no electric <strong>winches</strong> on this boat!<br />
All that remains is to re-fit the lower pawls and assembly to the spindle and base, which<br />
remain on the boat.<br />
At that time shimming of the main bearing sleeve will be done little by little until satisfactory<br />
play is achieved.<br />
I hope this may be of use/encouragement to someone.<br />
Hook the spring onto it’s peg
and position the pawl on it’s
If there was play in the main bearing, - wobbly drum - then the split bearing can be tightened<br />
by adding tape to the outside before refitting into the drum.<br />
The internal groove should be full of grease
Squeeze the split bearing together and push into the drum. Then pop it back onto the spindle<br />
turning clockwise to set the pawls, and test for play. Add more tape as necessary - the slot can<br />
be widened using a hacksaw blade if more “shrink” is needed.<br />
Don’t forget to tighten down the retaining screw!<br />
Happy sailing.