70001B CHEETAH SCS Shifter - Turbo Action
70001B CHEETAH SCS Shifter - Turbo Action
70001B CHEETAH SCS Shifter - Turbo Action

You also want an ePaper? Increase the reach of your titles
YUMPU automatically turns print PDFs into web optimized ePapers that Google loves.
<strong>70001B</strong><br />
1535 Owens Road, Jacksonville, FL 32218<br />
Phone (904)741-4850 *** FAX (904)741-4853<br />
www.turboaction.com<br />
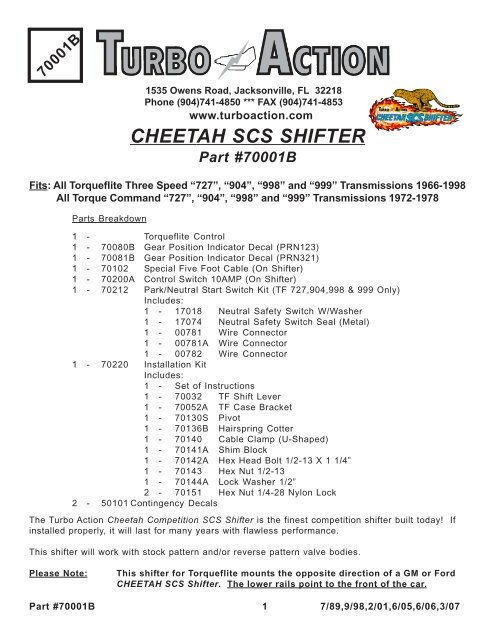
<strong>CHEETAH</strong> <strong>SCS</strong> SHIFTER<br />
Part #<strong>70001B</strong><br />
Fits: All Torqueflite Three Speed “727”, “904”, “998” and “999” Transmissions 1966-1998<br />
All Torque Command “727”, “904”, “998” and “999” Transmissions 1972-1978<br />
Parts Breakdown<br />
1 - Torqueflite Control<br />
1 - 70080B Gear Position Indicator Decal (PRN123)<br />
1 - 70081B Gear Position Indicator Decal (PRN321)<br />
1 - 70102 Special Five Foot Cable (On <strong>Shifter</strong>)<br />
1 - 70200A Control Switch 10AMP (On <strong>Shifter</strong>)<br />
1 - 70212 Park/Neutral Start Switch Kit (TF 727,904,998 & 999 Only)<br />
Includes:<br />
1 - 17018 Neutral Safety Switch W/Washer<br />
1 - 17074 Neutral Safety Switch Seal (Metal)<br />
1 - 00781 Wire Connector<br />
1 - 00781A Wire Connector<br />
1 - 00782 Wire Connector<br />
1 - 70220 Installation Kit<br />
Includes:<br />
1 - Set of Instructions<br />
1 - 70032 TF Shift Lever<br />
1 - 70052A TF Case Bracket<br />
1 - 70130S Pivot<br />
1 - 70136B Hairspring Cotter<br />
1 - 70140 Cable Clamp (U-Shaped)<br />
1 - 70141A Shim Block<br />
1 - 70142A Hex Head Bolt 1/2-13 X 1 1/4”<br />
1 - 70143 Hex Nut 1/2-13<br />
1 - 70144A Lock Washer 1/2”<br />
2 - 70151 Hex Nut 1/4-28 Nylon Lock<br />
2 - 50101 Contingency Decals<br />
The <strong>Turbo</strong> <strong>Action</strong> Cheetah Competition <strong>SCS</strong> <strong>Shifter</strong> is the finest competition shifter built today! If<br />
installed properly, it will last for many years with flawless performance.<br />
This shifter will work with stock pattern and/or reverse pattern valve bodies.<br />
Please Note:<br />
This shifter for Torqueflite mounts the opposite direction of a GM or Ford<br />
<strong>CHEETAH</strong> <strong>SCS</strong> <strong>Shifter</strong>. The lower rails point to the front of the car.<br />
Part #<strong>70001B</strong> 1 7/89,9/98,2/01,6/05,6/06,3/07
FIRST, READ INSTRUCTIONS CAREFULLY, THEN PROCEED WITH EACH STEP<br />
INDIVIDUALLY!<br />
USE LIFTER ONLY TO GO INTO REVERSE! The unique reverse lockout system requires only that<br />
you lift the reverse lockout mechanism with your fingers while placing into reverse with the same<br />
hand.<br />
NOTE: Do NOT lift mechanism for any other shift.<br />
CAUTION:<br />
In a race car it is imperative that the forward gears be precise in relation to the<br />
shifter.<br />
CAUTION! CAUTION!<br />
Be absolutely sure that vehicle is in park or neutral position before<br />
attempting to start motor.<br />
SPECIAL NOTE:<br />
Sanctioned dragstrips require functional Neutral Safety Switch mandatory.<br />
STEP #1:<br />
STEP #2:<br />
The shifter is preassembled and only requires locating a suitable spot to mount it and<br />
hooking up necessary brackets to hang cable to side of transmission.<br />
If mounting shifter on thin floor pan, such as a Super Gas or Econo-Altered, would<br />
suggest putting a thin steel strapping behind floor pan to offer a support where the<br />
shifter mounting bolts go through. Be sure to locate shifter in a position which will be<br />
comfortable for the driver to shift.<br />
SPECIAL NOTE:<br />
The Chrysler shifter control has the cable coming out forward<br />
towards engine, makes a 180 o turn down the passenger side of<br />
the transmission towards the rear of the car, then a 90 o turn<br />
towards driver side of car going under the tailhousing<br />
between the pan and the tailhousing mount and now a 90 o turn<br />
towards the front of the car and attach to the bracket on the<br />
transmission.<br />
The special cable included is very unique in that you can run tight radius turns and the shifter<br />
will still shift smoothly and be positive in shift feel! However, be careful to keep away from<br />
rotating parts (driveshaft) and hot parts (headers, mufflers).<br />
STEP #3:<br />
Install transmission Case Bracket on back hole located in transmission driver’s side,<br />
Fig. #1 & #2.<br />
STEP #4: Install Cable on transmission Case Bracket per Fig. #1 & #2.<br />
STEP #5: Install New <strong>Turbo</strong> <strong>Action</strong> Shift Lever on transmission, Fig. #1 & #2.<br />
STEP #6:<br />
CAUTION:<br />
STEP #7:<br />
Push Shift Lever all the way forward towards engine.<br />
In a race car it is imperative that the forward gears be precise in relation to the<br />
shifter.<br />
Depending on type of valve body, place shifter in third if a reverse pattern (PRN123).<br />
If stock pattern, place in low (PRN321).<br />
Part # <strong>70001B</strong> 2 7/89,9/98,6/06,3/07
STEP #8:<br />
STEP #9:<br />
CAUTION:<br />
Adjust Pivot to fit in Shift Lever properly.<br />
Before installing Hairspring Cotter, have someone sit in car and move shifter lever<br />
through each gear while you check to see if shift lever on transmission is moving the<br />
full distance.<br />
You must use the <strong>Turbo</strong> <strong>Action</strong> Part #70032 Shift Lever and the <strong>Turbo</strong> <strong>Action</strong><br />
#70052A Case Bracket. No other brand lever or bracket will work properly for<br />
gate alignment. Other brands will result in misalignment and cause the<br />
transmission to fail.<br />
STEP #10: Install Park/Neutral Switch per instructions included (page 5).<br />
Note: If car is equipped with a working factory Park/Neutral Switch it will not be<br />
necessary to hook up the <strong>Turbo</strong> <strong>Action</strong> Switch.<br />
Fig. #1<br />
Installation Kit - #70220<br />
8<br />
7<br />
70052A<br />
10<br />
U-Clamp must fit over<br />
groove in steel jacket<br />
on the cable.<br />
4<br />
9<br />
1<br />
2<br />
3<br />
Transmission<br />
Case<br />
5<br />
6<br />
Item Description Qty.<br />
1 Hex Nut 1/4-28 2<br />
2 TF Case Bracket 1<br />
3 Shim Block 1<br />
4 Cable U-Clamp 1<br />
5 Lock Washer 1/2 1<br />
6 Hex Nut 1/2-13 1<br />
7 Hairspring Cotter 1<br />
8 TF Shift Lever 1<br />
9 Pivot 1<br />
10 Hex Head Bolt 1/2-13 x 1 1/4 1<br />
Part #<strong>70001B</strong> 3 7/89,9/98,2/01,6/05,6/06,3/07
Fig. #2<br />
Note:<br />
U-Clamp must fit over groove<br />
in steel jacket on the cable.<br />
Part # <strong>70001B</strong> 4 7/89,9/98,6/06,3/07
Park/Neutral Start Kit<br />
Installation Instructions<br />
1. Install #17018 Switch and #17074 Seal into side of transmission, driver’s side.<br />
2. Install a #14 gauge wire from this switch to the starter relay which is usually located<br />
on the left fender near the battery. Attach wire to spade shown as “G” in drawing.<br />
3. Install a #14 gauge wire from spade marked “I” on starter relay to either the key<br />
switch or a remote start button.<br />
4. The other side of the start button should have a 12V source.<br />
5. Install a #12 gauge wire from post “S” on starter relay to the starter solenoid.<br />
6. Install a wire from the positive battery post of the battery to the post marked “B” on<br />
the starter relay.<br />
7. This neutral safety system works in park, neutral and requires no adjustment.<br />
Park/Neutral Start Switch<br />
#17018<br />
#14 Wire<br />
To Starter<br />
Solenoid<br />
#12 Wire<br />
Starter Relay<br />
G I<br />
S<br />
Key<br />
or<br />
Start Button<br />
T<br />
12 Volt<br />
To Starter<br />
#6 Wire<br />
Battery<br />
Cable<br />
B<br />
+<br />
#10-#12 Wire<br />
Battery<br />
-<br />
Chassis Ground or Motor<br />
Part #<strong>70001B</strong> 5 7/89,9/98,2/01,6/05,6/06,3/07
#70061<br />
T-HANDLE<br />
#70086<br />
DECAL<br />
#70166<br />
SCREW<br />
SPRING<br />
#70200A<br />
SWITCH ASSEMBLY<br />
#70064<br />
Fig. #7<br />
ControlSwitch Kit - #70205<br />
and<br />
T-Handle Kit - #70061<br />
VIEW A<br />
PUNCH OUT CENTER<br />
SECTION WITH SMALL<br />
BLADE SCREWDRIVER<br />
NEAR OUTSIDE EDGE.<br />
#70066<br />
SWITCH RETAINER<br />
(SEE VIEW A)<br />
#70063 #70065<br />
LIFTER Roll Pin<br />
1535 Owens Road, Jacksonville, FL<br />
32218 (904)741-4850<br />
FAX (904)741-4853<br />
Part # <strong>70001B</strong> 6 7/89,9/98,6/06,3/07