View - Stoves Online
View - Stoves Online
View - Stoves Online

Create successful ePaper yourself
Turn your PDF publications into a flip-book with our unique Google optimized e-Paper software.
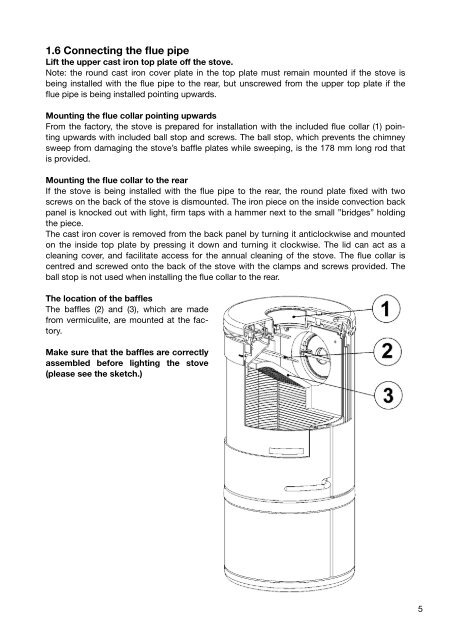
1.6 Connecting the flue pipe<br />
Lift the upper cast iron top plate off the stove.<br />
Note: the round cast iron cover plate in the top plate must remain mounted if the stove is<br />
being installed with the flue pipe to the rear, but unscrewed from the upper top plate if the<br />
flue pipe is being installed pointing upwards.<br />
Mounting the flue collar pointing upwards<br />
From the factory, the stove is prepared for installation with the included flue collar (1) pointing<br />
upwards with included ball stop and screws. The ball stop, which prevents the chimney<br />
sweep from damaging the stove’s baffle plates while sweeping, is the 178 mm long rod that<br />
is provided.<br />
Mounting the flue collar to the rear<br />
If the stove is being installed with the flue pipe to the rear, the round plate fixed with two<br />
screws on the back of the stove is dismounted. The iron piece on the inside convection back<br />
panel is knocked out with light, firm taps with a hammer next to the small ”bridges” holding<br />
the piece.<br />
The cast iron cover is removed from the back panel by turning it anticlockwise and mounted<br />
on the inside top plate by pressing it down and turning it clockwise. The lid can act as a<br />
cleaning cover, and facilitate access for the annual cleaning of the stove. The flue collar is<br />
centred and screwed onto the back of the stove with the clamps and screws provided. The<br />
ball stop is not used when installing the flue collar to the rear.<br />
The location of the baffles<br />
The baffles (2) and (3), which are made<br />
from vermiculite, are mounted at the factory.<br />
Make sure that the baffles are correctly<br />
assembled before lighting the stove<br />
(please see the sketch.)<br />
5