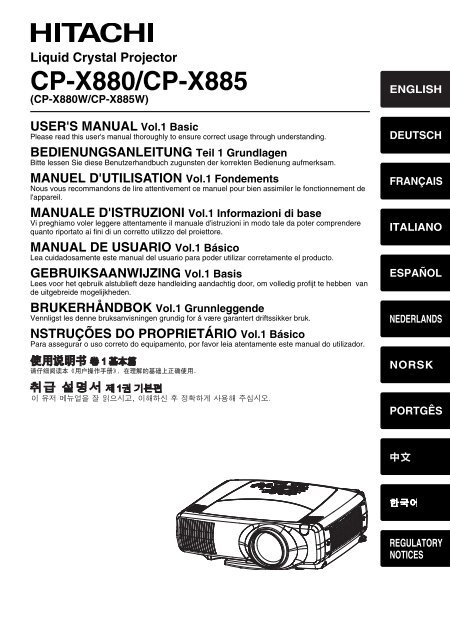
User Manual - Hitachi America, Ltd.
User Manual - Hitachi America, Ltd.
User Manual - Hitachi America, Ltd.

You also want an ePaper? Increase the reach of your titles
YUMPU automatically turns print PDFs into web optimized ePapers that Google loves.
Liquid Crystal Projector<br />
CP-X880/CP-X885<br />
(CP-X880W/CP-X885W)<br />
USER'S MANUAL Vol.1 Basic<br />
Please read this user's manual thoroughly to ensure correct usage through understanding.<br />
BEDIENUNGSANLEITUNG Teil 1 Grundlagen<br />
Bitte lessen Sie diese Benutzerhandbuch zugunsten der korrekten Bedienung aufmerksam.<br />
MANUEL D'UTILISATION Vol.1 Fondements<br />
Nous vous recommandons de lire attentivement ce manuel pour bien assimiler le fonctionnement de<br />
l'appareil.<br />
MANUALE D'ISTRUZIONI Vol.1 Informazioni di base<br />
Vi preghiamo voler leggere attentamente il manuale d'istruzioni in modo tale da poter comprendere<br />
quanto riportato ai fini di un corretto utilizzo del proiettore.<br />
MANUAL DE USUARIO Vol.1 Básico<br />
Lea cuidadosamente este manual del usuario para poder utilizar corretamente el producto.<br />
GEBRUIKSAANWIJZING Vol.1 Basis<br />
Lees voor het qebruik alstublieft deze handleiding aandachtig door, om volledig profijt te hebben van<br />
de uitgebreide mogelijkheden.<br />
BRUKERHÅNDBOK Vol.1 Grunnleggende<br />
Vennligst les denne bruksanvisningen grundig for å være garantert driftssikker bruk.<br />
NSTRUÇÕES DO PROPRIETÁRIO Vol.1 Básico<br />
Para assegurar o uso correto do equipamento, por favor leia atentamente este manual do utilizador.<br />
ENGLISH<br />
DEUTSCH<br />
FRANÇAIS<br />
ITALIANO<br />
ESPAÑOL<br />
NEDERLANDS<br />
NORSK<br />
PORTGÊS<br />
<br />
REGULATORY<br />
NOTICES
LCD Projector CP-X880/CP-X885<br />
USER'S MANUAL Vol.1 (Basic)<br />
Thank you for purchasing this projector.<br />
WARNING • Please read the accompanying manual “SAFETY<br />
INSTRUCTIONS” and this “USER'S MANUAL” thoroughly to ensure correct<br />
usage through understanding. After reading, store this instruction manual in a<br />
safe place for future reference.<br />
NOTE • The information in this manual is subject to change without notice.<br />
• The manufacturer assumes no responsibility for any errors that may appear in this manual<br />
• The reproduction, transmission or use of this document or contents is not permitted without express<br />
written authority.<br />
TRADEMARK ACKNOWLEDGEMENT :<br />
• PS/2, VGA and XGA are registered trademarks of the International Business Machines Corporation.<br />
• Apple, Mac and ADB are registered trademarks of Apple Computer, Inc.<br />
• VESA and SVGA are trademarks of the Video Electronics Standard Association.<br />
• Windows is a registered trademark of Microsoft Corporation.<br />
• All other trademarks are the property of their respective owners.<br />
CONTENTS<br />
Page<br />
PROJECTOR FEATURES................2<br />
PREPARATIONS ..............................2<br />
PART NAMES...................................4<br />
SETTING UP<br />
THE PROJECTOR ............................6<br />
CONNECTING<br />
YOUR DEVICES................................8<br />
USING THE REMOTE<br />
CONTROL.......................................13<br />
TURNING ON THE POWER ...........15<br />
TURNING OFF THE POWER .........17<br />
ADJUSTING THE VOLUME ...........18<br />
TEMPORARILY MUTING<br />
THE SOUND....................................18<br />
ADJUSTING THE POSITION..........19<br />
USING THE AUTOMATIC<br />
ADJUSTMENT FEATURE ..............20<br />
CORRECTING KEYSTONE<br />
DISTORTIONS ................................21<br />
Page<br />
USING THE MAGNIFY<br />
FEATURE........................................22<br />
FREEZING THE SCREEN ..............22<br />
ADJUSTING SCREEN WITH<br />
ONE-TOUCH...................................23<br />
SELECTING THE ASPECT<br />
RATIO..............................................24<br />
TEMPORARILY BLANKING<br />
THE SCREEN..................................24<br />
DISPLAYING CHILD WINDOW<br />
(P. IN. P: Picture in Picture) ..........24<br />
USING THE MENU<br />
FUNCTIONS....................................25<br />
OPERATING THE PC SCREEN .....26<br />
THE LAMP ......................................27<br />
THE AIR FILTER.............................29<br />
OTHER CARE.................................31<br />
1
Liquid Crystal Projector<br />
ENGLISH<br />
USER'S MANUAL Vol.1 Basic<br />
Please read this user's manual thoroughly to ensure correct usage through understanding.<br />
DEUTSCH<br />
BEDIENUNGSANLEITUNG Teil 1 Grundlagen<br />
Bitte lessen Sie diese Benutzerhandbuch zugunsten der korrekten Bedienung aufmerksam.<br />
MANUEL D'UTILISATION Vol.1 Fondements<br />
FRANÇAIS<br />
Nous vous recommandons de lire attentivement ce manuel pour bien assimiler le fonctionnement de<br />
l'appareil.<br />
MANUALE D'ISTRUZIONI Vol.1 Informazioni di base<br />
Vi preghiamo voler leggere attentamente il manuale d'istruzioni in modo tale da poter comprendere<br />
quanto riportato ai fini di un corretto utilizzo del proiettore.<br />
ITALIANO<br />
MANUAL DE USUARIO Vol.1 Básico<br />
Lea cuidadosamente este manual del usuario para poder utilizar corretamente el producto.<br />
GEBRUIKSAANWIJZING Vol.1 Basis<br />
ESPAÑOL<br />
Lees voor het qebruik alstublieft deze handleiding aandachtig door, om volledig profijt te hebben van<br />
de uitgebreide mogelijkheden.<br />
BRUKERHÅNDBOK Vol.1 Grunnleggende<br />
Vennligst les denne bruksanvisningen grundig for å være garantert driftssikker bruk.<br />
NEDERLANDS<br />
NSTRUÇÕES DO PROPRIETÁRIO Vol.1 Básico<br />
Para assegurar o uso correto do equipamento, por favor leia atentamente este manual do utilizador.<br />
NORSK<br />
PORTGÊS<br />
<br />
REGULATORY<br />
NOTICES<br />
LASER<br />
INDICATOR<br />
STANDBY/ON VIDEO RGB<br />
FOCUS<br />
BLANK<br />
ASPECT<br />
PUSH<br />
ENTER<br />
UP<br />
DOWN<br />
LASER<br />
ESC MENU RESET<br />
POSITION<br />
MAGNIFY<br />
ON<br />
OFF<br />
WIRELESS<br />
ZOOM<br />
AUTO<br />
FREEZE<br />
KEYSTONE<br />
PAGE<br />
PinP<br />
VOLUME<br />
MUTE<br />
ONE TOUCH<br />
PROJECTOR<br />
FEATURES<br />
This liquid crystal projector is used to project<br />
various computer signals as well as NTSC / PAL /<br />
SECAM video signals onto a screen. Little space<br />
is required for installation and large images can<br />
easily be realized.<br />
●Ultra High Brightness<br />
Crisp, ultra-bright presentations is achieved<br />
by using a UHB (ultra high brightness) lamp<br />
and a highly efficient optical system<br />
●Partial Magnification Function<br />
Interesting parts of images can be magnified<br />
for closer viewing<br />
●One Touch Function<br />
Just press the ONE TOUCH button to<br />
automatically retrieve input signals, calibrate<br />
images, and correct keystone distortion<br />
●Whisper Mode Equipped<br />
Special mode is available for reducing<br />
projector noise to achieve quieter operation<br />
PREPARATIONS<br />
Your projector should come with the items<br />
shown below. Check to make sure that all the<br />
items are included. Contact your dealer if<br />
anything is missing.<br />
NOTE<br />
• Keep the original packing material for future reshipment.<br />
Projector<br />
(with Lens Cap)<br />
Power cord<br />
(US Type)<br />
Power cord<br />
(UK Type)<br />
Power cord<br />
(Europe Type)<br />
CP-X880/CP-X885<br />
(CP-X880W/CP-X885W)<br />
RGB cable<br />
Video/Audio cable<br />
USB mouse<br />
cable<br />
<strong>User</strong>'s <strong>Manual</strong>s<br />
(Vol.1/Vol.2)<br />
Safety Instructions<br />
RS-232C<br />
adapter<br />
Two AA batteries<br />
(for the remote<br />
control)<br />
Soft carrying case<br />
Remote control<br />
2
WARNING Precautions to observe in regards to the power cord: Please use extra<br />
caution when connecting the projector's power cord as incorrect or faulty<br />
connections may result in FIRE AND/OR ELECTRICAL SHOCK. Please adhere to the<br />
following safety guidelines to insure safe operation of the projector:<br />
• Only plug the power cord into outlets rated for use with the power cord's specified voltage range.<br />
• Only use the power cord that came with the projector.<br />
• NEVER ATTEMPT TO DEFEAT THE GROUND CONNECTION OF THE THREE-<br />
PRONGED PLUG!<br />
• Make sure that you firmly connect the power cord to the projector and wall outlet.<br />
1<br />
Connect your devices to the projector<br />
Connect your computer, VCR and/or other<br />
devices you will be using to the projector.<br />
<br />
<br />
<br />
Insert the batteries into the remote<br />
2<br />
<br />
control<br />
3<br />
Connect the power cord<br />
(1) Connect the connector of the electrical power cord to the AC inlet of the main unit.<br />
(2) Firmly plug the power cord's plug into the outlet<br />
Power outlet<br />
AC inlet<br />
(1)<br />
(2)<br />
Power cord<br />
3
PART NAMES THE PROJECTOR Indicates the<br />
corresponding<br />
reference page<br />
RGB indicator <br />
BNC indicator <br />
DVI indicator <br />
VIDEO indicator <br />
S-VIDEO indicator <br />
COMPONENT indicator <br />
STANDBY/ON button <br />
INPUT dial <br />
RGB<br />
BNC<br />
DVI<br />
VIDEO<br />
S-VIDEO<br />
COMPONENT<br />
STANDBY/ON<br />
INPUT<br />
TENP<br />
<br />
KEYSTONE<br />
MENU<br />
Control Panel<br />
ONE TOUCH<br />
RESET<br />
LANP<br />
KEYSTONE button<br />
<br />
FOCUS<br />
ONE TOUCH button<br />
ZOOM<br />
<br />
<br />
RESET button<br />
<br />
<br />
Vol.2<br />
Vol.2<br />
FOCUS button<br />
ZOOM button<br />
<br />
MENU button<br />
<br />
LAMP indicator<br />
TEMP indicator<br />
<br />
Elevator screw<br />
Elevator feet<br />
<br />
Lens cap <br />
<br />
Air filter<br />
<br />
Remote sensor<br />
<br />
Lens<br />
<br />
Elevator button<br />
COMPONENT VIDEO port <br />
CONTROL port <br />
WIRELESS & NETWORK<br />
MODULE port Vol.2<br />
RGB OUT port <br />
DVI port <br />
<br />
<br />
REMOTE CONTROL port<br />
VIDEO IN port<br />
S-VIDEO IN port<br />
Remote sensor<br />
RGB port <br />
<br />
AC power inlet<br />
<br />
Power switch<br />
BNC port <br />
<br />
USB port<br />
AUDIO IN R/L port <br />
<br />
AUDIO OUT port<br />
4<br />
<br />
AUDIO IN 1/2 port
THE REMOTE CONTROL<br />
LASER INDICATOR <br />
<br />
RGB button<br />
VIDEO button <br />
LASER<br />
INDICATOR<br />
<br />
ZOOM buttons<br />
STANDBY/ON button<br />
<br />
STANDBY/ON<br />
VIDEO<br />
RGB<br />
<br />
PAGE buttons<br />
FOCUS buttons <br />
FOCUS<br />
ZOOM<br />
UP<br />
PAGE<br />
DOWN<br />
BLANK button <br />
BLANK<br />
LASER<br />
<br />
LASER button<br />
Right mouse button<br />
Disk pad <br />
<br />
<br />
Mouse cursor movement<br />
Right mouse click<br />
Left mouse click<br />
ASPECT<br />
Lever switch (*)<br />
ASPECT button <br />
Left /Right<br />
Key buttons PUSH<br />
ENTER<br />
RESET button<br />
ESC MENU RESET<br />
AUTO button<br />
POSITION AUTO PinP<br />
ESC button <br />
PinP button<br />
MAGNIFY<br />
VOLUME<br />
ON<br />
MENU button <br />
FREEZE MUTE<br />
VOLUME button<br />
POSITION button <br />
MAGNIFY buttons <br />
WIRELESS button Vol.2<br />
<br />
KEYSTONE button <br />
OFF<br />
WIRELESS<br />
KEYSTONE ONE TOUCH<br />
<br />
<br />
<br />
MUTE button<br />
FREEZE button<br />
ONE TOUCH button<br />
REMOTE CONTROL port <br />
* Using the lever switch<br />
Flip toward disk pad : Up ( ) key<br />
Flip toward MENU button: Down ( ) key<br />
Press in center : ENTER button<br />
5
SETTING UP THE PROJECTOR<br />
CAUTION • Install the projector in a suitable environment according to instructions<br />
of the accompanying manual “SAFETY INSTRUCTIONS” and this manual.<br />
• If you press the elevator buttons without holding the projector, the projector might<br />
crash down, overturn, smash your fingers and possibly result in malfunction. To<br />
prevent damaging the projector and injuring yourself, ALWAYS HOLD THE<br />
PROJECTOR whenever using the elevator buttons to adjust the elevator feet.<br />
Adjusting the Projector's Elevator Feet<br />
If the surface on which the projector is placed, or the screen is tilted, use the<br />
elevator feet and elevator screw to adjust the projection angle of the main unit.<br />
The adjustment range of the elevator feet is 0 to 9 degrees.<br />
1<br />
Press and hold in the elevator<br />
buttons<br />
Elevator button<br />
2<br />
Raise or lower the projector to the<br />
desired height and then release the<br />
elevator buttons<br />
When you release the elevator buttons, the elevator<br />
feet will lock into position.<br />
Elevator feet<br />
3<br />
Turn the elevator screw to fine tune.<br />
Elevator screw<br />
6
Adjusting the Screen Size and Projection Distance<br />
Refer to the illustrations and tables below to determine the screen size and<br />
projection distance.<br />
The values shown in the table are calculated for a full size screen<br />
a:Distance from the projector to the screen (±10%)<br />
b:Distance from the lens center to the bottom of the screen (±10%)<br />
c:Distance from the lens center to the top of the screen (±10%)<br />
The screen<br />
Top view<br />
If 4:3 aspect ratio<br />
4<br />
3<br />
c<br />
Lens center<br />
a<br />
Side view<br />
Screen Size [inch (m)]<br />
a [inch (m)] b c<br />
Min. Max. [inch (cm)] [inch (cm)]<br />
30 (0.8) 34 (0.9) 52 (1.3) 0 (0) 18 (46)<br />
40 (1.0) 46 (1.2) 71 (1.8) 0 (0) 24 (61)<br />
50 (1.3) 58 (1.5) 89 (2.3) 0 (0) 30 (76)<br />
60 (1.5) 71 (1.8) 107 (2.7) 0 (0) 36 (91)<br />
70 (1.8) 83 (2.1) 126 (3.2) 0 (0) 42 (107)<br />
80 (2.0) 95 (2.4) 144 (3.7) 0 (0) 48 (122)<br />
90 (2.3) 108 (2.7) 162 (4.1) 0 (0) 54 (137)<br />
100 (2.5) 120 (3.0) 181 (4.6) 0 (0) 60 (152)<br />
120 (3.0) 144 (3.7) 217 (5.5) 0 (0) 72 (183)<br />
150 (3.8) 181 (4.6) 272 (6.9) 0 (0) 90 (229)<br />
200 (5.0) 243 (6.2) 364 (9.2) 0 (0) 120 (305)<br />
250 (6.3) 304 (7.7) 455 (11.6) 0 (0) 150 (381)<br />
300 (7.5) 366 (9.3) 547 (13.9) 0 (0) 180 (457)<br />
The screen<br />
Top view<br />
If 16:9 aspect ratio<br />
16<br />
9<br />
b<br />
c<br />
Lens center<br />
a<br />
Side view<br />
Screen Size [inch (m)]<br />
a [inch (m)] b c<br />
Min. Max. [inch (cm)] [inch (cm)]<br />
30 (0.8) 37 (0.9) 57 (1.4) 2 (6.2) 17 (44)<br />
40 (1.0) 50 (1.3) 77 (2.0) 13 (32) 27 (70)<br />
50 (1.3) 64 (1.6) 97 (2.5) 16 (41) 31 (78)<br />
60 (1.5) 77 (2.0) 117 (3.0) 19 (49) 34 (86)<br />
70 (1.8) 90 (2.3) 137 (3.5) 22 (57) 37 (94)<br />
80 (2.0) 104 (2.6) 157 (4.0) 26 (65) 40 (102)<br />
90 (2.3) 117 (3.0) 177 (4.5) 29 (73) 43 (110)<br />
100 (2.5) 131 (3.3) 197 (5.0) 32 (81) 47 (118)<br />
120 (3.0) 157 (4.0) 237 (6.0) 38 (97) 53 (134)<br />
150 (3.8) 198 (5.0) 296 (7.5) 48 (121) 63 (159)<br />
200 (5.0) 265 (6.7) 396 (10.1) 64 (162) 78 (199)<br />
250 (6.3) 332 (8.4) 496 (12.6) 80 (202) 94 (240)<br />
300 (7.5) 399 (10.1) 596 (15.1) 96 (243) 110 (280)<br />
7
CONNECTING YOUR DEVICES<br />
Devices You Can Connect to the Projector<br />
(Refer to this section for planning your device<br />
configuration to use for your presentation.)<br />
CAUTION • Incorrect connecting could result in fire or electrical shock. Please<br />
read this manual and the separate “SAFETY INSTRUCTIONS”.<br />
ATTENTION Precautions to observe when connecting other devices to the projector<br />
• Whenever attempting to connect other devices to the projector, please thoroughly<br />
read the manual of each device to be connected.<br />
• TURN OFF ALL DEVICES prior to connecting them to the projector. Attempting to<br />
connect a live device to the projector may generate extremely loud noises or other<br />
abnormalities that may result in malfunction and/or damage to the device and/or<br />
projector. Refer to the “TECHNICAL” of the USER’S MANUAL (Vol.2) for the pin<br />
assignment of connectors and RS-232C communication data.<br />
• Make sure that you connect devices to the correct port. Incorrect connection may<br />
result in malfunction and/or damage to the device and/or projector.<br />
• Some other cables have to be used with core set. Use the accessory cable or a<br />
designated-type cable for the connection. For cables that have a core only at one<br />
end, connect the core to the projector.<br />
• Secure the screws on the connectors and tighten.<br />
Indicates the<br />
corresponding<br />
reference page<br />
<br />
Display monitors<br />
<br />
DVD players<br />
<br />
Laptop computers<br />
<br />
VCRs<br />
<br />
Desktop computers<br />
8
Ports and Cables<br />
Refer to the table below to find out which projector port and cable to use for connecting a<br />
given device. Use this table for determining which cables to prepare.<br />
Function Projector Port Connection Cables<br />
Analog RGB input<br />
Analog output<br />
RGB cable<br />
RGB<br />
(With D-sub 15-pin shrink jack and inch<br />
thread screws)<br />
BNC(R/CR/PR)(G/Y)(B/CB/PB)(H)(V)<br />
BNC cable<br />
• When BNC (RGB) is selected (*)<br />
RGB OUT<br />
DVI input DVI DVI cable<br />
Audio input from computer<br />
AUDIO IN 1<br />
• Linked to RGB or DVI port input<br />
AUDIO IN 2<br />
• Linked to BNC (RGB) port input (*)<br />
USB mouse control USB USB cable<br />
PS/2 mouse control<br />
ADB mouse control<br />
Serial mouse control<br />
RS-232C communications<br />
CONTROL<br />
RGB cable<br />
(With D-sub 15-pin shrink jack and inch<br />
thread screws)<br />
Audio/video cable (Stereo mini)<br />
PS/2 mouse cable<br />
ADB mouse cable<br />
Serial mouse cable<br />
RS-232C adapter + RS-232C cable<br />
S video input S-VIDEO IN S-video cable (mini DIN 4-pin jack)<br />
Video input VIDEO IN Audio/video cable<br />
Component video input<br />
COMPONENT(CR/PR)(CB/PB)(Y)<br />
BNC(R/CR/PR)(G/Y)(B/CB/PB)<br />
• When BNC (COMPONENT) is<br />
selected (*)<br />
Component video cable<br />
Audio input from video equipment AUDIO IN R,L Audio/video cable or audio cable (RCA jack)<br />
Audio output AUDIO OUT Audio cable (Stereo mini)<br />
Wired remote control signal input REMOTE CONTROL Audio cable (Stereo mini)<br />
* Before using the BNC port, change RGB input to component video input on the BNC menu item of<br />
the INPUT menu.<br />
NOTE About Plug-and-Play Capability<br />
• This projector is compatible with VESA DDC 1/2B. Plug-and-Play can be achieved by connecting<br />
this projector to computers that are VESA DDC (display data channel) compatible. Please take<br />
advantage of this function by connecting the accessory RGB cable to the RGB port (DDC 1/2B<br />
compatible). Plug-and-Play may not work properly if any other type of connection is attempted.<br />
• Plug-and-Play is a system composed of the computer, its operating system and<br />
peripheral equipment (i.e. display devices).<br />
• Please use the standard drivers as this projector is a Plug-and-Play monitor.<br />
9
CONNECTING YOUR DEVICES (continued)<br />
Connecting to a Computer<br />
ATTENTION Whenever attempting to connect a laptop computer to the projector,<br />
be sure to activate the laptop's RGB external image output (set the laptop to CRT<br />
display or to simultaneous LCD and CRT display). For details on how this is done,<br />
please refer to the instruction manual of the corresponding laptop computer.<br />
<br />
RGB<br />
DVI<br />
RGB OUT CONTROL<br />
R/CR/PR G/Y B/Ca/Pa H V<br />
CR/PR Ca/Pa Y COMPONENT VIIDEO<br />
R-AUDIO IN-L VIDEO IN<br />
1 2<br />
<br />
REMOTE<br />
CONTROL<br />
S-VIDEO IN<br />
BNC AUDIO IN AUDIO OUT USB<br />
<br />
RGB<br />
DVI<br />
R/CR/PR G/Y B/Ca/Pa H V<br />
<br />
RGB OUT CONTROL<br />
CR/PR Ca/Pa Y COMPONENT VIIDEO<br />
R-AUDIO IN-L VIDEO IN<br />
1 2<br />
<br />
REMOTE<br />
CONTROL<br />
S-VIDEO IN<br />
<br />
BNC AUDIO IN AUDIO OUT USB<br />
<br />
<br />
<br />
<br />
<br />
<br />
USB cable<br />
Analogue<br />
RGB cable<br />
RGB OUT<br />
AUDIO cable<br />
(Stereo mini)<br />
AUDIO OUT<br />
Analogue<br />
RGB cable<br />
RGB OUT<br />
CONTROL OUT<br />
MOUSE cable<br />
AUDIO cable<br />
(Stereo mini) AUDIO OUT<br />
USB OUT<br />
If connecting to a<br />
USB port equipped<br />
computer<br />
Desktop computer<br />
Laptop computer<br />
NOTE<br />
• Some computers may have multiple display screen modes. Use of some of these<br />
modes will not be possible with this projector.<br />
• For some RGB input modes, the optional Mac adapter is necessary.<br />
10
Connecting to a Computer (continued)<br />
BNC Input<br />
DVI Input<br />
REMOTE<br />
CONTROL<br />
<br />
REMOTE<br />
CONTROL<br />
DVI<br />
CR/PR Ca/Pa Y COMPONENT VIIDEO<br />
DVI<br />
CR/PR Ca/Pa Y COMPONENT VIIDEO<br />
RGB<br />
RGB OUT CONTROL<br />
R/CR/PR G/Y B/Ca/Pa H V<br />
<br />
R-AUDIO IN-L<br />
1 2<br />
<br />
VIDEO IN<br />
S-VIDEO IN<br />
BNC AUDIO IN AUDIO OUT USB<br />
RGB<br />
RGB OUT CONTROL<br />
R/CR/PR G/Y B/Ca/Pa H V<br />
R-AUDIO IN-L<br />
1 2<br />
<br />
VIDEO IN<br />
S-VIDEO IN<br />
BNC AUDIO IN AUDIO OUT USB<br />
<br />
<br />
<br />
<br />
AUDIO cable<br />
(Stereo mini) AUDIO OUT<br />
DVI cable<br />
DVI OUT<br />
AUDIO cable<br />
(Stereo mini) AUDIO OUT<br />
BNC cable<br />
BNC OUT<br />
Desktop computer<br />
Desktop computer<br />
11
CONNECTING YOUR DEVICES (continued)<br />
Connecting to a DVD Player<br />
Connecting to a VCR<br />
REMOTE<br />
CONTROL<br />
REMOTE<br />
CONTROL<br />
DVI<br />
RGB<br />
RGB OUT CONTROL<br />
R/CR/PR G/Y B/Ca/Pa H V<br />
CR/PR Ca/Pa Y COMPONENT VIIDEO<br />
<br />
<br />
<br />
R-AUDIO IN-L VIDEO IN S-VIDEO IN<br />
1 2<br />
DVI<br />
RGB<br />
RGB OUT CONTROL<br />
R/CR/PR G/Y B/Ca/Pa H V<br />
CR/PR Ca/Pa Y COMPONENT VIIDEO<br />
<br />
R-AUDIO IN-L VIDEO IN S-VIDEO IN<br />
1 2<br />
BNC AUDIO IN AUDIO OUT USB<br />
BNC AUDIO IN AUDIO OUT USB<br />
<br />
<br />
<br />
<br />
<br />
COMPONENT VIDEO cable<br />
COMPONENT OUT<br />
AUDIO/VIDEO cable<br />
AUDIO/VIDEO OUT<br />
S-VIDEO OUT<br />
S-VIDEO cable<br />
If using a S-video<br />
connection<br />
AUDIO/VIDEO cable<br />
<br />
<br />
<br />
S-VIDEO cable<br />
If using a S-video<br />
connection<br />
<br />
<br />
<br />
<br />
VCR<br />
DVD player<br />
Connecting to a Display Monitor<br />
REMOTE<br />
CONTROL<br />
DVI<br />
<br />
CR/PR Ca/Pa Y COMPONENT VIIDEO<br />
RGB<br />
RGB OUT CONTROL<br />
R/CR/PR G/Y B/Ca/Pa H V<br />
R-AUDIO IN-L VIDEO IN S-VIDEO IN<br />
1 2<br />
BNC AUDIO IN AUDIO OUT USB<br />
<br />
<br />
RGB cable<br />
12<br />
Display monitor
USING THE REMOTE CONTROL<br />
Putting batteries into the remote control unit<br />
CAUTION Precautions to observe in regards to the batteries<br />
Always handle the batteries with care and use them only as directed. Improper use may result in<br />
battery cracking or leakage, which could result in fire, injury and/or pollution of the surrounding environment.<br />
• Keep the battery away from children and pets.<br />
• Be sure to use only the batteries specified for use with the remote control. Do not mix new batteries with used ones.<br />
• When inserting batteries, verify that the plus and minus terminals are aligned correctly (as indicated in the remote control).<br />
• When you dispose the battery, you should obey the law in the relative area or country.<br />
1<br />
Remove the battery cover<br />
Slide back and remove the battery cover in the direction of the<br />
arrow.<br />
2<br />
Insert the batteries<br />
Align and insert the two AA batteries (that came with the<br />
projector) according to their plus and minus terminals (as<br />
indicated in the remote control).<br />
3<br />
Close the battery cover<br />
Replace the battery cover in the direction of the arrow and<br />
snap it back into place.<br />
13
USING THE REMOTE CONTROL (continued)<br />
Operating the remote control<br />
WARNING • The laser pointer of the remote control transmitter is used in<br />
place of a finger or rod. Never look directly into the laser beam outlet or point<br />
the laser beam at other people. The laser beam can cause vision problems.<br />
CAUTION • Use of controls or adjustments or performance of procedures<br />
other than those specified herein may result in hazardous radiation exposure.<br />
• The remote control works with both the<br />
projector's front and rear remote sensors.<br />
• The range of the remote sensor on the front is 3<br />
meters with a 60-degree range (30 degrees to the<br />
left and right of the remote sensor), and back is 3<br />
meters with a 40-degree range.<br />
• Since the remote control uses infrared light to send<br />
signals to the projector (Class 1 LED), be sure to use<br />
the remote control in an area free from obstacles<br />
that could block the remote control's output signal to<br />
the projector.<br />
• The wired remote control:<br />
approximately<br />
3 meters<br />
You can use the remote control as a wired remote control, by connecting the REMOTE CONTROL ports of the<br />
main unit and remote control via an audio cable (3.5 dia. stereo mini cable with plugs).<br />
30 degrees<br />
30 degrees<br />
approximately<br />
3 meters<br />
20 degrees<br />
20 degrees<br />
ATTENTION Precautions to observe when using the remote control<br />
• Do not disassemble the remote control.<br />
• Do not drop or otherwise expose the remote control to physical impact.<br />
• Do not get the remote control wet or place it on wet objects. Doing so may result in malfunction.<br />
• Do not place the remote control near the projector’s lens, fan, or vents.<br />
• Remove the batteries from the remote control and store them in a safe place if you<br />
won't be using the remote control for an extended period.<br />
• Replace the batteries whenever the remote control starts to malfunction.<br />
• When strong light, such as direct sunlight or light from an extremely close range (such as from an<br />
inverter fluorescent lamp), hits the projector's remote sensor, the remote control may cease to function.<br />
Adjust the direction of the projector to keep light from directly hitting the projector's remote sensor.<br />
14
TURNING ON THE POWER<br />
Precautions<br />
Connect all devices to be used to the projector prior to turning on the power.<br />
<br />
<br />
<br />
WARNING When the power is ON, a strong light is emitted. Do not look into the<br />
lens.<br />
LASER<br />
INDICATOR<br />
STANDBY/ON VIDEO RGB<br />
UP<br />
FOCUS ZOOM PAGE<br />
1<br />
Make sure that the power cord is firmly and<br />
correctly connected to the projector and outlet<br />
<br />
BLANK<br />
DOWN<br />
LASER<br />
2<br />
Turn on the projector's power<br />
Set the power switch to [ | ] (ON). The STANDBY/ON<br />
indicator will light to solid orange.<br />
power switch<br />
Control panel<br />
RGB<br />
BNC<br />
INPUT<br />
KEYSTONE<br />
DVI<br />
VIDEO<br />
ONE TOUCH<br />
FOCUS<br />
RESET<br />
ZOOM<br />
STANDBY/ON indicator<br />
S-VIDEO<br />
COMPONENT<br />
MENU<br />
STANDBY/ON<br />
TENP<br />
LANP<br />
NOTE Turn the<br />
power on/off in<br />
right order.<br />
• Power on the<br />
projector before the<br />
computer or video<br />
tape recorder.<br />
• Power off the<br />
projector after the<br />
computer or video<br />
tape recorder.<br />
3<br />
4<br />
Press the STANDBY/ON button (control<br />
panel or remote control)<br />
• The projector begins warming up and the<br />
STANDBY/ON indicator blinks green.<br />
STANDBY/ON<br />
• The STANDBY/ON indicator stops blinking<br />
and lights to solid green once the<br />
projector's power is completely on.<br />
Remove the lens cap<br />
The picture is projected.<br />
15
TURNING ON THE POWER (continued)<br />
Selecting an Input Signal<br />
5<br />
Using the remote control<br />
If selecting RGB input<br />
Press the RGB button<br />
Press this button to toggle between the devices<br />
connected to RGB IN 1 and 2. As illustrated<br />
below, each time you press the RGB button, the<br />
projector switches between RGB IN 1 and 2.<br />
Select the signal you wish to project.<br />
• When BNC (RGB) is selected:<br />
RGB BNC(RGB) DVI<br />
RGB<br />
• When BNC (COMPONENT) is selected:<br />
RGB<br />
DVI<br />
If selecting video input<br />
Press the VIDEO button<br />
Press this button to toggle between the VIDEO<br />
devices connected to VIDEO IN, S-VIDEO<br />
IN and COMPONENT VIDEO. As<br />
illustrated below, each time you press the<br />
VIDEO button, the projector switches between<br />
VIDEO IN, S-VIDEO IN and COMPONENT VIDEO.<br />
Select the signal you wish to project.<br />
• When BNC (RGB) is selected:<br />
VIDEO IN S-VIDEO IN COMPONENT VIDEO<br />
Using the projector's control panel<br />
Turn the INPUT dial<br />
Turning the dial cycles<br />
through the inputs as<br />
shown below. Select the<br />
terminal to which the signal<br />
you want to project is input.<br />
• When BNC (RGB) is selected:<br />
GB<br />
INPUT<br />
RGB BNC(RGB) DVI<br />
COMPONENT VIDEO<br />
S-VIDEO<br />
VIDEO<br />
• When BNC (COMPONENT) is selected:<br />
RGB BNC(COMPONENT) DVI<br />
COMPONENT VIDEO<br />
S-VIDEO<br />
VIDEO<br />
NOTE<br />
Turn the INPUT dial and set it at the<br />
click point, otherwise input signal<br />
selection may be incorrect.<br />
• When BNC (COMPONENT) is selected:<br />
VIDEO IN S-VIDEO IN COMPONENT VIDEO<br />
BNC(COMPONENT)<br />
6<br />
Use the ZOOM / buttons to adjust<br />
the screen size<br />
ZOOM<br />
ZOOM<br />
(Control panel)<br />
(Remote control)<br />
7<br />
Use the FOCUS / buttons to adjust<br />
the focus<br />
FOCUS<br />
FOCUS<br />
(Control panel)<br />
(Remote control)<br />
16
TURNING OFF THE POWER<br />
LASER<br />
INDICATOR<br />
STANDBY/ON VIDEO RGB<br />
UP<br />
1<br />
Press the STANDBY/ON button (control<br />
panel or remote control)<br />
The message "Power off" will appear on the screen for<br />
STANDBY/ON<br />
approximately 5 seconds.<br />
FOCUS<br />
ZOOM<br />
PAGE<br />
DOWN<br />
BLANK<br />
LASER<br />
ASPECT<br />
PUSH<br />
ENTER<br />
ESC MENU RESET<br />
POSITION AUTO PinP<br />
MAGNIFY<br />
VOLUME<br />
ON<br />
FREEZE MUTE<br />
OFF<br />
2<br />
Press the STANDBY/ON button again<br />
(control panel or remote control)<br />
Press the STANDBY/ON button again while the "Power off"<br />
message is visible. The projector lamp goes off and starts cooling<br />
down. While cooling, the STANDBY/ON indicator flashes orange.<br />
When in this state, pressing the STANDBY/ON button has no<br />
effect.<br />
When lamp cooling is complete, the STANDBY/ON indicator stops<br />
flashing, and turning solid orange.<br />
STANDBY/ON<br />
WIRELESS<br />
KEYSTONE<br />
ONE TOUCH<br />
Control panel<br />
RGB<br />
INPUT<br />
BNC<br />
DVI<br />
VIDEO<br />
S-VIDEO<br />
COMPONENT<br />
STANDBY/ON<br />
KEYSTONE<br />
ONE TOUCH<br />
FOCUS<br />
RESET<br />
MENU<br />
TENP LANP<br />
ZOOM<br />
3<br />
Check that the STANDBY/ON indicator<br />
stops blinking and lights to<br />
solid orange.<br />
Switch the power switch to<br />
[O] (OFF).<br />
power switch<br />
STANDBY/ON indicator<br />
NOTE<br />
• Except in cases of<br />
emergency, do not turn off<br />
the power switch while the<br />
STANDBY/ON indicator is<br />
solid or flashing green.<br />
Doing so could shorten<br />
the lamp lifetime.<br />
4<br />
Confirm that the STANDBY/ON indicator has<br />
gone off and then attach the lens cap.<br />
When the projector has completed powering down, the<br />
STANDBY/ON indicator will go off.<br />
17
ADJUSTING THE VOLUME<br />
STANDBY/ON<br />
FOCUS<br />
VIDEO<br />
LASER<br />
INDICATOR<br />
RGB<br />
UP<br />
DOWN<br />
1<br />
Press the VOLUME button<br />
As illustrated on the right, a dialog will<br />
appear on the screen to aid you in adjusting<br />
the volume.<br />
ZOOM PAGE VOLUME<br />
VOLUME<br />
BLANK<br />
LASER<br />
16<br />
ASPECT<br />
PUSH<br />
ENTER<br />
ESC MENU RESET<br />
2 Use the lever switch / to adjust the<br />
volume<br />
Press the VOLUME button again to close the dialog and<br />
complete this operation. (Even if you don't do anything, the<br />
dialog will automatically disappear after a few seconds.)<br />
POSITION<br />
AUTO<br />
PinP<br />
VOLUME<br />
MAGNIFY<br />
ON<br />
OFF<br />
WIRELESS<br />
VOLUME<br />
FREEZE MUTE<br />
KEYSTONE ONE TOUCH<br />
Press this to increase the volume<br />
Press this to decrease the volume<br />
16<br />
TEMPORARILY MUTING THE SOUND<br />
BLANK<br />
ASPECT<br />
DOWN<br />
LASER<br />
1<br />
Press the MUTE button<br />
As illustrated on the right, a dialog will appear on the<br />
screen indicating that you have muted the sound. Press<br />
the VOLUME button to close the dialog. (Even if you don't<br />
do anything, the dialog will automatically disappear after<br />
a few seconds.)<br />
Press the MUTE button again to restore the sound.<br />
PUSH<br />
ENTER<br />
VOLUME<br />
ESC MENU RESET<br />
MUTE<br />
POSITION<br />
AUTO<br />
PinP<br />
MAGNIFY<br />
ON<br />
OFF<br />
FREEZE<br />
VOLUME<br />
MUTE<br />
WIRELESS<br />
KEYSTONE<br />
ONE TOUCH<br />
16<br />
18
ADJUSTING THE POSITION<br />
LASER<br />
INDICATOR<br />
STANDBY/ON VIDEO RGB<br />
UP<br />
1<br />
Press the POSITION button<br />
As illustrated on the right, a dialog will appear on the screen to<br />
aid you in adjusting the position.<br />
FOCUS<br />
ZOOM<br />
PAGE<br />
DOWN<br />
BLANK<br />
LASER<br />
POSITION<br />
POSITION<br />
ASPECT<br />
PUSH<br />
ENTER<br />
ESC MENU RESET<br />
POSITION AUTO PinP<br />
MAGNIFY<br />
VOLUME<br />
ON<br />
FREEZE MUTE<br />
OFF<br />
WIRELESS KEYSTONE ONE TOUCH<br />
2 Use the , , , buttons to adjust the<br />
position<br />
When you want to initialize the position, press the RESET<br />
button during adjustment.<br />
Press the POSITION button again to close the dialog and<br />
complete this operation. (Even if you don't do anything, the<br />
dialog will automatically disappear after a few seconds.)<br />
This function is only available for RGB/BNC (RGB) input.<br />
19
USING THE AUTOMATIC ADJUSTMENT FEATURE<br />
BLANK<br />
LASER<br />
1<br />
Press the AUTO button<br />
AUTO<br />
ASPECT<br />
PUSH<br />
ENTER<br />
ESC MENU RESET<br />
POSITION AUTO PinP<br />
MAGNIFY<br />
VOLUME<br />
ON<br />
FREEZE MUTE<br />
OFF<br />
WIRELESS KEYSTONE ONE TOUCH<br />
Automatic Adjustment for RGB Input<br />
Horizontal position (H. POSIT), vertical position (V.<br />
POSIT), clock phase (H. PHASE) and horizontal size (H.<br />
SIZE) are automatically adjusted.<br />
Make sure that the application window is set to its<br />
maximum size prior to attempting to use this feature.<br />
Dark pictures may still be incorrectly adjusted. Use a<br />
bright screen when adjusting.<br />
Automatic Adjustment for Video Input<br />
The signal type best suited for the respective input<br />
signal is selected automatically.<br />
This feature is available only if VIDEO is set to AUTO in<br />
the INPUT menu.<br />
NOTE<br />
The automatic adjustment operation requires approximately 10 seconds. Also, please<br />
note that it may not function correctly with some input signals.<br />
20
CORRECTING KEYSTONE DISTORTIONS<br />
ASPECT<br />
1<br />
Press the KEYSTONE button<br />
As illustrated on the right, a dialog will appear<br />
on the screen to aid you in correcting the<br />
distortion.<br />
KEYSTONE<br />
KEYSTONE<br />
PUSH<br />
ENTER<br />
ESC MENU RESET<br />
16<br />
POSITION<br />
AUTO<br />
PinP<br />
MAGNIFY<br />
ON<br />
OFF<br />
WIRELESS<br />
VOLUME<br />
FREEZE MUTE<br />
KEYSTONE ONE TOUCH<br />
2<br />
Use the , buttons to select the<br />
direction of distortion to correct ( / )<br />
3 Use the lever switch / to correct<br />
distortion<br />
Press the KEYSTONE button again to close the dialog and<br />
complete this operation. (Even if you don't do anything, the<br />
dialog will automatically disappear after a few seconds.)<br />
NOTE<br />
• This function may not be work well with some types of input signals.<br />
• The adjustable range for correcting keystone distortions will vary with the type of<br />
input signal.<br />
21
USING THE MAGNIFY FEATURE<br />
BLANK<br />
DOWN<br />
LASER<br />
1<br />
Press the MAGNIFY (ON) button<br />
The projector enters MAGNIFY mode.<br />
MAGNIFY<br />
ON<br />
ASPECT<br />
2<br />
Press the POSITION button, then use the lever switch<br />
/ , / to select the area to zoom. Press the<br />
POSITION button again to finalize the zoom area.<br />
PUSH<br />
ENTER<br />
ESC MENU RESET<br />
POSITION<br />
POSITION<br />
POSITION<br />
AUTO<br />
PinP<br />
MAGNIFY<br />
ON<br />
VOLUME<br />
OFF<br />
WIRELESS<br />
FREEZE MUTE<br />
KEYSTONE ONE TOUCH<br />
3<br />
Use the lever switch / to adjust the<br />
zoom level<br />
Press the MAGNIFY (OFF) button to exit MAGNIFY mode<br />
and restore the screen to normal. (The projector will also<br />
automatically exit MAGNIFY mode if there is a change in the<br />
input signal's state.)<br />
NOTE<br />
The projector will automatically exit from MAGNIFY mode if either the INPUT SELECT,<br />
AUTO, ASPECT or VIDEO feature is used, or, if there is a change in the input signal's state.<br />
FREEZING THE SCREEN<br />
PUSH<br />
ENTER<br />
ESC MENU RESET<br />
POSITION<br />
MAGNIFY<br />
ON<br />
OFF<br />
AUTO<br />
FREEZE<br />
PinP<br />
VOLUME<br />
MUTE<br />
1<br />
Press the FREEZE button<br />
The [II] icon appears and the screen will freeze at<br />
the current image. Press the FREEZE button again<br />
and the [ ] appears as the projector exits FREEZE<br />
mode.<br />
<br />
FREEZE<br />
WIRELESS<br />
KEYSTONE<br />
ONE TOUCH<br />
NOTE<br />
• The projector will automatically exit from FREEZE mode if either the POSITION, VOLUME, MUTE, AUTO,<br />
BLANK ON/OFF or MENU ON/OFF feature is used, or, if there is a change in the input signal's state.<br />
• If the projector continues projecting the same image for a long time (i.e. you forget to exit FREEZE mode),<br />
the image might possibly remain as an afterimage. Do not leave the projector in FREEZE mode for too long.<br />
22
ADJUSTING SCREEN WITH ONE-TOUCH<br />
FOCUS<br />
BLANK<br />
DOWN<br />
LASER<br />
1<br />
Press the ONE TOUCH button<br />
You can activate the following functions just by<br />
pressing the ONE TOUCH button:<br />
ZOOM PAGE ONE TOUCH<br />
ASPECT<br />
PUSH<br />
ENTER<br />
ESC MENU RESET<br />
(1) Signal search: Cycle through input signals, displaying<br />
the images of retrieved signals. If no signal is found,<br />
returns to the signal that was selected before the search<br />
was begun.<br />
• When BNC (RGB) is selected:<br />
RGB BNC(RGB) DVI<br />
POSITION<br />
MAGNIFY<br />
ON<br />
OFF<br />
WIRELESS<br />
AUTO PinP<br />
VOLUME<br />
FREEZE MUTE<br />
KEYSTONE ONE TOUCH<br />
COMPONENT VIDEO S-VIDEO VIDEO<br />
• When BNC (COMPONENT) is selected:<br />
RGB BNC(COMPONENT) DVI<br />
COMPONENT VIDEO<br />
S-VIDEO<br />
VIDEO<br />
(2) Automatic adjustment: In RGB mode, automatically<br />
adjust the picture position and size; for VIDEO input,<br />
automatically select the signal mode. ( )<br />
(3) Automatic keystone distortion correction: This is only<br />
performed if ONE TOUCH of the AUTO menu is set to<br />
TURN ON. When performed, the unit automatically corrects<br />
vertical keystone distortion due to the (forward/backward)<br />
setup angle of the main unit. (Vol.2 )<br />
NOTES<br />
• May not function properly with some input signals.<br />
• This function takes about 10 seconds to display an image.<br />
23
SELECTING THE ASPECT RATIO<br />
BLANK<br />
ASPECT<br />
DOWN<br />
LASER<br />
1<br />
Press the ASPECT button<br />
RGB, DVI, COMPONENT VIDEO<br />
(HDTV signals : 1125i (1035i/1080i), 750p)<br />
4:3 16:9<br />
VIDEO IN, S-VIDEO IN, COMPONENT VIDEO<br />
(Non-HDTV signals : 525i, 525p,625i)<br />
4:3 16:9 SMALL<br />
ASPECT<br />
PUSH<br />
ENTER<br />
ESC MENU RESET<br />
POSITION AUTO PinP<br />
TEMPORARILY BLANKING THE SCREEN<br />
FOCUS<br />
BLANK<br />
ZOOM<br />
UP<br />
PAGE<br />
DOWN<br />
LASER<br />
1<br />
Press the BLANK button<br />
The input signal screen is shut off, and a blank screen<br />
appears. You can set the blank screen using the menu<br />
(from the SCREEN menu, select BLANK). Press the BLANK<br />
button again to remove the blank screen, and return to the<br />
input signal screen.<br />
ASPECT<br />
BLANK<br />
PUSH<br />
ENTER<br />
ESC MENU RESET<br />
DISPLAYING CHILD WINDOW (P. IN. P: Picture in Picture)<br />
ASPECT<br />
PUSH<br />
ENTER<br />
ESC MENU RESET<br />
POSITION<br />
MAGNIFY<br />
ON<br />
OFF<br />
AUTO<br />
FREEZE<br />
PinP<br />
VOLUME<br />
MUTE<br />
1<br />
Press the P. in P. Button<br />
You can display the video input in a child window while<br />
displaying RGB, BNC, or DVI input.<br />
Display child window<br />
(small)<br />
Display child window<br />
(large)<br />
No display<br />
You can select the video input to display in the child<br />
window, and the position of the child window, from the<br />
INPUT menu. (Vol.2 )<br />
WIRELESS<br />
KEYSTONE<br />
ONE TOUCH<br />
24
USING THE MENU FUNCTIONS<br />
LASER<br />
INDICATOR<br />
STANDBY/ON VIDEO RGB<br />
UP<br />
FOCUS ZOOM PAGE<br />
DOWN<br />
1<br />
Press the MENU button<br />
MENU<br />
The menu display appears on the screen. The projector<br />
has the following menus: MAIN, PICTURE-1, PICTURE-2,<br />
INPUT, AUTO, SCREEN, and OPTION, WIRELESS. When<br />
you select a menu name using the lever switch / , the<br />
current settings of items that can be manipulated from that menu are displayed.<br />
BLANK<br />
LASER<br />
ASPECT<br />
PUSH<br />
ENTER<br />
ESC MENU RESET<br />
POSITION AUTO PinP<br />
MAGNIFY<br />
VOLUME<br />
ON<br />
FREEZE MUTE<br />
OFF<br />
WIRELESS KEYSTONE ONE TOUCH<br />
2<br />
3<br />
Use the lever switch / to select a menu, then<br />
press the or ENTER button<br />
The display of the selected menu appears.<br />
[ex. Adjusting SHARPNESS]<br />
Use the lever switch / to select PICTURE-1, then press the<br />
or ENTER button.<br />
PUSH<br />
ENTER<br />
MENU<br />
MAIN COLOR BAL R<br />
PICTURE-1 COLOR BAL B<br />
PICTURE-2 SHARPNESS<br />
INPUT COLOR<br />
AUTO TINT<br />
SCREEN<br />
OPTION<br />
WIRELESS<br />
: SELECT<br />
Use the lever switch / to select SHARPNESS,<br />
then press the or ENTER button<br />
The operation display of the selected item appears. To<br />
adjust a numerical value, press the or ENTER button<br />
again to switch to the single menu (small display showing<br />
only the operation display area).<br />
[ex. Adjusting SHARPNESS]<br />
Use the lever switch / to select SHARPNESS, then<br />
press the or ENTER button.<br />
–1<br />
+1<br />
–1<br />
+1<br />
–1<br />
PUSH<br />
ENTER<br />
MENU<br />
MAIN<br />
PICTURE-1<br />
PICTURE-2<br />
INPUT<br />
AUTO<br />
SCREEN<br />
OPTION<br />
WIRELESS<br />
: SELECT<br />
COLOR BAL R<br />
COLOR BAL B<br />
SHARPNESS<br />
COLOR<br />
TINT<br />
0<br />
NOTE<br />
• For details about menu<br />
operations, see the<br />
separate "MULTI<br />
FUNCTIONAL<br />
SETTINGS" (Vol. 2).<br />
4 Use the lever switch / to adjust the level<br />
Press the MENU button to hide the menu and finish your<br />
operation. Alternatively, press the or ESC button to<br />
return to the previous display.<br />
[ex. Adjusting SHARPNESS]<br />
Use the lever switch / to adjust the sharpness.<br />
25
OPERATING THE PC SCREEN<br />
You can use the remote control as a simplified mouse or keyboard.<br />
CAUTION Caution: Mistaken use of the mouse/keyboard control could damage your equipment.<br />
• Only connect to a PC.<br />
• Before connecting, read the manuals of the device you will connect.<br />
• Do not unplug the connector cables while the computer is operating.<br />
STANDBY/ON VIDEO<br />
FOCUS ZOOM<br />
BLANK<br />
ASPECT<br />
LASER<br />
INDICATOR<br />
RGB<br />
UP<br />
PAGE<br />
DOWN<br />
LASER<br />
PS/2, ADB, Serial Mouse Control<br />
1. Turn off the projector and PC power, and connect the projector’s<br />
CONTROL terminal to the computer via the mouse cable.<br />
2. If a USB cable is connected, disconnect it. If a USB cable is connected, the USB control<br />
function is given priority, and mouse control from the CONTROL terminal will not function.<br />
3. Turn on the projector power, then the computer.<br />
The functions in the table below can be controlled. If you have difficulty with control,<br />
restart the computer (either from the software or by pressing the restart button).<br />
Available Functions<br />
Remote Control Operation<br />
Move Pointer Move using on the disk pad<br />
Left click with mouse Press the center of the disk pad<br />
Right click with mouse<br />
Press the right mouse button<br />
PUSH<br />
ENTER<br />
ESC MENU RESET<br />
POSITION AUTO PinP<br />
MAGNIFY<br />
VOLUME<br />
ON<br />
FREEZE MUTE<br />
OFF<br />
WIRELESS KEYSTONE ONE TOUCH<br />
USB Mouse/Keyboard Control<br />
1. Connect the projector’s USB terminal to a PC using a USB cable.<br />
The functions in the table below can be controlled.<br />
Available Functions<br />
Remote Control Operation<br />
Move Pointer Move using on the disk pad<br />
Left click with mouse Press the center of the disk pad<br />
Right click with mouse<br />
Press the right mouse button<br />
Press the keyboard’s keys Press<br />
Press the keyboard’s ENTER key Press the ENTER button<br />
Press keyboard’s PAGE UP key Press PAGE UP button<br />
Press keyboard’s PAGE DOWN key Press PAGE DOWN button<br />
Press keyboard’s ESC key<br />
Press ESC button<br />
26<br />
NOTES<br />
• It may not be possible to control notebook PCs, and other computers with built-in pointing devices (e.g.<br />
track balls), using this remote control. In this case, before connecting go into BIOS (system setup) and<br />
select external mouse, and disable the pointing devices. In addition, the mouse may not function if the<br />
computer does not have the needed utility program. See your computer’s hardware manual for details.<br />
• The USB control can be used with Windows 95 OSR 2.1 or higher. It may not be possible to<br />
use the remote control, depending on the computer’s configurations and mouse drivers.<br />
• The USB control can only be used for the functions listed above. You cannot do things like press two buttons<br />
at once (for instance, pressing two buttons at the same time to move the mouse pointer diagonally).<br />
• This function is not available while the lamp is warming up (the POWER indicator flashes green), while adjusting the volume and<br />
display, correcting for trapezoidal distortion, zooming in on the screen, using the BLANK function, or displaying the menu screen.
THE LAMP<br />
HIGH VOLTAGE<br />
HIGH TEMPERATURE<br />
HIGH PRESSURE<br />
To replace the lamp, check the model number of the replacement lamp (sold separately) and<br />
contact your local dealer.<br />
Replacement lamp model number: DT00531<br />
If the projector is mounted on the ceiling, or if the lamp has broken, ask your dealer to replace the<br />
lamp. Lamp replacement is hazardous and should not be attempted by the user.<br />
Before replacing the lamp, make sure the power switch is off and the power cable is not plugged in,<br />
then wait at least 45 minutes for the lamp to cool sufficiently. Handling the lamp while hot can cause<br />
burns, as well as damaging the lamp.<br />
The LCD projector uses a glass lamp bulb. It is a mercury lamp with high<br />
WARNING<br />
internal pressure. High-pressure mercury lamps can break with a loud<br />
bang, or burn out, if jolted or scratched, or through wear over time. Each lamp has a<br />
different lifetime, and some may burst or burn out soon after you start using them. In<br />
addition, when the bulb bursts, it is possible for shards of glass to fly into the lamp housing,<br />
and for gas containing mercury to escape from the projector’s vent holes.<br />
• Do not open the lamp cover while the projector is suspended from above. This is<br />
dangerous, since if the lamp’s bulb has broken, the shards will fall out when the cover is<br />
opened. In addition, working in high places is dangerous, so ask your local dealer to have<br />
the lamp replaced even if the bulb is not broken.<br />
• Handle with care: jolting or scratching could cause the lamp bulb to burst during use.<br />
• If the replace lamp indicator (see "Related Messages" (Vol.2 ) and "Regarding the<br />
indicator Lamps" (Vol.2 )) comes on, replace the lamp as soon as possible. Using the<br />
lamp for long periods of time, or past the replacement date, could cause it to burst. Do<br />
not use old (used) lamps; this is a cause of breakage.<br />
• If the lamp breaks soon after the first time it is used, it is possible that there are electrical problems<br />
elsewhere besides the lamp. If this happens, contact your local dealer or a service representative.<br />
• If the lamp should break (it will make a loud bang when it does), ventilate the room well, and make<br />
sure not to breathe the gas that comes out of the projector vents, or get it in your eyes or mouth.<br />
• If the lamp should break (it will make a loud bang when it does), unplug the power cord from<br />
the outlet, and make sure to request a replacement lamp from your local dealer. Note that<br />
shards of glass could damage the projector’s internals, or cause injury during handling, so<br />
please do not try to clean the projector or replace the lamp yourself.<br />
• Obey local ordinances when disposing of used lamps. In most cases, it is possible to dispose of used<br />
bulbs in the same manner as used glass bottles, but in some cases, bulbs are sorted separately.<br />
• Do not use the projector with the lamp cover removed.<br />
27
PC<br />
CO LAMP<br />
PC<br />
CO LAMP<br />
PC<br />
CO LAMP<br />
PC<br />
CO LAMP<br />
THE LAMP (continued)<br />
Replacing the lamp<br />
All projector lamps will wear out eventually. If used for long periods of time, the image could become<br />
darkened, and the color contrast could be impacted as well. We recommend that you replace your lamps<br />
early. If the LAMP indicator turns red, or a message prompts you to replace the lamp when you power up<br />
the projector, the lamp needs to be replaced. (See "Related Messages" (Vol.2 ) and "Regarding the<br />
Indicator Lamps" (Vol.2 ) for details.)<br />
1<br />
Turn off the projector, and unplug the<br />
power cord. Allow the lamp bulb to cool<br />
for at least 45 minutes, and prepare a<br />
new lamp (serial number: DT00531)<br />
4<br />
Insert the new lamp, and<br />
tighten the 3 screws firmly to<br />
lock it in place<br />
2<br />
After making sure that the projector has<br />
cooled adequately, slide the knob of a<br />
lamp cover lock as shown in the figure.<br />
Then, one side of the lamp cover is<br />
raised. Pull up the lamp cover and<br />
remove it, as shown in the figure<br />
Knob of Lamp<br />
Cover Lock<br />
5<br />
Interlocking the 2 tabs of the<br />
lamp cover to the projector,<br />
put the lamp cover on the<br />
projector.<br />
Then push the point of the<br />
lamp cover to fix it, as shown<br />
in the figure.<br />
Make sure that the lamp<br />
cover does’t come up<br />
Tabs<br />
3<br />
Unscrew the 3 screws, and slowly pull<br />
out the lamp by the handle<br />
• Be careful not to touch the inside of the lamp case.<br />
6<br />
Push<br />
Turn on the projector power,<br />
and reset the lamp timer<br />
• To reset the lamp timer, from the<br />
OPTION menu, select the LAMP<br />
TIME. (Vol.2 )<br />
ATTENTION • Make sure that the screws are screwed in firmly. Loose screws could result in damage or injury.<br />
• Do not use with lamp cover removed.<br />
• Do not reset the lamp timer without replacing the lamp. Reset the lamp timer always when replacing<br />
the lamp. The message functions will not operate properly if the lamp timer is not reset correctly.<br />
• When the lamp has been replaced after the message of “CHANGE THE LAMP .....THE POWER<br />
WILL TURN OFF AFTER 0 hr.” is displayed, or the LAMP indicator is red, complete the following<br />
operation within 10 minutes of switching power on.<br />
NOTE • The LAMP indicator is also red when the lamp unit reaches high temperature.<br />
Before replacing the lamp, switch power off, wait approximately 20 minutes, and switch power on<br />
again. If the LAMP indicator is still red, replace the lamp.<br />
28
THE AIR FILTER<br />
Caring for the air filter<br />
The air filter should be cleaned about every 100 hours. If the LAMP indicator and<br />
TEMP indicator blink red simultaneously, or a message prompts you to clean the air<br />
filter when you turn on the unit, the filter needs to be cleaned. (See "Related<br />
Messages" (Vol.2 ) and "Regarding the Indicator Lamps" (Vol.2 ) for details.)<br />
1<br />
2<br />
Turn off the projector, and unplug the power cord<br />
Apply a vacuum cleaner to<br />
the top of the air filter cover<br />
to clean the air filter<br />
Air Filter Cover<br />
3<br />
Turn on the projector, and use the menu to reset the filter<br />
timer<br />
• To reset the air filter timer, from the OPTION menu, select FILTER TIME.<br />
29
THE AIR FILTER (continued)<br />
Replacing the air filter<br />
If the soiling will not come off the air filter, or it becomes damaged, then it needs to be<br />
replaced. Please contact your local dealer, after confirming the model of your<br />
separately sold replacement air filter.<br />
Replacement air filter model: NJ07081<br />
1<br />
2<br />
Turn off the projector, and unplug the power cord. Prepare a<br />
new air filter (one specified for your projector)<br />
Remove the air filter cover and air filter<br />
3<br />
Insert the new filter, and replace the<br />
filter cover<br />
4<br />
Turn on the projector power, and using the menu, reset the<br />
filter timer<br />
• To reset the lamp timer, from the OPTION menu, select FILTER TIME.<br />
ATTENTION • Make sure to turn off the power and unplug the power cord before caring for<br />
the unit. Please carefully read "Safety Instructions", in order to care for your projector correctly.<br />
• Do not use with air filter cover removed.<br />
• If the air filter becomes clogged by dust or the like, internal temperature rises and could cause<br />
malfunction. The power is automatically turned off in order to prevent the unit from overheating<br />
internally.<br />
30
OTHER CARE<br />
Caring for the inside of the projector :<br />
In order to ensure the safe use of your projector, please have it cleaned and inspected by<br />
your local dealer about once every 2 years. Never try to care for the inside of the unit<br />
yourself. Doing so is dangerous.<br />
Caring for the lens :<br />
Lightly wipe the lens with a commercially available lens-cleaning wipe. Do not touch the<br />
lens directly with your hand.<br />
Caring for the cabinet and remote control transmitter :<br />
Wipe lightly with gauze or a soft cloth. If soiling is severe, dip a soft cloth in water or a<br />
neutral cleanser diluted in water, and wipe lightly after wringing well. Then, wipe lightly<br />
with a soft, dry cloth.<br />
ATTENTION • Make sure to turn off the power and unplug the power cord before caring for<br />
the unit. Please carefully read "Safety Instructions" in this manual, in order to care for your projector<br />
correctly.<br />
• Do not use cleaners or chemicals other than those listed above, including benzene and paint<br />
thinner.<br />
• Do not use aerosols or sprays.<br />
• Do not polish or wipe with hard objects.<br />
31
LCD Projector CP-X880/CP-X885<br />
USER'S MANUAL Vol.2 (Extended)<br />
Thank you for purchasing this projector.<br />
WARNING • Please read the accompanying manual “SAFETY<br />
INSTRUCTIONS” and this “USER'S MANUAL” thoroughly to ensure correct<br />
usage through understanding. After reading, store this instruction manual in a<br />
safe place for future reference.<br />
NOTE • The information in this manual is subject to change without notice.<br />
• The manufacturer assumes no responsibility for any errors that may appear in this manual<br />
• The reproduction, transmission or use of this document or contents is not permitted without express<br />
written authority.<br />
TRADEMARK ACKNOWLEDGEMENT :<br />
• PS/2, VGA and XGA are registered trademarks of the International Business Machines Corporation.<br />
• Apple, Mac and ADB are registered trademarks of Apple Computer, Inc.<br />
• VESA and SVGA are trademarks of the Video Electronics Standard Association.<br />
• Windows is a registered trademark of Microsoft Corporation.<br />
• All other trademarks are the property of their respective owners.<br />
CONTENTS<br />
MULTIFUNCTIONAL SETTINGS ........................................................................2<br />
WHAT TO DO WHEN YOU THINK A MACHINE DEFECT HAS OCCURRED ......8<br />
SPECIFICATIONS .............................................................................................11<br />
WARRANTY AND AFTER-SERVICE................................................................12<br />
.......................................................................................<br />
For "TECHNICAL" see the end of this manual.<br />
Page<br />
1
MULTIFUNCTIONAL SETTINGS<br />
This device has 8 separate menus: MAIN, PICTURE-1, PICTURE-2, INPUT,<br />
AUTO, SCREEN, OPTION, WIRELESS. Each of these menus is operated using<br />
the same methods. The basic operations of these menus are as follows.<br />
Menu screen display : Press the MENU button.<br />
Menu selection : Use the lever switch to select a menu name, then press the<br />
or ENTER button.<br />
Item selection : Use the lever switch to select an item, then press the or<br />
ENTER button.<br />
Return menu to last previous screen: Press the button or the ESC button.<br />
Execution of settings and/or adjustments: Perform the operation using the lever switch .<br />
(For further details, read the explanation for each separate menu.)<br />
Initialization of settings and/or adjustments: During operation, press the RESET button.<br />
(Functions that are executed at the same time<br />
as a selection, including H PHASE, LANGUAGE<br />
selection, and ADJUST, will not be reset.)<br />
End menu operations: Press the MENU button, or do not perform any operation for<br />
several seconds.<br />
MAIN Menu<br />
With the MAIN menu, the seven items shown in the Table below can be<br />
performed.<br />
Perform each operation in accordance with the instructions in the Table.<br />
MAIN Menu<br />
Item<br />
Description<br />
MENU<br />
MAIN<br />
PICTURE-1<br />
PICTURE-2<br />
INPUT<br />
AUTO<br />
SCREEN<br />
OPTION<br />
WIRELESS<br />
: SELECT<br />
BRIGHT<br />
CONTRAST<br />
ASPECT<br />
PICT. POSIT.<br />
GAMMA<br />
MIRROR<br />
LANGUAGE<br />
12<br />
Example : MAIN Menu<br />
(BRIGHT)<br />
BRIGHT Adjust Brightness: Light Dark<br />
2<br />
CONTRAST Adjust Contrast: Strong Weak<br />
ASPECT<br />
PICT.POSIT.<br />
GAMMA<br />
MIRROR<br />
LANGUAGE<br />
Select Aspect Ratio:<br />
At RGB Input or Hi-Vision 1125i(1035i/1080i)/750p of COMPONENT VIDEO<br />
Input:<br />
4:3 16:9<br />
At VIDEO Input, S-VIDEO Input or 525i/525p/625i of COMPONENT VIDEO Input:<br />
4:3 16:9 SMALL<br />
• The SMALL picture may not be displayed correctly with certain input signals.<br />
Select Picture Position (for 16:9/SMALL Picture):<br />
TOP CENTER BOTTOM<br />
Select Gamma Mode:<br />
NORMAL CINEMA DYNAMIC<br />
Select Mirror Status:<br />
NORMAL H:INVERT V:INVERT H&V:INVERT<br />
Select Menu Language:<br />
ENGLISH FRANÇAIS DEUTSCH ESPAÑOL<br />
ITALIANO NORSK NEDERLANDS<br />
POTUGUÊS
PICTURE-1 Menu<br />
With the PICTURE-1 menu, the five items shown in the Table<br />
below can be performed.<br />
Perform each operation in accordance with the instructions in the<br />
Table.<br />
PICTURE-1 Menu<br />
Item<br />
Description<br />
MENU<br />
MAIN<br />
PICTURE-1<br />
PICTURE-2<br />
INPUT<br />
AUTO<br />
SCREEN<br />
OPTION<br />
WIRELESS<br />
: SELECT<br />
COLOR BAL R<br />
COLOR BAL B<br />
SHARPNESS<br />
COLOR<br />
TINT<br />
12<br />
Example : PICTURE1 Menu<br />
(COLOR BAL R)<br />
COLOR BAL R Adjust Red Color Balance: Dark Light<br />
COLOR BAL B Adjust Blue Color Balance: Dark Light<br />
SHARPNESS Adjust Sharpness (for VIDEO/S-VIDEO): Clear Soft<br />
COLOR<br />
Adjust COLOR (for VIDEO/S-VIDEO/COMPONENT VIDEO):<br />
Dark Light<br />
TINT Adjust Tint (for VIDEO/S-VIDEO): Green Red<br />
PICTURE-2 Menu<br />
With the PICTURE-2 menu, the five items shown in the Table<br />
below can be performed.<br />
Perform each operation in accordance with the instructions in the<br />
Table.<br />
PICTURE-2 Menu<br />
Item<br />
Description<br />
MENU<br />
MAIN<br />
PICTURE-1<br />
PICTURE-2<br />
INPUT<br />
AUTO<br />
SCREEN<br />
OPTION<br />
WIRELESS<br />
: SELECT<br />
V POSITION<br />
H POSITION<br />
H PHASE<br />
H SIZE<br />
OVER SCAN<br />
12<br />
Example : PICTURE2 Menu<br />
(V POSITION)<br />
V POSITION Adjust Vertical Position (for RGB): Up Down<br />
H POSITION Adjust Horizontal Position (for RGB): Left Right<br />
H PHASE<br />
H SIZE<br />
OVER SCAN<br />
Adjust Horizontal Phase (for RGB/COMPONENT VIDEO):<br />
Right Left<br />
• Adjust to eliminate flicker.<br />
Adjust Horizontal Size (for RGB): Large Small<br />
• If the horizontal size adjustment is excessive, the image may not be displayed<br />
correctly. In such a case, initialize H SIZE with the RESET button.<br />
Select Over-scan Ratio (for VIDEO/S-VIDEO/COMPONENT VIDEO):<br />
LARGE MIDDLE SMALL<br />
• If you select LARGE, you may note streaking on the top and bottom of the<br />
screen, or flicker. If this is irritating, we suggest you select SMALL.<br />
3
MULTIFUNCTIONAL SETTINGS (continued)<br />
INPUT Menu<br />
The three Input menu items listed in the table below can be manipulated. For<br />
RGB input, the reception signal’s horizontal and vertical frequency is displayed<br />
on the initial menu screen. Use the table below as a guide for operation.<br />
INPUT Menu<br />
Item<br />
BNC<br />
VIDEO<br />
Description<br />
MENU<br />
MAIN<br />
PICTURE-1<br />
PICTURE-2<br />
INPUT<br />
AUTO<br />
SCREEN<br />
OPTION<br />
WIRELESS<br />
: SELECT<br />
BNC<br />
VIDEO<br />
HDTV<br />
SYNC ON G<br />
P. IN P. INPUT<br />
P. IN P. POSIT<br />
RGB<br />
COMPONENT<br />
Example : INPUT Menu<br />
(BNC)<br />
BNC Pin (R/CR/PR, G/Y, B/CB/PB, H, V) function selection:<br />
BNC (RGB) BNC (COMPONENT)<br />
(R) (G) (B) (H) (V) (CR/PR) (Y) (CB/PB) ( - ) ( - )<br />
(Pins for RGB) (Pins for COMPONENT)<br />
Selecting BNC (RGB) allows the 5 RGB2 pins (R/CR/PR, G/Y, B/CB/PB, H, V) to be<br />
used as RGB signal BNC input as-is.<br />
Selecting BNC (COMPONENT) allows the 3 leftmost RGB2 pins (R/CR/PR, G/Y,<br />
B/CB/PB) to be used as the COMPONENT VIDEO input CR/PR, Y, and CB/PB pins.<br />
Select Mode of Signal Type (for VIDEO/S-VIDEO):<br />
AUTO NTSC PAL SECAM NTSC4.43<br />
M-PAL N-PAL<br />
When AUTO is selected, the video/ S-video input function under ADJUST ( 5 are enabled, and is<br />
executed simultaneously so that the optimum signal mode is selected from among the modes listed above.<br />
Use this function if the image becomes unstable with VIDEO/S-VIDEO. (e.g. The image becomes irregular, or lacks color.)<br />
• AUTO mode may not function correctly with a PAL60 signal and certain other signals.<br />
• The AUTO mode operation requires approximately 10 seconds.<br />
• For COMPONENT VIDEO, the signal type is identified automatically even if<br />
this function is inactive. For a HDTV signal, refer to the item HDTV below.<br />
HDTV<br />
SYNC ON G<br />
Select HDTV Signal Mode: 1080i 1035i<br />
• If the selected HDTV mode is incompatible with the input signal, the picture may be distorted.<br />
On/Off SYNC ON G Mode: TURN ON TURN OFF<br />
Selecting TURN ON turns on the SYNC ON G mode. The SYNC ON G mode<br />
allows reception of SYNC on G.<br />
• In the SYNC ON G mode, the picture may be distorted with certain input<br />
signals. In such a case, remove the signal connector so that no signal is<br />
received and turn SYNC ON G off, and then reconnect the signal.<br />
P. IN P. INPUT<br />
P. IN P. POSIT<br />
P. IN P. screen (*) input signal selection: VIDEO S-VIDEO<br />
Selects the signal displayed on the P. IN P. subscreen.<br />
P. IN P. screen (*) display position selection:<br />
Selects the position at which the P. IN P. subscreen is displayed.<br />
(*) The P. IN P. (picture-in-picture) function displays the video signal image in a subscreen (P. IN P. screen) on<br />
top of the screen on which the RGB signal image is being displayed. (See “Displaying Child Window” Vol.1<br />
24 .)<br />
4
AUTO Menu<br />
With the AUTO menu, the four items shown in the Table below can<br />
be performed.<br />
Please perform each operation in accordance with the instructions<br />
in the Table.<br />
MENU<br />
MAIN<br />
PICTURE-1<br />
PICTURE-2<br />
INPUT<br />
AUTO<br />
SCREEN<br />
OPTION<br />
WIRELESS<br />
: SELECT<br />
ADJUST<br />
KEYSTONE<br />
POWER OFF<br />
ONE TOUCH<br />
EXECUTE<br />
Example : AUTO Menu<br />
(ADJUST)<br />
AUTO Menu<br />
Item<br />
ADJUST<br />
KEYSTONE<br />
POWER OFF<br />
ONE TOUCH<br />
Description<br />
Auto Adjust (for RGB): Automatically adjusts H POSITION, V POSITION, H<br />
PHASE, and H SIZE. Use this function with the maximum window size.<br />
Auto Adjust (for VIDEO/S-VIDEO): This function automatically selects the<br />
appropriate signal mode depending on input signals. This is only performed if<br />
AUTO is selected on the VIDEO menu item ( 4 ) of the INPUT menu.<br />
• This function may not be available with a PAL60 signal and certain other<br />
signals.<br />
• The AUTO mode operation requires approximately 10 seconds.<br />
• For COMPONENT VIDEO, the signal type is identified automatically even if this<br />
function is inactive. For more information on HDTV signals, see HDTV. ( 4 )<br />
Automatic keystone distortion correction:<br />
You can automatically correct vertical keystone distortion corresponding to the<br />
angle (forward/backward tilt) at which the unit is set up.<br />
• If the projection screen is inclined, or if the projector is angled downwards, it<br />
may not be possible to make the correct adjustment when V: INVERT or H&V:<br />
INVERT is selected under the MIRROR item of the MAIN menu.<br />
• When the zoom adjustment is set to the TELE side, automatic correction may<br />
be excessive. The automatic correction function should be used with zoom<br />
set to WIDE whenever possible.<br />
Adjust POWER OFF Time:<br />
Long (MAX. 99 min.) Short (Min. 1 min.) (DISABLE: 0 min.)<br />
If the time set here passes without valid signal input (there is no signal input, or<br />
signal input is out of specifications), the standby mode is set (see "TURNING<br />
ON THE POWER" Vol.1 15 ). This function is inactive when DISABLE (0 min.) is<br />
selected.<br />
Enabling/disabling the KEYSTONE function using the ONE TOUCH<br />
button:<br />
TURN ON TURN OFF<br />
Pressing the ONE TOUCH button will automatically retrieve pictures and<br />
automatically adjust the screen (see “ADJUSTING SCREEN WITH ONE-<br />
TOUCH” Vol.1 23 ), and you can also set the function to execute KEYSTONE<br />
(see above in this table) simultaneously when pressed. KEYSTONE will be<br />
executed if TURN ON is selected.<br />
5
MULTIFUNCTIONAL SETTINGS (continued)<br />
SCREEN Menu<br />
With the SCREEN menu, the five items shown in the Table below can be performed.<br />
Please perform each operation in accordance with the instructions in the Table.<br />
SCREEN Menu<br />
Item<br />
BLANK<br />
START UP<br />
MyScreen<br />
Description<br />
Selection of BLANK Screen:<br />
MyScreen ORIGINAL . . . . . .<br />
The BLANK Screen may be voluntarily selected. The BLANK Screen is displayed when the screen<br />
has been erased (i.e., made to vanish) by manipulating the BLANK button (please refer to the<br />
“Temporarily Blanking the Screen” section of the separate booklet, Vol. 1 (Basic)).<br />
MyScreen: Using the MyScreen category (see this Table, below), one can register a desired screen<br />
(or screens). At the time of factory shipment, this is set as a non-patterned (plain) blue color screen.<br />
ORIGINAL: Existing standard screens. Please make confirmation using the actual screen(s).<br />
Option screens: Various colored non-patterned (plain) screens displayed within the Menus.<br />
• The MyScreen and the ORIGINAL Screen will each change to a non-patterned (plain) black color<br />
screen several minutes after being displayed.<br />
Selection of START UP Screen: MyScreen ORIGINAL TURN OFF<br />
The START UP Screen may be voluntarily selected. The START UP Screen is displayed when<br />
no signal has been inputted, or when spec signals are being inputted.<br />
MyScreen: Using the MyScreen category (see this Table, below), one can register a desired screen<br />
(or screens). At the time of factory shipment, this is set as a non-patterned (plain) blue color screen.<br />
ORIGINAL: Existing standard screens. Please make confirmation using the actual screen(s).<br />
TURN OFF: A non-patterned (plain) blue color screen.<br />
• The MyScreen and ORIGINAL screens will switch to the BLANK screen (see above in this<br />
table) a few minutes after being displayed. If the BLANK screen is the MyScreen or<br />
ORIGINAL screen, it will turn immediately to a solid black screen.<br />
Registration of MyScreen:<br />
When this item is executed, the MyScreen Menu for registration of MyScreen for the BLANK Screen<br />
and the START UP Screen is displayed. When operations are performed in accordance with this Menu,<br />
one can “cut” and register desired screens from among the received images within the display.<br />
1. After the “Do you start capturing this picture” message has been displayed, pressing the ESC (or<br />
RESET) button interrupts execution of the MyScreen. When the ENTER button is pressed, the picture<br />
becomes static (no longer moves), and a frame for picture cutting, as well as the message that follows<br />
below, appear. Please press the button when the screen you want to register is currently being displayed.<br />
2. When the “Move the capture area as you want.” message has been displayed, pressing the ESC (or RESET)<br />
button will eliminate the static state of the picture, and operations can be performed again from operation 1.<br />
The frame can be moved using the<br />
buttons. After designating the screen you<br />
want to register, pressing the ENTER button will initiate screen registration. The registration<br />
process takes approximately 1 minute to complete.<br />
3. When the registration has been completed, the screen of the registered MyScreen, plus the<br />
message, “MyScreen registration is finished,” will be displayed for several seconds, after which<br />
the operation is terminated.<br />
MyScreen Size Selection of MyScreen display size: x1 FULL<br />
MENU<br />
MAIN<br />
PICTURE-1<br />
PICTURE-2<br />
INPUT<br />
AUTO<br />
SCREEN<br />
OPTION<br />
WIRELESS<br />
: SELECT<br />
BLANK<br />
START UP<br />
MyScreen<br />
MyScreen Size<br />
MyScreen Lock<br />
MyScreen<br />
ORIGINAL<br />
Example : SCREEN Menu<br />
(BLANK)<br />
6<br />
MyScreen Lock<br />
Invalidation of MyScreen registration function: TURN ON TURN OFF<br />
When TURN ON is selected, the MyScreen category (see this Table, above) cannot be executed; in<br />
this way, one can prohibit rewrites (“writeovers”) of the MyScreen.
OPTION Menu<br />
With the OPTION menu, the five items shown in the Table below can<br />
be performed.<br />
Please perform each operation in accordance with the instructions in<br />
the Table.<br />
OPTION Menu<br />
Item<br />
Description<br />
MENU<br />
MAIN<br />
PICTURE-1<br />
PICTURE-2<br />
INPUT<br />
AUTO<br />
SCREEN<br />
OPTION<br />
WIRELESS<br />
: SELECT<br />
VOLUME<br />
WHISPER<br />
IR REMOTE<br />
LAMP TIME<br />
FILTER TIME<br />
Example : OPTION Menu<br />
(VOLUME)<br />
12<br />
VOLUME Adjust Volume: High Low<br />
WHISPER<br />
IR REMOTE<br />
LAMP TIME<br />
FILTER TIME<br />
Select WHISPER Mode:<br />
NORMAL WHISPER<br />
When WHISPER is selected the WHISPER mode is activated. In the WHISPER<br />
mode, acoustic noise and screen brightness are reduced.<br />
Selecting the remote control receiver:<br />
The unit has 3 remote control receivers, as shown in the figure<br />
to the right (1, 2, and 3). You can select which of them to<br />
activate (“v” in the figure), and which to disable.<br />
• The ambient lighting and other factors may prevent the<br />
remote control operation from functioning properly. If this<br />
happens, use this function to disable receivers being<br />
impacted by unneeded light.<br />
1<br />
1 2 3<br />
1 2 3<br />
1 2 3<br />
1 2 3<br />
1 2 3<br />
1 2 3<br />
1 2 3<br />
Refer to LAMP TIME: When set, this function displays the total time the<br />
projector lamp has been used since new.<br />
Reset LAMP TIME [Use this function only when the lamp has been replaced!]:<br />
Depress the RESET button for at least 3 seconds while lamp time is being<br />
displayed. The reset menu will then appear. After you replace the lamp with a<br />
new lamp, select RESET on the menu with the button.<br />
• Do not reset the lamp time unless you have replaced the lamp. And, always<br />
reset the lamp time when replacing the lamp. The message functions will not<br />
operate properly if the lamp time is not reset correctly.<br />
• Before replacing the lamp, carefully read the descriptions headed "THE LAMP".<br />
Refer to FILTER TIME: This function displays the total time the air-filter has<br />
been used since new.<br />
Reset FILTER TIME [Use this function only when the filter is cleaned or replaced!]:<br />
Depress the RESET button for at least 3 seconds while lamp time is being<br />
displayed. The reset menu will then appear. After you replace the filter, select<br />
RESET on the menu with the button.<br />
RESET CANCEL<br />
• Do not reset the filter time unless you have cleaned or replaced the filter. And,<br />
always reset the filter time when cleaning or replacing the filter. The message<br />
functions will not operate properly if the filter time is not reset correctly.<br />
• Before cleaning or replacing the filter, carefully read the descriptions headed "THE AIR FILTER".<br />
2<br />
3<br />
WIRELESS Menu<br />
The WIRELESS menu is only enabled if the wireless function is enabled. Using the<br />
wireless function requires a Wireless & Network Module Terminal (sold separately). See<br />
the Wireless & Network Module Terminal user’s manual for more information about the<br />
WIRELESS menu. Contact your local dealer for more information about the wireless<br />
function and Wireless & Network Module Terminal.<br />
7
WHAT TO DO WHEN YOU THINK A MACHINE DEFECT HAS OCCURRED<br />
Related Messages<br />
When the unit's power is ON, messages such as those shown below may be displayed. When<br />
any such message is displayed on the screen, please respond as described below.<br />
Message<br />
CHANGE THE LAMP<br />
AFTER REPLACING LAMP,<br />
RESET THE LAMP TIMER.<br />
(Note 1)<br />
CHANGE THE LAMP<br />
AFTER REPLACING LAMP,<br />
RESET THE LAMP TIMER.<br />
THE POWER WILL TURN OFF<br />
AFTER hr.<br />
(Note 1)<br />
CHANGE THE LAMP<br />
AFTER REPLACING LAMP,<br />
RESET THE LAMP TIMER.<br />
THE POWER WILL TURN OFF<br />
AFTER 0 hr.<br />
CLEAN THE AIR FILTER<br />
AFTER CLEANING AIR FILTER,<br />
RESET THE FILTER TIMER.<br />
NO INPUT IS DETECTED<br />
ON<br />
SYNC IS OUT OF RANGE<br />
ON fH<br />
kHz fV<br />
Hz<br />
CHECK THE AIR FLOW<br />
Description<br />
Lamp usage time is approaching 2,000 hours. (Note 2)<br />
Preparation of a new lamp, and an early lamp change, is<br />
recommended. After you have changed the lamp, please be<br />
sure to reset the lamp timer.<br />
Lamp usage time is approaching 2,000 hours. A lamp change<br />
within hours is recommended. (Note 2)<br />
When lamp usage reaches 2,000 hours, the power will<br />
automatically be turned OFF. Please change the lamp by<br />
referring to “THE LAMP” (Vol.1 27 ). After you have<br />
changed the lamp, please be sure to reset the lamp<br />
timer.<br />
As lamp use has reached 2,000 hours, the power will soon be<br />
automatically turned OFF. (Note 2)<br />
Please immediately turn the power OFF, and follow the<br />
instructions in the “THE LAMP” (Vol.1 27 ).<br />
After you have changed the lamp, please be sure to reset the<br />
lamp timer. ( 7 )<br />
A note of precaution when cleaning the air filter.<br />
After cleaning the filter, operate FILTER TIME of the OPTION<br />
Menu ( 7 ), and perform reset of the filter timer.<br />
There is no input signal.<br />
Please confirm the signal input connection, and the status of the<br />
signal source.<br />
The horizontal or vertical wavelength of the inputted signal is<br />
outside of the response parameters of this unit. Please confirm<br />
the specs for this unit or the signal source specs.<br />
The internal portion temperature is rising. Please turn the power<br />
OFF, and allow the unit to cool down for approximately 20<br />
minutes. After having confirmed the following items, then please<br />
resent the power to ON.<br />
• Is there blockage of the air passage aperture<br />
• Is the air filter dirty<br />
• Does the peripheral temperature exceed 35°C<br />
8<br />
NOTES<br />
Note 1: Although this message will be automatically disappeared after around 3 minutes, it will be<br />
reappeared every time the power is turned ON.<br />
Note 2: Lamps have a finite product life. Lamps are characterized by the fact that, after long hours of<br />
usage, a lamp will no longer light up, or the lamp will break or burst, etc. This unit is equipped<br />
with an automatic shut-down function, such that the power will automatically be turned OFF<br />
when lamp usage time has reached 2,000 hours. Please be aware, however, that among lamp<br />
types, there are major differences in product lifetimes; a lamp may thus fail to light even prior<br />
to the functioning of the automatic shut-down function of this unit.
Regarding the Indicator Lamps<br />
Lighting and flashing of the POWER indicator, the LAMP indicator, and the<br />
TEMP indicator have the meanings as described in the Table below.<br />
Please respond in accordance with the instructions within the Table.<br />
POWER<br />
indicator<br />
LAMP<br />
indicator<br />
TEMP<br />
indicator<br />
Description<br />
The orange<br />
lamp is lighted<br />
Turned OFF<br />
(Not lighted)<br />
Turned OFF<br />
(Not lighted)<br />
The STANDBY mode is set<br />
Flashing of the green lamp Turned OFF Turned OFF The unit is warming up. Please wait.<br />
The green lamp is lighted Turned OFF Turned OFF The unit is in an ON state. Ordinary operations may be performed.<br />
Flashing of the orange lamp Turned OFF Turned OFF The unit is cooling down. Please wait.<br />
Blinking of the<br />
red lamp<br />
The red lamp<br />
is lighted, or<br />
blinks<br />
The red lamp<br />
is lighted, or<br />
blinks<br />
The red lamp<br />
is lighted, or<br />
blinks<br />
The red lamp is<br />
lighted, or<br />
blinks<br />
The green lamp<br />
is lighted<br />
The green<br />
lamp is lighted<br />
- -<br />
The red lamp<br />
is lighted<br />
Blinking of the<br />
red lamp<br />
Turned<br />
OFF<br />
Turned<br />
OFF<br />
Turned<br />
OFF<br />
Turned<br />
OFF<br />
Blinking of the<br />
red lamp<br />
The red lamp is<br />
lighted<br />
Alternative blinking<br />
with the red lamp<br />
Simultaneous blinking<br />
with the red lamp<br />
The unit is cooling down. Please wait.<br />
A certain error has been detected. Wait until the POWER indicator lamp has finished<br />
flashing, and then perform the proper response measure using the item descriptions<br />
below as reference.<br />
The lamp does not light.<br />
There is a possibility that the interior portion has become heated. Turn the power OFF and wait<br />
approximately 20 minutes. After the main unit has cooled down, please confirm whether or not<br />
there is blockage of the air passage aperture, whether or not the filter is dirty, and/or whether or<br />
not the peripheral temperature exceeds 35°C, etc. After performing any needed maintenance,<br />
turn the power ON again; if the same display is displayed, then please change the lamp.<br />
Either there is no lamp and/or lamp cover, or either of these has not been properly fixed<br />
(attached). Turn the power OFF and wait approximately 45 minutes. After the main unit has<br />
sufficiently cooled down, please make confirmation of the attachment state of the lamp and<br />
lamp cover. After performing any needed maintenance, turn the power ON again; if the same<br />
display is displayed, then please contact a sales store or a service company.<br />
The cooling fan is not operating. Turn the power OFF and wait approximately 20 minutes. After the<br />
main unit has cooled down, please make confirmation that no foreign matter has become caught in<br />
the fan, etc. After performing any needed maintenance, turn the power ON again; if the same display<br />
is displayed, then please contact a sales store or a service company.<br />
There is a possibility that the interior portion has become heated. Turn the power OFF and wait<br />
approximately 20 minutes. After the main unit has cooled down, please confirm whether or not<br />
there is blockage of the air passage aperture, whether or not the filter is dirty, and/or whether or<br />
not the peripheral temperature exceeds 35°C, etc. After performing any needed maintenance,<br />
turn the power ON again; if the same display is displayed, then please contact a sales store or a<br />
service company.<br />
There is a possibility that the interior portion has become overcooled. Please use the unit within<br />
the usage temperature parameters (0°C to 35°C). After performing any needed maintenance,<br />
turn the power ON again; if the same display is displayed, then please contact a sales store or a<br />
service company.<br />
This is a notification that it is time to clean the filter.<br />
After cleaning the filter, operate the FILTER TIME portion of the OPTION Menu, and perform<br />
reset of the FILTER TIME.<br />
NOTE<br />
When the interior portion has become overheated, for safety purposes, the power source is automatically turned OFF,<br />
and the indicator lamps may also be turned OFF. Press the “ ” (power OFF) side of the main power switch, and wait<br />
for approximately 20 minutes. Please then use the unit only after having first confirmed that the unit has sufficiently<br />
cooled down.<br />
9
WHAT TO DO WHEN YOU THINK A MACHINE DEFECT HAS OCCURRED (continued)<br />
Phenomena That May Easily Be Mistaken for Machine Defects<br />
Before requesting repair, check in accordance with the following chart.<br />
If the situation cannot be corrected, then contact your dealer.<br />
Phenomenon Cases not involving a machine defect Items to be confirmed<br />
Reference<br />
Page(s)<br />
The main power source is not ON. Turn on the main power.<br />
The electrical power cord is not plugged in. Correctly connect the power cord.<br />
Vol.1-3, 15<br />
Power does not<br />
Be sure to press the “O” (power OFF) side<br />
come ON<br />
The main power source has been of the main power switch, and leave this OFF<br />
interrupted during operation, such as by for approximately 20 minutes. After the unit Vol.1-15<br />
a power outage (blackout), etc.<br />
has sufficiently cooled down, turn ON the<br />
power source.<br />
No sound or<br />
pictures are<br />
outputted<br />
The input changeover settings<br />
are mismatched.<br />
Select the input signal, and<br />
correct the settings.<br />
Vol.1-16<br />
No signal is being inputted. Correctly connect the connection cord. Vol.1-8-12<br />
Pictures are<br />
displayed, but no<br />
sounds are heard<br />
Sounds are<br />
heard, but no<br />
pictures are<br />
displayed<br />
The electrical wiring to this unit<br />
is not correctly connected.<br />
The volume setting has been set at (or<br />
adjusted to) an extremely low level.<br />
The MUTE mode is the current setting.<br />
The electrical wiring to this unit<br />
is not correctly connected.<br />
The brightness setting has been set at<br />
(or adjusted to) an extremely low level.<br />
Correctly connect the connection cord.<br />
Adjust the VOLUME setting to a higher level.<br />
Press the MUTE button to release<br />
(change) the MUTE mode setting.<br />
Correctly connect the connection cord.<br />
Adjust the BRIGHT setting to a<br />
brighter level.<br />
Vol.1-8-12<br />
Vol.1-18<br />
Vol.1-18<br />
Vol.1-8-12<br />
Vol.2-2<br />
The lens cap has not been removed. Remove the lens cap. Vol.1-15<br />
Colors have a fadedout<br />
appearance<br />
Color tone is poor<br />
Color depth setting or color tone setting<br />
Perform picture adjustments by changing the<br />
COLOR BAL R, the COLOR BAL B, and/or the<br />
TINT settings, etc.<br />
Vol.2-3<br />
The brightness setting and/or contrast<br />
setting has not been properly adjusted.<br />
Perform picture adjustments by changing the<br />
BRIGHT and/or CONTRAST settings, etc.<br />
Vol.2-2<br />
Pictures appear<br />
dark<br />
The WHISPER mode is the current<br />
setting.<br />
Change (by releasing) from the<br />
WHISPER mode.<br />
Vol.2-7<br />
Lamp is approaching the end of its<br />
product lifetime.<br />
Exchange the old lamp with a new<br />
lamp.<br />
Vol.1-27, 28<br />
Pictures appear<br />
blurry<br />
Either the FOCUS setting or the H<br />
PHASE is not properly adjusted.<br />
Adjust the FOCUS and H PHASE settings.<br />
Vol.1-16<br />
Vol.2-3<br />
Input signal changes<br />
with no-operation.<br />
INPUT dial is set between the click<br />
points.<br />
Turn the INPUT dial and set it at the<br />
click point.<br />
Vol.1-16<br />
NOTE<br />
Although bright spots or dark spots may appear on the screen, this is a unique characteristic of liquid crystal displays, and<br />
such do not constitute or imply a machine defect.<br />
10
SPECIFICATIONS<br />
NOTE<br />
• This specifications are subject to change without notice.<br />
Item<br />
Product name<br />
Liquid Panel size<br />
crystal Drive system<br />
panel Pixels<br />
Lens<br />
Lamp<br />
Speaker<br />
Dimension Diagram<br />
Specification<br />
Liquid crystal projector<br />
2.5 cm (0.99 type)<br />
TFT active matrix<br />
786,432 pixels (1024 horizontal x 768 vertical)<br />
Zoom lens F=1.7 ~ 2.4 f=30.5 ~ 45.8 mm<br />
275 W UHB<br />
1.0W+1.0W (Stereo)<br />
Power supply AC100 ~ 120V, 4.7A / AC220 ~ 240V, 2.0A<br />
Power consumption<br />
Temperature range<br />
Size<br />
Weight (mass)<br />
Ports<br />
Optional Parts<br />
430W<br />
0 ~ 35°C (Operating)<br />
380 (W) x 120 (H) x 290 (D) mm (Not including protruding parts)<br />
5.7 kg<br />
RGB Input Ports<br />
RGB ................................1<br />
BNC (when RGB selected)<br />
– (R.G.B.H.V) ..................1<br />
DVI..................................1<br />
VIDEO Input Ports<br />
VIDEO IN ........................1<br />
S-VIDEO IN ....................1<br />
COMPONENT VIDEO<br />
– (CR/PR, CB/PB, Y) ........1<br />
BNC<br />
(when COMPONENT selected)<br />
– (CR/PR, Y, CB/PB) ........1<br />
Lamp: DT00531 Air Filter: NJ07081<br />
* For others, consult your dealer.<br />
AUDIO Ports<br />
AUDIO IN 1 ....................1<br />
AUDIO IN 2 ....................1<br />
AUDIO IN (R, L)..............1<br />
RGB Output Port<br />
RGB OUT........................1<br />
AUDIO Output Port<br />
AUDIO OUT....................1<br />
CONTROL Ports<br />
CONTROL ......................1<br />
USB ................................1<br />
Other Ports<br />
WIRELESS & NETWORK MODULE....1<br />
REMOTE CONTROL ......1<br />
<br />
<br />
<br />
<br />
<br />
<br />
<br />
Unit : mm<br />
<br />
11
WARRANTY AND AFTER-SERVICE<br />
If a problem occurs with the equipment, first refer to the 8 “WHAT TO DO WHEN YOU<br />
THINK A MACHINE DEFECT HAS OCCURRED” section and run through the suggested<br />
checks. If this does not resolve the problem contact your dealer or service company. They<br />
will tell you what warranty condition is applied.<br />
12
TECHNICAL<br />
SIGNAL CONNECTOR PIN ASSIGNMENT<br />
RGB IN [1]/[2]<br />
RGB OUT<br />
S-VIDEO<br />
D-sub 15-pin Shrink<br />
Pin No Signal Pin No Signal<br />
1 Video input Red 9 -<br />
2 Video input Green 10 Ground<br />
3 Video input Blue 11 -<br />
4 -<br />
RGB IN [1]: SDA (DDC)<br />
5 Ground 12 RGB IN [2]: -<br />
6 Ground Red RGB OUT : -<br />
7 Ground Green 13 H. sync./ Composite sync.<br />
8 Ground Blue 14 Vertical sync<br />
RGB IN [1]: SCL (DDC)<br />
15 RGB IN [2]: -<br />
RGB OUT : -<br />
Mini Din 4-pin<br />
Mini Din 4-pin<br />
Pin No Signal<br />
Color:<br />
0.286Vp-p (NTSC, burst signal),<br />
1 75Ω terminator<br />
0.3Vp-p (PAL/SECAM, burst signal),<br />
75Ω terminator<br />
Brightness:<br />
2<br />
1.0Vp-p, 75Ω terminator<br />
3 Ground<br />
4 Ground<br />
signal Terminal Specification<br />
Video: RGB separate, Analog, 0.7Vp-p, 75Ω terminator (positive)<br />
RGB<br />
H/V. sync.: TTL level (positive/negative)<br />
Composite sync.: TTL level<br />
D-sub 15-pin shrink jack<br />
RGB signal<br />
input<br />
Video signal<br />
input<br />
BNC (RGB)<br />
(R,G,B,H,V)<br />
DVI<br />
AUDIO IN 1<br />
AUDIO IN 2<br />
VIDEO IN<br />
S-VIDEO IN<br />
COMPONENT VIDEO<br />
(CR/PR, CB/PB, Y)<br />
BNC (COMPONENT)<br />
(CR/PR, CB/PB, Y)<br />
AUDIO IN<br />
RGB OUT<br />
Signal output<br />
Control<br />
functions<br />
AUDIO OUT<br />
CONTROL<br />
USB<br />
R L<br />
Video: RGB separate, Analog 0.7Vp-p, 75Ω terminator (positive)<br />
H/V. sync.: TTL level (positive/negative)<br />
Composite sync.: TTL level<br />
BNC connector x 5<br />
TMDS, DC 150-1200 mV/AC 1.56 Vp-p, TTL Level (Positive/Negative)<br />
DVI connector<br />
200mVrms, 57Ω (max. 3.0Vp-p)<br />
Stereo mini jack<br />
1.0Vp-p, 75Ω terminator, RCA jack<br />
Brightness signal: 1.0Vp-p, 75Ω terminator<br />
Color signal: 0.286Vp-p (NTSC, burst signal),75Ω terminator<br />
Color signal: 0.300Vp-p (PAL/SECAM, burst signal),75Ω terminator<br />
Mini DIN 4-pin jack<br />
Y signal: 1.0 Vp-p, 75 Ω terminator<br />
CR/PR signal: 0.7 Vp-p, 75 Ω terminator<br />
CB/PB signal: 0.7 Vp-p, 75 Ω terminator<br />
RCA jack x 3 (BNC connector x 5)<br />
200mVrms, 50 kΩ (max. 3.0Vp-p)<br />
RCA jack<br />
Video: RGB separate, Analog 0.7Vp-p, 75Ω (positive)<br />
Sync.: H,V separate, TTL level (positive/negative)<br />
Composite sync.: TTL level<br />
D-sub 15-pin shrink jack<br />
200mV(rms), output impedance 1kΩ (max. 3.0Vp-p)<br />
Stereo mini jack<br />
D-sub 15pin shrink plug<br />
USB jack (B type)<br />
1
EXAMPLE OF COMPUTER SIGNAL<br />
Resolution<br />
H × V<br />
fH (kHz) fV (Hz) Rating Signal mode<br />
CP-X880<br />
Display mode<br />
CP-X885<br />
720 × 400 37.9 85.0 VESA TEXT Zoom in Zoom in<br />
640 × 480 31.5 59.9 VESA VGA (60Hz) Zoom in Zoom in<br />
640 × 480 35.0 66.7 Mac13"mode Zoom in Zoom in<br />
640 × 480 37.9 72.8 VESA VGA (72Hz) Zoom in Zoom in<br />
640 × 480 37.5 75.0 VESA VGA (75Hz) Zoom in Zoom in<br />
640 × 480 43.3 85.0 VESA VGA (85Hz) Zoom in Zoom in<br />
800 × 600 35.2 56.3 VESA SVGA (56Hz) Zoom in<br />
800 × 600 37.9 60.3 VESA SVGA (60Hz) Zoom in<br />
800 × 600 48.1 72.2 VESA SVGA (72Hz) Zoom in<br />
800 × 600 46.9 75.0 VESA SVGA (75Hz) Zoom in<br />
800 × 600 53.7 85.1 VESA SVGA (85Hz) Zoom in<br />
832 × 624 49.7 74.5 Mac16"mode Zoom out Zoom in<br />
1024 × 768 48.4 60.0 VESA XGA (60Hz) Zoom out<br />
1024 × 768 56.5 70.1 VESA XGA (70Hz) Zoom out<br />
1024 × 768 60.0 75.0 VESA XGA (75Hz) Zoom out<br />
1024 × 768 68.7 85.0 VESA XGA (85Hz) Zoom out<br />
1152 × 864 67.5 75.0 VESA SXGA (75Hz) Zoom out Zoom out<br />
1280 × 960 60.0 60.0 VESA SXGA (60Hz) Zoom out Zoom out<br />
1280 × 1024 64.0 60.0 VESA SXGA (60Hz) Zoom out Zoom out<br />
1280 × 1024 80.0 75.0 VESA SXGA (75Hz) Zoom out Zoom out<br />
1280 × 1024 91.2 85.0 VESA SXGA (85Hz) Zoom out Zoom out<br />
1600 × 1200 75.0 60.0 VESA UXGA (60Hz) Zoom out Zoom out<br />
NOTE • Some computers may have multiple display screen modes. Use of some<br />
of these modes will not be possible with this projector.<br />
• Be sure to check jack type, signal level, timing and resolution before connecting this<br />
projector to a computer.<br />
• Depending on the input signal, full-size display may not be possible in some cases.<br />
Refer to the number of display pixels above.<br />
• Although the projector can display signals (except DVI input) with resolution up to<br />
UXGA (1,600 x 1,200), the signal will be converted to the projector’s panel resolution<br />
before being displayed. The best display performance will be achieved if the<br />
resolutions of the input signal and projector panel are identical.<br />
• The image may not be displayed correctly when the input sync. signal is “Composite<br />
Sync.” or “Sync. on G”.<br />
• UXGA (1,600 x 1,200) signals cannot be displayed with DVI input.<br />
2
INITIAL SET SIGNALS<br />
The following signals are used for the initial settings.<br />
The signal timing of some computer models may be different. In such case, refer to<br />
adjust the V.POSIT and H.POSIT of the menu.<br />
Back porch b<br />
Front porch d<br />
Display interval c<br />
Back porch b<br />
Front porch d<br />
Display interval c<br />
DATA<br />
DATA<br />
HSYNC<br />
Sync a<br />
VSYNC<br />
Sync a<br />
Computer / Horizontal signal timing (µs)<br />
Signal a b c d<br />
TEXT 2.0 3.0 20.3 1.0<br />
VGA (60Hz) 3.8 1.9 25.4 0.6<br />
Mac 13"mode 2.1 3.2 21.2 2.1<br />
VGA (72Hz) 1.3 3.8 20.3 1.0<br />
VGA (75Hz) 2.0 3.8 20.3 0.5<br />
VGA (85Hz) 1.6 2.2 17.8 1.6<br />
SVGA (56Hz) 2.0 3.6 22.2 0.7<br />
SVGA (60Hz) 3.2 2.2 20.0 1.0<br />
SVGA (72Hz) 2.4 1.3 16.0 1.1<br />
SVGA (75Hz) 1.6 3.2 16.2 0.3<br />
SVGA (85Hz) 1.1 2.7 14.2 0.6<br />
Mac 16"mode 1.1 3.9 14.5 0.6<br />
XGA (60Hz) 2.1 2.5 15.8 0.4<br />
XGA (70Hz) 1.8 1.9 13.7 0.3<br />
XGA (75Hz) 1.2 2.2 13.0 0.2<br />
XGA (85Hz) 1.0 2.2 10.8 0.5<br />
1152×864 (75Hz) 1.2 2.4 10.7 0.6<br />
1280×960 (60Hz) 1.0 2.9 11.9 0.9<br />
1280×1024 (60Hz) 1.0 2.3 11.9 0.4<br />
1280×1024 (75Hz) 1.1 1.8 9.5 0.2<br />
1280×1024 (85Hz) 1.0 1.4 8.1 0.4<br />
1600×1200 (60Hz) 1.2 1.9 9.9 0.4<br />
Computer / Vertical signal timimg (lines)<br />
Signal a b c d<br />
TEXT 3 42 400 1<br />
VGA (60Hz) 2 33 480 10<br />
Mac 13"mode 3 39 480 3<br />
VGA (72Hz) 3 28 480 9<br />
VGA (75Hz) 3 16 480 1<br />
VGA (85Hz) 3 25 480 1<br />
SVGA (56Hz) 2 22 600 1<br />
SVGA (60Hz) 4 23 600 1<br />
SVGA (72Hz) 6 23 600 37<br />
SVGA (75Hz) 3 21 600 1<br />
SVGA (85Hz) 3 27 600 1<br />
Mac 16"mode 3 39 624 1<br />
XGA (60Hz) 6 29 768 3<br />
XGA (70Hz) 6 29 768 3<br />
XGA (75Hz) 3 28 768 1<br />
XGA (85Hz) 3 36 768 1<br />
1152×864 (75Hz) 3 32 864 1<br />
1280×960 (60Hz) 3 36 960 1<br />
1280×1024 (60Hz) 3 38 1024 1<br />
1280×1024 (75Hz) 3 37 1024 2<br />
1280×1024 (85Hz) 3 44 1024 1<br />
1600×1200 (60Hz) 3 46 1200 1<br />
3
CONNECTION TO THE MOUSE CONTROL<br />
ADB Mouse<br />
CONTROL Terminal<br />
D-sub 15-pin shrink jack<br />
1 2 3 4 5<br />
8 9 10<br />
6 7<br />
11 12 13 14 15<br />
Projector<br />
1<br />
2<br />
DATA 3<br />
4<br />
5<br />
6<br />
RTS 7<br />
8<br />
+5V 9<br />
GND 10<br />
11<br />
12<br />
13<br />
14<br />
15<br />
Computer<br />
1 ADB<br />
2 (POWER ON)<br />
3 +5V<br />
4 GND<br />
Mouse jack<br />
Mini DIN 4-pin<br />
4 3<br />
2 1<br />
Serial Mouse<br />
CONTROL Terminal<br />
D-sub 15-pin shrink jack<br />
1 2 3 4 5<br />
8 9 10<br />
6 7<br />
11 12 13 14 15<br />
Projector<br />
1<br />
2<br />
3<br />
4<br />
5<br />
SEL0 6<br />
RTS 7<br />
8<br />
9<br />
GND 10<br />
11<br />
12<br />
13<br />
TD 14<br />
15<br />
Computer<br />
1 CD<br />
2 RD<br />
3 TD<br />
4 DTR<br />
5 GND<br />
6 DSR<br />
7 RTS<br />
8 CTS<br />
9 RI<br />
Mouse jack<br />
D-sub 9-pin<br />
1 2 3 4<br />
6<br />
7<br />
8 9<br />
5<br />
USB Mouse<br />
USB jack<br />
(B type) Projector<br />
Computer<br />
USB jack<br />
(A type)<br />
2<br />
3<br />
1<br />
4<br />
+5V 1<br />
—DATA 2<br />
+DATA 3<br />
GND 4<br />
1 +5V<br />
2 —DATA<br />
3 +DATA<br />
4 GND<br />
USB cable<br />
1 2 3 4<br />
PS/2 Mouse<br />
Projector<br />
Computer<br />
4<br />
CONTROL Terminal<br />
D-sub 15-pin shrink jack<br />
1 2 3 4 5<br />
8 9 10<br />
6 7<br />
11 12 13 14 15<br />
1<br />
CLK 2<br />
DATA 3<br />
4<br />
5<br />
SEL0 6<br />
RTS 7<br />
8<br />
+5V 9<br />
GND 10<br />
11<br />
12<br />
13<br />
14<br />
15<br />
1<br />
2<br />
3<br />
4<br />
5<br />
6<br />
DATA<br />
GND<br />
+5V<br />
CLK<br />
Mouse jack<br />
Mini DIN 6-pin<br />
6 5<br />
4 3<br />
2 1
RS-232C COMMUNICATION<br />
(1) Turn off the projector and computer power supplies, and connect with the RS-232C<br />
adapter via the RS-232C cable.<br />
(2) Turn on the computer power supply and after the computer has started up, turn on the<br />
projector power supply.<br />
Control jack<br />
D-sub 15-pin shrink jack<br />
Projector<br />
1<br />
2<br />
3<br />
4<br />
5<br />
SELO 6<br />
RTS 7<br />
8<br />
9<br />
GND 10<br />
11<br />
12<br />
RD 13<br />
TD 14<br />
15<br />
Computer<br />
1 CD<br />
2 RD<br />
3 TD<br />
4 DTR<br />
5 GND<br />
6 DSR<br />
7 RTS<br />
8 DTS<br />
9 RI<br />
RS-232C jack<br />
D-sub 9-pin<br />
1 2 3 4 5<br />
6 7 8 9<br />
RS-232C adapter<br />
Communications setting<br />
19200bps, 8N1<br />
1 Protocol<br />
Consist of header (7 bytes) + command data (6 bytes).<br />
2 Header<br />
BE + EF + 03 + 06 + 00 + CRC_low + CRC_high<br />
CRC_low : Lower byte of CRC flag for command data.<br />
CRC_high : Upper byte of CRC flag for command data.<br />
3 Command data<br />
Command data chart<br />
byte_0 byte_1 byte_2 byte_3 byte_4 byte_5<br />
Action Type Setting code<br />
low high low high low high<br />
Action (byte_0 - 1)<br />
Action Classification Content<br />
1 SET Change setting to desired value.<br />
2 GET Read projector internal setup value.<br />
4 INCREMENT Increment setup value by 1.<br />
5 DECREMENT Decrement setup value by 1.<br />
6 EXECUTE Run a command.<br />
5
RS-232C COMMUNICATION (continued)<br />
Requesting projector status (Get command)<br />
(1) Send the request code Header + Command data (‘02H’+‘00H’+ type (2 bytes)<br />
+‘00H’+‘00H’) from the computer to the projector.<br />
(2) The projector returns the response code ‘1DH’+ data (2 bytes) to the computer.<br />
Changing the projector settings (Set command)<br />
(1) Send the setting code Header + Command data (‘01H’+‘00H’+ type (2 bytes) +<br />
setting code (2 bytes)) from the computer to the projector.<br />
(2) The projector changes the setting based on the above setting code.<br />
(3) The projector returns the response code ‘06H’ to the computer.<br />
Using the projector default settings (Reset Command)<br />
(1) The computer sends the default setting code Header + Command data (‘06H’+‘00H’+<br />
type (2 bytes) +‘00H’+‘00H’) to the projector.<br />
(2) The projector changes the specified setting to the default value.<br />
(3) The projector returns the response code ‘06H’ to the computer.<br />
Increasing the projector setting value (Increment command)<br />
(1) The computer sends the increment code Header + Command data (‘04H’+‘00H’+<br />
type (2 bytes) +‘00H’+‘00H’) to the projector.<br />
(2) The projector in creases the setting value on the above setting code.<br />
(3) The projector returns the response code ‘06H’ to the computer.<br />
Decreasing the projector setting value (Decrement command)<br />
(1) The computer sends the decrement code Header + Command data (‘05H’+‘00H’+<br />
type (2 bytes) +‘00H’ + ‘00H’) to the projector.<br />
(2) The projector decreases the setting value on the above setting code.<br />
(3) The projector returns the response code ‘06H’ to the computer.<br />
When a command sent by the projector cannot be understood by the computer<br />
When the command sent by the projector cannot be understood, the error command ‘15H’ is<br />
returned by the computer. Some times, the projector ignores RS-232C commands during<br />
other works. If the error command ‘15H’ is returned, please send the same command again.<br />
When data sent by the projector cannot be practice<br />
When the command sent by the projector cannot be practiced, the the error code ‘1cH’<br />
+‘xxxxH’ is returned.<br />
When the data length is greater than indicated by the data length code, the projector will<br />
ignore the excess data code.<br />
Conversely, when the data length is shorter than indicated by the data length code, an<br />
error code will be returned to the projector.<br />
6<br />
NOTE • Operation cannot be guaranteed when the projector receives an<br />
undefined command or data.<br />
• Provide an interval of at least 40ms between the response code and any other code.<br />
• The projector outputs test data when the power supply is switched ON, and when the<br />
lamp is lit. Ignore this data.<br />
• Commands are not accepted during warm-up.
Command data chart<br />
Command data<br />
Names Operation type Header<br />
CRC Action Type Setting code<br />
Blue BE EF 03 06 00 CB D3 01 00 00 30 03 00<br />
White BE EF 03 06 00 6B D0 01 00 00 30 05 00<br />
Set Black BE EF 03 06 00 9B D0 01 00 00 30 06 00<br />
Blank Color<br />
MyScreen BE EF 03 06 00 FB CA 01 00 00 30 20 00<br />
ORIGNAL BE EF 03 06 00 FB E2 01 00 00 30 40 00<br />
Get BE EF 03 06 00 08 D3 02 00 00 30 00 00<br />
Normal BE EF 03 06 00 C7 D2 01 00 01 30 00 00<br />
H Inverse BE EF 03 06 00 57 D3 01 00 01 30 01 00<br />
Set<br />
Mirror<br />
V lnverse BE EF 03 06 00 A7 D3 01 00 01 30 02 00<br />
H&V Inverse BE EF 03 06 00 37 D2 01 00 01 30 03 00<br />
Get BE EF 03 06 00 F4 D2 02 00 01 30 00 00<br />
Normal BE EF 03 06 00 83 D2 01 00 02 30 00 00<br />
Set<br />
Freeze<br />
Freeze BE EF 03 06 00 13 D3 01 00 02 30 01 00<br />
Get BE EF 03 06 00 B0 D2 02 00 02 30 00 00<br />
ORIGNAL BE EF 03 06 00 0B D2 01 00 04 30 00 00<br />
Startup<br />
Set OFF BE EF 03 06 00 9B D3 01 00 04 30 01 00<br />
MyScreen BE EF 03 06 00 CB CB 01 00 04 30 20 00<br />
Get BE EF 03 06 00 38 D2 02 00 04 30 00 00<br />
English BE EF 03 06 00 F7 D3 01 00 05 30 00 00<br />
Français BE EF 03 06 00 67 D2 01 00 05 30 01 00<br />
Deutsch BE EF 03 06 00 97 D2 01 00 05 30 02 00<br />
Español BE EF 03 06 00 07 D3 01 00 05 30 03 00<br />
Italiano BE EF 03 06 00 37 D1 01 00 05 30 04 00<br />
Set<br />
Language<br />
Magnify<br />
Norsk BE EF 03 06 00 A7 D0 01 00 05 30 05 00<br />
Nederlands BE EF 03 06 00 57 D0 01 00 05 30 06 00<br />
Português BE EF 03 06 00 C7 D1 01 00 05 30 07 00<br />
BE EF 03 06 00 37 D4 01 00 05 30 08 00<br />
BE EF 03 06 00 A7 D5 01 00 05 30 09 00<br />
BE EF 03 06 00 57 D5 01 00 05 30 0A 00<br />
Get BE EF 03 06 00 C4 D3 02 00 05 30 00 00<br />
Get BE EF 03 06 00 7C D2 02 00 07 30 00 00<br />
Increment BE EF 03 06 00 1A D2 04 00 07 30 00 00<br />
Decrement BE EF 03 06 00 CB D3 05 00 07 30 00 00<br />
Get BE EF 03 06 00 08 86 02 00 10 31 00 00<br />
Auto off<br />
Increment BE EF 03 06 00 6E 86 04 00 10 31 00 00<br />
Decrement BE EF 03 06 00 BF 87 05 00 10 31 00 00<br />
Brightness Reset Execute BE EF 03 06 00 58 D3 06 00 00 70 00 00<br />
Contrast Reset Execute BE EF 03 06 00 A4 D2 06 00 01 70 00 00<br />
V.Position Reset Execute BE EF 03 06 00 E0 D2 06 00 02 70 00 00<br />
7
Command data chart (continued)<br />
8<br />
Names Operation type Header<br />
Command data<br />
CRC Action Type Setting code<br />
H.Position Reset Execute BE EF 03 06 00 IC D3 06 00 03 70 00 00<br />
H.Size Reset Execute BE EF 03 06 00 68 D2 06 00 04 70 00 00<br />
Color Balance<br />
R Reset<br />
Execute BE EF 03 06 00 94 D3 06 00 05 70 00 00<br />
Color Balance<br />
B Reset<br />
Execute BE EF 03 06 00 D0 D3 06 00 06 70 00 00<br />
Sharpness Reset Execute BE EF 03 06 00 C4 D0 06 00 09 70 00 00<br />
Color Reset Execute BE EF 03 06 00 80 D0 06 00 0A 70 00 00<br />
Tint Reset Execute BE EF 03 06 00 7C D1 06 00 0B 70 00 00<br />
Keystone_V Reset Execute BE EF 03 06 00 08 D0 06 00 0C 70 00 00<br />
Keystone_H Reset Execute BE EF 03 06 00 98 D8 06 00 20 70 00 00<br />
Auto Adjust Execute BE EF 03 06 00 91 D0 06 00 0A 20 00 00<br />
Auto Keystone_V Execute BE EF 03 06 00 E5 D1 06 00 0D 20 00 00<br />
Lamp Time Reset Execute BE EF 03 06 00 58 DC 06 00 30 70 00 00<br />
Filter Time Reset Execute BE EF 03 06 00 98 C6 06 00 40 70 00 00<br />
off BE EF 03 06 00 FB D8 01 00 20 30 00 00<br />
Set<br />
Blank on/off<br />
on BE EF 03 06 00 6B D9 01 00 20 30 01 00<br />
Get BE EF 03 06 00 C8 D8 02 00 20 30 00 00<br />
BE EF 03 06 00 D9 D8 02 00 20 60 00 00<br />
Error Status<br />
Get<br />
(Example of Return)<br />
00 00 01 00 02 00 03 00<br />
(Normal) (Cover-error) (Fan-error) (Lamp-error)<br />
04 00 05 00 06 00 07 00 08 00<br />
(Temp-error) (Air flow-error) (Lamp-Time-over) (Cool-error) (Filter-Error)<br />
OFF BE EF 03 06 00 2A D3 01 00 00 60 00 00<br />
Set<br />
Power<br />
ON BE EF 03 06 00 BA D2 01 00 00 60 01 00<br />
Get BE EF 03 06 00 19 D3 02 00 00 60 00 00<br />
RGB BE EF 03 06 00 FE D2 01 00 00 20 00 00<br />
RGB) BE EF 03 06 00 3E D0 01 00 00 20 04 00<br />
Video BE EF 03 06 00 6E D3 01 00 00 20 01 00<br />
Input Source<br />
Set S-Video BE EF 03 06 00 9E D3 01 00 00 20 02 00<br />
Component BE EF 03 06 00 AE D1 01 00 00 20 05 00<br />
DVI BE EF 03 06 00 0E D2 01 00 00 20 03 00<br />
BNC (Component) BE EF 03 06 00 5E D1 01 00 00 20 06 00<br />
Get BE EF 03 06 00 CD D2 02 00 00 20 00 00<br />
Get BE EF 03 06 00 31 D3 02 00 01 20 00 00<br />
Volume<br />
Increment BE EF 03 06 00 57 D3 04 00 01 20 00 00<br />
Decrement BE EF 03 06 00 86 D2 05 00 01 20 00 00<br />
Normal BE EF 03 06 00 46 D3 01 00 02 20 00 00<br />
Set<br />
Mute<br />
Mute BE EF 03 06 00 D6 D2 01 00 02 20 01 00<br />
Get BE EF 03 06 00 75 D3 02 00 02 20 00 00<br />
Get BE EF 03 06 00 89 D2 02 00 03 20 00 00<br />
Brightness<br />
Increment BE EF 03 06 00 EF D2 04 00 03 20 00 00<br />
Decrement BE EF 03 06 00 3E D3 05 00 03 20 00 00<br />
Get BE EF 03 06 00 FD D3 02 00 04 20 00 00<br />
Contrast<br />
Increment BE EF 03 06 00 9B D3 04 00 04 20 00 00<br />
Decrement BE EF 03 06 00 4A D2 05 00 04 20 00 00<br />
Get BE EF 03 06 00 01 D2 02 00 05 20 00 00<br />
Color Balance R Increment BE EF 03 06 00 67 D2 04 00 05 20 00 00<br />
Decrement BE EF 03 06 00 B6 D3 05 00 05 20 00 00
Names Operation type Header<br />
Color Balance B<br />
Keystone_V<br />
Keystone_H<br />
Aspect<br />
Picture<br />
Position at<br />
16 : 9 or Small<br />
V.Position<br />
H.Position<br />
H.Size<br />
H.Phase<br />
Sharpness<br />
Color<br />
Tint<br />
BNC<br />
Video Format<br />
HDTV<br />
Command data<br />
CRC Action Type Setting code<br />
Get BE EF 03 06 00 45 D2 02 00 06 20 00 00<br />
Increment BE EF 03 06 00 23 D2 04 00 06 20 00 00<br />
Decrement BE EF 03 06 00 F2 D3 05 00 06 20 00 00<br />
Get BE EF 03 06 00 B9 D3 02 00 07 20 00 00<br />
Increment BE EF 03 06 00 DF D3 04 00 07 20 00 00<br />
Decrement BE EF 03 06 00 0E D2 05 00 07 20 00 00<br />
Get BE EF 03 06 00 E9 D0 02 00 0B 20 00 00<br />
Increment BE EF 03 06 00 8F D0 04 00 0B 20 00 00<br />
Decrement BE EF 03 06 00 5E D1 05 00 0B 20 00 00<br />
4:3 BE EF 03 06 00 9E D0 01 00 08 20 00 00<br />
Set 16:9 BE EF 03 06 00 0E D1 01 00 08 20 01 00<br />
Small BE EF 03 06 00 FE D1 01 00 08 20 02 00<br />
Get BE EF 03 06 00 AD D0 02 00 08 20 00 00<br />
Default BE EF 03 06 00 62 D1 01 00 09 20 00 00<br />
Set Bottom BE EF 03 06 00 F2 D0 01 00 09 20 01 00<br />
Top BE EF 03 06 00 02 D0 01 00 09 20 02 00<br />
Get BE EF 03 06 00 51 D1 02 00 09 20 00 00<br />
Get BE EF 03 06 00 0D 83 02 00 00 21 00 00<br />
Increment BE EF 03 06 00 6B 83 04 00 00 21 00 00<br />
Decrement BE EF 03 06 00 BA 82 05 00 00 21 00 00<br />
Get BE EF 03 06 00 F1 82 02 00 01 21 00 00<br />
Increment BE EF 03 06 00 97 82 04 00 01 21 00 00<br />
Decrement BE EF 03 06 00 46 83 05 00 01 21 00 00<br />
Get BE EF 03 06 00 B5 82 02 00 02 21 00 00<br />
Increment BE EF 03 06 00 D3 82 04 00 02 21 00 00<br />
Decrement BE EF 03 06 00 02 83 05 00 02 21 00 00<br />
Get BE EF 03 06 00 49 83 02 00 03 21 00 00<br />
Increment BE EF 03 06 00 2F 83 04 00 03 21 00 00<br />
Decrement BE EF 03 06 00 FE 82 05 00 03 21 00 00<br />
Get BE EF 03 06 00 F1 72 02 00 01 22 00 00<br />
Increment BE EF 03 06 00 97 72 04 00 01 22 00 00<br />
Decrement BE EF 03 06 00 46 73 05 00 01 22 00 00<br />
Get BE EF 03 06 00 B5 72 02 00 02 22 00 00<br />
Increment BE EF 03 06 00 D3 72 04 00 02 22 00 00<br />
Decrement BE EF 03 06 00 02 73 05 00 02 22 00 00<br />
Get BE EF 03 06 00 49 73 02 00 03 22 00 00<br />
Increment BE EF 03 06 00 2F 73 04 00 03 22 00 00<br />
Decrement BE EF 03 06 00 FE 72 05 00 03 22 00 00<br />
Set<br />
RGB BE EF 03 06 00 C2 D7 01 00 11 20 00 00<br />
Component BE EF 03 06 00 52 D6 01 00 11 20 01 00<br />
Get BE EF 03 06 00 F1 D7 02 00 11 20 00 00<br />
Auto BE EF 03 06 00 9E 75 01 00 00 22 0A 00<br />
NTSC BE EF 03 06 00 FE 71 01 00 00 22 04 00<br />
PAL BE EF 03 06 00 6E 70 01 00 00 22 05 00<br />
Set SECAM BE EF 03 06 00 6E 75 01 00 00 22 09 00<br />
NTSC 4.43 BE EF 03 06 00 5E 72 01 00 00 22 02 00<br />
M-PAL BE EF 03 06 00 FE 74 01 00 00 22 08 00<br />
N-PAL BE EF 03 06 00 0E 71 01 00 00 22 07 00<br />
Get BE EF 03 06 00 0D 73 02 00 00 22 00 00<br />
Set<br />
1080i BE EF 03 06 00 F2 73 01 00 05 22 00 00<br />
1035i BE EF 03 06 00 62 72 01 00 05 22 01 00<br />
Get BE EF 03 06 00 C1 73 02 00 05 22 00 00<br />
9
Command data chart (continued)<br />
10<br />
Command data<br />
Names Operation type Header<br />
CRC Action Type Setting code<br />
off BE EF 03 06 00 CB D0 01 00 08 30 01 00<br />
Set<br />
Sync on G<br />
on BE EF 03 06 00 5B D1 01 00 08 30 00 00<br />
Get BE EF 03 06 00 68 D1 02 00 08 30 00 00<br />
off BE EF 03 06 00 FE 22 01 00 00 23 00 00<br />
PinP Size<br />
Set Large BE EF 03 06 00 6E 23 01 00 00 23 01 00<br />
Small BE EF 03 06 00 9E 23 01 00 00 23 02 00<br />
Get BE EF 03 06 00 CD 22 02 00 00 23 00 00<br />
Upper left BE EF 03 06 00 02 23 01 00 01 23 00 00<br />
Upper right BE EF 03 06 00 92 22 01 00 01 23 01 00<br />
Set<br />
PinP Position<br />
Bottom left BE EF 03 06 00 62 22 01 00 01 23 02 00<br />
Bottom right BE EF 03 06 00 F2 23 01 00 01 23 03 00<br />
Get BE EF 03 06 00 31 23 02 00 01 23 00 00<br />
RGB BE EF 03 06 00 BA 22 01 00 03 23 00 00<br />
Set<br />
PinP Audio ch<br />
Video BE EF 03 06 00 2A 23 01 00 03 23 01 00<br />
Get BE EF 03 06 00 89 22 02 00 03 23 00 00<br />
Video BE EF 03 06 00 D6 22 01 00 02 23 01 00<br />
Set<br />
PinP Input<br />
S-Video BE EF 03 06 00 26 22 01 00 02 23 02 00<br />
Get BE EF 03 06 00 75 23 02 00 02 23 00 00<br />
NORMAL BE EF 03 06 00 3B 23 01 00 00 33 00 00<br />
Set<br />
WHISPER<br />
WHISPER BE EF 03 06 00 AB 22 01 00 00 33 01 00<br />
Get BE EF 03 06 00 08 23 02 00 00 33 00 00<br />
NORMAL BE EF 03 06 00 C7 F0 01 00 A1 30 00 00<br />
GAMMA<br />
Set CINEMA BE EF 03 06 00 57 F1 01 00 A1 30 01 00<br />
DYNAMIC BE EF 03 06 00 A7 F1 01 00 A1 30 02 00<br />
Get BE EF 03 06 00 F4 F0 02 00 A1 30 00 00<br />
Large BE EF 03 06 00 C2 71 01 00 09 22 02 00<br />
Over Scan<br />
Set Middle BE EF 03 06 00 32 71 01 00 09 22 01 00<br />
Small BE EF 03 06 00 A2 70 01 00 09 22 00 00<br />
Get BE EF 03 06 00 91 70 02 00 09 22 00 00<br />
Full BE EF 03 06 00 43 D6 01 00 12 30 00 00<br />
Set<br />
MyScreen Size<br />
X1 BE EF 03 06 00 D3 D7 01 00 12 30 01 00<br />
Get BE EF 03 06 00 70 D6 02 00 12 30 00 00<br />
off BE EF 03 06 00 3B EF 01 00 C0 30 00 00<br />
Set<br />
MyScreen Lock<br />
on BE EF 03 06 00 AB EE 01 00 C0 30 01 00<br />
Get BE EF 03 06 00 08 EF 02 00 C0 30 00 00<br />
Lamp Time Get BE EF 03 06 00 C2 FF 02 00 90 10 00 00<br />
Filter Time Get BE EF 03 06 00 C2 F0 02 00 A0 10 00 00<br />
off BE EF 03 06 00 FF 32 01 00 00 26 00 00<br />
Set<br />
IR Remote Front<br />
on BE EF 03 06 00 6F 33 01 00 00 26 01 00<br />
Get BE EF 03 06 00 CC 32 02 00 00 26 00 00<br />
off BE EF 03 06 00 03 33 01 00 01 26 00 00<br />
Set<br />
IR Remote Rear<br />
on BE EF 03 06 00 93 32 01 00 01 26 01 00<br />
Get BE EF 03 06 00 30 33 02 00 01 26 00 00<br />
off BE EF 03 06 00 47 33 01 00 02 26 00 00<br />
Set<br />
IR Remote Top<br />
on BE EF 03 06 00 D7 32 01 00 02 26 01 00<br />
Get BE EF 03 06 00 74 33 02 00 02 26 00 00
<strong>Hitachi</strong> <strong>America</strong>, <strong>Ltd</strong>.<br />
Computer Division 2000 Sierra Point Parkway,<br />
MS760 Brisbane, CA 94005-1835<br />
Tel: +1-800-225-1741 Fax: +1-650-244-7776<br />
www.hitachi.com/lcd.<br />
<strong>Hitachi</strong> Canada, <strong>Ltd</strong>.<br />
6740 Campobello Road, Mississauga, Ontario<br />
L5N2L8, Canada<br />
Tel: +1-905-821-4545 Fax: +1-905-821-1101<br />
<strong>Hitachi</strong> Home Electronics (Europe), <strong>Ltd</strong>.<br />
Dukes Meadow, Millboard Road, Bourne End ,<br />
Buckinghamshire SL8 5XF UK<br />
Tel: +44-162-864-3000 Fax: +44-162-864-3400<br />
<strong>Hitachi</strong> Home Electronics Europe <strong>Ltd</strong><br />
426 Bergensesteenweg, 1500 Halle, Belgium<br />
Tel: +32-2-363-9901 Fax: +34-2-363-9900<br />
<strong>Hitachi</strong> Home Electronics Europe <strong>Ltd</strong><br />
Gewerbepark, Hintermattlistr, Postfach, 5506<br />
Magenwil, Switzerland<br />
Tel: +41-62-889-8011 Fax: +41-62-896-4771<br />
<strong>Hitachi</strong> Europe GmbH<br />
Business Systems Division<br />
Via T. Gulli. 39, 20147 Milano, Italy<br />
Tel: +39-2-487861 Fax: +39-2-48786322<br />
<strong>Hitachi</strong> Sales Europe GmbH<br />
Business Systems Division<br />
Am Seestern 18, 40547 Dusseldorf, Germany<br />
Tel: +49-211-529-1551 Fax: +49-211-529-1594<br />
<strong>Hitachi</strong> Business Systems (Nordic)<br />
Brugata 14, N-0184 Oslo, Norway<br />
Tel: +47-2205-9060 Fax: +47-2205-9061<br />
<strong>Hitachi</strong> Business Systems (Nordic)<br />
Domnarvsgatan 29, Lunda, Box 62, S-163 91<br />
Spanga, Sweden<br />
Tel: +46-8-621-8260 Fax: +46-8-761-6250<br />
<strong>Hitachi</strong> Business Systems (Nordic)<br />
Kuldyssen 13, DK-2630 Tåstrup, Denmark<br />
Tel: +45-43-99-9200 Fax: +45-43-99-9392<br />
<strong>Hitachi</strong> Business Systems (Nordic)<br />
Tapiolan Keskustorni 11 Krs. Fin-02100 Espoo,<br />
Finland<br />
Tel: +358-9-3487-1188 Fax: +358-9-455-2152<br />
<strong>Hitachi</strong> France<br />
Immeuble, 'Ariane', 18 Rue Grange Dame Rose,<br />
B.P. 134, 78148 Velizy, Cedex, France<br />
Tel: +33-1-34630542 Fax: +33-1-34650761<br />
<strong>Hitachi</strong> Sales Iberica S A<br />
Gran Via Carlos 111, 101, 1-1, 08028 Barcelona,<br />
Spain<br />
Tel: +34-3-330-8652 Fax: +34-3-339-7839<br />
<strong>Hitachi</strong> Home Electronics Asia, (S) Pte <strong>Ltd</strong>.<br />
16 Collyer Quay #20-00 <strong>Hitachi</strong> Tower Singapore<br />
049318, Singapore<br />
Tel: +65-536-2520 Fax: +65-536-2521<br />
<strong>Hitachi</strong> Sales (Malaysia) Sdn. Bhd.<br />
Wisma <strong>Hitachi</strong>, No.2, Lorong 13/6A, 46200<br />
Petaling<br />
Jaya, Selangor Darul Ehsan, Malaysia<br />
Tel: +60-3-7573455 Fax: +60-3-7556090<br />
<strong>Hitachi</strong> Sales (Thailand), <strong>Ltd</strong>.<br />
994,996 Soi Thonglor, Sukhumvit 55 Road,<br />
Klongton,<br />
Klongtoey, Bangkok 10110, Thailand<br />
Tel: +66-2-381-8381 Fax: +66-2-381-9520<br />
<strong>Hitachi</strong> (Hong Kong), <strong>Ltd</strong>.<br />
8th Floor Park-in Commercial Centre, No.56,<br />
Dundas<br />
Street, Kowloon Bay, Kowloon, Hong Kong<br />
Tel: +852-2-7804351 Fax: +852-2-7804915<br />
<strong>Hitachi</strong> Sales Corp. of Taiwan.<br />
2nd Floor, No.65, Nanking East Road, Section 3,<br />
Taipei, Taiwan<br />
Tel: +886-2-516-0500 Fax: +886-2-516-1501<br />
<strong>Hitachi</strong> Australia <strong>Ltd</strong>.<br />
13-15 Lyonpark Road, North Ryde NSW 2113,<br />
Australia<br />
Tel: +61-2-9888-4100 Fax: +61-2-9888-4144<br />
<strong>Hitachi</strong>, <strong>Ltd</strong>.<br />
15-12, Nishi Simbashi 2-chome, Minato-ku, Tokyo,<br />
105 Japan<br />
Tel: +81-3-3502-2111 Fax: +81-3-3506-1440<br />
*QR54481*<br />
Printed in Japan