Dicor Rubber/TPO Brite-Ply Retro-Fit Roofing Installation Guide
Dicor Rubber/TPO Brite-Ply Retro-Fit Roofing Installation Guide
Dicor Rubber/TPO Brite-Ply Retro-Fit Roofing Installation Guide

You also want an ePaper? Increase the reach of your titles
YUMPU automatically turns print PDFs into web optimized ePapers that Google loves.
NOTE: Butyl tape should also be used under the EPDM membrane where it<br />
comes in contact with the unit body at the front, rear, and side terminations. See<br />
all termination drawings for correct butyl placement.<br />
9. Using a utility knife “X” cut all roof openings. Make sure all openings are cut the<br />
same size as previous openings. Round all 90 degree cuts to eliminate<br />
“running cuts”. Surplus material should be stapled inside vent openings. Do<br />
not stretch the rubber membrane. Trim all excess material.<br />
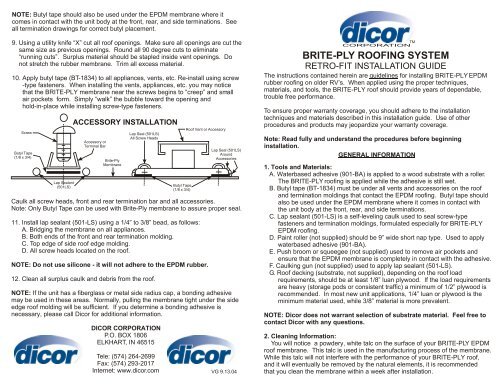
10. Apply butyl tape (BT-1834) to all appliances, vents, etc. Re-install using screw<br />
-type fasteners. When installing the vents, appliances, etc. you may notice<br />
that the BRITE-PLY membrane near the screws begins to “creep” and small<br />
air pockets form. Simply “walk” the bubble toward the opening and<br />
hold-in-place while installing screw-type fasteners.<br />
Screw<br />
Butyl Tape<br />
(1/8 x 3/4)<br />
Lap Sealant<br />
(501LS)<br />
ACCESSORY INSTALLATION<br />
Accessory or<br />
Terminal Bar<br />
<strong>Brite</strong>-<strong>Ply</strong><br />
Membrane<br />
Lap Seal (501LS)<br />
All Screw Heads<br />
Caulk all screw heads, front and rear termination bar and all accessories.<br />
Note: Only Butyl Tape can be used with <strong>Brite</strong>-<strong>Ply</strong> membrane to assure proper seal.<br />
11. Install lap sealant (501-LS) using a 1/4” to 3/8” bead, as follows:<br />
A. Bridging the membrane on all appliances.<br />
B. Both ends of the front and rear termination molding.<br />
C. Top edge of side roof edge molding.<br />
D. All screw heads located on the roof.<br />
NOTE: Do not use silicone - it will not adhere to the EPDM rubber.<br />
12. Clean all surplus caulk and debris from the roof.<br />
NOTE: If the unit has a fiberglass or metal side radius cap, a bonding adhesive<br />
may be used in these areas. Normally, pulling the membrane tight under the side<br />
edge roof molding will be sufficient. If you determine a bonding adhesive is<br />
necessary, please call <strong>Dicor</strong> for additional information.<br />
DICOR CORPORATION<br />
P.O. BOX 1806<br />
ELKHART, IN 46515<br />
Butyl Tape<br />
(1/8 x 3/4)<br />
Roof Vent or Accessory<br />
Lap Seal (501LS)<br />
Around<br />
Accessories<br />
Tele: (574) 264-2699<br />
Fax: (574) 293-2017<br />
Internet: www.dicor.com VG 9.13.04<br />
CORPORATION TM<br />
BRITE-PLY ROOFING SYSTEM<br />
RETRO-FIT INSTALLATION GUIDE<br />
The instructions contained herein are guidelines for installing BRITE-PLY EPDM<br />
rubber roofing on older RV’s. When applied using the proper techniques,<br />
materials, and tools, the BRITE-PLY roof should provide years of dependable,<br />
trouble free performance.<br />
To ensure proper warranty coverage, you should adhere to the installation<br />
techniques and materials described in this installation guide. Use of other<br />
procedures and products may jeopardize your warranty coverage.<br />
Note: Read fully and understand the procedures before beginning<br />
installation.<br />
GENERAL INFORMATION<br />
1. Tools and Materials:<br />
A. Waterbased adhesive (901-BA) is applied to a wood substrate with a roller.<br />
The BRITE-PLY roofing is applied while the adhesive is still wet.<br />
B. Butyl tape (BT-1834) must be under all vents and accessories on the roof<br />
and termination moldings that contact the EPDM roofing. Butyl tape should<br />
also be used under the EPDM membrane where it comes in contact with<br />
the unit body at the front, rear, and side terminations.<br />
C. Lap sealant (501-LS) is a self-leveling caulk used to seal screw-type<br />
fasteners and termination moldings, formulated especially for BRITE-PLY<br />
EPDM roofing.<br />
D. Paint roller (not supplied) should be 9” wide short nap type. Used to apply<br />
waterbased adhesive (901-BA).<br />
E. Push broom or squeegee (not supplied) used to remove air pockets and<br />
ensure that the EPDM membrane is completely in contact with the adhesive.<br />
F. Caulking gun (not supplied) used to apply lap sealant (501-LS).<br />
G. Roof decking (substrate, not supplied), depending on the roof load<br />
requirements, should be at least 1/8” luan plywood. If the load requirements<br />
are heavy (storage pods or consistent traffic) a minimum of 1/2” plywood is<br />
recommended. In most new unit applications, 1/4” luan or plywood is the<br />
minimum material used, while 3/8” material is more prevalent.<br />
NOTE: <strong>Dicor</strong> does not warrant selection of substrate material. Feel free to<br />
contact <strong>Dicor</strong> with any questions.<br />
2. Cleaning Information:<br />
You will notice a powdery, white talc on the surface of your BRITE-PLY EPDM<br />
roof membrane. This talc is used in the manufacturing process of the membrane.<br />
While this talc will not interfere with the performance of your BRITE-PLY roof,<br />
and it will eventually be removed by the natural elements, it is recommended<br />
that you clean the membrane within a week after installation.
BRITE-PLY EPDM roofing can be cleaned with <strong>Dicor</strong> <strong>Rubber</strong> Roof Cleaner. For<br />
stubborn stains, products containing mineral spirits are recommended. Do not<br />
use Acetone or Citrus Cleaners. Do not let any cleaning solvent come in<br />
contact with the membrane for extended periods of time.<br />
Because dust and dirt may collect on the roof, regular cleaning with <strong>Dicor</strong>’s<br />
RP-RC160C or RP-RC320S <strong>Rubber</strong> Roof Cleaner is recommended. Do not park<br />
vehicle for extended periods where roof will be exposed to tree sap or fruit as<br />
staining may result.<br />
A soft bristle brush may be used during cleaning.<br />
PREPARATION<br />
1. Remove all appliances, vents, moldings, etc. that may inhibit the current roofing<br />
material from being removed.<br />
2. Evaluate the old roof. BRITE-PLY roofing must have a sturdy foundation.<br />
Determine if the entire roof should be removed, or if the addition of decking<br />
(substrate) will be sufficient. Remember that the substrate must be securely<br />
fastened on all edges and seams.<br />
3. Either remove the old roof or apply the substrate over the old roof, if removal<br />
will create structural damage.<br />
4. When applying the substrate, make sure it extends to the edges of the roof.<br />
Also, make sure all seams are tight and as level as possible. The substrate<br />
should be applied using screw-type fasteners with screw heads level or slightly<br />
below the surface of the substrate. All substrate seams should be on a rafter<br />
for necessary support and to reduce the possibility of “seam separation”. If<br />
seams are wider than 1/16” you may want to bridge seams with <strong>Dicor</strong> Fleece<br />
Tape 511FT. Additionally, if on the roof edge, the membrane will be going<br />
over a sharp edge, you should either bevel the edge of the substrate with a<br />
sander or place the <strong>Dicor</strong> Fleece Tape 511FT over the edge to protect the<br />
membrane from the edge.<br />
5. Route-out or cut all vent and appliance openings.<br />
6. Broom or blow-off of substrate all foreign materials and check entire roof for<br />
exposed screw heads or sharp objects that may prematurely wear the BRITE-<br />
PLY roof.<br />
INSTALLATION<br />
1. Locate the ends (front and rear) where the BRITE-PLY roof will be terminated.<br />
Use a chalk-line to mark these areas. Make sure there is sufficient roof<br />
structure to fasten to.<br />
2. Cover the roof with the BRITE-PLY membrane making sure there is sufficient<br />
length at both the front and rear termination points. Fold membrane in-half,<br />
exposing the roof areas.<br />
4. Fold the membrane the opposite direction and repeat step #3.<br />
5. With the membrane in place, adjust to make sure there is sufficient length at<br />
both termination points and on both sides of the vehicle. Remove wrinkles by<br />
lifting and pulling the membrane. Do not stretch the rubber membrane.<br />
6. Lightly squeegee or broom to eliminate air pockets, making sure the membrane<br />
is completely in contact with the adhesive.<br />
7. Apply butyl tape (BT-1834) to the side of the roof edge molding. While holding<br />
the molding, draw surplus material tight with a downward pull. (You may staple<br />
the membrane in-place spacing 1/2” staples 3-5” apart to keep proper tension.)<br />
For best results, install this molding from the center of the vehicle toward the<br />
ends. When complete, use a utility knife to cut surplus material from below the<br />
molding. Repeat on opposite side.<br />
NOTE: It may helpful to strike a chalk line to assist in keeping the side-body<br />
molding straight and in proper position.<br />
SIDE WALL<br />
TERMINATION<br />
Termination<br />
Bar<br />
Butyl Tape<br />
(1/8 x 3/4)<br />
Fastener<br />
Lap Sealant<br />
(501LS)<br />
Radius Cap<br />
Exterior Skin<br />
<strong>Brite</strong>-<strong>Ply</strong> Membrane<br />
Fastener<br />
Termination Bar<br />
Butyl Tape<br />
(1/8 x 3/4)<br />
Radius Corner With<br />
<strong>Brite</strong>-<strong>Ply</strong> Membrane<br />
Lap Sealant (501LS)<br />
<strong>Brite</strong>-<strong>Ply</strong> Membrane<br />
Radius Corner With<br />
Exposed Cap<br />
Adhesive (901BA)<br />
Decking<br />
Fastener<br />
Adhesive (901BA)<br />
Decking<br />
Termination<br />
Bar<br />
Butyl Tape<br />
(1/8 x 3/4)<br />
Lap Sealant<br />
(501LS)<br />
Metal Must Be<br />
Below Roof Line<br />
<strong>Brite</strong>-<strong>Ply</strong> Membrane<br />
Adhesive (901BA)<br />
Decking<br />
Square Corner With<br />
<strong>Brite</strong>-<strong>Ply</strong> Membrane<br />
8. Apply butyl tape (BT-1834) to the termination molding. On the front, the front<br />
cap should lay on top of the membrane. Using a screw-type fastener, install the<br />
termination moldings - making sure there is sufficient roof structure. On the<br />
rear of the vehicle, the membrane should lay on top of the rear cap.<br />
FRONT AND REAR TERMINATION<br />
Fastener<br />
Termination<br />
Bar<br />
Butyl Tape<br />
(1/8 x 3/4)<br />
Lap Sealant<br />
(501LS)<br />
Butyl Tape<br />
(1/8 x 3/4)<br />
<strong>Brite</strong>-<strong>Ply</strong> Membrane<br />
Fastener<br />
Termination<br />
Bar<br />
Butyl Tape<br />
(1/8 x 3/4)<br />
Lap Sealant<br />
(501LS)<br />
Butyl Tape<br />
(1/8 x 3/4)<br />
3. Open the waterbased adhesive (901-BA) and stir thoroughly. Using a 9” wide<br />
short nap paint roller, apply adhesive to the substrate at a rate of 160 sq. ft. per<br />
gallon. The membrane is to be mated with the adhesive as quickly as possible.<br />
Metal or<br />
Fiberglass<br />
Wrap<br />
Decking<br />
Front Termination<br />
Adhesive (901BA)<br />
Decking<br />
Rear Termination<br />
Metal or<br />
Fiberglass<br />
Wrap