vaal main brochure - Tiles2Taps
vaal main brochure - Tiles2Taps
vaal main brochure - Tiles2Taps

You also want an ePaper? Increase the reach of your titles
YUMPU automatically turns print PDFs into web optimized ePapers that Google loves.
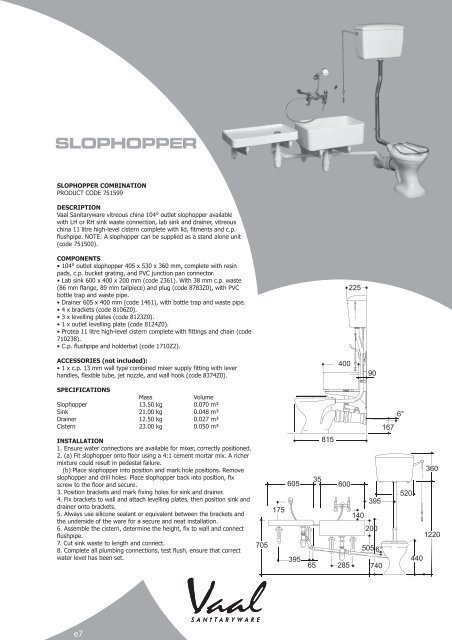
SLOPHOPPER<br />
SLOPHOPPER COMBINATION<br />
PRODUCT CODE 751599<br />
DESCRIPTION<br />
Vaal Sanitaryware vitreous china 104° outlet slophopper available<br />
with LH or RH sink waste connection, lab sink and drainer, vitreous<br />
china 11 litre high-level cistern complete with lid, fitments and c.p.<br />
flushpipe. NOTE: A slophopper can be supplied as a stand alone unit<br />
(code 751500).<br />
COMPONENTS<br />
• 104° outlet slophopper 405 x 530 x 360 mm, complete with resin<br />
pads, c.p. bucket grating, and PVC junction pan connector.<br />
• Lab sink 600 x 400 x 200 mm (code 2361). With 38 mm c.p. waste<br />
(86 mm flange, 89 mm tailpiece) and plug (code 8783Z0), with PVC<br />
bottle trap and waste pipe.<br />
• Drainer 605 x 400 mm (code 1461), with bottle trap and waste pipe.<br />
• 4 x brackets (code 8106Z0).<br />
• 3 x levelling plates (code 8123Z0).<br />
• 1 x outlet levelling plate (code 8124Z0).<br />
• Protea 11 litre high-level cistern complete with fittings and chain (code<br />
710238).<br />
• C.p. flushpipe and holderbat (code 1710Z2).<br />
ACCESSORIES (not included):<br />
• 1 x c.p. 13 mm wall type combined mixer supply fitting with lever<br />
handles, flexible tube, jet nozzle, and wall hook (code 8374Z0).<br />
400<br />
225<br />
90<br />
SPECIFICATIONS<br />
Mass<br />
Volume<br />
Slophopper 13.50 kg 0.070 m³<br />
Sink 21.00 kg 0.048 m³<br />
Drainer 12.50 kg 0.027 m³<br />
Cistern 23.00 kg 0.050 m³<br />
INSTALLATION<br />
1. Ensure water connections are available for mixer, correctly positioned.<br />
2. (a) Fit slophopper onto floor using a 4:1 cement mortar mix. A richer<br />
mixture could result in pedestal failure.<br />
(b) Place slophopper into position and mark hole positions. Remove<br />
slophopper and drill holes. Place slophopper back into position, fix<br />
screw to the floor and secure.<br />
3. Position brackets and mark fixing holes for sink and drainer.<br />
4. Fix brackets to wall and attach levelling plates, then position sink and<br />
drainer onto brackets.<br />
5. Always use silicone sealant or equivalent between the brackets and<br />
the underside of the ware for a secure and neat installation.<br />
6. Assemble the cistern, determine the height, fix to wall and connect<br />
flushpipe.<br />
7. Cut sink waste to length and connect.<br />
8. Complete all plumbing connections, test flush, ensure that correct<br />
water level has been set.<br />
705<br />
65 285<br />
6°<br />
167<br />
815<br />
360<br />
605<br />
35<br />
600<br />
520<br />
395<br />
175<br />
140<br />
395<br />
200<br />
505 6°<br />
440<br />
740<br />
1220<br />
e7