Home Controller HC-1000 V3 Installation Guide
Home Controller HC-1000 V3 Installation Guide
Home Controller HC-1000 V3 Installation Guide

You also want an ePaper? Increase the reach of your titles
YUMPU automatically turns print PDFs into web optimized ePapers that Google loves.
WARNING! To reduce the risk of electrical shock, do not expose this apparatus<br />
to rain or moisture.<br />
<strong>Home</strong> <strong>Controller</strong><br />
<strong>HC</strong>-<strong>1000</strong> <strong>V3</strong><br />
<strong>Installation</strong> <strong>Guide</strong><br />
AVERTISSEMENT! Pour réduire le risque de choc électrique, n’exposez pas cet<br />
appareil à la pluie ou à l’humidité.<br />
WARNUNG! Um das Risiko des elektrischen Schlages zu verringern, setzen Sie<br />
diesen Apparat nicht Regen oder Feuchtigkeit aus.<br />
WARNING! This CLASS I apparatus must be connected to an AC mains socket<br />
outlet that has a protective earthing connection (i.e., third-prong ground conductor).<br />
DO NOT DEFEAT THE PROTECTIVE EARTHING CONNECTION!<br />
Control4 Supported Devices<br />
The <strong>HC</strong>-<strong>1000</strong> <strong>V3</strong> enhances existing system capabilities. It replaces the Primary <strong>Controller</strong>,<br />
running Director and Media Manager. You must have a Secondary <strong>Controller</strong>, such as a<br />
<strong>Home</strong> <strong>Controller</strong> <strong>HC</strong>-200 or <strong>HC</strong>-300 to communicate with lighting and other ZigBee devices.<br />
The <strong>HC</strong>-<strong>1000</strong> <strong>V3</strong> enhances a system’s capability to control the following Control4® devices:<br />
Supported Model<br />
C4-<strong>HC</strong><strong>1000</strong><strong>V3</strong>-E-B <strong>Home</strong> <strong>Controller</strong> <strong>HC</strong>-<strong>1000</strong> <strong>V3</strong><br />
Introduction<br />
The Control4® <strong>Home</strong> <strong>Controller</strong> <strong>HC</strong>-<strong>1000</strong> provides the capability for controlling lights, home<br />
theaters, distributed audio systems, and other devices.<br />
It provides extensive Media Management services for audio sources, such as CDs and<br />
DVDs stored in connected devices and lets you use an external storage device for media<br />
storage. It also includes multi-zone audio capabilities, distributing digital music to rooms<br />
throughout the home when used with additional home controllers.<br />
What’s in the Box<br />
The following are included in your <strong>Home</strong> <strong>Controller</strong> box:<br />
• <strong>Home</strong> <strong>Controller</strong> <strong>HC</strong>-<strong>1000</strong> <strong>V3</strong><br />
• IEC 320 power cord<br />
• Rack mount ears<br />
• <strong>Home</strong> <strong>Controller</strong> <strong>HC</strong>-<strong>1000</strong> <strong>Installation</strong> <strong>Guide</strong> (this document). Note: You can find this<br />
and other related documents online also at the Dealer portal: http://www.control4.com/<br />
dealer/products/documentation/.<br />
Important Safety Instructions<br />
1. Read and keep these instructions.<br />
2. Heed all warnings and follow all instructions for this product in this and other Control4®<br />
documents included with or related to this product.<br />
3. Improper use of this product may result in potential electric shock.<br />
4. Do not use this product near water.<br />
5. Never spill liquid of any kind on this product.<br />
6. Clean this product only with a damp or dry cloth. Do not use liquid cleaners or aerosol<br />
cleaners to clean the product.<br />
7. Install this product according to the manufacturer’s instructions.<br />
8. Install this product according to the National Electrical Code ANSI/NFPA 70 and the<br />
prevailing local codes and requirements.<br />
9. This product should be operated with the type of power indicated on the marked label.<br />
If you are not sure of the type of power available, consult your Control4 dealer or local<br />
power company.<br />
10. Slots and openings on a cabinet rack, and components used with this product are provided<br />
for ventilation, reliable operation, and protection from overheating of the product.<br />
These slots and openings must not be blocked or covered.<br />
11. This product should never be placed near or over a radiator or heat register, or in a<br />
built-in installation unless proper ventilation is provided.<br />
12. Never push objects of any kind into this product through cabinet slots because they<br />
may touch dangerous voltage points or short out parts that could result in a fire or<br />
electric shock.<br />
13. Only use the attachments and accessories included with this product or recommended<br />
by Control4.<br />
14. Do not allow anything to rest on the power cord. Do not install or place this product<br />
where people will walk on the cord.<br />
15. Do not use extension cords with any products in a Control4 system.<br />
16. If applicable, unplug this product during lightning storms or when unused for long<br />
periods of time.<br />
17. Do not exceed the maximum wire size (if specified) in this guide.<br />
18. This product must be installed by qualified professionals only.<br />
19. Do not attempt to service this product yourself except as noted in this guide. Opening<br />
or removing covers of internal components may expose you to dangerous voltage<br />
points or other risks.<br />
20. Refer all servicing to qualified service personnel. Servicing is required when the apparatus<br />
has been damaged or frayed in any way; for example, a power-supply cord or<br />
plug is damaged, liquid has been spilled or objects have fallen into this product, this<br />
product has been exposed to rain or moisture, this product does not operate normally,<br />
or this product has been dropped.<br />
• Touch Screens—All types and sizes (such as portable, tabletop, and in-wall, or 10”, 7”,<br />
and 5”)<br />
• LCD Keypads<br />
• Wireless 2, 3, & 6 Button Keypads<br />
• Wireless Thermostats<br />
• Speaker Points®<br />
• Audio Matrix Switch<br />
• Multi Channel Amplifiers<br />
• 4-Zone Amplifiers<br />
• Multi Tuners (V1 or V2)<br />
• Wireless Dimmers<br />
• Wireless Switches<br />
• Wireless Outlet Dimmers<br />
• Wireless Outlet Switches<br />
• Third-party devices<br />
For a more information, see the Products pages at http://www.control4.com.<br />
Requirements and Specifications<br />
Prior to installing this product, ensure that: Ethernet network wiring is in place.<br />
The <strong>Home</strong> <strong>Controller</strong> <strong>HC</strong>-<strong>1000</strong> <strong>V3</strong> specifications include:<br />
Model Number<br />
Media Recognition<br />
Display<br />
Power Requirements<br />
C4-<strong>HC</strong><strong>1000</strong><strong>V3</strong>-E-B<br />
Online CD/DVD recognition and media information<br />
service<br />
LED indicators<br />
100-240 VAC, 60/50 Hz, 0.7 A MAX<br />
Dimensions H x W x D: 3 3/8” x 16.75” x 14”<br />
Weight<br />
Shipping Weight<br />
Additional Resources<br />
15.4 pounds<br />
20 pounds<br />
The following resources are available to provide you with additional support.<br />
• Your Control4 Reseller<br />
• Control4 Web Site: http://www.control4.com<br />
• Composer documentation in online help or PDF format<br />
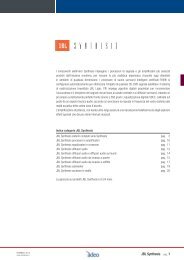
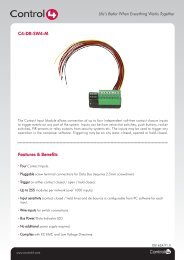
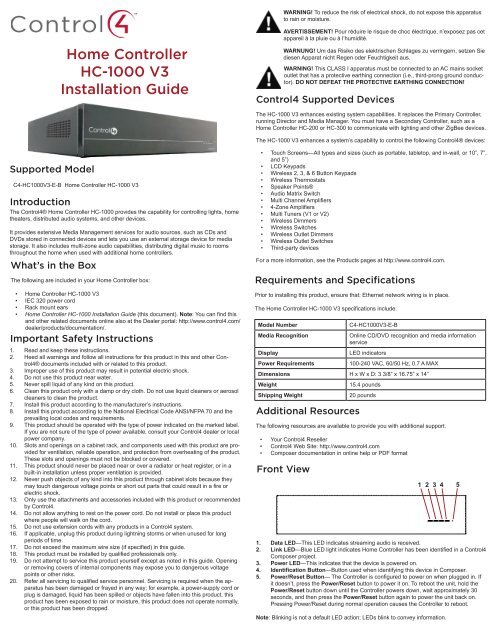
Front View<br />
1 2 3 4 5<br />
1. Data LED—This LED indicates streaming audio is received.<br />
2. Link LED—Blue LED light indicates <strong>Home</strong> <strong>Controller</strong> has been identified in a Control4<br />
Composer project.<br />
3. Power LED—This indicates that the device is powered on.<br />
4. Identification Button—Button used when identifying this device in Composer.<br />
5. Power/Reset Button— The <strong>Controller</strong> is configured to power on when plugged in. If<br />
it doesn’t, press the Power/Reset button to power it on. To reboot the unit, hold the<br />
Power/Reset button down until the <strong>Controller</strong> powers down, wait approximately 30<br />
seconds, and then press the Power/Reset button again to power the unit back on.<br />
Pressing Power/Reset during normal operation causes the <strong>Controller</strong> to reboot.<br />
Note: Blinking is not a default LED action; LEDs blink to convey information.
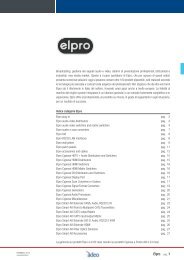
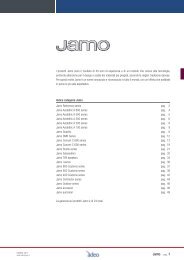
Back View<br />
1 2<br />
FCC/Industry Canada<br />
This device complies with Part 15 of the FCC Rules Sub-Part A and B and with Canada<br />
ICES-003 and RSS-Gen. Operation is subject to the following two conditions: (1) this device<br />
may not cause harmful interference, and (2) this device must accept any interference<br />
received, including interference that may cause undesired operation.<br />
1. Power plug port—AC power receptacle for an IEC 320 power cord.<br />
2. Ethernet—RJ-45 jack for a 10/100 BaseT Ethernet connection.<br />
3. USB (4 ports)—For external storage device with USB support (such as FAT32 formatted<br />
devices).<br />
4. Power Switch— Controls power to the device. During normal operation, this switch<br />
should be on.<br />
Install the System<br />
To install this <strong>Controller</strong>:<br />
1. Ensure that your home network is in place before starting your system setup: The<br />
<strong>Home</strong> <strong>Controller</strong> <strong>HC</strong>-<strong>1000</strong> <strong>V3</strong> requires a network connection to use all features as designed.<br />
When connected, the <strong>Home</strong> <strong>Controller</strong> can access web-based media databases<br />
and Control4® system updates and communicate with other IP devices.<br />
2.<br />
3.<br />
4.<br />
5.<br />
4<br />
Connect the <strong>HC</strong>-<strong>1000</strong> controller to the network: To connect using an Ethernet connection,<br />
plug the data cable from the home network into the <strong>Home</strong> <strong>Controller</strong> RJ-45 port<br />
(labeled “Ethernet”).<br />
Power up the controller: Plug the <strong>HC</strong>-<strong>1000</strong> power cord (provided) into the <strong>Home</strong><br />
<strong>Controller</strong> power plug port and an electrical outlet.<br />
Connect the system devices: As described in the “Connect Devices” section that<br />
follows.<br />
Optional: Set up external storage devices as described in “Set up External Storage<br />
Device.”<br />
Connect Devices<br />
Note: You can use the Composer software to step through the connection process before or<br />
after the physical connections are completed.<br />
Connect all applicable devices to the <strong>Home</strong> <strong>Controller</strong> <strong>HC</strong>-<strong>1000</strong> <strong>V3</strong> using one of the connection<br />
options described in the following table.<br />
Table 1. Connections Options<br />
3<br />
This equipment has been tested and found to comply with the limits for a Class B digital<br />
device, pursuant to Part 15 of the FCC Rules. These limits are designed to provide reasonable<br />
protection against harmful interference in a residential installation. This equipment<br />
generates, uses, and can radiate radio frequency energy and, if not installed and used in<br />
accordance with the instructions, may cause harmful interference to radio communications.<br />
However, there is no guarantee that interference will not occur in a particular installation. If<br />
this equipment does cause harmful interference to radio or television reception, which can<br />
be determined by turning the equipment off and on, the user is encouraged to try to correct<br />
the interference by one or more of the following measures:<br />
• Reorient or relocate the receiving antenna.<br />
• Increase the separation between the equipment and receiver.<br />
• Connect the equipment into an outlet on a circuit different from that to which the<br />
receiver is connected.<br />
• Consult the dealer or an experienced radio/TV technician for help.<br />
Australian/New Zealand Compliance<br />
• AS/NZS CISPR 22:2006.<br />
Recycling<br />
For information on recycling, please go to www.control4.com/recycling.<br />
Limited Warranty<br />
For complete warranty information, including details on consumer legal rights as well as<br />
warranty exclusions, visit www.control4.com/warranty.<br />
About this Document<br />
Copyright ©2011 Control4. Control4, the Control4 logo, the Control4 iQ logo and the Control4<br />
certified logo are registered trademarks or trademarks of Control4 Corporation in the<br />
United States and/or other countries. All other names or brands may be claimed as property<br />
by their respective owners. Pricing and specifications are subject to change without notice.<br />
Part Number: 200-00144 Rev C 4/20/2011<br />
Power plug port—For use with the IEC 320 power connector (provided).<br />
Ethernet—RJ-45 for a 10/100 BaseT Ethernet connection.<br />
USB (1 port)—For external storage device with USB support (such as FAT32<br />
formatted devices). See “Set up External Storage Device” for information.<br />
Note: The <strong>Home</strong> <strong>Controller</strong> <strong>HC</strong>-<strong>1000</strong> <strong>V3</strong> has no Audio Out ports. Use the Ethernet connection<br />
to perform audio streaming to Control4 audio end point devices configured in the<br />
system.<br />
Set Up External Storage Device<br />
You can store and access media from an external storage device, such as a network hard<br />
drive or USB memory device. Simply configure a NAS device in Composer, or plug the<br />
USB drive into one of the USB ports and configure or scan the media from Composer. See<br />
“Use External Storage Devices” or “Using External Storage Devices” in the Composer Pro<br />
documentation.<br />
Troubleshooting<br />
• To reboot the device, press and hold the Identify button. When both LEDs illuminate<br />
momentarily, the device is reset.<br />
• To reboot and reset to the factory defaults, press and hold the Identify button when<br />
the device is powered up until all of the LEDs illuminate.<br />
• Pressing Power/Reset during normal operation causes the <strong>Controller</strong> to reboot.<br />
Regulatory Compliance<br />
IMPORTANT! Any changes or modifications not expressly approved by the<br />
party responsible for compliance could void the user’s authority to operate this<br />
equipment.<br />
IMPORTANT! Tous les changements ou modifications pas expressément<br />
approuvés par la partie responsable de la conformité ont pu vider l’autorité de<br />
l’utilisateur pour actionner cet équipement.