
Create successful ePaper yourself
Turn your PDF publications into a flip-book with our unique Google optimized e-Paper software.
PRODUCT REFERENCE GUIDE<br />
<strong>SNAP</strong><br />
<strong>DUO</strong><br />
Stroller<br />
© Copyright<br />
VE 2012<br />
vs270412<br />
FURTHER INFORMATION:<br />
In North America only<br />
www.valcobaby.com<br />
1800 610 7850<br />
Find us on:
<strong>SNAP</strong><br />
<strong>DUO</strong><br />
Stroller<br />
Thank you for purchasing a quality<br />
VALCO BABY product.<br />
Please read and follow the instructions<br />
outlined in this guide carefully. Familiarise<br />
yourself with the construction and safety<br />
features; be sure that you understand all<br />
the warnings and safety<br />
guidelines before use.<br />
Important: Please read the<br />
following instructions carefully<br />
before assembling this product.<br />
Retain this guide in a safe place<br />
for future reference.<br />
DISCLAIMER<br />
Due to our policy of continuous product development,<br />
this product is constantly evolving. It is possible that<br />
some features or procedures outlined here have<br />
changed since this document was written. If you are<br />
unsure of any procedure shown here, please contact<br />
us via the web at info@valcobaby.com to obtain the<br />
most up to date information before use. Include the<br />
batch number and model number, which can be found<br />
on a sticker on the frame.<br />
All pictures and diagrams herein are provided for illustration<br />
purposes only. Actual product, colour or fabric may vary.<br />
VALCO BABY reserves the right to modify or alter any<br />
specification or colour without notice or obligation to<br />
modify any product previously purchased
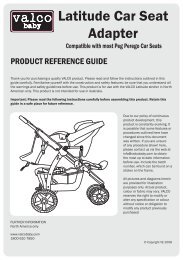
1>PARTS LIST<br />
A<br />
REAR<br />
WHEELS x 2<br />
C<br />
BUMPER<br />
BARS x 2<br />
B<br />
FRONT DUAL<br />
WHEELS X 2<br />
D<br />
STROLLER<br />
FRAME,<br />
SEATS &<br />
HOOD UNIT<br />
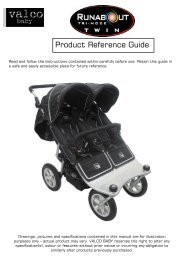
2>TO OPEN<br />
a<br />
3>REAR WHEELS<br />
b<br />
4>FRONT WHEELS<br />
c<br />
e<br />
d<br />
f
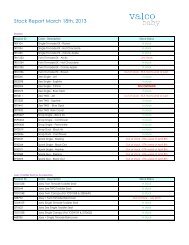
5>TO FOLD<br />
h<br />
i<br />
j<br />
g<br />
6>BUMPER BARS<br />
k<br />
7>SEAT RECLINE<br />
l<br />
m<br />
SQUEEZE<br />
PULL
8>HARNESS<br />
o<br />
p<br />
CLICK<br />
n<br />
q<br />
PRESS<br />
DOWN<br />
r<br />
HOLD<br />
DOWN<br />
s<br />
RELEASE<br />
HOLD<br />
PUSH<br />
9>HOODS<br />
t<br />
CLICK<br />
u
INSTRUCTIONS<br />
1>PARTS LIST<br />
Stroller frame with hood attached, 2x rear<br />
wheels, 1x front dual swivel wheel, 1x<br />
bumper bar.<br />
2>TO OPEN<br />
Release the frame lock (a) by pulling it clear<br />
of the locking pin.<br />
Lift the handle in one continuous motion while<br />
allowing the legs to simultaneously open.<br />
Continue until the frame locks fully open.<br />
IMPORTANT WARNING: ALWAYS TEST<br />
THAT ALL LATCHES ARE SECURELY<br />
ENGAGED BEFORE USE.<br />
3>REAR WHEELS<br />
While depressing the button (b) at the rear<br />
axle junction, insert the rear wheel axle into<br />
the rear axle tube of the stroller. Push the<br />
axle into the tube as far as it will go before<br />
releasing the button.<br />
Repeat for other wheel.<br />
To release your wheel, press button (b) and<br />
pull from axle tube.<br />
IMPORTANT: Test that each wheel<br />
has FULLY engaged in the frame<br />
tube before use by pulling on it.<br />
To use the rear brakes:<br />
Press down on the right side of the red<br />
brake lever located on the rear axle to<br />
simultaneously engage the brake in both<br />
rear wheels.<br />
To release, press down on the left side of the<br />
red brack lever with your foot.<br />
IMPORTANT WARNING: ALWAYS TEST<br />
THAT THE BRAKES ARE SECURELY<br />
DISENGAGED BEFORE USE.<br />
4>FRONT WHEELS<br />
Align the front wheel centre channel (c)<br />
beneath the housing on the front leg of the<br />
stroller. Be sure that the swivel lock tab (d) is<br />
at the top of the channel. Lift the front wheel<br />
so that the housing engages securely in the<br />
channel. Repeat for other wheel.<br />
IMPORTANT: ALWAYS TEST THAT THE<br />
WHEEL HAS SECURELY ENGAGED IN THE<br />
CHANNEL BEFORE USE. IF THERE IS ANY<br />
ISSUE, CHECK THAT THE CHANNEL IS<br />
ENGAGED THE CORRECT WAY UP.<br />
To fix the front wheels in the non-swivel<br />
position: Turn the wheel so that the notch at<br />
the front of the wheel channel (e) lines up<br />
with the one in the top plastic housing (f).<br />
Press down firmly on the tab until it locks<br />
into place.<br />
5>TO FOLD<br />
Press down on the secondary lock button<br />
(g) - it will stay down. Squeeze the fold<br />
button in the handle (h), moving the handle<br />
forward slightly.<br />
Grasp the folding handle (i) allowing the<br />
handle to move all the way forward till the<br />
frame automatically locks shut (j).<br />
Your <strong>SNAP</strong> stroller can stand unaided for<br />
easy storage.<br />
HINT: WHILE NOT NECESSARY FOR<br />
FOLDING, MOVING THE SEAT BACK<br />
FIRST TO THE MOST UPRIGHT POSITION<br />
AND FORWARD THROUGH THE FRAME<br />
WILL MAKE FOR THE MOST SIMPLE AND<br />
COMPACT FOLDING.<br />
6>BUMPER BAR<br />
Insert each side of the bumper bar fitting into<br />
the corresponding housing in the seat frame<br />
until you hear it click into place. Repeat for<br />
other bumper bar.<br />
The bumper bar can be opened as a “gate”<br />
for easy access pressing on one of the<br />
release buttons (k) and lifting the side out<br />
of the housing. For full removal, repeat this<br />
process for the other side.<br />
7>SEAT RECLINE<br />
To recline: While squeezing the seat adjuster<br />
tabs (l) together in a pincer like movement,<br />
ease the seat down to the desired<br />
position. Release the tabs and the seat will<br />
automatically lock in that position<br />
To incline: Place your hand in the centre of<br />
the seat at the rear.
Pull the incline strap (m) while gently pushing<br />
the seat upward to the desired position.<br />
8>HARNESS<br />
To secure your child in the harness:<br />
Overlap buckles and so that they fit together<br />
to form one complete buckle (n).<br />
Insert the completed buckle into the Buckle<br />
Housing (o) until it engages securely in<br />
place(p).<br />
To open your harness:<br />
Push down on both Buckle Prongs (q).<br />
Simultaneously press the release button in<br />
the centre of the buckle (r).<br />
Lift the buckles from the Buckle Housing (s).<br />
IMPORTANT WARNING:<br />
avoid serious injury from falling<br />
or sliding out. always use seat belt.<br />
9>HOOD<br />
Your <strong>SNAP</strong> hood is designed to provide<br />
maximum shade and comfort for your child<br />
by incorporating the pop out sun cap (t).<br />
Additional ventilation can be achieved by<br />
rolling up the rear of the hood like a blind<br />
and securing in the open position with the<br />
toggle (u).
WARNING: To avoid injury or death<br />
• always apply the brakes whenever the pram/stroller is stationary<br />
• DO NOT LEAVE CHILDREN UNATTENDED.<br />
• DO NOT CARRY EXTRA CHILDREN OR BAGS ON THIS PRAM/STROLLER.<br />
• MAKE SURE CHILDREN ARE CLEAR OF ANY MOVING PARTS IF YOU ADJUST THE PRAM/STROLLER.<br />
OTHERWISE THEY MAY BE INJURED.<br />
! warning: use this harness at all times.<br />
! warning: when not in use disconnect shoulder straps from the waist strap and/or<br />
buckle.<br />
• FOLLOW THE MANUFACTURER’S INSTRUCTIONS.<br />
Remember, your child’s safety is your responsibility...<br />
• NEVER USE ON stairs or ESCALATORS.<br />
• Always use the tether strap when the stroller is in use.<br />
• THE CORRECT USE AND MAINTENANCE OF THIS VEHICLE ARE ESSENTIAL.<br />
• Be sure that all clamps and buckles are securely fixed and in place before use<br />
! ALWAYS use the harness, correctly fitted and adjusted, with your child in this seat.<br />
• The maximum weight of each child for which this stroller was intended is 20kgs (44lbs).<br />
• The maximum height of each child for which this stroller was intended is 90cm (35inches).<br />
• the stroller will become unstable if the manufacturer’s recommended load is exceeded.<br />
• care must be taken when folding and unfolding the product to prevent finger<br />
entrapment.<br />
• Can be used from a newborn baby onwards. A cocoon, specially designed to be used<br />
with a stroller, is recommended when any fully reclining stroller is used with a<br />
newborn.<br />
• Never run with a newborn baby in any pram or stroller until the child can sit up<br />
unassisted (approximately 6 months).<br />
• CHECK ALL PARTS BEFORE USE FOR BREAKAGE OR FATIGUE. DISCONTINUE USE IMMEDIATELY IF ANY<br />
PART IS FOUND TO BE DAMAGED OR BROKEN.<br />
• MAXIMUM LOAD OF BASKETS: 5KGS (11LBS).<br />
• Do not carry additional children.<br />
THIS STROLLER IS MANUFACTURED FOR USE WITH two children ONLY<br />
• ALWAYS be aware of the risks provided by fire and other significant sources of heat such<br />
as radiators, etc. which may be in the immediate vicinity of your stroller.<br />
• It may be unsafe to use any accessories other than VALCO baby approved ones.<br />
• This product is intended for domestic use only. It is not intended for commercial use.<br />
Should the chassis become wet, dry off promptly before storing. If this pram is used near the ocean or salted roads, spray the<br />
chassis and seat frame with water and dry. We recommend a rust inhibiting product should be used to prevent rust and fatigue on<br />
metal parts.<br />
We recommend that you wipe down axles and lubricate the wheels every 3 months. Sand and dirt can grind down axles, if you live<br />
near the beach or in a dusty environment you must wipe down the axles and wheels then lubricate them monthly.<br />
AXLES ARE BEST LUBRICATED WITH GREASE OR PETROLEUM JELLY. MOVING PARTS ARE BEST LUBRICATED WITH SILICONE BASED<br />
PRODUCTS. DO NOT USE OIL BASED PRODUCTS.<br />
FURTHER INFORMATION:<br />
In North America only<br />
www.valcobaby.com<br />
1800 610 7850<br />
info@valcobaby.com<br />
Find us on: