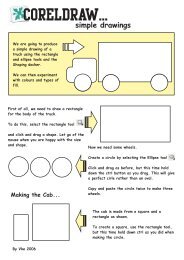
Combining shapes in coreldraw
Combining shapes in coreldraw
Combining shapes in coreldraw

You also want an ePaper? Increase the reach of your titles
YUMPU automatically turns print PDFs into web optimized ePapers that Google loves.
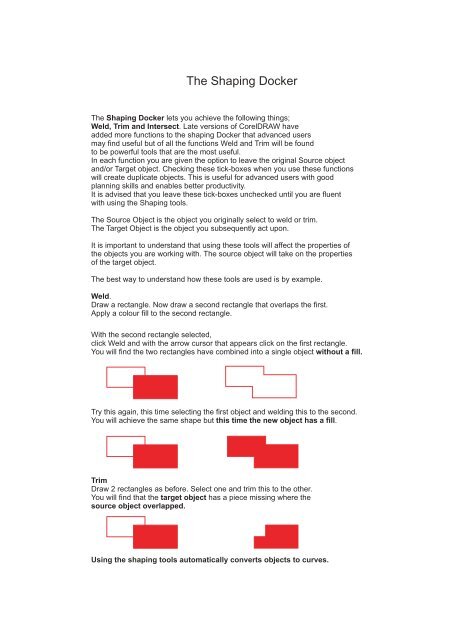
The Shap<strong>in</strong>g Docker<br />
The Shap<strong>in</strong>g Docker lets you achieve the follow<strong>in</strong>g th<strong>in</strong>gs;<br />
Weld, Trim and Intersect. Late versions of CorelDRAW have<br />
added more functions to the shap<strong>in</strong>g Docker that advanced users<br />
may f<strong>in</strong>d useful but of all the functions Weld and Trim will be found<br />
to be powerful tools that are the most useful.<br />
In each function you are given the option to leave the orig<strong>in</strong>al Source object<br />
and/or Target object. Check<strong>in</strong>g these tick-boxes when you use these functions<br />
will create duplicate objects. This is useful for advanced users with good<br />
plann<strong>in</strong>g skills and enables better productivity.<br />
It is advised that you leave these tick-boxes unchecked until you are fluent<br />
with us<strong>in</strong>g the Shap<strong>in</strong>g tools.<br />
The Source Object is the object you orig<strong>in</strong>ally select to weld or trim.<br />
The Target Object is the object you subsequently act upon.<br />
It is important to understand that us<strong>in</strong>g these tools will affect the properties of<br />
the objects you are work<strong>in</strong>g with. The source object will take on the properties<br />
of the target object.<br />
The best way to understand how these tools are used is by example.<br />
Weld.<br />
Draw a rectangle. Now draw a second rectangle that overlaps the first.<br />
Apply a colour fill to the second rectangle.<br />
With the second rectangle selected,<br />
click Weld and with the arrow cursor that appears click on the first rectangle.<br />
You will f<strong>in</strong>d the two rectangles have comb<strong>in</strong>ed <strong>in</strong>to a s<strong>in</strong>gle object without a fill.<br />
Try this aga<strong>in</strong>, this time select<strong>in</strong>g the first object and weld<strong>in</strong>g this to the second.<br />
You will achieve the same shape but this time the new object has a fill.<br />
Trim<br />
Draw 2 rectangles as before. Select one and trim this to the other.<br />
You will f<strong>in</strong>d that the target object has a piece miss<strong>in</strong>g where the<br />
source object overlapped.<br />
Us<strong>in</strong>g the shap<strong>in</strong>g tools automatically converts objects to curves.
The Weld Command<br />
The Weld command creates a s<strong>in</strong>gle curve from 2 or more components.<br />
The components may overlap, sit next to each other or be some distance<br />
apart.<br />
You are given the option to leave the orig<strong>in</strong>al<br />
Source object and/or Target object. Check<strong>in</strong>g these tick-boxes<br />
will create duplicate orig<strong>in</strong>als. This is useful for advanced users with good<br />
plann<strong>in</strong>g skills and<br />
enables better productivity. It is advised that you leave these<br />
tick-boxes unchecked until you are fluent with us<strong>in</strong>g the Shap<strong>in</strong>g<br />
tools. The Source Object is the object you orig<strong>in</strong>ally select to weld<br />
or trim. The Target Object is the object you subsequently act upon.<br />
It is important to understand that us<strong>in</strong>g these tools will affect the<br />
properties of the objects you are work<strong>in</strong>g with. The source object<br />
will take on the properties of the target object. The best way to<br />
understand how these tools are used is by example.<br />
Draw a rectangle. Now draw a second rectangle that overlaps<br />
the first. Apply a colour fill to the second rectangle. With the second<br />
rectangle selected, click Weld and with the arrow cursor that appears<br />
click on the first rectangle. You will f<strong>in</strong>d the two rectangles have<br />
comb<strong>in</strong>ed <strong>in</strong>to a s<strong>in</strong>gle object without a fill.<br />
Try this aga<strong>in</strong>, this time select<strong>in</strong>g the first object and weld<strong>in</strong>g this to the second.<br />
You will achieve the same shape but this time the new object has a fill.
The Trim Command<br />
The Trim command creates a s<strong>in</strong>gle curve from 2 or more components.<br />
The components must overlap. Trim forms the shape of the selected<br />
object (Source Object) <strong>in</strong>to the object you trim to where it overlaps.<br />
(Target Object).<br />
You are given the option to leave the orig<strong>in</strong>al<br />
Source object and/or Target object. Check<strong>in</strong>g these tick-boxes<br />
will create duplicate orig<strong>in</strong>als. This is useful for advanced users with good<br />
plann<strong>in</strong>g skills and<br />
enables better productivity. It is advised that you leave these<br />
tick-boxes unchecked until you are fluent with us<strong>in</strong>g the Shap<strong>in</strong>g<br />
tools. The Source Object is the object you orig<strong>in</strong>ally select to weld<br />
or trim. The Target Object is the object you subsequently act upon.<br />
It is important to understand that us<strong>in</strong>g these tools will affect the<br />
properties of the objects you are work<strong>in</strong>g with. The source object<br />
will take on the properties of the target object. The best way to<br />
understand how these tools are used is by example.<br />
Draw a rectangle. Now draw a second rectangle that overlaps<br />
the first. With the second<br />
rectangle selected, click Trim and with the arrow cursor that appears<br />
click on the first rectangle.
The Intersect Command<br />
Intersect creates the shape that is formed by the overlap of 2<br />
components.<br />
You are given the option to leave the orig<strong>in</strong>al<br />
Source object and/or Target object. Check<strong>in</strong>g these tick-boxes<br />
will create duplicate orig<strong>in</strong>als.<br />
Draw a rectangle. Now draw a second rectangle that overlaps<br />
the first. With the second<br />
rectangle selected, click Intersect With and with the arrow cursor that<br />
appears<br />
click on the first rectangle.<br />
Try <strong>in</strong>tersect<strong>in</strong>g circles with squares<br />
In this example I have Intersected one circle with another then <strong>in</strong>tersected<br />
this with the third.