instructions - Master Lock Safety
instructions - Master Lock Safety
instructions - Master Lock Safety

Create successful ePaper yourself
Turn your PDF publications into a flip-book with our unique Google optimized e-Paper software.
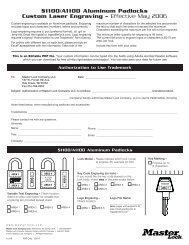
Custom <strong>Master</strong> <strong>Lock</strong><br />
Guardian Extreme Tags and Signs<br />
End User Order Process<br />
Process Overview<br />
1. Create your custom graphics<br />
2. Name and save your graphic file(s)<br />
3. Place order with your distributor<br />
4. Transfer your custom graphics to <strong>Master</strong> <strong>Lock</strong><br />
Step 1: Create Your Custom Graphics<br />
Using your own graphics program, create any graphic you want within the dimensions shown in<br />
the chart below. Your graphics can include simple text, color text or logos and even include<br />
color pictures.<br />
Templates in Microsoft Word, Adobe Illustrator, and Adobe PhotoShop can be downloaded from<br />
www.safetyseries.com. Click on “Developing Custom Tags and Signs”<br />
While you will find it easiest to create and manipulate graphics in programs such as Illustrator,<br />
Publisher, Quark Express, InDesign, and other powerful graphic programs, you can also create<br />
simple custom tags and signs in Word.<br />
Once you’ve created your tag or sign, you should save, export, or print as a PDF file. Follow the<br />
file naming format explained in step 2. By saving as a PDF you ensure the fonts; images, etc<br />
are embedded within the file. What you see when you look at your printed color PDF is what we<br />
will produce. If it looks good when you print it to a laser printer it will look good on your tag or<br />
sign. However, keep in mind that if it looks poor when you print it to a laser printer, it will not get<br />
better when molded into the tag or sign.<br />
Graphic dimensions:<br />
Model No. Number of sides Product Description Area avail. for Graphics<br />
S90001 Front and Back Two sided Custom OSHA Tag 3” x 5-3/4 ” 2.95” x 4.88”<br />
S90002 Front and Back Two sided Custom <strong>Lock</strong>out ID Tag 3” x 1-1/2” 2.95” x 1.45”<br />
S90003 Front and Back Two sided Custom Scaffold Tag 3” x 9” 2.75” x 7.80”<br />
S90004 Front Custom Sign 7” x 10” 6.5” x 9.5”<br />
S90005 Front Custom Sign 10” x 14” 13.375” x 9.70”<br />
S90006 Front Custom Sign 14” x 20” 13.00” x 19.25”<br />
S90007 Front Custom Sign 12” x 18” 11.75” x 17.75”<br />
S90008 Front Custom Sign 12” x 10” 11.75” x 9.75”<br />
S90009 Front Custom Sign 12” x 9” 11.75” x 8.625”<br />
S90010 Front Custom Sign 12” x 8” 11.75” x 7.75”<br />
S90011 Front Custom Sign 12” x 4” 11.75” x 3.75”<br />
S90014 Front and Back Two sided Custom Sign 7” x 10” 6.5” x 9.5”<br />
S90015 Front and Back Two sided Custom Sign 10” x 14” 13.375” x 9.70”<br />
S90016 Front and Back Two sided Custom Sign 14” x 20” 13.00” x 19.25”<br />
S90017 Front and Back Two sided Custom Sign 12” x 18” 11.75” x 17.75”<br />
S90018 Front and Back Two sided Custom Sign 12” x 10” 11.75” x 9.75”<br />
S90019 Front and Back Two sided Custom Sign 12” x 9” 11.75” x 8.625”<br />
S90020 Front and Back Two sided Custom Sign 12” x 8” 11.75” x 7.75”<br />
S90021 Front and Back Two sided Custom Sign 12” x 4” 11.75” x 3.75”
Step 2: Name Your Graphic File(s)<br />
Once you have your graphic created, save it as a hi-res PDF file.<br />
Please name the graphic files using the following format:<br />
YourCompanyNamePO#Qty#FrontTag#.pdf<br />
YourCompanyNamePO#Qty#BackTag#.pdf<br />
If you are ordering multiple custom tags or signs on the same order the Company Name and PO<br />
# would remain the same. The Quantity may change. You need to include an identifier to<br />
separate one custom tag or sign from another. We suggest using numbers.<br />
Example:<br />
End User is Acme<br />
Purchase order number is 239057<br />
Ordering 2 custom tags<br />
First custom tag is for 36 pieces<br />
Second custom tag is for 504 pieces<br />
ACMEPO239057QTY36FRONTTAG1<br />
ACMEPO239057QTY36BACKTAG1<br />
ACMEPO239057QTY504FRONTTAG2<br />
ACMEPO239057QTY504BACKTAG2<br />
By using this graphic naming format it will speed up processing and molding of your custom<br />
tags. It will also make it easier to reorder in the future. <strong>Master</strong> <strong>Lock</strong> will retain the graphic file<br />
under this name.<br />
Step 3: Place Your Order<br />
Once you’ve created and named your graphic files, place your order with the distributor. Be sure<br />
to include the name of the graphic file(s) on your purchase order. Be sure the correct graphic<br />
files are associated with the correct tag or sign model number. Your distributor will communicate<br />
that information to <strong>Master</strong> <strong>Lock</strong>, making it possible to match your graphic files with your order.<br />
Please include a contact name and phone number in case we have any questions about the<br />
graphics or the order. Once we receive your completed order from the distributor it takes<br />
approximately 7 working days to mold and ship the Guardian Extreme tags or signs.<br />
Step 4: Transfer the Graphics to <strong>Master</strong> <strong>Lock</strong><br />
1. Email option: Email the graphic files to graphics@masterlockgraphics.com. If the file(s) are<br />
over 10 Meg we recommend using our ftp site at www.masterlockgraphics.com.<br />
2. FTP option: When you go to www.masterlockgraphics.com to transfer your graphic files you<br />
will be asked to fill in a username and password. These are:<br />
Username: masterlockgraphics<br />
Password: graphics<br />
*The username is all one word. Both Username and Password are all lower case.<br />
3. Mail. Burn files to disc and mail to <strong>Master</strong> <strong>Lock</strong>, Attention: Guardian Extreme, 1516 East<br />
Mapleleaf Drive, Mt. Pleasant, IA 52641<br />
Questions Email us at graphics@masterlockgraphics.com