AL1072 â Installed Daylight Sensors Guide - Alera Lighting
AL1072 â Installed Daylight Sensors Guide - Alera Lighting
AL1072 â Installed Daylight Sensors Guide - Alera Lighting

Create successful ePaper yourself
Turn your PDF publications into a flip-book with our unique Google optimized e-Paper software.
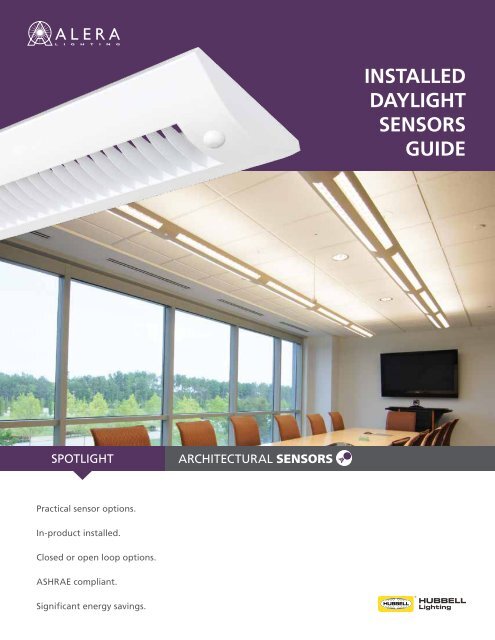
INSTALLED<br />
DAYLIGHT<br />
SENSORS<br />
GUIDE<br />
SPOTLIGHT<br />
ARCHITECTURAL SENSORS<br />
Practical sensor options.<br />
In-product installed.<br />
Closed or open loop options.<br />
ASHRAE compliant.<br />
Significant energy savings.
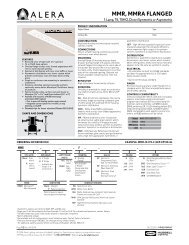
5 STEPS TO DAYLIGHTING SUCCESS<br />
GOOD NEWS <strong>Daylight</strong> Harvesting is easily adapted to existing architecture and need not require an expensive overhaul.<br />
Most buildings already include windows where natural light is present during normal business hours. Simply install new lighting with<br />
sensors pre-placed within the luminaires and start taking advantage of nature's lighting bounty today.<br />
ARCHITECTURAL SENSORS FROM ALERA LIGHTING<br />
IN-PRODUCT INSTALLED DAYLIGHT SENSORS<br />
It makes sense to use <strong>Alera</strong>'s Practical Sensor options to simplify installation, add value to the project, and improve<br />
CODE COMPLIANCE<br />
Does your state require <strong>Daylight</strong> Harvesting today Will it tomorrow<br />
States will be required to update their energy codes to meet or exceed the ASHRAE 90.1-2010 by October 2013 1 . ASHRAE 90.1 requires<br />
control when daylight from toplighting (skylights) or sidelighting (windows) is present. This new standard applies to daylight areas<br />
exceeding 900ft 2 for toplighting areas or 250ft 2 for sidelighting areas. Control must be multi-level with continuous dimming or at least<br />
two output levels from 0–35% and 50–75%.<br />
sustainable design for commercial indoor lighting projects.<br />
STEP 1 SELECT YOUR PRODUCT AVAILABLE WITH ARCHITECTURAL SENSORS<br />
Fixture Efficiency<br />
In addition, ASHRAE 90.1-2010 lowers the allowable power density for commercial, educational, and institutional spaces, meaning that<br />
the type of lighting installed must be energy efficient and inherently sustainable. <strong>Alera</strong> <strong>Lighting</strong> products fit this requirement with typical<br />
efficiencies above 90%.<br />
96%<br />
91%<br />
92%<br />
92%<br />
87%<br />
<strong>Alera</strong> meets the continuous dimming requirements with both the Philips and Lutron installed sensor solution options.<br />
ASHRAE 90.1-2010<br />
• States must meet, but many may<br />
choose to exceed requirements<br />
Curv, Curv Plus Liso<br />
Indirect<br />
95-100% Up, 0-5%<br />
Down<br />
4', 8', 12'<br />
1-3 Lamp Cross Sections<br />
Curv Radial Lens<br />
Direct/Indirect<br />
70% Up, 30% Down<br />
4', 8'<br />
1-3 Lamp Cross Sections<br />
Curv Radial Baffle<br />
Direct/Indirect<br />
65% Up, 35% Down<br />
4', 8'<br />
1-3 Lamp Cross Sections<br />
Curv Radial Perf Baffle<br />
Direct/Indirect<br />
65% Up, 35% Down<br />
4', 8'<br />
1-3 Lamp Cross Sections<br />
Curv Louvered<br />
Direct/Indirect<br />
65% Up, 35% Down<br />
4', 8'<br />
1-3 Lamp Cross Sections<br />
*<br />
• <strong>Daylight</strong>ing and occupancy control<br />
requirements increase dramatically<br />
• Not limited to new construction—<br />
*<br />
* *<br />
alterations of a space by 10% or<br />
more require code compliance<br />
97%<br />
97%<br />
93%<br />
93%<br />
93%<br />
ASHRAE 90.1-2010/2012 IECC equivalent or more energy efficient<br />
Washington D.C.<br />
American Samoa<br />
Guam<br />
ASHRAE 90.1-2001/2003 IECC equivalent or less energy efficient<br />
*<br />
N. Mariana Islands<br />
Puerto Rico<br />
U.S. Virgin Islands<br />
Plank<br />
Plank Plus Liso<br />
Direct/Indirect<br />
75% Up, 20% Down<br />
4', 8', 12'<br />
1-3 Lamp Cross Sections<br />
Nevis<br />
Nevis Plus Liso<br />
Direct/Indirect<br />
75% Up, 20% Down<br />
4', 8', 12'<br />
1-3 Lamp Cross Sections<br />
Curvista Solid<br />
Direct/Indirect<br />
70% Up, 30% Down<br />
4', 8'<br />
2-4 Lamp Cross Sections<br />
Curvista Perf<br />
Direct/Indirect<br />
70% Up, 30% Down<br />
4', 8'<br />
2-4 Lamp Cross Sections<br />
Paleta<br />
Direct/Indirect<br />
70% Up, 30% Down<br />
4', 8'<br />
2-4 Lamp Cross Sections<br />
ASHRAE 90.1-2007/2009 IECC equivalent or more energy efficient<br />
No Statewide Code<br />
ASHRAE 90.1-2004/2006 IECC equivalent<br />
*<br />
State has adopted new Code to be effected at a later date<br />
Source: Data is current as of August, 2012. Retreived from http://www.energycodes.gov/states/maps/commercialstatus.stm<br />
1<br />
Federal Register Volume 75, No. 202, Page 65904. October 19, 2011<br />
2<br />
3
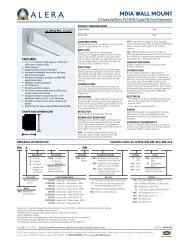
5 STEPS TO DAYLIGHTING SUCCESS<br />
STEP 2 SELECT YOUR INSTALLED SENSOR<br />
CLOSED LOOP<br />
PHILIPS LUXSENSE (-DSPL)<br />
Sensor signal affected by light sources controlled<br />
SYSTEM TYPE<br />
ADVANTAGES<br />
APPEARANCE<br />
PHILIPS LUXSENSE<br />
Sensor views<br />
below<br />
STAND-ALONE SYSTEM<br />
Delivered pre-commissioned. Commissioning<br />
adjustment, if desired, via manual twist sensor ring.<br />
Does not require additional components to operate and<br />
commission; preset for 45fc out of the box.<br />
COMPATIBLE BALLASTS<br />
EDMK7—Mark 7 0-10V Dimming<br />
• Small, unobtrusive daylight sensor does not impact<br />
luminaire aesthetic<br />
• Closed loop daylight harvesting method<br />
— Looks down at a cone of light below the product to<br />
measure electrical input needed<br />
— Does not require a direct view of window to operate<br />
— Stand-alone system does not require additional<br />
components to operate correctly<br />
• <strong>Daylight</strong> Sensor and Mark 7 0-10V dimming ballast<br />
arrive pre-installed in <strong>Alera</strong> <strong>Lighting</strong> product<br />
SHOWN WITH CURV RADIAL BAFFLE SOLID<br />
OPEN LOOP<br />
LUTRON ECOSYSTEM (-DSL)<br />
Sensor signal not affected by light sources controlled<br />
SYSTEM TYPE<br />
ADVANTAGES<br />
APPEARANCE<br />
LUTRON ECOSYSTEM<br />
Sensor views<br />
window<br />
INTEGRATED SYSTEM<br />
Sensor and dimming ballasts are factory installed as<br />
components of a larger Lutron EcoSystem® controls<br />
plan. Requires additional vendor supplied components to<br />
operate and commission.<br />
• Modestly sized sensor with white finish<br />
• Open loop daylight harvesting method<br />
— Aims directly at window for a true daylight reading<br />
— Requires a direct view of the window to operate<br />
— Part of a Lutron EcoSystem installation which integrates<br />
COMPATIBLE BALLASTS<br />
EDLUTES—Lutron EcoSystem (EC5 Series)<br />
seamlessly into Lutron's proprietary larger system<br />
• <strong>Daylight</strong> Sensor and Lutron EcoSystem® digital dimming<br />
ballast arrive pre-installed in <strong>Alera</strong> <strong>Lighting</strong> product<br />
SHOWN WITH CURV RADIAL BAFFLE SOLID<br />
4<br />
5
5 STEPS TO DAYLIGHTING SUCCESS<br />
STEP 3 PLACE ORDER<br />
Example shown below is Curv Radial Baffle product.<br />
For additional product availability, see back cover or contact <strong>Alera</strong> <strong>Lighting</strong> for additional details.<br />
BALLAST<br />
EDUMK7 Universal Voltage<br />
Electronic Dimming<br />
Advance Mark 7 (0-<br />
10V) 3, 4<br />
EDULUTES Universal Voltage<br />
Electronic Dimming<br />
Lutron EcoSystem<br />
(EC5 Series) 4,7<br />
STEP 5 EASY INSTALL<br />
<strong>Sensors</strong> arrive pre-installed<br />
DSPL OPTION PHILIPS LUXSENSE<br />
System is pre-commissioned by Philips and assumes 45fc out-of-the-box. For on-site adjustments, if desired, simply<br />
twist sensor to set at new level. For details, see page 9 of this brochure.<br />
DSL OPTION LUTRON ECOSYSTEM® SENSOR<br />
Product becomes an element of the EcoSystem family and the installed sensor is commissioned using Lutron's<br />
proprietary interfaces. Ballast and sensor are pre-installed by <strong>Alera</strong> to facilitate on-site simplicity of sensor installation<br />
and connection to ballast(s). For details, see pages 6 and 7 of this brochure.<br />
3<br />
Philips Mark 7 required with DSPL Option.<br />
Contact factory for other compatible Philips ballasts.<br />
4<br />
Not available with all configurations; some limitations apply.<br />
Contact factory for details.<br />
7<br />
Lutron EcoSystem series ballast required for DSL option.<br />
Contact factory for other compatible Lutron ballasts.<br />
OPTIONS<br />
DSPL Philips LuxSense<br />
<strong>Daylight</strong> Sensor 3, 4<br />
DSL Lutron <strong>Daylight</strong> Sensor<br />
(Must Specify Lutron<br />
Dimming Ballast) 4, 7<br />
QUICK-CONNECT IN-ROW CONTROL AND FIXTURE WIRING<br />
Short rows typically require a single feed where control wiring is carried through the<br />
luminaires via quick-connect wiring to dramatically reduce complexity and on-site wiring<br />
errors. Power feed wires are also handled via the installer-friendly Quick-Connect method.<br />
STEP 4 DESIGN ROOM<br />
Examples below show installed sensor locations. Products will be wired to your specifications.<br />
Single 4', 8' or 12' * Fixture with Sensor.<br />
EXAMPLE OF A PRIVATE OFFICE WITH<br />
SUSPENDED LUMINAIRE WITH SENSOR<br />
Row of two or more 4', 8' or 12' * Fixtures with <strong>Sensors</strong> where Sensor is placed at row end.<br />
Suspended <strong>Alera</strong> <strong>Lighting</strong> Luminaire<br />
12-18" Suspension<br />
Row of two or more 4', 8' or 12' * Fixtures with <strong>Sensors</strong> where Sensor is placed within row.<br />
8' Mounting Height from Floor to Sensor<br />
Aircraft Cable<br />
Feed Cord<br />
*Available lengths vary by product family.<br />
SHOWN WITH PLANK<br />
2.5' from Floor to Desktop<br />
6<br />
7
TECHNICAL DATA<br />
WHY INSTALL A DAYLIGHT SENSOR<br />
ENERGY REDUCTION<br />
Incorporating <strong>Daylight</strong> Harvesting can save significant energy in both private offices and large, open areas where natural sunlight is<br />
present during operating hours. Energy savings from facility operations go directly to operating profit, making this an attractive element<br />
of any energy reduction strategy.<br />
INSTALLED SENSOR OPTION<br />
DSPL—DAYLIGHT SENSOR, PHILIPS LUXSENSE<br />
Requires Mark 7 Dimming Ballast, 0-10v • Up to 32% Potential Energy Savings<br />
Shown installed in Curv Radial Lens at left.<br />
For specific in-product placement in other <strong>Alera</strong> <strong>Lighting</strong> products, see individual product specification<br />
and/or technical data sheets. For special placement requests, contact <strong>Alera</strong> <strong>Lighting</strong>.<br />
CLOSED LOOP OPERATION<br />
SENSOR MANUFACTURER DATA<br />
LuxSense Commissioning<br />
• Measure the light level under each LuxSense sensor with no or negligible daylight contribution<br />
— Light meter required<br />
• If needed, turn the sensor until the required light level is reached (with no or negligible daylight contribution)<br />
• Duplicate this in other rooms when similar daylight and reflectance conditions exist<br />
• Note that Philips LuxSense is not designed for maintaining a constant light level<br />
• Warning: The reduced light level should be no more than 30% lower than the average installed light level, without<br />
daylight contributions (example: 55fc installed, adjustment down to 39fc is possible)<br />
Optical Characteristics<br />
• It is assumed that the reflection in a room is such that a light level of 45fc on a table (2.6' high) will result in 2.3fc<br />
seen by the controller at 8' under a viewing angle of 45°; the opening angle can be adapted by the sensor ring<br />
control, realizing an adjustment factor between 1⁄3 and 3.<br />
SUSTAINABLE BEST PRACTICE<br />
A true win-win solution. Many leading organizations place importance on sustainable best practices that can be easily demonstrated<br />
to customers, employees, and shareholders. <strong>Daylight</strong> harvesting is a simple way to implement best practice lighting that can be used to<br />
enhance company image while saving incremental energy for a true win-win solution.<br />
Controls Characteristics<br />
• LuxSense compensates approximately for 50% of the added light (simulated and measured with a fluorescent<br />
light source). See graph at left below. In case of a natural light source, the compensation is higher than 50%.<br />
To adjust light level setting, twist sensor as indicated by arrow and seen below.<br />
Sensor<br />
8<br />
All technical data is per published data from Philips unless noted. Subject to change without notice.<br />
For additional technical data and/or the most current information available, visit Philips.com.<br />
9
TECHNICAL DATA<br />
INSTALLED SENSOR OPTION<br />
DSL—LUTRON ECOSYSTEM® SENSOR<br />
Requires Integration into Larger Lutron EcoSystem® Package<br />
Requires Lutron EcoSystem® EC5 Series Digital Ballasts<br />
40%-70% Potential Energy Savings when <strong>Installed</strong> as Part of a Complete EcoSystem® Installation<br />
Shown installed in Curv Radial Lens at left.<br />
For specific in-product placement in other <strong>Alera</strong> <strong>Lighting</strong> products, see individual product specification<br />
and/or technical data sheets. For special placement requests, contact <strong>Alera</strong> <strong>Lighting</strong>.<br />
OPEN LOOP OPERATION<br />
SENSOR MANUFACTURER DATA CONTINUED<br />
Determining the <strong>Daylight</strong> Sensor Mounting Location<br />
Determine the proper location of the <strong>Daylight</strong> Sensor using the adjacent diagrams.<br />
• The arrow on the daylight sensor points toward the area viewed by the sensor.<br />
• Place the daylight sensor so its viewing area is centered on the nearest window at a distance<br />
from the window of between one to two times the effective window height, H.<br />
• The effective window height, H, starts at the window sill or 3 feet (91 cm) up from the floor,<br />
whichever is higher, and ends at the top of the window.<br />
• Ensure that the view of the daylight sensor is not obstructed.<br />
• Do not position the daylight sensor in the well of a skylight or above indirect lighting fixtures.<br />
• For narrow areas where the daylight sensor cannot be placed 1-2 H from windows, place<br />
sensor near window facing into the space.<br />
SENSOR MANUFACTURER DATA<br />
Lutron Commissioning<br />
The installed lutron sensor integrates into the larger EcoSystem® application via proprietary Lutron components.<br />
For commissioning details, please contact Lutron, or if applicable, your <strong>Alera</strong> <strong>Lighting</strong> representative.<br />
TYPICAL INSTALLATION<br />
Arrow points toward the area viewed<br />
by the sensor (toward windows)<br />
Bottom of sensor<br />
1-2 H<br />
NARROW AREA INSTALLATION<br />
Arrow points toward the area viewed<br />
by the sensor (away from window)<br />
Sensor<br />
Optical Characteristics<br />
Directional light sensing requires lens be aimed at window(s). (see adjacent page)<br />
Controls Characteristics<br />
• Sensor is equipped with IR receiver<br />
• EcoSystem® Programmer can be used to commission<br />
— See Lutron.com for additional data<br />
H = Effective Window Height<br />
H<br />
3 ft (91 cm)<br />
<strong>Alera</strong> <strong>Lighting</strong> Note<br />
To adjust sensor direction, twist sensor as indicated by arrow seen at left.<br />
Lutron Additional Componentry<br />
Please note that the Lutron system can include wall switches and occupancy sensors which may need to be wired into the<br />
EcoSystem ® ballast. While these additional ancillary components are not available installed on the fixture itself, the in-fixture<br />
wiring requirements can typically be accommodated.<br />
<strong>Alera</strong> <strong>Lighting</strong> will, therefore, ask for project details to determine if additional wiring is required within the <strong>Alera</strong> product.<br />
Testing the <strong>Daylight</strong> Sensor<br />
• Ensure power to the lighting circuit in ON.<br />
• Ensure the lighting control system is commissioned properly.<br />
WARNING: Electrical shock hazard. Can cause serious injury or death. The lighting<br />
circuit should be energized only when all wiring is complete and all persons are clear<br />
of fixtures/devices. Turn power ON only after checking that it is safe to do so.<br />
• Shine a flashlight directly onto the daylight sensor.<br />
• Keep the light ON for at least 30-40 seconds. This should cause the lights connected or<br />
programmed to the sensor to dim. If the lights do not dim, they may already be at a dimmed<br />
level due to daylight. If so, you may test the sensor by covering it for 30-40 seconds. This<br />
should cause the lights to get brighter.<br />
10<br />
All technical data is per published data from Lutron unless noted. Subject to change without notice.<br />
All technical data is per published data from Lutron unless noted. Subject to change without notice.<br />
11<br />
For additional technical data and/or the most current information available, visit Lutron.com.<br />
For additional technical data and/or the most current information available, visit Lutron.com.
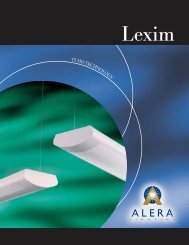
ALERA LIGHTING<br />
ARCHITECTURAL AREA LIGHTING<br />
BEACON PRODUCTS<br />
COLUMBIA LIGHTING<br />
COMPASS<br />
DEVINE LIGHTING<br />
DUAL-LITE<br />
HUBBELL BUILDING AUTOMATION<br />
HUBBELL INDUSTRIAL LIGHTING<br />
HUBBELL OUTDOOR LIGHTING<br />
KIM LIGHTING<br />
KURT VERSEN<br />
PRESCOLITE<br />
PROGRESS LIGHTING<br />
SPAULDING LIGHTING<br />
SPORTSLITER SOLUTIONS<br />
STERNER<br />
WHITEWAY<br />
701 Millennium Blvd. Greenville, SC 29607<br />
Tel 864.678.1000 Fax 866.898.0131<br />
www.aleralighting.com<br />
AL1071 Rev 3/14<br />
© 2014 <strong>Alera</strong> <strong>Lighting</strong>, a division of Hubbell <strong>Lighting</strong>, Inc. All rights reserved.<br />
Because of continuing product improvement programs, <strong>Alera</strong> <strong>Lighting</strong> reserves the right to change specifications without notice.