Fiberglass Staining Instructions - Masonite
Fiberglass Staining Instructions - Masonite
Fiberglass Staining Instructions - Masonite

You also want an ePaper? Increase the reach of your titles
YUMPU automatically turns print PDFs into web optimized ePapers that Google loves.
a<br />
c<br />
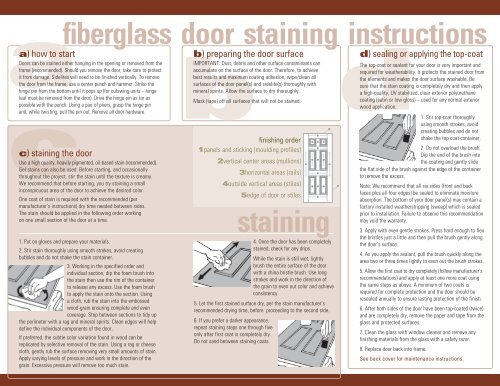
fiberglass door staining instructions<br />
a) how to start<br />
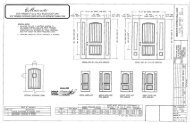
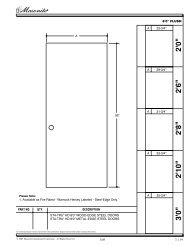
Doors can be stained either hanging in the opening or removed from the<br />
frame (recommended). Should you remove the door, take care to protect<br />
it from damage. Sidelites will need to be finished vertically. To remove<br />
the door from the frame, use a center punch and hammer. Strike the<br />
hinge pin from the bottom until it pops up (for outswing units – hinge<br />
leaf must be removed from the door). Drive the hinge pin as far as<br />
possible with the punch. Using a pair of pliers, grasp the hinge pin<br />
and, while twisting, pull the pin out. Remove all door hardware.<br />
c) staining the door<br />
Use a high quality, heavily pigmented, oil-based stain (recommended).<br />
Gel stains can also be used. Before starting, and occasionally<br />
throughout the project, stir the stain until the texture is creamy.<br />
We recommend that before starting, you try staining a small<br />
inconspicuous area of the door to achieve the desired color.<br />
One coat of stain is required with the recommended (per<br />
manufacturer’s instructions) dry time needed between sides.<br />
The stain should be applied in the following order working<br />
on one small section of the door at a time.<br />
1. Put on gloves and prepare your materials.<br />
2. Stir stain thoroughly using smooth strokes, avoid creating<br />
bubbles and do not shake the stain container.<br />
3. Working in the specified order and<br />
individual section, dip the foam brush into<br />
the stain then use the rim of the container<br />
to release any excess. Use the foam brush<br />
to apply the stain onto the section. Using<br />
a cloth, rub the stain into the embossed<br />
wood-grain ensuring complete and even<br />
coverage. Stop between sections to tidy up<br />
the perimeter with a rag and mineral spirits. Clean edges will help<br />
define the individual components of the door.<br />
If preferred, the subtle color variation found in wood can be<br />
replicated by selective removal of the stain. Using a rag or cheese<br />
cloth, gently rub the surface removing very small amounts of stain.<br />
Apply varying levels of pressure and work in the direction of the<br />
grain. Excessive pressure will remove too much stain.<br />
b<br />
b) preparing the door surface<br />
d)<br />
Important: Dust, debris and other surface contaminants can<br />
accumulate on the surface of the door. Therefore, to achieve<br />
best results and maximum coating adhesion, wipe/clean all<br />
surfaces of the door panel(s) and sidelite(s) thoroughly with<br />
mineral spirits. Allow the surface to dry thoroughly.<br />
Mask (tape) off all surfaces that will not be stained.<br />
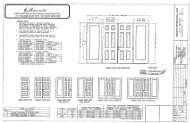
finishing order<br />
1panels and sticking (moulding profiles)<br />
2vertical center areas (mullions)<br />
3horizontal areas (rails)<br />
4outside vertical areas (stiles)<br />
5edge of door or stiles<br />
staining<br />
4. Once the door has been completely<br />
stained, check for any drips.<br />
While the stain is still wet, lightly<br />
brush the entire surface of the door<br />
with a china bristle brush. Use long<br />
strokes and work in the direction of<br />
the grain to even out color and achieve<br />
consistency.<br />
5. Let the first stained surface dry, per the stain manufacturer’s<br />
recommended drying time, before proceeding to the second side.<br />
6. If you prefer a darker appearance,<br />
repeat staining steps one through five<br />
only after first coat is completely dry.<br />
Do not sand between staining coats.<br />
sealing or applying the top-coat<br />
The top-coat or sealant for your door is very important and<br />
required for weatherability. It protects the stained door from<br />
the elements and makes the door surface washable. Be<br />
sure that the stain coating is completely dry and then apply<br />
a high-quality, UV stabilized, clear exterior polyurethane<br />
coating (satin or low gloss) – used for any normal exterior<br />
wood application.<br />
1. Stir top-coat thoroughly<br />
using smooth strokes, avoid<br />
creating bubbles and do not<br />
shake the top coat container.<br />
2. Do not overload the brush.<br />
Dip the end of the brush into<br />
the coating and gently slide<br />
the flat side of the brush against the edge of the container<br />
to remove the excess.<br />
Note: We recommend that all six sides (front and back<br />
faces plus all four edges) be sealed to eliminate moisture<br />
absorption. The bottom of your door panel(s) may contain a<br />
factory installed weatherstripping (sweep) which is sealed<br />
prior to installation. Failure to observe this recommendation<br />
may void the warranty.<br />
3. Apply with even gentle strokes. Press hard enough to flex<br />
the bristles just a little and then pull the brush gently along<br />
the door’s surface.<br />
4. As you apply the sealant, pull the brush quickly along the<br />
area two or three times lightly to even out the brush strokes.<br />
5. Allow the first coat to dry completely (follow manufacturer’s<br />
recommendations) and apply at least one more coat using<br />
the same steps as above. A minimum of two coats is<br />
required for complete protection and the door should be<br />
resealed annually to ensure lasting protection of the finish.<br />
6. After both sides of the door have been top-coated (twice)<br />
and are completely dry, remove the paper and tape from the<br />
glass and protected surfaces.<br />
7. Clean the glass with window cleaner and remove any<br />
finishing materials from the glass with a safety razor.<br />
8. Replace door back into frame.<br />
See back cover for maintenance instructions.