XB-502 manual - X-Treme
XB-502 manual - X-Treme
XB-502 manual - X-Treme

You also want an ePaper? Increase the reach of your titles
YUMPU automatically turns print PDFs into web optimized ePapers that Google loves.
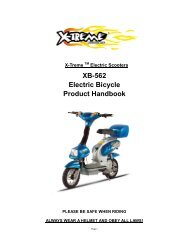
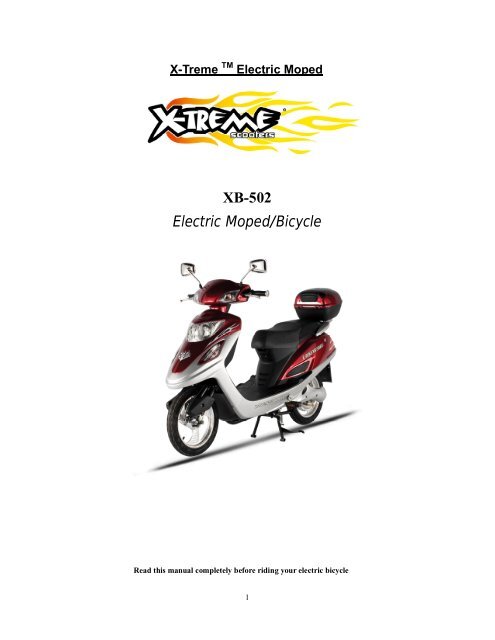
X-<strong>Treme</strong> TM Electric Moped<br />
<strong>XB</strong>-<strong>502</strong><br />
Electric Moped/Bicycle<br />
Read this <strong>manual</strong> completely before riding your electric bicycle<br />
1
DO NOT RETURN TO STORE!<br />
Do not use this vehicle for the first time until you have inflated the tires to the correct PSI<br />
and completely charged the battery. Failure to follow these instructions may damage your<br />
vehicle and void your warranty.<br />
CALL TOLL FREE OR GO ONLINE<br />
1-800-772-3852 / www.x-tremescooters.com/support/<br />
For General Information or Parts Visit www.x-tremescooters.com<br />
Contents<br />
Riding Safety ………………………………………………………..3-5<br />
Product Features……………………………………………………….6<br />
Package Contents………………………………………………….…..7<br />
Installation Instructions…………………………………………….….7<br />
Front Wheel & Brake………………………….………………….7<br />
Handle Bar Installation………………………..…………………..8<br />
Headlight/Headlight Fairing Installation..…….…………………..9<br />
Trunk/Pedals/Mirror Installation……….………………………..10<br />
Battery Connection & Initial Charging Instructions…………….11<br />
Tire Inflation……………………………………………………..11<br />
Product Specification…………….……………………………………12<br />
Operation………………………………………………………………13<br />
Riding Tip Checklist……………………….………………………….13<br />
Battery Charging & Safety…………………………………………….14<br />
Basic Maintenance & Schedule……………………………………14-15<br />
Support…………………………………………………………………………..16<br />
2
RIDING SAFETY<br />
Like any sport, biking carries the risk of injury and damage. By choosing to ride the<br />
<strong>XB</strong>-<strong>502</strong>, you assume all responsibility for these risks. Thus, you need to know<br />
and practice the rules of safe and responsible riding.<br />
YOUR INSURANCE POLICIES MAY NOT PROVIDE COVERAGE FOR ACCIDENTS<br />
INVOLVING THE USE OF THIS ELECTRIC BICYCLE. TO DETERMINE IF COVERAGE<br />
IS PROVIDED YOU SHOULD CONTACT YOUR INSURANCE COMPANY OR AGENT.<br />
Safety Basics: Do’s and Don’ts<br />
The Do’s<br />
o<br />
Always conduct a Safety Check before you ride your <strong>XB</strong>-<strong>502</strong>. Be thoroughly familiar with<br />
the controls of your <strong>XB</strong>-<strong>502</strong>.<br />
o Always wear an approved helmet when riding your <strong>XB</strong>-<strong>502</strong>. Follow the helmet<br />
manufacturer’s instructions for fit, use and care of your helmet.<br />
o<br />
o<br />
o<br />
o<br />
Always keep body parts and other objects away from the spinning wheels of your <strong>XB</strong>-<strong>502</strong>.<br />
Always wear shoes that will stay on your feet and will stay on the floorboard.<br />
Wear bright, visible clothing that is not so loose that it can catch on moving parts of the<br />
<strong>XB</strong>-<strong>502</strong> or objects at the side of the road or trail.<br />
Think about your speed, and keep your speed consistent with safe operating conditions.<br />
The Don’ts<br />
o<br />
Never ride with headphones. They mask traffic sounds, distract you from concentrating on<br />
your surroundings, and their wires can tangle in the moving parts of the <strong>XB</strong>-<strong>502</strong>, causing you<br />
to lose control.<br />
Never carry a passenger. The maximum carrying capacity is 300 lbs.<br />
o<br />
o<br />
o<br />
o<br />
o<br />
Never ride barefoot or wearing sandals.<br />
Don’t jump with your <strong>XB</strong>-<strong>502</strong>. It puts great stress on everything from frame and forks to drive<br />
train. Riders who insist on jumping their <strong>XB</strong>-<strong>502</strong> risk serious damage to their <strong>XB</strong>-<strong>502</strong> as<br />
well as to themselves.<br />
Never carry anything which obstructs your vision or your complete control of the <strong>XB</strong>-<strong>502</strong> or<br />
which could become entangled in the moving parts of the <strong>XB</strong>-<strong>502</strong>.<br />
Never hitch a ride by holding on to another vehicle.<br />
Never ride your <strong>XB</strong>-<strong>502</strong> while under the influence of alcohol or other drugs.<br />
3
o<br />
o<br />
If possible, avoid riding in bad weather, when visibility is obscured, at dusk or in the dark, or<br />
when you are very tired. Each of these conditions increases the risk of accident.<br />
Never allow children to ride. Never allow others to ride without reading and understanding<br />
these instructions.<br />
Operating Reminders and Suggestions<br />
o<br />
o<br />
o<br />
o<br />
Review all instructions carefully before riding the <strong>XB</strong>-<strong>502</strong>.<br />
Follow all rules and regulations in your area for operating a motorized bicycle. Obey the same<br />
road laws as all other road vehicles, including yielding the right-of-way to pedestrians, and<br />
stopping at red lights and stop signs.<br />
Ride predictably and in a straight line. Never ride against traffic.<br />
Ride defensively. To other road users, you may be hard to see.<br />
o Concentrate on the path ahead. Avoid potholes, gravel, dirt, wet road, oil, curbs, speed<br />
bumps, drain grates and other obstacles.<br />
o<br />
o<br />
o<br />
o<br />
Be alert for unexpected events, such as opening car doors or cars backing out of concealed<br />
driveways.<br />
Be extra careful at intersections and when preparing to pass other vehicles.<br />
Don't carry packages or passengers that will interfere with your visibility or control of the<br />
bike. Don't use items that may restrict your hearing.<br />
Maintain a comfortable stopping distance from all other riders, vehicles and objects. Safe<br />
braking distance and forces are subject to the prevailing weather and road conditions.<br />
Wet Weather Riding<br />
Wet weather impairs traction, braking and visibility, both for the rider and for other vehicles<br />
sharing the road. The risk of accident is dramatically increased in wet conditions. In wet<br />
weather you need to take extra care. In wet conditions, the stopping power of your brakes (as<br />
well as the brakes of other vehicles sharing the road) is dramatically reduced. This makes it<br />
harder to control speed and easier to lose control. To make sure that you can slow down and<br />
stop safely in wet conditions, apply your brakes earlier and more gradually than you would<br />
under normal, dry conditions.<br />
Decrease your riding speed, avoid sudden braking, and take corners with additional caution.<br />
Keep in mind that there is a direct, but inverse, relationship between speed and controllability.<br />
Be more visible on the road. Wear reflective clothing and use safety lights.<br />
Potholes and slippery surfaces such as lane markings and train tracks all become more<br />
hazardous when wet.<br />
Night Riding<br />
A rider is very difficult for motorists to see at dusk, at night, or at other times of poor visibility. If<br />
you must ride under these conditions, check and be sure you comply with all local laws about<br />
night riding; follow the Rules of the Road, and take the following precautions:<br />
4
Make sure that your <strong>XB</strong>-<strong>502</strong> is equipped with correctly positioned and securely mounted<br />
reflectors. Make sure your clothing or cargo does not obstruct a reflector or light.<br />
Wear light colored, reflective clothing and accessories, any reflective device or light source that<br />
moves will help you get the attention of approaching motorists, pedestrians and other traffic.<br />
Ride slowly. Avoid hazards, such as potholes and curbs.<br />
Avoid areas of heavy traffic, dark areas, and roads with speed limit over 35 mph. If possible, ride<br />
on routes already familiar to you.<br />
Ride at night only if necessary. Slow down and use familiar roads with street lighting, if possible.<br />
Other Important Reminders<br />
The battery does NOT require deep discharging.<br />
battery at least once every 90 days.<br />
If your <strong>XB</strong>-<strong>502</strong> is put into storage, re-charge its<br />
Do not store your <strong>XB</strong>-<strong>502</strong> in direct sunlight for an extended time.<br />
Store your <strong>XB</strong>-<strong>502</strong> in a dry place. Exposing your <strong>XB</strong>-<strong>502</strong> to rain, snow, or other precipitation may<br />
result in damage.<br />
5
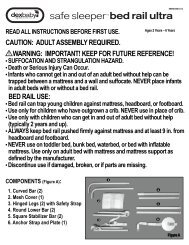
Product features<br />
6
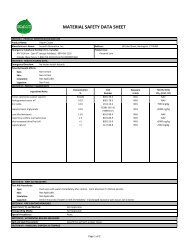
Package Contents:<br />
<br />
<br />
<br />
<br />
<br />
<br />
<br />
<br />
<br />
<strong>XB</strong>-<strong>502</strong> Moped/Bicycle<br />
48V 12AH Charger<br />
Left & Right Mirrors<br />
Front Tire<br />
Left & Right Foot Pedals<br />
Ignition Keys<br />
Trunk<br />
Foot Pad<br />
User Manual & Tool Kit<br />
Assembly Instructions<br />
After removing the cardboard carton & metal crate, disconnect all wires holding the items in place<br />
and remove all protective packaging foam. Remove axle from front fork & shipping crate and<br />
set aside, do not discard. There are 8 installation steps that must be done prior to using your<br />
<strong>XB</strong>-<strong>502</strong>. Be sure to do them in order and do not skip a step.<br />
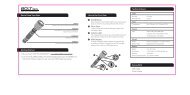
1.) INSTALLATION OF FRONT WHEEL AND BRAKE.<br />
1. Insert brake hub onto wheel as shown<br />
above.<br />
2. Slide wheel into front forks being sure<br />
to align brake hub bracket with right side<br />
fork. See image below.<br />
(When sitting on bike, front brake is on riders<br />
left side of front wheel)<br />
7
3. Slide axle thru left fork, then spacer before<br />
inserting it into the left side of front wheel.<br />
4. Secure with nut on right side (brake side)<br />
and tighten securely<br />
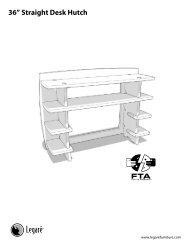
2.) HANDLEBAR INSTALLATION<br />
1. Locate and remove the handlebar bolt,<br />
washer & nut as shown above.<br />
2. Slide handlebars over post in the correct<br />
position, then insert the bolt & concave<br />
washer into the front (speedometer side) of<br />
the handlebars and secure with nut on the<br />
back (riders side). Concave washer should<br />
be partially inserted into the handlebar and<br />
make contact with internal post to be<br />
tightened properly and securely.<br />
8
3.) HEADLIGHT/HEADLIGHT FAIRING INSTALLATION<br />
1. Locate and remove packing material<br />
from the front headlight fairing.<br />
2. Attach wire clips as shown.<br />
3. Line up headlight fairing to front of<br />
scooter being careful not to break the<br />
plastic clips underneath.<br />
4. Slide the headlight fairing into place<br />
and snap.<br />
5. Finally, secure to front of scooter<br />
using the 4 enclosed screws.<br />
4-6.) TRUNK/PEDALS & MIRROR INSTALLATION<br />
1. Attach trunk to back cargo rack<br />
using the 4 enclosed bolts/nuts &<br />
washers. Secure to rack with the<br />
washers & nuts on the underside.<br />
9
1. Attach left & right foot pedals according<br />
to correct side by lining up pedal with bearing<br />
on pedal shaft and snap into place.<br />
4. Screw left & right mirrors into place and<br />
adjust to appropriate riding need.<br />
7.) BATTERY CONNECTION & INITIAL CHARGING<br />
1. Remove battery pack and locate plug.<br />
2. Plug battery wire into battery pack and<br />
reinstall pack into foot plate.<br />
3. IMPORTANT: Completely charge<br />
battery for a maximum of 8 hours before<br />
use. DO NOT CHARGE FOR MORE<br />
THAN 8 HOURS AS THIS CAN<br />
DAMAGE BATTERIES.<br />
8.) TIRE INFLATION<br />
Finally, inflate both tires to the minimum recommended tire pressure depending on the number of<br />
riders that will be using the bike. Recommended tire pressure is between 35 – 45 PSI. We do<br />
not recommend filling tire to 45 psi.<br />
Be sure to check all nuts screws and bolts including ones not mentioned in the set up, for tightness<br />
and fit before riding.<br />
10
Product Specifications<br />
1. Wire diagram<br />
2. Specifications<br />
Battery Voltage<br />
48Volt Dc,12Ah<br />
Motor Wattage<br />
500W<br />
Wheel Size<br />
16 inch<br />
Top Speed<br />
20 MPH<br />
Charging Time 6-8h<br />
Distance of full charge<br />
20 - 25 miles<br />
Battery charging cycles<br />
Around 350 times<br />
Max rider weight<br />
300 Lbs<br />
Two rider<br />
Yes<br />
Left and Right Indicators<br />
Yes<br />
Rear View mirrors<br />
Yes<br />
11
Operation<br />
Your new Electric Bicycle/scooter is a revolutionary new transport product using a sealed lead<br />
acid batteries and a super high efficiency electric hub motor designed to ASSIST in the propulsion<br />
of you and your bicycle. It is important to note the following riding guidelines to ensure you get<br />
the best possible experience from your electric bicycle.<br />
Riding tip checklist<br />
When starting off from stand still, pedal bicycle up to speed then engage throttle for best<br />
results.<br />
On inclines pedaling will be required to maintain momentum.<br />
Ensure Tires are fully inflated to 30-35 PSI for bikes.<br />
Remember performance of the bike is directly related to weight of the rider and any<br />
baggage/load together with the charge in the batteries.<br />
Ensure batteries are fully charged prior to riding.<br />
Charge overnight prior to riding the next day.<br />
Never let the batteries go fully flat. This will reduce battery and bike performance.<br />
Apply chain oil periodically and clean if dirty or gummed up using a degreaser then wipe<br />
clean and apply bicycle chain oil.<br />
If your bike is equipped with lights we recommend you ride with them switched on at all<br />
times to increase visibility for you and other road users.<br />
It’s important to start pedaling for a few revolutions THEN slowly turn the throttle control<br />
and gradually bring on the power. This ensures the battery and motor is not overloaded.<br />
12
Battery Charging and & Battery Safety<br />
Charging<br />
figure 1-4<br />
Specification:<br />
1.Input(AC): 100-240V<br />
2.Output: 54.60 ± 0.2V<br />
3.Charge current:1.8±0.2A<br />
frequency:50Hz/60Hz<br />
Charging (see figure 1-4)<br />
Ensure bike is turned off and key is removed.<br />
1.First connect to the battery charger to the charging socket located below the front of the seat or<br />
under the front seat.<br />
(Optionally, you can also remove the battery pack and charge outside of the bike if preferred)<br />
2. Insert the power plug on the battery charger into power outlet<br />
3. While charging, the light on the battery charger will illuminate Red.<br />
4. When fully charged, the light will illuminate Green.<br />
5. NEVER CHARGE FOR OVER 8 HOURS. DAMAGE MAY OCCUR TO BATTERY<br />
6. Always charge the bike in an enclosed area outdoors away from weather & wet conditions.<br />
NEVER CHARGE THE BIKE INSIDE YOUR HOME<br />
ONLY CONNECT THE BATTERY CHARGER LEAD TO THE BIKE. NEVER<br />
CONNECT ANY OTHER POWER SOURCE TO THE BIKE.<br />
13
Battery Charging Safety Notes<br />
1) While charging the Battery, keep the key switch OFF.<br />
2) Verify that you are using the correct charger for your vehicle, and that the charger input<br />
power is compatible the “house current” in your area.<br />
3) Keep the charger and battery away from water to prevent electrical shock and shorting.<br />
The charger is intended for indoor use only.<br />
4) Plug the end of the charger’s cord into the socket of the adaptor first. Next connect the<br />
adaptor to the <strong>XB</strong>-<strong>502</strong> (the charger port in located below the front of the seat). Then plug<br />
the chargers’ AC cords into the wall outlet.<br />
5) Read the charger label to learn about the charger indicator lights, and their meanings.<br />
6) Generally, a short drive will require a short time to re-charge, and a long ride will require<br />
a longer time. A complete (90%) discharge may require 6 hours to recharge. To<br />
prevent electrolysis (battery fluid loss by hydrogen generation,) do not charge for longer<br />
than eight hours.<br />
WARNING<br />
Do not place the battery near heat or fire. Do not expose the chargers to water.<br />
Maintenance ----Basic<br />
1. Your bike comes with a 30amp fuse, pre-installed at the factory and is located inside the<br />
battery box.<br />
2. Clean Chain Regularly.<br />
3. Ensure Tires are inflated to 35-45 PSI.<br />
4. Adjust Brake tension via adjusting screws located at Brake lever or on Brake control<br />
lever.<br />
5. Ensure regular servicing according to the schedule.<br />
6. Do not attempt to change any electronic components except changing light bulbs.<br />
7. DO not attempt to modify, open or perform maintenance on the Hub Motor.<br />
8. Any attempt to modify or adjustment of electrical components will void the warranty.<br />
14
Maintenance ----Schedule<br />
Service<br />
Interval<br />
Daily Monthly Every 6 Yearly<br />
Months<br />
Inspect Tires for wear and Yes Yes Yes Yes<br />
condition and inflation<br />
Check and adjust Brake Yes Yes Yes Yes<br />
Check operation of all lighting Yes Yes Yes Yes<br />
and horn devices. Replace<br />
globes if necessary<br />
Test Battery Capacity Yes Yes<br />
Replace Wheel Baring Grease<br />
Yes<br />
Full Brake Pad Change over<br />
Yes<br />
Check condition and torque<br />
settings of wheel nuts and<br />
suspension forks<br />
Yes<br />
Yes<br />
Other Helpful Instructions<br />
Pedals<br />
1. Use a pedal wrench of 16mm spanner to tighten pedals.<br />
2. Check and tighten pedal crank bolts with 14mm socket.<br />
Tires<br />
1. Inflate tire using a pump to 35-45psi. Remember lower tire pressures will negatively impact<br />
performance by causing too much resistance, but over inflating may cause the tube to burst.<br />
Chain<br />
1. Give the train a light drop of bicycle chain oil or sewing oil. Do not use RP7 type lubricants.<br />
15
DO NOT RETURN TO STORE!<br />
IF YOU NEED HELP<br />
CALL TOLL FREE OR GO ONLINE<br />
1-800-772-3852<br />
www.x-tremescooters.com/support/<br />
For General Information or Parts Visit<br />
www.x-tremescooters.com<br />
16<br />
Revised 3/9/10