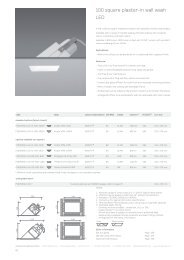
100 square plaster-in downlight LED - WhiteGoods
100 square plaster-in downlight LED - WhiteGoods
100 square plaster-in downlight LED - WhiteGoods

You also want an ePaper? Increase the reach of your titles
YUMPU automatically turns print PDFs into web optimized ePapers that Google loves.
code<br />
standard options (stock items):<br />
P<strong>100</strong>SDL-<strong>LED</strong>-XI-830-1300*<br />
P<strong>100</strong>SDL-<strong>LED</strong>-XI-930-<strong>100</strong>0*<br />
options available on request*:<br />
P<strong>100</strong>SDL-<strong>LED</strong>-XI-840-1300<br />
P<strong>100</strong>SDL-<strong>LED</strong>-XI-940-<strong>100</strong>0<br />
P<strong>100</strong>SDL-<strong>LED</strong>-BR-830-800<br />
P<strong>100</strong>SDL-<strong>LED</strong>-PH-830-1<strong>100</strong><br />
P<strong>100</strong>SDL-<strong>LED</strong>-OS-930-800<br />
whitegoods Light<strong>in</strong>g Limited Unit 19 Hiltongrove 14 Southgate Road London N1 3LY T +44 (0)20 7241 2032 F +44 (0)20 7241 2033 mail@whitegoods.com www.whitegoods.com<br />
34<br />
145<br />
115<br />
<strong>100</strong><br />
<strong>100</strong><br />
lamp<br />
Xicato XSM-1300<br />
Xicato XSM-<strong>100</strong>0A<br />
Xicato XSM-1300<br />
Xicato XSM-<strong>100</strong>0A<br />
Bridgelux ES Array-800<br />
Phillips FortimoSLM-1<strong>100</strong><br />
Osram Preva<strong>LED</strong>-800<br />
25<br />
25<br />
(5)<br />
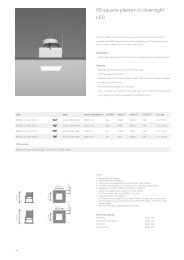
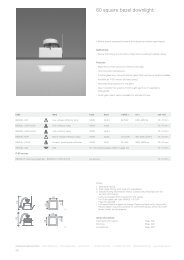
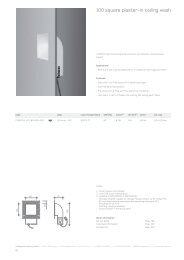
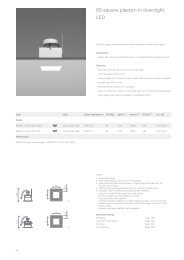
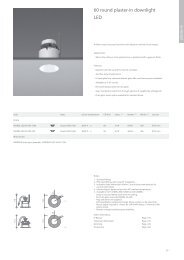
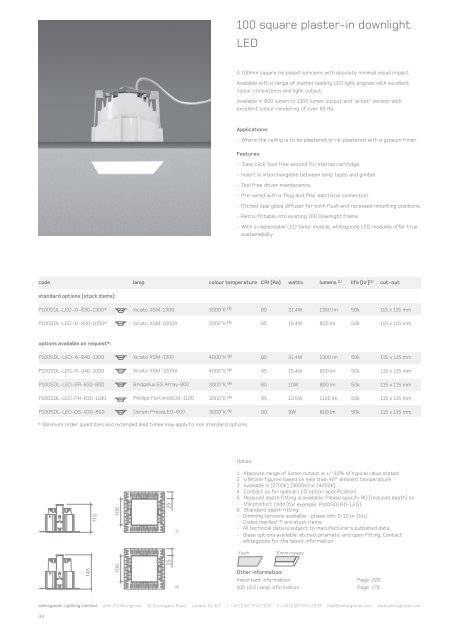
<strong>100</strong> <strong>square</strong> <strong>plaster</strong>-<strong>in</strong> <strong>downlight</strong><br />
<strong>LED</strong><br />
A <strong>100</strong>mm <strong>square</strong> recessed lum<strong>in</strong>aire with absolute m<strong>in</strong>imal visual impact.<br />
Available with a range of market lead<strong>in</strong>g <strong>LED</strong> light eng<strong>in</strong>es with excellent<br />
colour consistency and light output.<br />
Available <strong>in</strong> 800 lumen to 1300 lumen output and “artist” version with<br />
excellent colour render<strong>in</strong>g of over 95 Ra.<br />
Applications:<br />
- Where the ceil<strong>in</strong>g is to be <strong>plaster</strong>ed or re-<strong>plaster</strong>ed with a gypsum f<strong>in</strong>ish.<br />
Features:<br />
colour temperature<br />
3000˚K (3)<br />
3000˚K (3)<br />
4000˚K (4)<br />
4000˚K (4)<br />
3000˚K (4)<br />
3000˚K (4)<br />
3000˚K (4)<br />
* M<strong>in</strong>imum order quantities and extended lead times may apply to non standard options.<br />
(6)<br />
- ‘Easy click’ tool free second fix <strong>in</strong>ternal cartridge.<br />
- Insert is <strong>in</strong>terchangeble between lamp types and gimbal.<br />
- Tool free driver ma<strong>in</strong>tenance.<br />
- Pre-wired with a ‘Plug and Play’ electrical connection.<br />
- Etched opal glass diffuser for both flush and recessed mount<strong>in</strong>g positions.<br />
- Retro-fittable <strong>in</strong>to exist<strong>in</strong>g <strong>100</strong> Downlight frame.<br />
- With a replaceable <strong>LED</strong> ‘lamp’ module, whitegoods <strong>LED</strong> modules offer true<br />
susta<strong>in</strong>ability.<br />
Notes:<br />
CRI (Ra)<br />
80<br />
95<br />
80<br />
95<br />
80<br />
85<br />
90<br />
watts<br />
21.4W<br />
15.4W<br />
21.4W<br />
15.4W<br />
10W<br />
13.5W<br />
9W<br />
flush 30mm recess<br />
lumens (1)<br />
1300 lm<br />
800 lm<br />
1300 lm<br />
800 lm<br />
800 lm<br />
1<strong>100</strong> lm<br />
800 lm<br />
life (hr) (2)<br />
50k<br />
50k<br />
50k<br />
50k<br />
50k<br />
50k<br />
50k<br />
Other <strong>in</strong>formation:<br />
Important <strong>in</strong>formation Page 225<br />
<strong>100</strong> <strong>LED</strong> Lamp <strong>in</strong>formation Page 179<br />
cut-out<br />
115 x 115 mm<br />
115 x 115 mm<br />
115 x 115 mm<br />
115 x 115 mm<br />
115 x 115 mm<br />
115 x 115 mm<br />
115 x 115 mm<br />
1. Absolute range of lumen output is +/-10% of typical value stated.<br />
2. Lifetime figures based on less than 40° ambient temperature.<br />
3. Available <strong>in</strong> (2700K), (3000K) or (4000K).<br />
4. Contact us for special <strong>LED</strong> option specification.<br />
5. Reduced depth fitt<strong>in</strong>g is available. Please specify RD (reduced depth) on<br />
the product code (for example: P<strong>100</strong>SDLRD-<strong>LED</strong>).<br />
6. Standard depth fitt<strong>in</strong>g.<br />
- Dimm<strong>in</strong>g versions available: -phase dim; 0-10 or DALI.<br />
- Codes marked ‘*’ are stock items.<br />
- All technical data is subject to manufacturer’s published data.<br />
- Glass options available: etched, prismatic and open fitt<strong>in</strong>g. Contact<br />
whitegoods for the latest <strong>in</strong>formation.
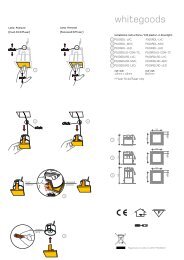
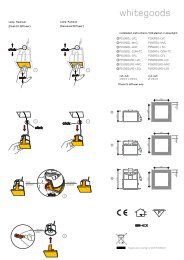
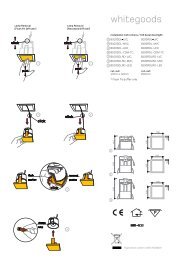
Lamp Removal<br />
(Flush Fit Diffuser)<br />
cc lliicc<br />
kk<br />
cc<br />
lliicc<br />
kk<br />
push<br />
flush<br />
position<br />
1<br />
2<br />
click<br />
change<br />
lamp<br />
click<br />
click<br />
3<br />
4<br />
Lamp Removal<br />
(Recessed Diffuser)<br />
recessed<br />
position<br />
push<br />
1<br />
2<br />
whitegoods<br />
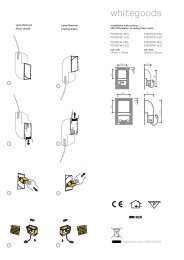
<strong>in</strong>stallation <strong>in</strong>structions / <strong>100</strong> <strong>plaster</strong>-<strong>in</strong> <strong>downlight</strong>:<br />
P<strong>100</strong>SDL-LVC<br />
P<strong>100</strong>SDL-MVC<br />
P<strong>100</strong>SDL-CDM-SM<br />
P<strong>100</strong>SDL-<strong>LED</strong>-XI<br />
P<strong>100</strong>SDL-<strong>LED</strong>-BR<br />
P<strong>100</strong>SDL-<strong>LED</strong>-PH<br />
P<strong>100</strong>SDL-<strong>LED</strong>-OS<br />
cut-out:<br />
115mm x 115mm<br />
115<br />
Reduced depth<br />
145<br />
115<br />
Reduced depth<br />
145<br />
P<strong>100</strong>RDL-LVC<br />
P<strong>100</strong>RDL-MVC<br />
P<strong>100</strong>RDL-CDM-SM<br />
P<strong>100</strong>RDL-<strong>LED</strong>-XI<br />
P<strong>100</strong>RDL-<strong>LED</strong>-BR<br />
P<strong>100</strong>RDL-<strong>LED</strong>-PH<br />
P<strong>100</strong>RDL-<strong>LED</strong>-OS<br />
cut-out:<br />
Ø115mm<br />
<strong>100</strong><br />
<strong>100</strong><br />
25<br />
25<br />
25<br />
25<br />
Registration number is WEE/FG0362QY<br />
<strong>100</strong><br />
<strong>100</strong>
150<br />
cut-out<br />
150<br />
P<strong>100</strong>SDL-LVC; P<strong>100</strong>RDL-LVC; P<strong>100</strong>SDL-<strong>LED</strong>; P<strong>100</strong>RDL-<strong>LED</strong>;<br />
150<br />
P<strong>100</strong>SDL-MVC; P<strong>100</strong>RDL-MVC; P<strong>100</strong>SDLRD-MVC; P<strong>100</strong>RDLRD-MVC;<br />
150<br />
cut-out<br />
cut-out<br />
150<br />
150<br />
A<br />
secutity<br />
cable<br />
P<strong>100</strong>SDLRD-LVC; P<strong>100</strong>RDLRD-LVC; P<strong>100</strong>SDLRD-<strong>LED</strong>; P<strong>100</strong>RDLRD-<strong>LED</strong><br />
A<br />
A<br />
c. gear<br />
<strong>plaster</strong><br />
P<strong>100</strong>SDL-CMH; P<strong>100</strong>RDL-CMH;<br />
secutity<br />
cable<br />
secutity<br />
cable<br />
c. gear<br />
<strong>plaster</strong><br />
<strong>plaster</strong><br />
c. gear<br />
B<br />
C<br />
B<br />
C<br />
c. gear<br />
B<br />
C<br />
B/C<br />
B/C<br />
B/C<br />
c. gear<br />
c. gear<br />
CLICK<br />
CLICK<br />
CLICK<br />
c. gear<br />
c. gear
code<br />
lamp<br />
colour temperature CRI (Ra) watts<br />
type<br />
base<br />
lumens<br />
life (hr)<br />
cut-out<br />
P<strong>100</strong>SDL-<strong>LED</strong>-XI-830-700<br />
code<br />
Xicato XSM-700 lamp 3000˚K<br />
80 type 12.4W base<br />
watts<br />
lumen 700 lm<br />
cut-out 50k<br />
115 x 115 mm<br />
P<strong>100</strong>SDL-<strong>LED</strong>-XI-830-<strong>100</strong>0<br />
P<strong>100</strong>SDL-LVC; P<strong>100</strong>RDL-LVCXicato<br />
XSM-<strong>100</strong>0 Low voltage capsule 3000˚K<br />
80 QTax-12 18.3W GY6.35<br />
20-50 W<br />
320-930 <strong>100</strong>0 lm lm<br />
115 50kx<br />
115mm; Ø115mm 115 x 115 mm<br />
P<strong>100</strong>SDL-<strong>LED</strong>-XI-930-700<br />
P<strong>100</strong>SDL-MVC; P<strong>100</strong>RDL-MVC<br />
Xicato XSM-700A<br />
Ma<strong>in</strong>s voltage capsule<br />
3000˚K<br />
P<strong>100</strong>SDL-<strong>LED</strong>-BR-830-800 ES Array-800<br />
3000˚K<br />
P<strong>100</strong>SDL-CMH; P<strong>100</strong>RDL-CMH Ceramic metal halide superm<strong>in</strong>i<br />
P<strong>100</strong>SDL-<strong>LED</strong>-PH-830-1<strong>100</strong> FortimoSLM-1<strong>100</strong><br />
3000˚K<br />
P<strong>100</strong>SDL-<strong>LED</strong>-OS930-800<br />
P<strong>100</strong>SDL-<strong>LED</strong>; P<strong>100</strong>RDL-<strong>LED</strong><br />
Preva<strong>LED</strong>-800<br />
Light emitt<strong>in</strong>g<br />
3000˚K<br />
diode<br />
P<strong>100</strong>SDL-LVC P<strong>100</strong>SDL-<strong>LED</strong>-Xicato; P<strong>100</strong>RDL-<strong>LED</strong>-Xicato<br />
Low voltage capsule Xicato XSM-700<br />
P<strong>100</strong>SDL-MVC P<strong>100</strong>SDL-<strong>LED</strong>-CREE; P<strong>100</strong>RDL-<strong>LED</strong>-CREE<br />
Ma<strong>in</strong>s voltage capsule 6 x CREE XP<br />
95<br />
82<br />
80<br />
90<br />
QT14<br />
CMH<br />
<strong>LED</strong><br />
-<br />
-<br />
21.3W<br />
14W<br />
18W<br />
11W<br />
20-50W<br />
25-60W<br />
G9<br />
GU6-5<br />
NA<br />
-<br />
-<br />
QTax-12<br />
QT14<br />
25-60 W<br />
35 W<br />
16W<br />
- GY6.35<br />
- G9<br />
260-820<br />
700 lm<br />
lm<br />
800 lm<br />
2200 lm<br />
1<strong>100</strong> lm<br />
700<br />
900<br />
lm<br />
lm<br />
- 320-930 lm<br />
- 260-820 lm<br />
115<br />
50k<br />
x 115mm; Ø115mm<br />
115 x 115 mm<br />
50k<br />
115 x 115 mm<br />
115 x 115mm; Ø115mm<br />
50k<br />
115 x 115 mm<br />
115<br />
50k<br />
x 115mm; Ø115mm<br />
115 x 115 mm<br />
115 x 115mm; Ø115mm 115 x 115 mm<br />
115 x 115mm; Ø115mm 115 x 115 mm<br />
P<strong>100</strong>SDL-CDM-SM<br />
Ceramic metal halide superm<strong>in</strong>i<br />
35W<br />
CDM-SM GU6.5<br />
2200 lm<br />
115 x 115 mm<br />
GB<br />
Installation<br />
Disconnect the ma<strong>in</strong>s supply before <strong>in</strong>stallation<br />
This fixture is to be <strong>in</strong>stalled and ma<strong>in</strong>ta<strong>in</strong>ed by a recognised electrician.<br />
Care must be taken when <strong>plaster</strong><strong>in</strong>g the hous<strong>in</strong>g that no excess <strong>plaster</strong> is applied on the <strong>in</strong>side of the lum<strong>in</strong>aire hous<strong>in</strong>g as this is detrimental to the<br />
operation of the lum<strong>in</strong>aire.<br />
1. Cut-out the required recess<strong>in</strong>g aperture and screw fix the frame (A) to the soffit. (as shown) Use a timber batten back<strong>in</strong>g to the soffit if stronger fix<strong>in</strong>g<br />
po<strong>in</strong>ts are required.<br />
2. Remove any <strong>in</strong>sulation or obstruction with<strong>in</strong> 150mm of the mount<strong>in</strong>g frame.<br />
3. Plaster the ceil<strong>in</strong>g us<strong>in</strong>g the lip of the frame as a stop bead for the <strong>plaster</strong> f<strong>in</strong>ish.<br />
4. Clean any excess <strong>plaster</strong> from <strong>in</strong>side the mount<strong>in</strong>g frame as this will have detrimental effect on the operation of the lum<strong>in</strong>aire.<br />
Make the electrical connection as follows:<br />
Fitt<strong>in</strong>g Type: P<strong>100</strong>SDL-LVC; P<strong>100</strong>RDL-LVC; P<strong>100</strong>SDLRD-LVC; P<strong>100</strong>RDLRD-LVC;<br />
A. Remove the female 230/240v 50/60Hz 2-p<strong>in</strong> connector plug from the lum<strong>in</strong>aire and wire the plug to the secondary side of the transformer. Refer to the<br />
transformer for a detailed wir<strong>in</strong>g diagram. Use only Whitegoods supplied transformers.<br />
B. Wire the ma<strong>in</strong>s <strong>in</strong>put to the supplied transformer, refer to the transformer for a detailed wir<strong>in</strong>g diagram.<br />
C. Re-connect the female plug from the ma<strong>in</strong>s transformer to the male plug attached to the lum<strong>in</strong>aire.<br />
Fitt<strong>in</strong>g Type P<strong>100</strong>SDL-MVC; P<strong>100</strong>RDL-MVC; P<strong>100</strong>SDLRD-MVC; P<strong>100</strong>RDLRD-MVC<br />
A. Unplug the female 230/240v 50/60Hz 3-p<strong>in</strong> connector from the lamp <strong>in</strong>sert and wire the ma<strong>in</strong>s cable <strong>in</strong>to position.<br />
B. Re-connect the female to male plug.<br />
Fitt<strong>in</strong>g Type: P<strong>100</strong>SDL-<strong>LED</strong>; P<strong>100</strong>RDL-<strong>LED</strong>; TBA<br />
Fitt<strong>in</strong>g Type: P<strong>100</strong>SDL-CMH; P<strong>100</strong>RDL-CMH;<br />
A. Unplug the female 230/240v 50/60Hz 2-p<strong>in</strong> plug from the lamp <strong>in</strong>sert and wire the control gear secondary side to the plug. Refer to the control gear for<br />
a detailed wir<strong>in</strong>g diagram. Use only Whitegoods supplied control gear.<br />
B. Wire the ma<strong>in</strong>s <strong>in</strong>put to the supplied transformer, refer to the transformer for a detailed wir<strong>in</strong>g diagram.<br />
C. Re-connect the female plug from the ma<strong>in</strong>s transformer to the male plug attached to the lum<strong>in</strong>aire.<br />
5. Insert the specific lamp <strong>in</strong>to the lamp <strong>in</strong>sert as shown.<br />
6. Clip the glass stirrup (C) onto the lamp cartridge (B) (The glass stirrup can be connected <strong>in</strong> a the flush or recessed position, dependant on lamp type)<br />
7. Connect the reta<strong>in</strong><strong>in</strong>g cord to the lum<strong>in</strong>aire <strong>in</strong>sert and ‘push-click’ the lamp <strong>in</strong>sert assembly (B/C) <strong>in</strong>to the frame (A)<br />
Re-lamp<strong>in</strong>g Procedure<br />
Disconnect the ma<strong>in</strong>s power supply before re-lamp<strong>in</strong>g<br />
1. ‘Push-click’ the lamp cartridge assembly (B/C) to release from the frame (A)<br />
2. Suspend the assembly on the retention wire<br />
3. Remove the glass stirrup (C)<br />
4. Replace the lamp with<strong>in</strong> the lamp <strong>in</strong>sert (B), (dispose of lamp accord<strong>in</strong>g to specific regulations)<br />
5. Re-fit the glass stirrup to lamp <strong>in</strong>sert (The glass stirrup can be connected <strong>in</strong> a flush or recessed position as described above)<br />
6. ‘Push-click’ the lamp <strong>in</strong>sert assembly (B/C) <strong>in</strong>to the frame (A)
whitegoods ltd light<strong>in</strong>g P<strong>100</strong> S-R DL 3/6<br />
GB<br />
Installation<br />
Disconnect the ma<strong>in</strong>s supply before <strong>in</strong>stallation<br />
This fixture is to be <strong>in</strong>stalled and ma<strong>in</strong>ta<strong>in</strong>ed by a recognised electrician.<br />
Care must be taken when <strong>plaster</strong><strong>in</strong>g the hous<strong>in</strong>g that no excess <strong>plaster</strong><br />
is applied on the <strong>in</strong>side of the lum<strong>in</strong>aire hous<strong>in</strong>g as this is detrimental to<br />
the operation of the lum<strong>in</strong>aire.<br />
1. Cut-out the required recess<strong>in</strong>g aperture and screw fix the frame (A) to<br />
the soffit. (as shown) Use a timber batten back<strong>in</strong>g to the soffit if stronger<br />
fix<strong>in</strong>g po<strong>in</strong>ts are required.<br />
2. Remove any <strong>in</strong>sulation or obstruction with<strong>in</strong> 150mm of the mount<strong>in</strong>g<br />
frame.<br />
3. Plaster the ceil<strong>in</strong>g us<strong>in</strong>g the lip of the frame as a stop bead for the<br />
<strong>plaster</strong> f<strong>in</strong>ish.<br />
4. Clean any excess <strong>plaster</strong> from <strong>in</strong>side the mount<strong>in</strong>g frame as this will<br />
have detrimental effect on the operation of the lum<strong>in</strong>aire.<br />
Make the electrical connection as follows:<br />
Fitt<strong>in</strong>g Type: P<strong>100</strong>SDL-LVC; P<strong>100</strong>RDL-LVC; P<strong>100</strong>SDLRD-LVC;<br />
P<strong>100</strong>RDLRD-LVC;<br />
A. Remove the female 230/240v 50/60Hz 2-p<strong>in</strong> connector plug from the<br />
lum<strong>in</strong>aire and wire the plug to the secondary side of the transformer.<br />
Refer to the transformer for a detailed wir<strong>in</strong>g diagram. Use only Whitegoods<br />
supplied transformers.<br />
B. Wire the ma<strong>in</strong>s <strong>in</strong>put to the supplied transformer, refer to the<br />
transformer for a detailed wir<strong>in</strong>g diagram.<br />
C. Re-connect the female plug from the ma<strong>in</strong>s transformer to the male<br />
plug attached to the lum<strong>in</strong>aire.<br />
Fitt<strong>in</strong>g Type P<strong>100</strong>SDL-MVC; P<strong>100</strong>RDL-MVC; P<strong>100</strong>SDLRD-MVC;<br />
P<strong>100</strong>RDLRD-MVC<br />
A. Unplug the female 230/240v 50/60Hz 3-p<strong>in</strong> connector from the lamp<br />
<strong>in</strong>sert and wire the ma<strong>in</strong>s cable <strong>in</strong>to position.<br />
B. Re-connect the female to male plug.<br />
Fitt<strong>in</strong>g Type: P<strong>100</strong>SDL-<strong>LED</strong>; P<strong>100</strong>RDL-<strong>LED</strong>; TBA<br />
Fitt<strong>in</strong>g Type: P<strong>100</strong>SDL-CMH; P<strong>100</strong>RDL-CMH;<br />
A. Unplug the female 230/240v 50/60Hz 2-p<strong>in</strong> plug from the lamp <strong>in</strong>sert<br />
and wire the control gear secondary side to the plug. Refer to the control<br />
gear for a detailed wir<strong>in</strong>g diagram. Use only Whitegoods supplied control<br />
gear.<br />
B. Wire the ma<strong>in</strong>s <strong>in</strong>put to the supplied transformer, refer to the<br />
transformer for a detailed wir<strong>in</strong>g diagram.<br />
C. Re-connect the female plug from the ma<strong>in</strong>s transformer to the male<br />
plug attached to the lum<strong>in</strong>aire.<br />
5. Insert the specific lamp <strong>in</strong>to the lamp <strong>in</strong>sert as shown.<br />
6. Clip the glass stirrup (C) onto the lamp cartridge (B) (The glass stirrup<br />
can be connected <strong>in</strong> a the flush or recessed position, dependant on lamp<br />
type)<br />
7. Connect the reta<strong>in</strong><strong>in</strong>g cord to the lum<strong>in</strong>aire <strong>in</strong>sert and ‘push-click’ the<br />
lamp <strong>in</strong>sert assembly (B/C) <strong>in</strong>to the frame (A)<br />
Re-lamp<strong>in</strong>g Procedure<br />
Disconnect the ma<strong>in</strong>s power supply before re-lamp<strong>in</strong>g<br />
1. ‘Push-click’ the lamp cartridge assembly (B/C) to release from the<br />
frame (A)<br />
2. Suspend the assembly on the retention wire<br />
3. Remove the glass stirrup (C)<br />
4. Replace the lamp with<strong>in</strong> the lamp <strong>in</strong>sert (B), (dispose of lamp accord<strong>in</strong>g<br />
to specific regulations)<br />
5. Re-fit the glass stirrup to lamp <strong>in</strong>sert (The glass stirrup can be<br />
connected <strong>in</strong> a flush or recessed position as described above)<br />
6. ‘Push-click’ the lamp <strong>in</strong>sert assembly (B/C) <strong>in</strong>to the frame (A)<br />
FR<br />
Installation<br />
Débrancher la source pr<strong>in</strong>cipale d’alimentation avant de procéder à<br />
l’<strong>in</strong>stallation.<br />
Cet accessoire doit être <strong>in</strong>stallé et entretenu par un électricien autorisé<br />
seulement.<br />
Lors du plâtrage de la maison, veiller à ne pas appliquer trop de plâtre à<br />
l’<strong>in</strong>tèrieur du logement du lum<strong>in</strong>aire, car cela pourrait compromettre le<br />
bon fonctionnement du lum<strong>in</strong>aire.<br />
1. Creuser l’ouverture de montage et fixer l’armature (A) au soffitte par<br />
des vis comme <strong>in</strong>diqué.Appliquer une latte de bois au soffitte si des<br />
po<strong>in</strong>ts de fixation plus résistants se rendent nécessaires.<br />
2. Enlever toute isolation ou obstruction dans les 150 mm autour de<br />
l’armature de montage.<br />
3. Plâtrer le plafond en se servant du bec de l’armature comme po<strong>in</strong>t de<br />
référence pour la f<strong>in</strong>ition du plâtrage.<br />
4. Enlever l’excès de plâtre de l'armature de montage, car cela pourrait<br />
compromettre le bon fonctionnement du lum<strong>in</strong>aire.<br />
Effectuer les connexions électriques comme suit :<br />
Types de raccordement : P<strong>100</strong>SDL-LVC; P<strong>100</strong>RDL-LVC;<br />
P<strong>100</strong>SDLRD-LVC; P<strong>100</strong>RDLRD-LVC;<br />
A. Débrancher le connecteur femelle 230/240v 50/60 Hz à 2 broches du<br />
lum<strong>in</strong>aire et connecter la prise au côté secondaire du transformateur.<br />
Consulter le schéma de câblage détaillé fourni avec le transformateur.<br />
N’utiliser que les transformateurs fournis par Whitegoods.<br />
B. Connecter l'entrée pr<strong>in</strong>cipale au transformateur fourni. Consulter le<br />
schéma de câblage détaillé fourni avec le transformateur.<br />
C. Rebrancher la prise femelle du tranformateur pr<strong>in</strong>cipal à la prise mâle<br />
côté lum<strong>in</strong>aire.<br />
Types de raccordement : P<strong>100</strong>SDL-MVC; P<strong>100</strong>RDL-MVC;<br />
P<strong>100</strong>SDLRD-MVC; P<strong>100</strong>RDLRD-MVC<br />
A. Débranchez le connecteur femelle 230/240 v 50/60 Hz à 3 broches<br />
du porte-ampoule et connecter les câbles pr<strong>in</strong>cipaux en position.<br />
B. Rebrancher la prise femelle à la prise mâle.<br />
Types de raccordement : P<strong>100</strong>SDL-<strong>LED</strong>; P<strong>100</strong>RDL-<strong>LED</strong>; (EN<br />
PHASE CONCEPTUELLE)<br />
Types de raccordement : P<strong>100</strong>SDL-CMH; P<strong>100</strong>RDL-CMH;<br />
A. Débrancher la prise femelle 230/240 v 50/60 Hz à 2 broches du<br />
porte-ampoule et connecter la prise au côté secondaire de la<br />
commande de réglage à distance. Consulter le schéma de câblage<br />
détaillé fourni avec la commande de réglage à distance. N’utiliser que<br />
les commandes de réglage à distance fournies par Whitegoods.<br />
B. Connecter l'entrée pr<strong>in</strong>cipale au transformateur fourni. Consulter le<br />
schéma de câblage détaillé fourni avec le transformateur.<br />
C. Rebrancher la prise femelle du tranformateur pr<strong>in</strong>cipal à la prise mâle<br />
côté lum<strong>in</strong>aire.<br />
5. Insérer la lampe dans son porte-ampoule comme <strong>in</strong>diqué.<br />
6. Fixer l’étrier du diffuseur (C) sur le porte-ampoule (B). (L’étrier du<br />
diffuseur peut être <strong>in</strong>séré dans l'encastrement ou être enfoncé selon le<br />
type de lampe).<br />
7. Connecter le fil de rétention à l’armature du lum<strong>in</strong>aire et ensuite<br />
bloquer le porte-ampoule (B/C) dans l’armature (A).<br />
Remplacement de l’ampoule<br />
Débrancher la source pr<strong>in</strong>cipale d’alimentation avant de remplacer<br />
l’ampoule.<br />
1. Excercer une pression sur le porte-ampoule (B/C) pour le libérer de<br />
l’armature (A).<br />
2. Suspendre l’ensemble par le fil de rétention.<br />
3. Enlever l’étrier du diffuseur (C)<br />
4. Remplacer l’ampoule qui se trouve dans le porte-ampoule (B).<br />
Elim<strong>in</strong>er l'ampoule conformément aux normes en vigueur dans ce<br />
doma<strong>in</strong>e.<br />
5. Repositionner l’étrier du diffuseur sur le porte-ampoule. (L’étrier du<br />
diffuseur peut être <strong>in</strong>séré dans l'encastrement ou être enfoncé comme<br />
<strong>in</strong>diqué ci-dessus).<br />
6. Excercer une pression sur le porte-ampoule (B/C) pour qu’il se<br />
bloque dans l’armature (A).<br />
SP<br />
Instalación<br />
Desconecte la alimentación eléctrica antes de llevar a cabo a<br />
<strong>in</strong>stalación.<br />
Esta lum<strong>in</strong>aria debe ser <strong>in</strong>stalada y mantenida por un electricista<br />
autorizado.<br />
Prestar atención al colocar el emplaste en la caja, tratando de que el<br />
exceso de emplaste no entre en el <strong>in</strong>terior de la caja de la lum<strong>in</strong>aria;<br />
esto es perjudicial para el funcionamiento de la lum<strong>in</strong>aria.<br />
1. Corte la abertura necesaria para empotrar la lum<strong>in</strong>aria y fije el<br />
bastidor (A) al falso techo. (como se muestra). Si se requiere una
whitegoods ltd light<strong>in</strong>g P<strong>100</strong> S-R DL 4/6<br />
fijación más segura utilice un listón de madera para reforzar el falso<br />
techo.<br />
2. Retire el material aislante o cualquier otro obstáculo que se encuentre<br />
a una distancia de 150 mm del bastidor.<br />
3. Coloque emplaste al cieloraso según se necesite usando el reborde<br />
del bastidor como tope para el acabado de emplaste.<br />
4. Limpie el exceso de emplaste desde el <strong>in</strong>terior del bastidor para evitar<br />
efectos perjudiciales en el funcionamiento de la lum<strong>in</strong>aria.<br />
Haga las conexiones eléctricas como se <strong>in</strong>dica a cont<strong>in</strong>uación:<br />
Acoplamientos de tipo: P<strong>100</strong>SDL-LVC; P<strong>100</strong>RDL-LVC;<br />
P<strong>100</strong>SDLRD-LVC; P<strong>100</strong>RDLRD-LVC;<br />
A. Desenchufe el conector hembra de dos patillas 230/240v 50/60Hz,<br />
de la lum<strong>in</strong>aria y empalme el toma al lado secundario del transformador.<br />
Vease el transformador para un diagrama detallado del cableado.<br />
Utilice sólo los transformadores Whitegoods sum<strong>in</strong>istrados.<br />
B. Empalme la entrada de corriente al transformador sum<strong>in</strong>istrado,<br />
vease el transformador para un diagrama detallado del cableado.<br />
C. Vuelva a conectar el toma hembra desde la alimentación del transformador<br />
al toma macho unido a la lum<strong>in</strong>aria.<br />
Acoplamientos de tipo: P<strong>100</strong>SDL-MVC; P<strong>100</strong>RDL-MVC;<br />
P<strong>100</strong>SDLRD-MVC; P<strong>100</strong>RDLRD-MVC<br />
A. Desenchufe el conector hembra de tres patillas, 230/240v 50/60Hz,<br />
del casquillo de la bombilla y conecte en su posición el cable de entrada<br />
de corriente.<br />
B. Vuelva a conectar el conector hembra al toma macho<br />
Acoplamientos de tipo: P<strong>100</strong>SDL-<strong>LED</strong>; P<strong>100</strong>RDL-<strong>LED</strong>; TBA<br />
Acoplamientos de tipo: P<strong>100</strong>SDL-CMH; P<strong>100</strong>RDL-CMH;<br />
A. Desenchufe el conector hembra de 2 patillas, 230/240v 50/60Hz, del<br />
casquillo de la bombilla y conecte el lado secundario del aparellaje al<br />
toma. Vease el aparellaje para un diagrama detallado del cableado.<br />
Utilice sólo aparellajes sum<strong>in</strong>istrados por Whitegoods.<br />
B. Empalme la entrada de corriente al transformador sum<strong>in</strong>istrado,<br />
vease el transformador para un diagrama detallado del cableado.<br />
C. Vuelva a conectar el toma hembra desde la alimentación del transformador<br />
al toma macho unido a la lum<strong>in</strong>aria.<br />
5. Coloque la bombilla específica en el encastre de la bombilla como se<br />
muestra.<br />
6. Enganche el estribo de vidrio (C) al casquillo de la bombilla (B) (El<br />
estribo de vidrio se puede acoplar en la posición enrasada o empotrada,<br />
dependiendo del tipo de bombilla).<br />
7. Conecte la alimentación al casquillo y al cable de retención y<br />
presione el conjunto de casquillo (B/C) en el bastidor (A).<br />
Cambio de la bombilla<br />
Antes de cambiar la bombilla desconecte la alimentación eléctrica.<br />
1. Presione el conjunto del casquillo (B/C) para desencajarlo del<br />
bastidor (A).<br />
2. Deje el conjunto colgando del cable de retención.<br />
3. Retire el estribo de vidrio ©.<br />
4. Cambie la bombilla dentro del casquillo (B), (deshágase de la<br />
bombilla según las normas específicas).<br />
5. Vuelva a acoplar el estribo de vidrio al casquillo. (El estribo de vidrio<br />
se puede acoplar en la posición rasada o empotrada).<br />
6. Resione el conjunto del casquillo (B/C) en el bastidor (A).<br />
ITA<br />
Installazione<br />
Prima dell’<strong>in</strong>stallazione staccare le corrente.<br />
L’<strong>in</strong>stallazione e qualsiasi <strong>in</strong>tervento deve essere effettuato da un<br />
elettricista autorizzato.<br />
Fare attenzione che al momento della posa dell’<strong>in</strong>tonaco parte di questo<br />
non f<strong>in</strong>isca all’<strong>in</strong>terno del sistema di illum<strong>in</strong>azione.<br />
1. Ritagliare un’apertura e fissare il telaio (A) con delle viti al soffitto<br />
(come mostrato). Utilizzare un r<strong>in</strong>forzo <strong>in</strong> legno qualora siano necessari<br />
dei punti di fissaggio piu’ solidi.<br />
2. Rimuovere il materiale isolante o eventuali altri ostacoli nel raggio di<br />
150mm dal telaio.<br />
3. Intonacare il soffitto f<strong>in</strong>o a bordo del telaio<br />
4. Rimuovere l’eccesso di <strong>in</strong>tonaco all’<strong>in</strong>terno del telaio che altrimenti<br />
comprometterebbe un regolare funzionamento del sistema di illum<strong>in</strong>azione.<br />
Effettuare il collegamento elettrico come segue<br />
Per i modelli: P<strong>100</strong>SDL-LVC; P<strong>100</strong>RDL-LVC; P<strong>100</strong>SDLRD-LVC;<br />
P<strong>100</strong>RDLRD-LVC;<br />
A. Scollegare le presa femm<strong>in</strong>a a due sp<strong>in</strong>otti 230/240v 50/60Hz dal<br />
portalampada e cablare la presa al trasformatore.<br />
B. Collegare la corrente pr<strong>in</strong>cipale al trasformatore. Per un diagramma<br />
di cablaggio piu’ dettagliato fare riferimento alle <strong>in</strong>dicazioni sul trasformatore.<br />
Utilizzare solo i trasformatori forniti da Whitegoods.<br />
C. Riconnettere le presa della lampada alla presa del trasformatore.<br />
Per i modelli: P<strong>100</strong>SDL-MVC; P<strong>100</strong>RDL-MVC; P<strong>100</strong>SDLRD-MVC;<br />
P<strong>100</strong>RDLRD-MVC<br />
A. Scollegare la presa femm<strong>in</strong>a a tre sp<strong>in</strong>otti 230/240v 50/60Hz dal<br />
portalampada e cablare il cavo pr<strong>in</strong>cipale nella sua posizione.<br />
B. Riconnettere le prese maschio e femm<strong>in</strong>a tra di loro.<br />
Per i modelli: P<strong>100</strong>SDL-<strong>LED</strong>; P<strong>100</strong>RDL-<strong>LED</strong>; (<strong>in</strong> fase di progettazione)<br />
Per i modelli: P<strong>100</strong>SDL-CMH; P<strong>100</strong>RDL-CMH;<br />
A. Scollegare le presa femm<strong>in</strong>a a due sp<strong>in</strong>otti 230/240v 50/60Hz dal<br />
portalampada e cablare la presa al trasformatore.<br />
B. Collegare la corrente pr<strong>in</strong>cipale al trasformatore. Per un diagramma<br />
di cablaggio piu’ dettagliato fare riferimento alle <strong>in</strong>dicazioni sul trasformatore.<br />
Utilizzare solo i trasformatori forniti da Whitegoods<br />
5. Inserire la lampad<strong>in</strong>a adeguata all’<strong>in</strong>terno del portalampada (B)<br />
(come mostrato <strong>in</strong> figura).<br />
6. Incastrare la montatura del vetro (C) nell’apposito b<strong>in</strong>ario del<br />
portalampada (B) come mostrato <strong>in</strong> figura (puo’ essere montato a filo del<br />
soffitto o <strong>in</strong> posizione rientrante <strong>in</strong> dipendenza anche del tipo di<br />
lampada)<br />
7. Connettere il cavo di sicurezza al portalampada e sp<strong>in</strong>gere<br />
(“push-click”) le parti assemblate (B/C) all’<strong>in</strong>terno del telaio (A).<br />
Sostituzione della lampad<strong>in</strong>a<br />
Staccare la corrente prima di sostituire la lampad<strong>in</strong>a.<br />
1. Sp<strong>in</strong>gere (“push-click”) il portalampada assemblato (B/C) perche’<br />
venga rilasciato dal telaio (A).<br />
2. Lascire pendere il portalampada utilizzando la corda di sicurezza.<br />
3. Rimuovere la montatura del vetro (C) dall’<strong>in</strong>castro.<br />
4. Sostituire la lampad<strong>in</strong>a all’<strong>in</strong>terno del portalampada (B)(utilizzare a<br />
norma con il sistema di illum<strong>in</strong>azione)<br />
5. Incastrare la montatura del vetro (C) nell’apposito b<strong>in</strong>ario del<br />
portalampada come mostrato <strong>in</strong> figura (puo’ essere montato a filo del<br />
soffitto o <strong>in</strong> posizione rientrante <strong>in</strong> dipendenza anche del tipo di<br />
lampada)<br />
6. Connettere il cavo di sicurezza al portalampada e sp<strong>in</strong>gere<br />
(“push-click”) le parti assemblate (B/C) all’<strong>in</strong>terno del telaio (A).
Installation<br />
Dimensions and specification<br />
Performance<br />
Temperature and physical environment<br />
Intellectual property<br />
Returns<br />
Service<br />
WEEE directive<br />
important <strong>in</strong>formation<br />
The <strong>in</strong>stallation of these products should only be carried out by a suitably qualified<br />
electrician <strong>in</strong> accordance with the <strong>in</strong>structions supplied with the product. All<br />
<strong>in</strong>stallation <strong>in</strong>structions can be downloaded from our website. We recommend that<br />
they are <strong>in</strong>cluded with construction issue draw<strong>in</strong>gs and specifications.<br />
Ceil<strong>in</strong>g void depths for recessed <strong>downlight</strong>s and l<strong>in</strong>ear lum<strong>in</strong>aires: The Ceil<strong>in</strong>g void<br />
depth should ideally be 25mm deeper than the overall height of the lum<strong>in</strong>aire. When<br />
a fire-hood and/or a remote emergency pack is to be used, the void depth and space<br />
surround<strong>in</strong>g the lum<strong>in</strong>aire will need to be <strong>in</strong>creased.<br />
The draw<strong>in</strong>gs, dimensions and f<strong>in</strong>ishes of the products <strong>in</strong> this catalogue and any<br />
accompany<strong>in</strong>g <strong>in</strong>formation are purely <strong>in</strong>dicative. Great care is taken to provide up<br />
to date <strong>in</strong>formation <strong>in</strong> this publication, however, due to a cont<strong>in</strong>u<strong>in</strong>g programme of<br />
design and development, we reserve the right to change these dimensions without<br />
prior notice. Please check the website for most up to date <strong>in</strong>formation. If a dimension<br />
is critical to the success of your project, please confirm it directly with the technical<br />
department. Throughout this publication, cut-out sizes refer to the aperture<br />
required when fitt<strong>in</strong>gs are mounted <strong>in</strong> soft <strong>plaster</strong>board. For fibrous tiles, timber,<br />
metal tiles and cast-<strong>in</strong> construction, check dimensions on site, or ask for a sample.<br />
Whitegoods reserves the right to discont<strong>in</strong>ue any product <strong>in</strong> this publication at any<br />
time without prior notice.<br />
All photometric data supplied is taken from a standard production lum<strong>in</strong>aire tested<br />
under ideal laboratory conditions and may vary from data taken <strong>in</strong> alternative<br />
conditions. All calculated light levels and/or light<strong>in</strong>g plots provided are offered for<br />
guidance only. The customer must satisfy themselves that lum<strong>in</strong>aires proposed are<br />
suitable for the application <strong>in</strong>tended <strong>in</strong> all performance and physical criteria.<br />
All products are tested with stated lamp wattage. Incorrect lamp types and<br />
wattages may effect efficiency, create glare and seriously overheat the lum<strong>in</strong>aire.<br />
Adequate ventilation and free air space around fitt<strong>in</strong>gs (<strong>in</strong> accordance with the<br />
<strong>in</strong>stallation <strong>in</strong>structions supplied with the product) will be necessary when used <strong>in</strong><br />
conf<strong>in</strong>ed spaces where elevated temperatures will occur. All lum<strong>in</strong>aires are designed<br />
to operate <strong>in</strong> a maximum 30degree ambient temperature. Operat<strong>in</strong>g <strong>in</strong> ambient<br />
temperatures above this can affect performance and the mechanical functionality of<br />
the lum<strong>in</strong>aire.<br />
In order that we can cont<strong>in</strong>ue to develop <strong>in</strong>novative quality products, we believe<br />
it is of critical importance that we protect our ideas and visions. Therefore any<br />
<strong>in</strong>fr<strong>in</strong>gement of our <strong>in</strong>tellectual property will be vigorously pursued.<br />
We cannot offer refunds on Custom or Tailored products, Standard product may<br />
be eligible for re-stock<strong>in</strong>g with<strong>in</strong> 3 months of orig<strong>in</strong>al purchase date, subject to a<br />
30% handl<strong>in</strong>g charge. All orig<strong>in</strong>al packag<strong>in</strong>g and documentation must be present and<br />
goods must be <strong>in</strong> orig<strong>in</strong>al condition.<br />
Whitegoods will endeavor to fulfill all orders as quickly as possible and treat all<br />
customers with the highest regard. For further <strong>in</strong>formation about Whitegoods<br />
products and services, please visit www.whitegoods.com.<br />
The Waste Electrical and Electronic Equipment Directive (WEEE Directive) is the<br />
European Community directive 2002/96/EC on waste electrical and electronic<br />
equipment, together with the RoHS Directive 2002/95/EC which became European<br />
Law <strong>in</strong> February 2003, sett<strong>in</strong>g collection, recycl<strong>in</strong>g and recovery targets for all<br />
types of electrical goods. This imposes responsibility for the disposal of waste<br />
electrical and electronic equipment (WEEE) on the manufacturers of such<br />
equipment. To meet these targets Whitegoods has become a member of Lumicom<br />
to allow us to meet the current and future directives. For further <strong>in</strong>formation on<br />
the WEEE directive please contact our offices.<br />
WEEE Registration number is WEE/FG0362QY<br />
Whitegoods Light<strong>in</strong>g Limited Unit 19 Hiltongrove 14 Southgate Road London N1 3LY T +44 (0)20 7241 2032 F +44 (0)20 7241 2033 mail@whitegoods.com www.whitegoods.com