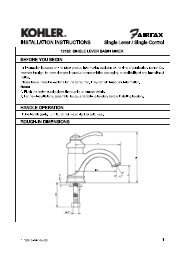
Installation Instructions - Kohler
Installation Instructions - Kohler
Installation Instructions - Kohler

Create successful ePaper yourself
Turn your PDF publications into a flip-book with our unique Google optimized e-Paper software.
AIRFAX<br />
All information is based on the latest product information available at the time of publication. <strong>Kohler</strong> Co.<br />
reserves the right to make changes in product characteristics, packaging, or availabilityat anytime<br />
without notice.<br />
Please leave these instructions for the consumer. Theycontain important information.<br />
1.Flushthewatersupplypipesthoroughlytoremovedebris.<br />
2. Shut off the water supplies to the fitting.<br />
3. Observe all local plumbing and building codes.<br />
4. Do not remove the guards until instructed to do so.<br />
4. To ensure the correct operation of the aspirator, i.e. no water flows out of shower head when faucet is<br />
in bath position, do not use pipe or piping components with an inside diameter less than 12mm between<br />
faucet body and spout.<br />
5. Check for leaks before covering the pipes, repairs asneeded.<br />
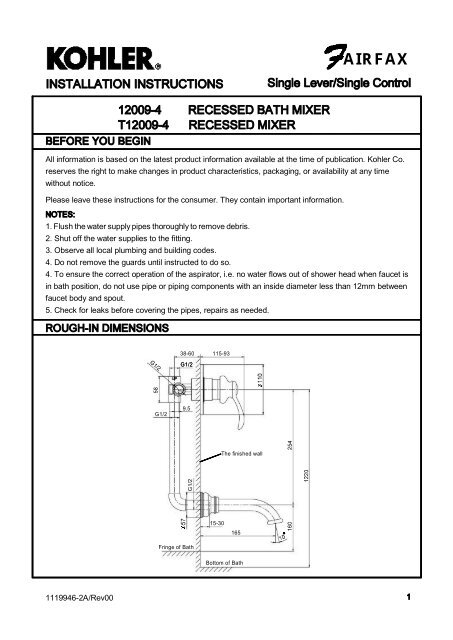
38-60 115-93<br />
G1/2<br />
G1/2<br />
9.5<br />
The finished wall<br />
15-30<br />
165<br />
Fringe of Bath<br />
Bottom of Bath<br />
1119946-2A/Rev00
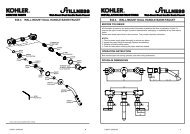
Construct suitable stud framing for attaching the mixer body.<br />
Locatesuitable screwsforfixingthemixer to the wall frame. Besure<br />
the 野 UP 冶 markingonthe valve body(1) is facing upward. Ensure the<br />
min. and max. dimensions between the centerline of the valve and<br />
38-60<br />
The finished wall<br />
the outside surface of the finished wall is 38-60mm.Fix thevalve<br />
body tothewallwithstraps(3),andattach the inlet and outlet tubes.<br />
Must be installed with the outlet verticallyup to ensure correct<br />
handle orientation. Connect the hot supplyto the left side inlet.<br />
Wrap the threads on the supplies and outlets with tape at least 4<br />
layers.<br />
Valve guard<br />
When attaching the inlet and outlet tubes, do not braze joints near<br />
Shower<br />
the mixer body as the heat will damage the ceramic valve and void<br />
the warranty.<br />
Up<br />
Cold<br />
For T12009-4, if used for shower only, install temporary G1/2"<br />
1<br />
nipple for shower. Applytape or sealant to the nipple threads of the<br />
plug(2), and intall it to mixer body; If used for bath also, discard it,<br />
Hot<br />
install temporaryG1/2" nipple for bath.<br />
2<br />
For 12009-4, used for bath only, install temporaryG1/2" nipple for<br />
bath. Apply tape or sealant to the nipple threadsof the plug(2), and<br />
3<br />
intall it onto the valve body.<br />
Bath<br />
During installation keep valve guard on valve body. Check for<br />
leakage after installation.<br />
Remove the plastic guard after completed the finished wall.<br />
Slide the faceplate(4) onto the valve and push it until it is flush with<br />
9<br />
the wall. Make sure that slot(9) on the faceplate is downwards.<br />
Align and fit handle(5) over valve spline with handle pointing down.<br />
Slide the washer(6) onto the setscrew(7). Attach the handle to the<br />
valve using the setscrew. Align and push in plug button(8). Ensure<br />
4 5<br />
6<br />
7<br />
8<br />
that the hot mark on the left.<br />
The illustration shown is the correct position of the handle in the off<br />
position.<br />
1119946-2A/Rev00
Remove protector from the G1/2"outlet(10, not provided).<br />
10<br />
11<br />
Measure the distance from the end of the outlet to the<br />
surface of the finished wall, make sure that it is between 15 and<br />
30mm. Ensure it is vertical as well.<br />
Apply tape or thread sealant to the threads of the outlet. Take out<br />
the adapter(11) from spout. Screw adapter onto the outlet, with<br />
the wrenching flats out. Put the rubber washer(12) into the bottom<br />
groove of the spout(15).Placethespoutover the adapter until its<br />
base is flush with the wall,lockinplacebythegrubscrew(13)with<br />
hexwrench(14).<br />
12<br />
13<br />
14<br />
15<br />
Ensure that all connections are tight. Ensure that the handle is in the<br />
off position.<br />
Open the drain. Turn on main water supplyand checkfor leaks.<br />
Repair as required.<br />
All Finishes: Clean the finish with mild soap and warm water. Wipe entire surface completelydrywith<br />
clean soft cloth. Manycleaners maycontain chemicals, such as ammonia, chlorine, toilet cleaner etc.<br />
which could adverselyaffect the finish and are not recommended for cleaning.<br />
Do not use abrasive cleaners or solvents on <strong>Kohler</strong> faucets and fittings.<br />
1119946-2A/Rev00
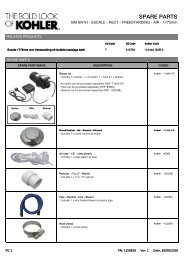
AIRFAX<br />
880063**<br />
Valve Body Assy<br />
1055197<br />
Collar<br />
834460<br />
Valve<br />
871483<br />
Nut<br />
836530<br />
Adapter<br />
832940<br />
Washer<br />
864204<br />
Plug<br />
1067470**<br />
Faceplate<br />
880084<br />
O-ring<br />
880085<br />
O-ring<br />
1126376<br />
Adapter<br />
871472<br />
O-ring<br />
871306<br />
Washer<br />
1126380**<br />
Spout<br />
871484**<br />
Bonnet<br />
78148**<br />
Lever Handle<br />
834554<br />
Screw<br />
836583**<br />
Plug Button<br />
66637<br />
Hex Wrench<br />
46112<br />
Screw<br />
NOTE: Part number with<br />
for 12009-4 only.<br />
**Color code must be specified when ordering.<br />
1119946-2A/Rev00