THE CANON Eos-1ds MARK III CAMERA: EOS REBORN
THE CANON Eos-1ds MARK III CAMERA: EOS REBORN
THE CANON Eos-1ds MARK III CAMERA: EOS REBORN

You also want an ePaper? Increase the reach of your titles
YUMPU automatically turns print PDFs into web optimized ePapers that Google loves.
Brightness Warning<br />
Display Function<br />
results are applied in real time to the image displayed in the [Lens aberration<br />
correction] window. One can then check the effects of distortion<br />
and peripheral illumination on the entire displayed image. One can also<br />
enlarge a section of the image to check for chromatic aberration or color<br />
blur by clicking in the section to be checked. That section then appears<br />
enlarged to 200% in the top right corner of the [Lens aberration correction]<br />
window, allowing one to check the effects in detail.<br />
If one is not happy with the results of the corrections performed by<br />
DPP, one can use the sliders for the different correction factors or the<br />
shooting distance to make additional adjustments. Also, one can<br />
correct red chromatic aberration with the [R] slider of the [Chromatic<br />
aberration] or blue chromatic aberration with the [B] slider.<br />
(Note that correcting peripheral illumination<br />
may result in noise appearing around the<br />
image periphery. One may be able to alleviate<br />
this noise by using the DPP noise reduction<br />
functions (luminance noise or chrominance<br />
noise reduction). In some images, using<br />
distortion correction may cause areas around<br />
the image periphery to be deleted. Also<br />
occasionally, color blur correction may have<br />
no discernible effect. Finally, color blur<br />
correction may also reduce color saturation<br />
in some images.)<br />
After completing the corrections, click the [OK] button to<br />
close the [Lens aberration correction] window. At that point,<br />
the corrections are applied to the image in the edit window<br />
and the corrections (ON or OFF) also appear in the tool palette.<br />
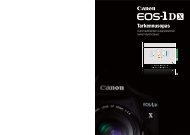
Lens Aberration Correction Window<br />
[NR/Lens] Tab in<br />
the Tool Palette<br />
Warning Display Settings in<br />
the Preferences Window<br />
The brightness warning display function has also been added.<br />
It is useful in preventing excessive adjustment and in checking<br />
white flare or shadowing in images. One can use the<br />
[Preferences] window to specify separate<br />
Edit Window (with Warnings Displayed)<br />
settings for highlights and shadows in the<br />
warning display range settings. If one selects<br />
the [Highlight] or [Shadow] setting in the [View]<br />
menu, highlights that exceed the specified<br />
range are displayed in red and shadows that<br />
exceed the range are displayed in blue in the<br />
image in the Edit or Edit Image window.<br />
VI. SOFTWARE 27