Tekmar 508 Data Brochure - eComfort.com
Tekmar 508 Data Brochure - eComfort.com
Tekmar 508 Data Brochure - eComfort.com

You also want an ePaper? Increase the reach of your titles
YUMPU automatically turns print PDFs into web optimized ePapers that Google loves.
MODE<br />
Heat In the heat mode, the Heat relay is operated to satisfy the temperature<br />
requirement of the zone.<br />
Off In the OFF mode, the Heat relay is not operated.<br />
NOTE: If an air or slab sensor is active in the OFF mode, a freeze protection is enabled<br />
that allows the Heat relay to be operated to keep the zone above 35°F (2°C).<br />
Installation<br />
STEP ONE<br />
GETTING READY<br />
Check the contents of this package. If any of the contents are missing or damaged, please<br />
contact your wholesaler or tekmar sales representative for assistance.<br />
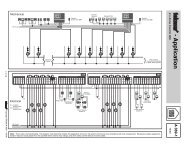
Type <strong>508</strong> Includes: • One Thermostat <strong>508</strong> • <strong>Data</strong> <strong>Brochure</strong> D <strong>508</strong> • User <strong>Brochure</strong> U <strong>508</strong><br />
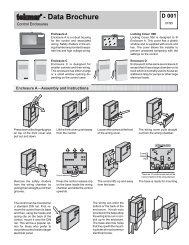
STEP TWO REMOVING THE FRONT COVER<br />
Place a screwdriver or similar object into the small slot located in the top of the thermostat.<br />
Push the screwdriver against the plastic tab and pull the top of the front cover so that it pivots<br />
around the bottom edge of the base.<br />
1 Push tab<br />
2<br />
Remove cover<br />
Menu Item<br />
STEP THREE<br />
MOUNTING THE BASE<br />
The thermostat should be installed on an interior wall of the desired zone approximately 5’ (1.5<br />
m) above the floor. Do not mount the thermostat in a location that may be affected by localized<br />
heat sources or cold drafts. It may be necessary to install a draft barrier behind the thermostat to<br />
prevent air from blowing through the wiring hole and affecting the thermostat’s built-in sensor.<br />
Mount the base directly to the wall using two #6<br />
1” screws. The screws are inserted through the<br />
mounting holes and must be securely fastened<br />
to the wall. If possible, at least one of the screws<br />
should enter a wall stud or similar surface.<br />
If the thermostat is to be mounted to a 2” x<br />
4” electrical box, order an Adaptor Plate 007.<br />
This plate mounts to the electrical box and the<br />
thermostat mounts to the plate. Ensure that the<br />
electrical box does not provide cold air to the<br />
thermostat.<br />
#6 1” screws<br />
© 2010 D <strong>508</strong> - 05/10 4 of 12