DVI to VGA Conversion Box Introduction Features Specifications
DVI to VGA Conversion Box Introduction Features Specifications
DVI to VGA Conversion Box Introduction Features Specifications

Create successful ePaper yourself
Turn your PDF publications into a flip-book with our unique Google optimized e-Paper software.
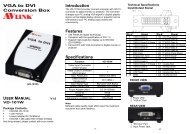
<strong>DVI</strong> <strong>to</strong> <strong>VGA</strong><br />
<strong>Conversion</strong> <strong>Box</strong><br />
<strong>Introduction</strong><br />
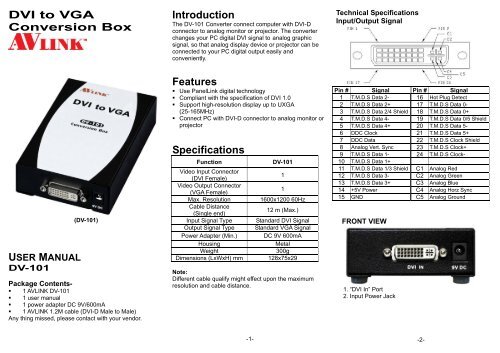
The DV-101 Converter connect computer with <strong>DVI</strong>-D<br />
connec<strong>to</strong>r <strong>to</strong> analog moni<strong>to</strong>r or projec<strong>to</strong>r. The converter<br />
changes your PC digital <strong>DVI</strong> signal <strong>to</strong> analog graphic<br />
signal, so that analog display device or projec<strong>to</strong>r can be<br />
connected <strong>to</strong> your PC digital output easily and<br />
conveniently.<br />
Technical <strong>Specifications</strong><br />
Input/Output Signal<br />
USER MANUAL<br />
DV-101<br />
(DV-101)<br />
Package Contents-<br />
• 1 AVLINK DV-101<br />
• 1 user manual<br />
• 1 power adapter DC 9V/600mA<br />
• 1 AVLINK 1.2M cable (<strong>DVI</strong>-D Male <strong>to</strong> Male)<br />
Any thing missed, please contact with your vendor.<br />
<strong>Features</strong><br />
• Use PanelLink digital technology<br />
• Compliant with the specification of <strong>DVI</strong> 1.0<br />
• Support high-resolution display up <strong>to</strong> UXGA<br />
(25-165MHz)<br />
• Connect PC with <strong>DVI</strong>-D connec<strong>to</strong>r <strong>to</strong> analog moni<strong>to</strong>r or<br />
projec<strong>to</strong>r<br />
<strong>Specifications</strong><br />
Function<br />
Video Input Connec<strong>to</strong>r<br />
(<strong>DVI</strong> Female)<br />
Video Output Connec<strong>to</strong>r<br />
(<strong>VGA</strong> Female)<br />
Max. Resolution<br />
Cable Distance<br />
(Single end)<br />
Input Signal Type<br />
Output Signal Type<br />
Power Adapter (Min.)<br />
Housing<br />
Weight<br />
Dimensions (LxWxH) mm<br />
DV-101<br />
1<br />
1<br />
1600x1200 60Hz<br />
12 m (Max.)<br />
Standard <strong>DVI</strong> Signal<br />
Standard <strong>VGA</strong> Signal<br />
DC 9V 600mA<br />
Metal<br />
300g<br />
128x75x29<br />
Note:<br />
Different cable qualify might effect upon the maximum<br />
resolution and cable distance.<br />
Pin # Signal Pin # Signal<br />
1 T.M.D.S Data 2- 16 Hot Plug Detect<br />
2 T.M.D.S Data 2+ 17 T.M.D.S Data 0-<br />
3 T.M.D.S Data 2/4 Shield 18 T.M.D.S Data 0+<br />
4 T.M.D.S Data 4- 19 T.M.D.S Data 0/5 Shield<br />
5 T.M.D.S Data 4+ 20 T.M.D.S Data 5-<br />
6 DDC Clock 21 T.M.D.S Data 5+<br />
7 DDC Data 22 T.M.D.S Clock Shield<br />
8 Analog Vert. Sync 23 T.M.D.S Clock+<br />
9 T.M.D.S Data 1- 24 T.M.D.S Clock-<br />
10 T.M.D.S Data 1+<br />
11 T.M.D.S Data 1/3 Shield C1 Analog Red<br />
12 T.M.D.S Data 3- C2 Analog Green<br />
13 T.M.D.S Data 3+ C3 Analog Blue<br />
14 +5V Power C4 Analog Horz Sync<br />
15 GND C5 Analog Ground<br />
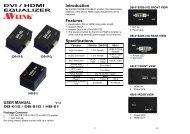
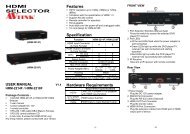
FRONT VIEW<br />
1. “<strong>DVI</strong> In” Port<br />
2. Input Power Jack<br />
-1-<br />
-2-
REAR VIEW<br />
1. Power LED<br />
2. “<strong>VGA</strong> Out” Port<br />
Installation<br />
1. Turn off the PC and moni<strong>to</strong>r.<br />
2. Connect the <strong>DVI</strong> male extension cable between the PC<br />
and the “<strong>DVI</strong> In” port of DV-101.<br />
3. Connect the <strong>VGA</strong> male extension cable between the<br />
moni<strong>to</strong>r and the “<strong>VGA</strong> Out” port of DV-101.<br />
4. Connect the power cord and turn on the DV-101.<br />
5. Turn on the PC and analog moni<strong>to</strong>r or projec<strong>to</strong>r.<br />
© C&C TECHNIC TAIWAN CO., LTD. All rights reserved.<br />
Trademarks:<br />
All the companies, brand names, and product names<br />
referred <strong>to</strong> this manual are the trademarks or<br />
registered trademarks belonging <strong>to</strong> their respective<br />
companies.<br />
-3-