
You also want an ePaper? Increase the reach of your titles
YUMPU automatically turns print PDFs into web optimized ePapers that Google loves.
<strong>COMM</strong>-<strong>TEC</strong> <strong>ProPLAY</strong> <strong>HD</strong><br />
High Definition<br />
Audio / Video Player<br />
User Manual<br />
Version 1.2<br />
1 of 38
Table Of Content<br />
1. General.......................................................................................................... 3<br />
1.1 Introduction................................................................................................. 3<br />
1.2 Scope of Delivery .................................................................................... 3<br />
1.3 Features...................................................................................................... 4<br />
2. Hardware ....................................................................................................... 5<br />
2.1 Remote Control........................................................................................... 6<br />
2.1.1 Entering Text or IP Address.................................................................... 6<br />
3. Getting started............................................................................................... 7<br />
4. Setup.............................................................................................................. 8<br />
4.1 Network Setup............................................................................................. 8<br />
4.2 FTP Setup..................................................................................................10<br />
4.2 Video Setup ...............................................................................................12<br />
4.4 Other Setup................................................................................................13<br />
5. Operation......................................................................................................15<br />
5.1 Play media files on the CF-Card.................................................................15<br />
5.1.1 Using the Remote Control When Media File Is Playing........................16<br />
5.2 Download Function.....................................................................................17<br />
5.2.1 Manual Download Function.................................................................17<br />
5.2.2 Auto Download Function.....................................................................18<br />
5.2.3 Download Pause / Resume.................................................................19<br />
5.3 Play the media files on the PC....................................................................20<br />
5.4 Download / Upload Media Files..................................................................23<br />
5.5 RS-232 Function (RS-232 cable is optional)...............................................27<br />
6. HTTP Command Function............................................................................28<br />
6.1 Player Control ............................................................................................29<br />
6.2 Network Setup............................................................................................30<br />
6.3 Timer Setup ...............................................................................................31<br />
7. Using the Play Buttons................................................................................32<br />
7.1 Using the Playlist Software.........................................................................32<br />
7.1.1 Default Setup......................................................................................32<br />
7.1.2 Button Setup.......................................................................................33<br />
7.2 Using the Play Buttons...............................................................................33<br />
7.3 Pin-Assignment Sub-D 25 Connector .........................................................34<br />
8. CGI-Commands............................................................................................35<br />
9. Troubleshooting...........................................................................................38<br />
Author: Sven Liebscher<br />
Date: 08/07/08<br />
2 of 38
1. General<br />
1.1 Introduction<br />
The <strong>ProPLAY</strong> <strong>HD</strong> is a digital media player that plays <strong>HD</strong> WMV9 and WMA from CF memory<br />
card without a <strong>com</strong>puter. Easily control the unit by using the external play buttons.<br />
The <strong>ProPLAY</strong> <strong>HD</strong> supports High Definition movie hardware decode acceleration, presents<br />
for you the smoother and clearer picture, it supports high resolution video output such as<br />
1080P / 1080i / 720P for movie theater quality video on a big screen. By connecting to<br />
Video, S-Video, Y.Pb.Pr, VGA (resolution up to 1360 x 768), <strong>HD</strong>MI (1920 x 1080P) and<br />
Audio, you can play picture, movie and music on any display device.<br />
1.2 Scope of Delivery<br />
• <strong>ProPLAY</strong> <strong>HD</strong><br />
• Remote Control<br />
• Audio Cable<br />
• Y.Pb.Pr Cable<br />
• S-Video Cable<br />
• <strong>HD</strong>MI Cable<br />
• Power Supply<br />
3 of 38
1.3 Features<br />
• Supports multiple file formats: <strong>HD</strong> WMV9 and WMA.<br />
• Supports Video, S-Video, Y.Pb.Pr, <strong>HD</strong>MI, VGA and Audio output.<br />
• <strong>HD</strong> Y.Pb.Pr output supports resolution:<br />
NTSC Mode(60Hz): 480P/ 720P/ 1080i.<br />
PAL Mode(50Hz): 576P/ 720P/ 1080i.<br />
• <strong>HD</strong>MI Output: 480P/ 720P/ 1080i/ 1080P.<br />
• VGA output supports resolution: 640x480/ 800x600/ 1024x768/ 1280x1024/<br />
1360x768.<br />
• Supports RS-232 port for <strong>com</strong>puter control with ASCII <strong>com</strong>mand (play, stop,<br />
pause…etc).<br />
• Connect using an Ethernet network cable at up to 100Mbps.<br />
• D-SUB 25-Pin: Easily control the <strong>ProPLAY</strong> <strong>HD</strong> by using the external play<br />
buttons.<br />
• The source of <strong>HD</strong> WMV9 MP@HL (Main Profile / High Level) supports resolution up<br />
to 1920x1080 (1080P) and the maximum bit rate is 12Mbps.<br />
• Supports CF memory cards. (Suggest using the high speed (150X) CF card)<br />
• Supports HTTP <strong>com</strong>mand function.<br />
• Supports Auto Key Lock function.<br />
• Exports the Configuration Value: You can export the configuration value to the CF<br />
card. The configuration can be modified on your PC, and can be applied to the<br />
<strong>ProPLAY</strong> <strong>HD</strong> or others.<br />
• Compatible with Windows Media Player 11: Play media files stored in a network<br />
<strong>com</strong>puter.<br />
• Supports FTP Auto Download Function: Connect to Remote FTP server and<br />
download data to the CF card automatically.<br />
• Supports Download Pause / Resume Function: Continue unfinished downloads<br />
upon next session.<br />
• Embedded FTP Server.<br />
• Supports NTP Network (G..M.T) Timer.<br />
• Supports Universal Plug and Play (UPnP) and DHCP.<br />
• Supports SLIDE SHOW Function (interval time with 10/ 15/ 30/ 60 seconds).<br />
4 of 38
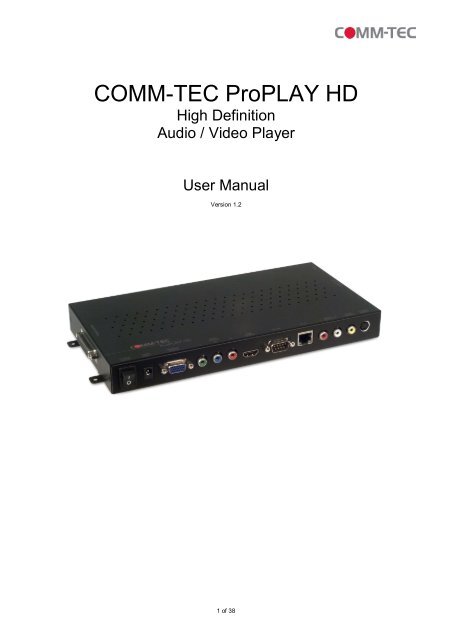
2. Hardware<br />
• Power Switch: Toggle between main power on & off.<br />
• DC Input: For the power adapter. (DC 12V / 1.5A)<br />
• VGA Connector: Connects to devices that support VGA input. (LCD projector)<br />
• Y.Pb.Pr Connector: Connects to devices that support Y.Pb.Pr input. (<strong>HD</strong>TV projector)<br />
• <strong>HD</strong>MI Connector: Connects to devices that support <strong>HD</strong>MI input.<br />
• RS-232 Connector: Used for <strong>com</strong>puter control with ASCII <strong>com</strong>mand.<br />
• RJ-45 Ethernet Connector: Connects to router or PC by RJ-45 Cable.<br />
• Audio Connector: Connects to sound input. (<strong>HD</strong>TV with amplified speaker)<br />
• Video Connector: Connects to devices that support Video input. (<strong>HD</strong>TV projector)<br />
• S-Video Connector: Connects to devices that support S-Video input. (<strong>HD</strong>TV projector)<br />
• D-SUB 25-Pin: Connects to play buttons.<br />
• CF Card Socket: For CF memory card.<br />
• “RESET” Button: To restart the <strong>ProPLAY</strong> <strong>HD</strong>.<br />
5 of 38
2.1 Remote Control<br />
1<br />
2<br />
3<br />
4<br />
5<br />
6<br />
7<br />
8<br />
9<br />
10<br />
11<br />
12<br />
13<br />
14<br />
15<br />
16<br />
17<br />
18<br />
19<br />
20<br />
21<br />
22<br />
23<br />
24<br />
Power on/ off<br />
Select the output mode<br />
Numeric Key<br />
Delete last entry<br />
Select a function or to play the selected<br />
file<br />
Open the setup menu Mute sound<br />
OSD display function on/ off<br />
Auto-play function on/ off<br />
Mute sound<br />
Volume up/ down<br />
Move the cursor<br />
Confirm the selection/ entry<br />
Go back one layer<br />
Select the TV type (NTSC/ PAL)<br />
Shuffle on & off<br />
Play the file selected<br />
View the previous/ next file<br />
Play the previous/ next file if in playback<br />
Select the repeat mode<br />
Rewind/ forward movie or music files<br />
Stop playback<br />
Show the information of the file selected<br />
Search video (movie) timeframe<br />
Zoom in/ out on the movie or picture<br />
Pause the playback or play frame by<br />
frame<br />
2.1.1 Entering Text or IP Address<br />
• Keys need to be pressed multiple times to enter the letter corresponding to that key.<br />
For Example: To enter the letter “a”. you would press the “2” button twice.<br />
• Enter The IP Address<br />
For Example: To enter the IP address ”192.168.100.100”,.<br />
Step 1: Press “1” once, then “1” is displayed, and the color of “1” is orange.<br />
Step 2: When the color of “1” turns white, press “9” once, then “9” is displayed.<br />
Step 3: Repeat steps 1 and 2 to enter and <strong>com</strong>plete the IP address.<br />
6 of 38
3. Getting started<br />
• Power On<br />
• Insert the CF memory card that has Picture, Music, Movie or WMV9 files.<br />
• Press the “POWER” button to power on the <strong>ProPLAY</strong> <strong>HD</strong>, then press the “TV<br />
MODE” button to select the output mode.<br />
• Status After Power On<br />
• Status 1: If the “AUTOPLAY (Movie or Picture)” function is enabled and there are<br />
movie or picture files in the CF card, the <strong>ProPLAY</strong> <strong>HD</strong> will auto play movie or<br />
picture files on the CF card after power on.<br />
• Status 2: If the “AUTOPLAY” function is disabled, after power on the main<br />
menu will appear as shown in the following figure. There are two groups in the<br />
main menu (“/mnt/CF” and “SETUP”).<br />
NOTE: The pop-up window that shows the IP address will appear later, if DHCP mode is<br />
selected when the <strong>ProPLAY</strong> <strong>HD</strong> is turned on.<br />
• Power Off: Press the “POWER” button again to power off.<br />
7 of 38
4. Setup<br />
• In the main menu, please using the “▼” button on remote control to select the “SETUP”<br />
item, then press the “ENTER” button. You will be presented with the <strong>ProPLAY</strong> <strong>HD</strong><br />
settings screen.<br />
• You can also press the “SETUP” button on remote control to directly open the settings<br />
screen. (If there is file that is being play, please stop first.)<br />
• There are four groups of sub-menu in the main menu (“Network Setup”, “FTP<br />
Setup”, “Video Setup” and “Other Setup”).<br />
• In the settings screen, you can use the “▲、▼、▲、▼” buttons to select an item, and<br />
press the “ENTER” button to confirm the selection.<br />
• Press the “SETUP” button on remote control to save and quit the settings screen.<br />
4.1 Network Setup<br />
• Network with: Select your network connection Disable/ RJ45.<br />
• IP Assigned by DHCP: If you have a DHCP-enabled router, please select “On”, then<br />
the router will automatically assigns an IP address to the <strong>ProPLAY</strong> <strong>HD</strong>. If you don’t<br />
have a DHCP –enabled router, select “Off” and type the network information in<br />
“Assign IP Address”.<br />
• Assign IP Address: If the <strong>ProPLAY</strong> <strong>HD</strong> is connected to a network without a DHCP<br />
server or you want to use Local FTP Server function, enter the fixed IP address, Mask,<br />
Gateway and DNS for the <strong>ProPLAY</strong> <strong>HD</strong>.<br />
PS. Refer to 5.1 for how to enter IP address by remote control.<br />
NOTE: Before setting the IP address, Mask, Gateway and DNS, check the network<br />
information of your PC. Please follow the steps below to get the network information of<br />
your PC.<br />
Step 1: Click on “Start” → “Run” and type in “<strong>com</strong>mand”, then press “ENTER”.<br />
The MS-DOS window will appear, type in “ipconfig” and then press “ENTER”<br />
to get the network information.<br />
8 of 38
Step 2: Assign IP Address, Mask (Subnet Mask) and Gateway (Default Gateway)<br />
for the <strong>ProPLAY</strong> <strong>HD</strong>.<br />
Enter the same values of the Subnet Mask and Gateway, and be careful not to enter<br />
the values of IP address that are already used by other devices on the network.<br />
• Media Player 11 Server: Enable/ disable the Media Player 11 server.<br />
9 of 38
4.2 FTP Setup<br />
• Local FTP Server: Turn on/ off the <strong>ProPLAY</strong> <strong>HD</strong> server.<br />
(If you use the <strong>ProPLAY</strong> <strong>HD</strong> server, please disable the DHCP function and input a<br />
fixed IP address, Mask, Gateway and DNS of the <strong>ProPLAY</strong> <strong>HD</strong>)<br />
• Local FTP Server Setup: Set the “Port”, “User ID” and “Password” of the <strong>ProPLAY</strong> <strong>HD</strong><br />
(The Default Port: 21, User ID: root, Password: admin)<br />
• FTP Auto Download: Enable/ Disable the FTP auto download function.<br />
• Remote FTP Download Setup<br />
- Server IP: Enter the domain name or IP address of the FTP as was given to you by<br />
your Web hosting provider.<br />
- Port: The default port for FTP is 21. In most cases you should not change this<br />
number. If the FTP site uses a port other than 21, you should enter the correct port.<br />
- User ID: Enter the user name of the Remote FTP server.<br />
- Password: Enter the Password of the Remote FTP server.<br />
- FTP Path: Enter the folder path that you want to share.<br />
• NTP Server: Enable/ Disable the NTP server function. (if the <strong>ProPLAY</strong> <strong>HD</strong> isn’t<br />
connect to internet, please disable the NTP Server function)<br />
• Time Setup: Set the NTP Server, Local Time and Auto Download Time here.<br />
NTP Server (the <strong>ProPLAY</strong> <strong>HD</strong> must be already connected to the network)<br />
- NTP Server: Enter the NTP server IP address like: 204.152.184.72.<br />
- G.M.T: After get the time from NTP server, it will update the G.M.T field.<br />
- Time Zone: Use the Volume +, - and Numeric Key to set the time zone of<br />
your location. (time zone must be set properly for the Auto-Download and<br />
Schedule functions)<br />
NOTE: GMT and applied regions<br />
10 of 38
Time Zone Region Time Zone Region<br />
(GMT-12:00) Eniwetok, Quazalen (GMT+02:00) Helsinki, Riga, Tallinn<br />
(GMT-11:00) Midway, Ireland, Samoa (GMT+03:00) Nairobi<br />
(GMT-10:00) Hawaii (GMT+03:00)<br />
Moscow, Saint Petersburg,<br />
Volgograd<br />
(GMT-09:00) Alaska (GMT+03:00) Baghdad<br />
(GMT-08:00)<br />
Pacific GMT (U.S. & Canada);<br />
Tijuana<br />
(GMT+03:00) Kuwait, Raid<br />
(GMT-07:00)<br />
Continental GMT (U.S. &<br />
Canada)<br />
(GMT+03:30) Tehran<br />
(GMT-07:00) Arizona (GMT+04:00) Baku, Tbilisi, Ere van<br />
(GMT-06:00) Mexico city (GMT+04:00) Abu Dhabi, Muscat<br />
(GMT-06:00) Saskatchewan (GMT+04:30) Kabul<br />
(GMT-06:00)<br />
Eastern Coast GMT (U.S. &<br />
Canada)<br />
(GMT+05:00) Yekaterinburg<br />
(GMT-06:00) Indiana (Eastern Coast) (GMT+05:00) Islamabad, Karachi, Tashkent<br />
(GMT-04:00) Atlantic GMT (Canada) (GMT+05:30)<br />
Calcutta, Chennai, Mumbai,<br />
New<br />
Delhi<br />
(GMT-04:00) Santiago (GMT+05:45) Katmandu<br />
(GMT-04:00) Caracas, La Paz (GMT+06:00) Sri Jayewardenepura Kotte<br />
(GMT-04:00) Newfoundland (GMT+06:00) Astana, Dakar<br />
(GMT-03:00) Greenland (GMT+08:00) Irkutsk, Ulan Bator<br />
(GMT-03:00) Buenos Aires, Georgetown (GMT+08:00) Kuala Lumpur, Singapore<br />
(GMT-03:00) Brasilia (GMT+08:00) Taipei<br />
(GMT-02:00) Mid-Atlantic (GMT+08:00) Perth<br />
(GMT-01:00) Capo Verde Is. (GMT+09:00) Seoul<br />
(GMT-01:00) Azores (GMT+09:00) Yakutsk<br />
(GMT-00:00)<br />
Greenwich GMT; Dublin,<br />
Edinburgh, Lisbon, London<br />
(GMT+09:00) Osaka, Sapporo, Tokyo<br />
(GMT-00:00) Casablanca, Monrovia (GMT+09:30) Darwin<br />
(GMT+01:00)<br />
Beograd, Bratislava, Budapest,<br />
Ljubljana, Prague<br />
(GMT+09:30) Adelaide<br />
(GMT+01:00)<br />
Brussels, Copenhagen,<br />
Madrid, Paris<br />
(GMT+10:00) Guam, Port Moresby<br />
(GMT+01:00)<br />
Sarajevo, Skopje, Sofia,<br />
Vilnius,<br />
(GMT+10:00) Brisbane<br />
Warsaw, Zagreb<br />
(GMT+01:00) Midwest Africa (GMT+10:00) Vladivostok<br />
(GMT+01:00)<br />
Amsterdam, Berlin, Bern,<br />
Rome,<br />
(GMT+10:00) Canberra, Melbourne, Sydney<br />
Stockholm, Vienna<br />
(GMT+02:00) Bucharest (GMT+10:00) Hobart<br />
(GMT+02:00) Athens, Istanbul, Minsk (GMT+11:00)<br />
Magadan, Solomon Is., New<br />
Caledonia<br />
(GMT+02:00) Jerusalem (GMT+12:00) Auckland, Wellington<br />
(GMT+02:00) Cairo (GMT+12:00)<br />
Fiji, Kamchatka Pen.,<br />
Marshall Is.<br />
(GMT+02:00) Harare, Pretoria (GMT+13:00) Nuku'alofa<br />
Local Time: Set the system time manually.<br />
NOTE: If the NTP Server and Local Time have been set, the NTP Server will be the<br />
first priority (the <strong>ProPLAY</strong> <strong>HD</strong> is already connected to the network).<br />
Download Time: Set the FTP auto-download time.<br />
• Local HTTP Server: Enable/ Disable the HTTP <strong>com</strong>mand function.<br />
• Local HTTP Server Setup: To set the “Port”, “User ID” and “Password” of the<br />
<strong>ProPLAY</strong> <strong>HD</strong>. (The Default Port: 80, User ID: root, Password: admin)<br />
NOTE: Press the “SETUP” button on the remote control to save the settings,<br />
and it will auto exit the settings screen, then restart the <strong>ProPLAY</strong> <strong>HD</strong>.<br />
11 of 38
4.2 Video Setup<br />
• TV Standard: Select the output TV video format (NTSC / PAL).<br />
• NTSC Active Output: Select the output mode. (<strong>HD</strong>MI/ SD Video/ VGA/ <strong>HD</strong> Y.Pb.Pr)<br />
You can also press directly the “TV MODE” button on the remote control to select<br />
output mode.<br />
• Aspecl-ratio: Select TV mode 4:3 or 16:9.<br />
• <strong>HD</strong>MI: Select the <strong>HD</strong>MI output resolution among 480i / 480p/ 720p / 1080i/ 1080p.<br />
Select the “Auto EDID”, the <strong>ProPLAY</strong> <strong>HD</strong> will scan the display device<br />
connected and set the correct resolution automatically.<br />
• SD Video: Select the SD output mode. (“Video/ S-Video” or “Y.Cb.Cr”)<br />
• VGA 60Hz: Select the VGA output resolution.<br />
(640*480 / 800*600/ 1024*768/ 1280*1024/ 1360*768)<br />
• <strong>HD</strong> Y.Pb.Pr 60Hz: Select the Y.Pb.Pr output resolution among 480p / 720p / 1080i.<br />
12 of 38
4.4 Other Setup<br />
• Play OSD Display: Enable or disable the OSD display.<br />
• Auto Play<br />
- Movies: Auto play movie files on the CF card after power on.<br />
- Pictures: Auto play picture files on the CF card after power on. (slideshow<br />
function)<br />
- Off: Turn off the Auto Play function.<br />
• SlideShow Interval: Set the time each photo is shown to 10, 15, 30 or 60 seconds.<br />
• Speakers Out: Supports 2 channel amplifier output.<br />
• Lock Remote Controller: Enable/ disable the auto key lock function. (The <strong>ProPLAY</strong><br />
<strong>HD</strong> will auto lock when there is no further input for 1 minute.)<br />
• Lock Password Setup: Press the “Enter” button to open the “Set Password” window.<br />
Enter the password with numeric buttons and press the “Enter” button to save the new<br />
password (The default password: 123).<br />
13 of 38
• Export Setting File: Press the “Enter” button to export the configuration value to the<br />
CF card.<br />
• Copy the file “<strong>HD</strong>PlayerSetting.txt” on CF card to your PC. Use the<br />
“Wordpad” to open the file, and you can see all the configuration value of<br />
<strong>ProPLAY</strong> <strong>HD</strong>.<br />
• You can modify directly the configuration value on your PC.<br />
Example. [AutoPlay] Off Options: Movies, Pictures, Off<br />
The “Auto Play” function is turned off, you can change directly the mode to Movies or<br />
Pictures.<br />
• Copy the <strong>com</strong>pleted file “<strong>HD</strong>PlayerSetting.txt” from PC to CF card. Insert the<br />
CF card to the <strong>ProPLAY</strong> <strong>HD</strong>, the <strong>ProPLAY</strong> <strong>HD</strong> will apply the new settings<br />
automatically.<br />
14 of 38
5. Operation<br />
5.1 Play media files on the CF-Card<br />
Step 1: Insert the CF card with media files (picture, music, movie), then turn on the <strong>ProPLAY</strong><br />
<strong>HD</strong> and press the “ENTER” button on the remote control when “’mnt/CF” is highlighted to take<br />
you into the CF card.<br />
Step 2: Select the type of data (VIDEO/ AUDIO/ PICTURES) you want to play, and then press<br />
the “ENTER” button on remote control to take you into the “VIDEO LIBRARY”, “AUDIO<br />
LIBRARY” or “PICTURE LIBRARY”.<br />
RETURN<br />
PS. If the symbol (return) appears on the screen, you can use “RETURN” button of the<br />
remote control to go back one layer.<br />
Step 3: Select the file you want to play, and press “ENTER” or “PLAY” button on the<br />
remote control to play the file.<br />
VIDEO LIBRARY AUDIO LIBRARY PICTURE LIBRARY<br />
15 of 38
5.1.1 Using the Remote Control When Media File Is Playing<br />
• SETUP: Press the button to adjust the brightness, contrast or saturation while the<br />
movie or picture is playing. With the “+ VOLUME –” button.<br />
- First Press: Adjust the brightness.<br />
- Second Press: Adjust the contrast.<br />
- Third Press: Adjust the saturation.<br />
Brightness Contrast Saturation<br />
• MUTE: Mute the sound while the movie or music is playing.<br />
• +/- VOLUME -: Increase/ decrease the volume while the movie or music is playing.<br />
• SHUFFLE: Turn on/ off the shuffle function.<br />
• PREV / NEXT: Play the previous/ next file.<br />
• REPEAT: Select the repeat mode.<br />
• REV / FWD: Rewind/ forward movie or music file.<br />
• STOP: Stop playing, and go back one layer.<br />
• INFO: Display the file information.<br />
File Information<br />
• SEARCH: Search video (movie) timeframe<br />
Press the “SEARCH” button, and enter the initial time that you want to start at, then press<br />
the<br />
“ENTER” button to play.<br />
16 of 38
• PAUSE/STEP: Pause the playback or play frame by frame.<br />
• ZOOM: Zoom in/ out on the movie or picture.<br />
Original Size First Press:ZOOM 01<br />
Second Press:ZOOM 02 Third Press:ZOOM 03<br />
5.2 Download Function<br />
Before it downloading files from the FTP server, <strong>ProPLAY</strong> <strong>HD</strong> will delete all contents on CF<br />
card except the file on the CF card and the FTP server are the same.<br />
5.2.1 Manual Download Function<br />
• Please confirm that the <strong>ProPLAY</strong> <strong>HD</strong> is already connected to the network. (Refer to 7.1<br />
Network Setup)<br />
• Please use the“▼”button to select the “DOWNLOAD” item, and press “ENTER” button.<br />
The <strong>ProPLAY</strong> <strong>HD</strong> will connect to the FTP server and download files automatically.<br />
• Before download files, <strong>ProPLAY</strong> <strong>HD</strong> will delete all contents on CF card first.<br />
• The pop-up window that shows the status of download and the screen saver will appear<br />
while the <strong>ProPLAY</strong> <strong>HD</strong> is downloading files. After finishing downloading files, the<br />
<strong>ProPLAY</strong> <strong>HD</strong> will display the files automatically.<br />
Screen Saver<br />
17 of 38
5.2.2 Auto Download Function<br />
• If there are more than one <strong>ProPLAY</strong> <strong>HD</strong> is, you can use ftp tools to divide them into<br />
different regional group.<br />
For example.<br />
- Use the ftp tool “Serv-U” to divide into three groups, and setup the “User name”,<br />
“Password” and “FTP port number” of three groups for login ftp server.<br />
Group 1: User name: ipmedia/ Password: 0000/ FTP port number: 21<br />
Group 2: User name: ipmedia2/ Password: 1111/ FTP port number: 21<br />
Group 3: User name: ipmedia3/ Password: 2222/ FTP port number: 21<br />
FTP tool:Serv-U<br />
Setup “User name”, “Password” and “FTP port number”<br />
- Enter the “Remote FTP Download Setup” window of <strong>ProPLAY</strong> <strong>HD</strong>, and then type the<br />
same “User name (User ID)”, “Password” and “Port”. The <strong>ProPLAY</strong> <strong>HD</strong> in group 1, please<br />
type the “User ID: ipmedia”, “Password: 0000” and “Port: 21”.<br />
- Please enter the “Network Timer NTP” window of <strong>ProPLAY</strong> <strong>HD</strong>, and set up the<br />
“Download Time”, then the <strong>ProPLAY</strong> <strong>HD</strong> will download all the files from the FTP server at<br />
the designated time.<br />
NOTE: The filename of the media files in FTP server cannot have any spaces.<br />
18 of 38
5.2.3 Download Pause / Resume<br />
<strong>ProPLAY</strong> <strong>HD</strong> supports download pause/resume. You can press the “STOP” button to pause<br />
downloading media files. The <strong>ProPLAY</strong> <strong>HD</strong> can continue unfinished downloads upon next<br />
session.<br />
NOTE:If the network connection is unstable or broken, a pop-up window will appear as shown<br />
below. The <strong>ProPLAY</strong> <strong>HD</strong> will attempt to resume downloading in 2 minutes. The user can<br />
terminate the download by pressing the “RETURN” button.<br />
19 of 38
5.3 Play the media files on the PC<br />
• Using Windows Media Player Version 11 ( Windows XP/ Vista only )<br />
Step 1: Please download and install Windows Media Player Version 11 on your PC first.<br />
Step 2: Launch the Windows Media Player Version 11 and the window below will appear.<br />
Step 3: Click the “Library” tab, and then click “Add to Library”.<br />
Step 4: Click “Add” and select the folder containing the media files you want to share, then<br />
click “OK”.<br />
Step 5: Click the “Library” tab, and then click “Media Sharing”.<br />
20 of 38
Step 6: Select the “Share my media”, and click “OK”.<br />
Step 7: In the Media Sharing dialog box, select the “Share my media” check box.<br />
Step 8: Confirm that the <strong>ProPLAY</strong> <strong>HD</strong> is connected to the network.<br />
In the list of devices below the “Share my media to” check box, select the device, and<br />
click “Allow” to share the media files.<br />
Step 9: The shared folder will appear on the screen of the <strong>ProPLAY</strong> <strong>HD</strong>. Select the folder<br />
and click the “ENTER” button on remote control to go into the folder.<br />
Step 10:Select the type of data (VIDEO/ AUDIO/ PICTURES) you want to play, and then<br />
press the “ENTER” button on remote control.<br />
21 of 38
Step 11: Select the file you want to play, and press “ENTER” or “PLAY” button on the remote<br />
control to play the file.<br />
NOTE: If the media files shared from PC are not listed on screen, restart<br />
your PC.<br />
22 of 38
5.4 Download / Upload Media Files<br />
Method 1: Connect by IE Browser<br />
Step 1: Confirm the “IP Assigned by DHCP” has been disabled, then enter the “<strong>ProPLAY</strong><br />
<strong>HD</strong> Network Setup” item, and type IP Address (example. 192.168.1.100), Mask and<br />
Gateway for the <strong>ProPLAY</strong> <strong>HD</strong> (refer to 7.1).<br />
Step 2: Confirm the “Local FTP Server” function has been enabled (refer to 7.1).<br />
Step 3: Please setup your router or firewall, and open a port 21 for the <strong>ProPLAY</strong> <strong>HD</strong>.<br />
The following figure is an example, please refer to your user’s manual of router for<br />
opening ports.<br />
Step 4: Start IE on PC and type the FTP site or IP<br />
In the local PC, please type “ftp://192.168.1.100”.<br />
In the remote PC, please type “ftp://61.30.13.40:21”.<br />
23 of 38
Step 5: Then type the “User Name” and “Password” and click “Log On” to log on to<br />
the <strong>ProPLAY</strong> <strong>HD</strong> Server. (Default User Name: root Default Password: admin)<br />
Step 6: After logging on, all the media files in the CF card on the <strong>ProPLAY</strong> <strong>HD</strong> will be<br />
listed. You can download and upload the media files between CF card and<br />
your PC.<br />
NOTE:<br />
After file being download/ upload will stop playing. After downloading files, the<br />
<strong>ProPLAY</strong> <strong>HD</strong> will display the movie files automatically.<br />
24 of 38
Method 2: Connect by FTP Tools<br />
For example:<br />
- If there are multiple <strong>ProPLAY</strong> <strong>HD</strong>, you can use the “CuteFTP” tool to connect and<br />
manage files easily.<br />
CuteFTP<br />
- You can create all the <strong>ProPLAY</strong> <strong>HD</strong>, and only select the <strong>ProPLAY</strong> <strong>HD</strong> that you want<br />
to connect in the list.<br />
25 of 38
- Select the files you want upload to the <strong>ProPLAY</strong> <strong>HD</strong>, or download the files to your<br />
PC.<br />
NOTE:<br />
After file being download/ upload will stop playing. After downloading files, the<br />
<strong>ProPLAY</strong> <strong>HD</strong> will display the movie files automatically.<br />
26 of 38
5.5 RS-232 Function (RS-232 cable is optional)<br />
Use the tool “Hyper Terminal” or other tools to control the <strong>ProPLAY</strong> <strong>HD</strong> with ASCII <strong>com</strong>mand.<br />
NOTE. 1.Baud Rates:<br />
- Firmware Updating: Set up the baud rate to 115200, 8,n,1.<br />
- ASCII Command: The available baud rates is 38400, 8,n,1.<br />
Commands end with a Carriage return (Hex 0D)<br />
Use a Null-Modem cable (Crossover, female-female)<br />
2. The reaction time of <strong>ProPLAY</strong> <strong>HD</strong> is around three seconds.<br />
• Keyboard Layout<br />
q: POWER -: VOL - w: SLOW<br />
R: RETURN *: MUTE >: NEXT<br />
!: REPEAT S: SELECT
6. HTTP Command Function<br />
• Confirm that the <strong>ProPLAY</strong> <strong>HD</strong> is already connected to the network. (Refer to 7.1)<br />
• Confirm the “Local HTTP Server” function has been enabled, and the “Local HTTP<br />
Server Setup” set has been <strong>com</strong>pleted (refer to 7.2).<br />
• Set your router or firewall, and open a port 80 for the <strong>ProPLAY</strong> <strong>HD</strong>. The following figure is<br />
an example, please refer to your user’s manual of router for opening ports.<br />
• Start IE on PC and type the HTTP site or IP:<br />
In the local PC, please type “http://192.168.1.100”.<br />
In the remote PC, please type “http://61.30.13.40:80”.<br />
• Type the “User Name”, “Password” and click “OK” to log on. (Default User Name: root<br />
Default Password: admin)<br />
• There are three items: “Player Control”, “Network Setup” and “Timer Setup” in the window.<br />
28 of 38
6.1 Player Control<br />
• Button Control: Directly control the play button to execute the action (the file “playlist.ini”<br />
must be on the CF card).<br />
• Power State: Turn on/ off the <strong>ProPLAY</strong> <strong>HD</strong>.<br />
• Check State: Check the current state of <strong>ProPLAY</strong> <strong>HD</strong>.<br />
• Playback Control: Control the <strong>ProPLAY</strong> <strong>HD</strong> to play file/ stop playback/ pause the<br />
playback/ play the previous file/ play the next file/ rewind movie/ forward movie.<br />
• Play File: Enter the file name that you want play, and click “Send” to play the file<br />
immediately.<br />
• Repeat File: Select the repeat mode.<br />
• Auto Download: Click “Send” to execute the auto download function immediately.<br />
Note: The “FTP Auto Download” function must be turned on and <strong>com</strong>pleted set.<br />
• Stop Auto Download: Click “Send” to stop the auto download function immediately.<br />
• Connect FTP Server: Click the FTP server address to connect to the <strong>ProPLAY</strong> <strong>HD</strong>, and<br />
enter the user name and password (Default User Name: root, Default Password:<br />
admin) to log on. After logging on all the media files in the CF card on the <strong>ProPLAY</strong> <strong>HD</strong><br />
will be listed. You can download and upload the media files between CF card and your<br />
PC.<br />
• Volume Control: Enter the value for volume (0-30).<br />
• Auto Play: Select the auto play mode (movies/ pictures/ off).<br />
• Reboot System: Click “Send” to reboot the <strong>ProPLAY</strong> <strong>HD</strong> immediately.<br />
29 of 38
6.2 Network Setup<br />
• Network Interface: Select your network connection Disable/ RJ45<br />
• DHCP: Enable/ Disable the DHCP function.<br />
• IP Address: Enter the fixed IP address, Mask, Gateway and DNS for the <strong>ProPLAY</strong> <strong>HD</strong>.<br />
• FTP Server: Enable/ Disable the FTP Server function. You can also change the User ID,<br />
Password and port of the FTP Server.<br />
• HTTP Server: Enable/ Disable the HTTP Server function. You can also change the User<br />
ID, Password and port of the HTTP Server.<br />
• Media Player 11: Enable/ disable the Media Player 11 server.<br />
• Reboot System: After setting, click “Send” to reboot the <strong>ProPLAY</strong> <strong>HD</strong>.<br />
30 of 38
6.3 Timer Setup<br />
• NTP Server: Set the NTP Server.<br />
• Auto Download: Set the auto download time.<br />
• Remote FTP: Set the Remote FTP Server.<br />
• Reboot System: After setting, click “Send” to reboot the <strong>ProPLAY</strong> <strong>HD</strong>.<br />
31 of 38
7. Using the Play Buttons<br />
Important: To use the Button control,<br />
you must set the <strong>ProPLAY</strong> <strong>HD</strong> to "Auto Play: Movies"<br />
7.1 Using the Playlist Software<br />
Double click the “playlist.exe” to run the program. It is consisted five control buttons (New,<br />
Open, Save, Save As and Exit), Default Setup and Button Setup.<br />
7.1.1 Default Setup<br />
Action Select: Select the action when no button is pressed.<br />
• Play all clips: Play all the video files on the CF card automatically.<br />
• Play default clips: Only play the default files (please set the default files in the Default<br />
Clips box).<br />
32 of 38
• Show logo: Display the picture file named “act_logo.jpg” (you have to put the picture<br />
file (JPG format) named “act_logo” on CF card). If the Show logo function is selected,<br />
but the “act_logo.jpg” file is not on the CF card, the <strong>ProPLAY</strong> <strong>HD</strong> will play the original<br />
background.<br />
• Show black screen: Display black screen.<br />
7.1.2 Button Setup<br />
• Button Select: Select the play button (1~16).<br />
• Action Select: Set the action of the selected button from a drop down list.<br />
7.2 Using the Play Buttons<br />
Step 1: After finishing all setup, press the “SAVE” button, and a pop-up window will appear.<br />
Select the path, then click the “SAVE” button to save.<br />
NOTE:<br />
Do not rename the file (playlist.ini); otherwise the <strong>ProPLAY</strong> <strong>HD</strong> will not be able to<br />
read the file.<br />
Step 2: Put the “playlist.ini” file and the associated video files on the CF card, and insert the<br />
CF card to the <strong>ProPLAY</strong> <strong>HD</strong>.<br />
Step 3: Confirm that the play buttons is connected to the <strong>ProPLAY</strong> <strong>HD</strong>.<br />
Step 4: Directly press one of the play buttons to control the <strong>ProPLAY</strong> <strong>HD</strong>.<br />
33 of 38
7.3 Pin-Assignment Sub-D 25 Connector<br />
Pin No. Description<br />
1-16 Input 1-16<br />
17-20 GND for Inputs<br />
21 N/C<br />
22 +12V<br />
23 +12<br />
24 GND<br />
25 GND<br />
34 of 38
8. CGI-Commands<br />
Function Command Comment<br />
Power State /SetCGI?Power=On Power On<br />
/SetCGI?Power=Off Power Off<br />
Playback Control Play /SetCGI?Playback=1<br />
Stop /SetCGI?Playback=2<br />
Pause/Step /SetCGI?Playback=3<br />
Prev /SetCGI?Playback=4<br />
Next /SetCGI?Playback=5<br />
Rew /SetCGI?Playback=6<br />
Fwd<br />
/SetCGI?Playback=7<br />
Play File<br />
Input file<br />
name<br />
/SetCGI?PlayFile=01_<br />
4.mpg<br />
01_4.mpg is file<br />
name.<br />
Repeat File Repeat All /SetCGI?Repeat=1<br />
Repeat Track /SetCGI?Repeat=2<br />
Repeat Off /SetCGI?Repeat=3<br />
AutoDownload<br />
/SetCGI?AutoDownloa<br />
dNow=1<br />
Stop<br />
AutoDownload<br />
/SetCGI?StopAutoDow<br />
nloadNow=1<br />
Volume Control /SetCGI?Volume=num num=0~28<br />
Auto Play Movies /SetCGI?AutoPlay=1<br />
Pictures /SetCGI?AutoPlay=2<br />
Off<br />
/SetCGI?AutoPlay=3<br />
Network Interface Disable /SetCGI?Network=1 need to reboot<br />
RJ45 /SetCGI?Network=2<br />
WiFi /SetCGI?Network=3<br />
DHCP Enable /SetCGI?DHCP=1 need to reboot<br />
Disable /SetCGI?DHCP=2<br />
35 of 38
IP Address<br />
FTP Server<br />
HTTP Server<br />
Media Player 11<br />
Wifi<br />
EncryptionMode<br />
WiFi SSID<br />
NTP Timer<br />
AutoDownload<br />
/SetCGI?IP=192.168.1<br />
68.100&Mask=255.255<br />
.255.0&Gateway=192.<br />
168.168.254&DNS=16<br />
8.95.1.1<br />
/SetCGI?FTPServer=v<br />
alue&FTPServerID=id<br />
&FTPServerPW=pw&F<br />
TPServerPort=port<br />
/SetCGI?HTTPServer=<br />
value&HTTPServerID=<br />
id&HTTPServerPW=p<br />
w&HTTPServerPort=p<br />
ort<br />
/SetCGI?MediaPlayer1<br />
1=value<br />
/SetCGI?EncryptionMo<br />
de=value<br />
/SetCGI?SSID=text&E<br />
ncryption=pw<br />
/SetCGI?NTPServer=t<br />
ext1&TimeDiffHr=text2<br />
&TimeDiffMin=text3<br />
/SetCGI?AutoDownloa<br />
d=value&AutoDownloa<br />
dTimeHr=text1&AutoD<br />
ownloadTimeMin=text2<br />
&AutoDownloadTimeS<br />
ec=text3<br />
need to reboot<br />
value= 1(Enable) /<br />
2(Disable); need to<br />
reboot<br />
id is your id of CF<br />
card ftp<br />
pw is your pw of CF<br />
card ftp<br />
port is your port<br />
number of CF card<br />
ftp<br />
value= 1(Enable) /<br />
2(Disable); need to<br />
reboot<br />
id is your id of http<br />
server<br />
pw is your pw of http<br />
server<br />
port is your port<br />
number of http<br />
server<br />
value= 1(Enable) /<br />
2(Disable); need to<br />
reboot<br />
value= 1(Open/None<br />
) / 2(WEP); need to<br />
reboot<br />
SSID need equal<br />
router's SSID; need<br />
to reboot<br />
text1 is a id address<br />
of NTP Server; need<br />
to reboot<br />
text2 is a timezone<br />
hour, ex:+8<br />
text3 is a timezone<br />
minute, ex:00<br />
value= 1(Enable) /<br />
2(Disable); need to<br />
reboot<br />
text1 is a hour, ex:20<br />
text2 is a minute,<br />
ex:00<br />
text3 is a second,<br />
ex:00<br />
36 of 38
Remote FTP<br />
/SetCGI?RemoteFTPI<br />
P=ip&RemoteFTPID=i<br />
d&RemoteFTPPW=pw<br />
&RemoteFTPPort=port<br />
&RemoteFTPPath=pat<br />
h<br />
ip is your ip address<br />
of Remote FTP;<br />
need to reboot<br />
id is your id of<br />
Remote FTP<br />
pw is your password<br />
of Remote FTP<br />
port is your port<br />
number of Remote<br />
FTP<br />
path is Remote FTP<br />
download path, ex:<br />
demo<br />
Reboot System /SetCGI?Reboot=1 pw need equal<br />
router's Encryption<br />
37 of 38
9. Troubleshooting<br />
Situation<br />
Check Point<br />
1. Check power cable and power switches.<br />
2. Ensure the video cables are connected between the player<br />
and the <strong>ProPLAY</strong> <strong>HD</strong>.<br />
No Picture<br />
3. Press the “TV MODE” button on the remote control to select<br />
the correct output mode.<br />
4. Make sure the file format on the CF card is correct.<br />
5. Check if the display device is switched to correct video input<br />
source.<br />
No Response From<br />
the Remote Control<br />
No setup menu<br />
No sound<br />
Network Not Working<br />
1. Ensure that there are 2 batteries (AAA size) in the<br />
remote control and they are inserted the correctly.<br />
2. Check for any barrier between the remote control and<br />
the product.<br />
1. A CF card with a valid video file must be in the<br />
<strong>ProPLAY</strong> <strong>HD</strong><br />
2. If a video clip is playing, press first the stop button and<br />
than the setup button<br />
1. Check if the mute function is on.<br />
2. Check if the volume is set properly.<br />
3. Check if audio cable has been connected correctly.<br />
1. Check your IP settings on the Network Setup page.<br />
(refer to 7.1)<br />
2. If using wired network, make sure the network cable is<br />
plugged in on both the <strong>ProPLAY</strong> <strong>HD</strong> and your network<br />
hub.<br />
38 of 38