maxxam setup instructions - Family Go Karts
maxxam setup instructions - Family Go Karts
maxxam setup instructions - Family Go Karts

Create successful ePaper yourself
Turn your PDF publications into a flip-book with our unique Google optimized e-Paper software.
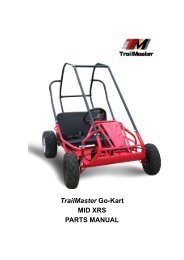
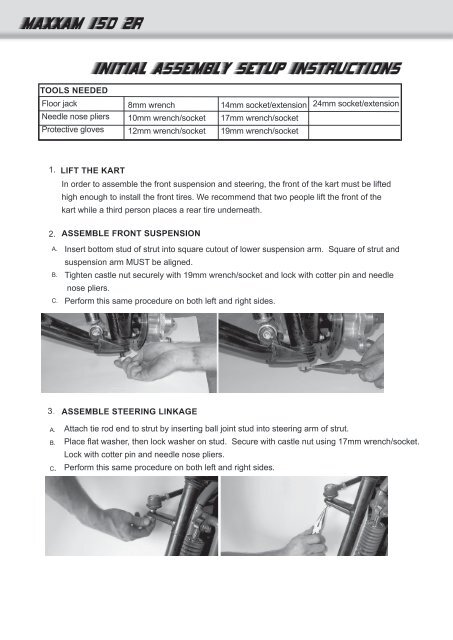
MAXXAM 150 2R<br />
INITIAL ASSEMBLY SETUP INSTRUCTIONS<br />
TOOLS NEEDED<br />
Floor jack<br />
Needle nose pliers<br />
Protective gloves<br />
8mm wrench<br />
10mm wrench/socket<br />
12mm wrench/socket<br />
14mm socket/extension<br />
17mm wrench/socket<br />
19mm wrench/socket<br />
24mm socket/extension<br />
1.<br />
2.<br />
A.<br />
B.<br />
C.<br />
LIFT THE KART<br />
In order to assemble the front suspension and steering, the front of the kart must be lifted<br />
high enough to install the front tires. We recommend that two people lift the front of the<br />
kart while a third person places a rear tire underneath.<br />
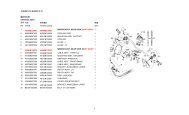
ASSEMBLE FRONT SUSPENSION<br />
Insert bottom stud of strut into square cutout of lower suspension arm. Square of strut and<br />
suspension arm MUST be aligned.<br />
Tighten castle nut securely with 19mm wrench/socket and lock with cotter pin and needle<br />
nose pliers.<br />
Perform this same procedure on both left and right sides.<br />
3<br />
A.<br />
B.<br />
C.<br />
ASSEMBLE STEERING LINKAGE<br />
Attach tie rod end to strut by inserting ball joint stud into steering arm of strut.<br />
Place flat washer, then lock washer on stud. Secure with castle nut using 17mm wrench/socket.<br />
Lock with cotter pin and needle nose pliers.<br />
Perform this same procedure on both left and right sides.
4.<br />
A.<br />
B.<br />
C.<br />
D.<br />
FRONT TIRES<br />
Remove lug nuts from front hub.<br />
Place tire in position by aligning the holes in the wheel with the lugs.<br />
Tighten lug nuts with 14mm socket with extension.<br />
Perform this same procedure on both left and right sides.<br />
5<br />
A.<br />
B.<br />
CARGO RACK<br />
Position the rack so that the inserted ends align with the holes in the frame behind the seat.<br />
Tighten with 10mm wrench/socket.<br />
Once in position tighten the rack supports with a 10mm wrench/socket and 12mm<br />
wrench/socket.<br />
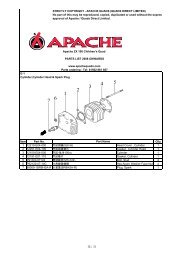
6. REAR SHOCKS<br />
A. Place floor jack under square tubing located under seat. Lift kart until rear shock mounts align<br />
with eyeholes in shock. Insert bolt.<br />
B. Tighten lock nut using 14mm and 12mm wrenches/sockets.<br />
C.<br />
Perform this same procedure on both left and right sides.
7. REAR TIRE<br />
A. Slide rear wheel/hub assembly onto axle. Splines must be aligned in order for the assembly to<br />
properly fit.<br />
B. Place small washer, then large washer on axle Tighten castle nut with 24mm socket with extension.<br />
C. Lock with cotter pin and needle nose pliers<br />
D<br />
Perform this same procedure on both left and right sides<br />
8.<br />
A.<br />
B.<br />
C.<br />
D.<br />
E.<br />
F.<br />
G.<br />
BRUSH BARS<br />
Place main bars in proper location by putting the open ends over the bar mounts located on the<br />
frame.<br />
On each end insert bolt with washer on each side and finger tighten with lock nut.<br />
Place each shoulder bar over the shoulder bar mounts on the frame. Line the holes of the bars up<br />
with those of the mounts. Insert bolt with washer on each side and finger tighten with lock nut.<br />
Align the top of the shoulder bars up with the holes in the main bar. Insert a bolt and washer and<br />
finger tighten.<br />
Place top cross bar between the main bars with hoop pointing towards the front of the kart. Align<br />
holes of the top cross bar with holes in the main bars. Insert a bolt and washer for each hole and<br />
finger tighten. Before placing the two cross bars in between, you must use an 8mm wrench to tap<br />
and chase the threads and clean the paint/debris out of the bolt holes.<br />
Place bottom cross bar between main bars toward the rear of the kart. Align holes of bottom cross<br />
bar with holes in main bars Insert bolt and washer and finger tighten.<br />
With all members of the brush bar in place, secure tightly with 10mm wrench/socket and 12mm<br />
wrench/socket.
9 WHEEL CAP<br />
10. STEERING WHEEL<br />
Place one rubber wheel cap on each wheel. Place the steering wheel on mount, align the<br />
holes and tighten with 10mm wrench/socket.<br />
Snap steering wheel cap into place.<br />
11FENDERS<br />
A.<br />
B.<br />
C.<br />
D.<br />
Install front fenders by inserting the turned down stud of the fender mount into the fender sleeve on<br />
the frame.<br />
Insert provided bolt into the mounting hole and tighten the fender to the frame with 8mm and 10mm<br />
wrench.<br />
Install the rear fenders to the swing arm by placing the square cut-out ends over<br />
the rectangle tubing.<br />
Align the holes of the fender mounts with those of the swing arm, and tighten with 10mm<br />
wrench/socket.<br />
12.<br />
HEADRESTS<br />
Put headrests in designated holes as shown in the picture below.
13.<br />
A.<br />
B.<br />
C.<br />
D.<br />
E.<br />
F.<br />
G.<br />
H.<br />
I.<br />
J.<br />
BATTERY<br />
Put on protective gloves.<br />
Remove strip covering acid ports from battery<br />
Place funnel into acid ports on battery. With funnel aligned in battery press acid container firmly<br />
into funnel allowing the acid to flow into the battery.<br />
Allow all acid to drain from container.<br />
Place rubber cap into position over the ports, let it sit with cap off for 10 minutes.<br />
Press cap firmly closing all ports securely and let the battery charge for 30 minutes on a 2-3 amp<br />
charger with the lid off.<br />
Position battery into battery holder on swing arm.<br />
Place rectangular nuts provided with battery under each post.<br />
Tightly fasten red cable to + pole and black or green cable to - pole.<br />
Place battery cover on top of battery and secure with rubber strap.<br />
14. TAIL LIGHT<br />
A.<br />
B<br />
Remove the nut and lock washer from each bolt in tail light.<br />
Mount tail light to kart by inserting the bolts in the tail light through the holes in the bottom crossbar.<br />
Tighten with 8mm wrench. Be sure not to over tighten.