Cheswick Platform Bed (California King/King) - Pottery Barn
Cheswick Platform Bed (California King/King) - Pottery Barn
Cheswick Platform Bed (California King/King) - Pottery Barn

Create successful ePaper yourself
Turn your PDF publications into a flip-book with our unique Google optimized e-Paper software.
<strong>Cheswick</strong> <strong>Platform</strong> <strong>Bed</strong><br />
(<strong>California</strong> <strong>King</strong>/<strong>King</strong>)<br />
Assembly Instructions<br />
Pre- Assembly:<br />
Please read all instructions carefully before assembling.<br />
For your safety, assembly by two people is recommended.<br />
Remove all parts from the box and lay out on a clear carpeted or scratch-free work surface. (The<br />
shipping box provides an ideal work surface), this will avoid damaging any parts during assembly.<br />
Do not dispose of any contents until assembly is completed to avoid accidentally discarding small<br />
parts.<br />
Use the parts lists above to identify and separate each of the pieces included.<br />
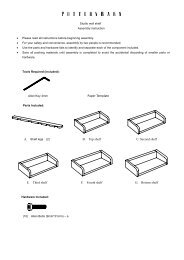
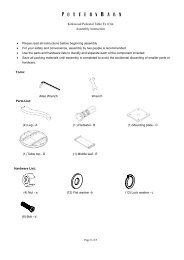
Parts Included:<br />
(2) Headboard and Footboard (A)<br />
(2) Side Rail (B)<br />
(4) Bun Feet (C)<br />
(1) Center Beam (D)<br />
(3) Center Leg (E)<br />
(30) Slat (F)<br />
(2) Headboard and footboard Thin Panel (G)<br />
(2) Side Rail Thin Panel (H)<br />
Hardware Included:<br />
(12) Wood dowel M8 x 30 (I)<br />
(10) JCBC Bolt M6 x 35 (J)<br />
(8) JCBC Bolt M6 x 60 (K)<br />
(18) Spring washer M6 (L)<br />
(10) Small flat washer M6 x 13 (M)<br />
(8) Large flat washer M6 x 16 (N)<br />
(8) Pan Head Screw M4 x 25 (O)<br />
(1) Allen key M4 (P)<br />
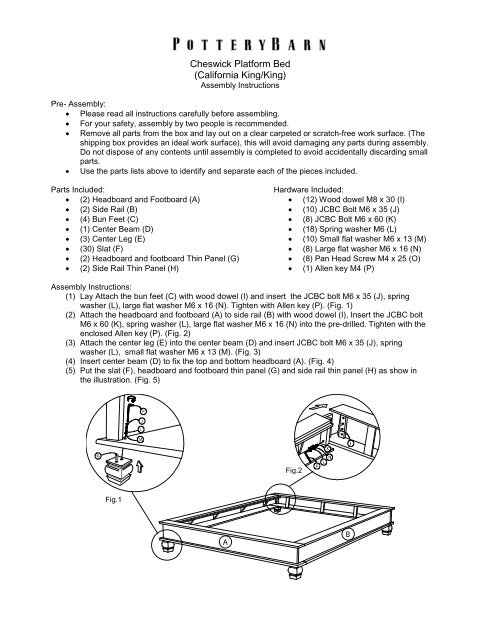
Assembly Instructions:<br />
(1) Lay Attach the bun feet (C) with wood dowel (I) and insert the JCBC bolt M6 x 35 (J), spring<br />
washer (L), large flat washer M6 x 16 (N). Tighten with Allen key (P). (Fig. 1)<br />
(2) Attach the headboard and footboard (A) to side rail (B) with wood dowel (I), Insert the JCBC bolt<br />
M6 x 60 (K), spring washer (L), large flat washer M6 x 16 (N) into the pre-drilled. Tighten with the<br />
enclosed Allen key (P). (Fig. 2)<br />
(3) Attach the center leg (E) into the center beam (D) and insert JCBC bolt M6 x 35 (J), spring<br />
washer (L), small flat washer M6 x 13 (M). (Fig. 3)<br />
(4) Insert center beam (D) to fix the top and bottom headboard (A). (Fig. 4)<br />
(5) Put the slat (F), headboard and footboard thin panel (G) and side rail thin panel (H) as show in<br />
the illustration. (Fig. 5)<br />
Fig.2<br />
Fig.1
Headboard and footboard<br />
thin (G)<br />
Side rail thin (H)<br />
Fig.5<br />
Slat (F)<br />
Slat (F)<br />
Fig.4<br />
Fig.5<br />
Fig.3<br />
<strong>Platform</strong> bed is also designed to be used as a<br />
<strong>California</strong> <strong>King</strong> and <strong>King</strong> bed size bed.<br />
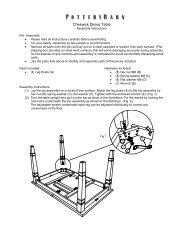
Adjusting Levelers:<br />
Due to an uneven floor the furniture may not sit level causing the doors to misalign or the piece to wobble.<br />
If either occurs, determine which corner is not level. With two people follow these steps:<br />
(1) Carefully elevate the item slightly to provide access to the levelers under that corner.<br />
(2) Turn the levelers until adequate contact will be made with the floor. Gently set down the piece<br />
and check door alignment and stability.<br />
(3) Repeat steps until furniture sits firmly and doors are properly aligned.<br />
Care Instructions:<br />
Dust with a clean, soft cloth<br />
Avoid the use of chemicals and harsh cleaning agents<br />
thank you for your purchase<br />
stores | catalog | www.potterybarn.com