Kirkwood Pedestal Table Ex 63in Assembly instruction - Pottery Barn
Kirkwood Pedestal Table Ex 63in Assembly instruction - Pottery Barn
Kirkwood Pedestal Table Ex 63in Assembly instruction - Pottery Barn
- No tags were found...

Create successful ePaper yourself
Turn your PDF publications into a flip-book with our unique Google optimized e-Paper software.
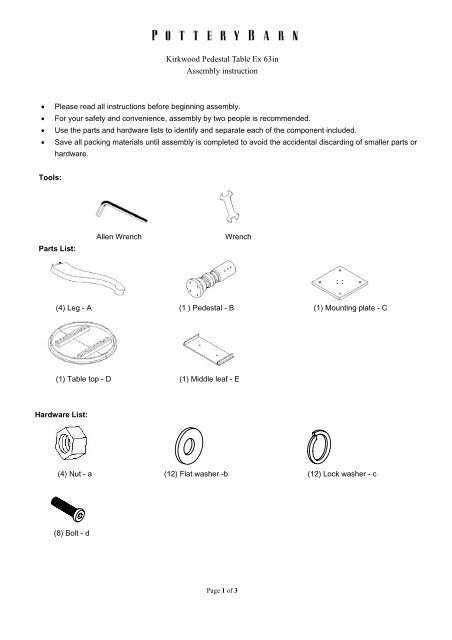
<strong>Kirkwood</strong> <strong>Pedestal</strong> <strong>Table</strong> <strong>Ex</strong> <strong>63in</strong><strong>Assembly</strong> <strong>instruction</strong>• Please read all <strong>instruction</strong>s before beginning assembly.• For your safety and convenience, assembly by two people is recommended.• Use the parts and hardware lists to identify and separate each of the component included.• Save all packing materials until assembly is completed to avoid the accidental discarding of smaller parts orhardware.Tools:Parts List:Allen WrenchWrench(4) Leg - A (1 ) <strong>Pedestal</strong> - B (1) Mounting plate - C(1) <strong>Table</strong> top - D (1) Middle leaf - EHardware List:(4) Nut - a (12) Flat washer -b (12) Lock washer - c(8) Bolt - dPage 1 of 3
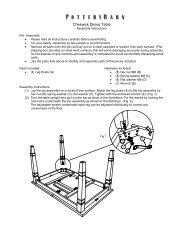
<strong>Assembly</strong> <strong>instruction</strong>s:1. Attach each leg (A) to the pedestal (B) aligning the dowel on leg (A) with the hole on pedestal (B) and usingnut (a), flat washer (b) and lock washer (c). Securely tighten all nuts by with wrench, but do not over tightenthe nuts. (See Fig.1)Fig. 1bca2. Align the middle pre-drilled hole on the pedestal with the pre-drilled hole on the mounting plate (C). Attachthe assembled pedestal (B) to the mounting plate (C) using flat washer (b), lock washer (c) and bolt (d).Securely tighten all bolts with Allen wrench, but do not over tighten the bolts (See Fig.2)Fig. 2dcbB3. Carefully turn the table top (D) upside down on soft, scratch-free surface such as a carpet or rug. Attach themounting plate (C) to the table top (D) using flat washer (b), lock washer (c) and bolt (d). Securely tightenall bolts with Allen wrench, but do not over tighten the bolts (See Fig.3)Fig. 3dcbBDPage 2 of 3
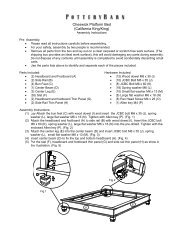
4. Turn the assembled table to an upright position.5. To install the <strong>Ex</strong>tension leaf (E), simply unlock the two metal catches on the underside of the table topand pull the table top apart as shown. Locate the extension leaf (E) in place and push the table topback together and relock the two metal clips. Note the holes and locating pins in the table top andextension leaves. Removal of extension leaf is a reversal of the above procedure.Fig. 4Metal catch6. <strong>Assembly</strong> is now complete.Adjusting Levelers:Due to an uneven floor the furniture may not sit level due causing it to wobbles. If the piece wobbles, determinewhich corner does not touch the ground correctly. With two people follow these steps:1. Carefully lift the item slightly to provide access to the levelers attached to the bottom. (Fig. 5)2. Turn the levelers until adequate contact will be made with the floor. Gently set down the piece and checkstability.3. Repeat steps until furniture sits firmly on the floor.Fig. 5AdjustablelevelerCare Instructions:• Dust with a clean, soft damp cloth and wipe dry immediately.• Avoid the use of chemicals and harsh cleaning agents.thank you for your purchasestores | catalog | www.potterybarn.comPage 3 of 3