mermaid Ventura 19", analog VGA and video-in
mermaid Ventura 19", analog VGA and video-in
mermaid Ventura 19", analog VGA and video-in

You also want an ePaper? Increase the reach of your titles
YUMPU automatically turns print PDFs into web optimized ePapers that Google loves.
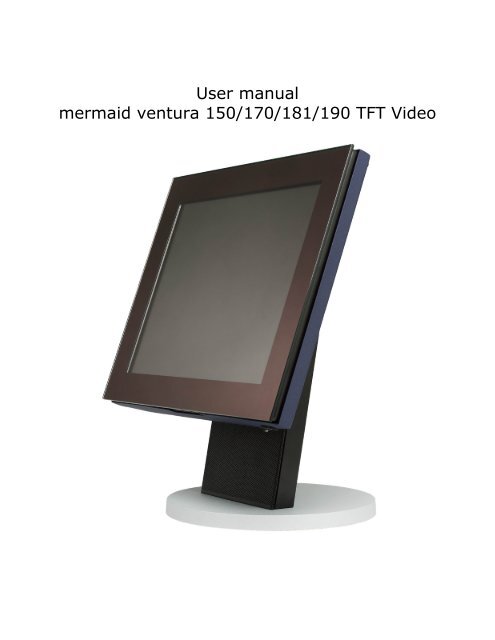
User manual<br />
<strong>mermaid</strong> ventura 150/170/181/190 TFT Video
<strong>mermaid</strong> ventura 150/170/181/190 TFT Video Models - Users Manual Version 3.0a<br />
___________________________________________________________________________________<br />
Table of Content:<br />
Table of Content: .................................................................................................................................... 2<br />
1. Introduction......................................................................................................................................... 3<br />
2. Important Information....................................................................................................................... 3<br />
3. Content of the Box............................................................................................................................... 4<br />
4. Unpack<strong>in</strong>g, Placement <strong>and</strong> Setup (PC)............................................................................................. 4<br />
5. OSD Key Functions............................................................................................................................. 5<br />
6. OSD Functions & Adjustments ......................................................................................................... 6<br />
RGB Ma<strong>in</strong> Menu ................................................................................................................................... 6<br />
RGB Picture Menu ................................................................................................................................ 6<br />
RGB Advanced Menu............................................................................................................................ 7<br />
RGB Advanced Menu - Cont<strong>in</strong>ued....................................................................................................... 8<br />
RGB Utility Menu ................................................................................................................................. 8<br />
RGB Utilities Menu............................................................................................................................... 9<br />
Video Picture Menu............................................................................................................................... 9<br />
7. Guarantee Terms .............................................................................................................................. 10<br />
8. If you need to contact us!.................................................................................................................. 10<br />
9. Troubleshoot<strong>in</strong>g ................................................................................................................................ 11<br />
Appendix A: Connector Specifications ............................................................................................... 12<br />
Appendix B: Power Management Mode: VESA DPMS protocol applied....................................... 13<br />
Appendix C: Technical Specifications................................................................................................. 13<br />
Appendix D: Video Mode Support...................................................................................................... 14<br />
Appendix E: Optical Characteristics – ventura 150 TFT Video-<strong>in</strong>.................................................. 15<br />
Appendix F: Optical Characteristics – ventura 170 TFT ................................................................. 16<br />
Appendix G: Optical Characteristics – ventura 181 TFT................................................................. 17<br />
Appendix H: Optical Characteristics – ventura 190 TFT Video-<strong>in</strong> ................................................. 18<br />
Page 2 of 18
<strong>mermaid</strong> ventura 150/170/181/190 TFT Video Models - Users Manual Version 3.0a<br />
___________________________________________________________________________________<br />
1. Introduction<br />
The <strong>mermaid</strong> ventura 150 TFT, 170 TFT, 181 TFT, <strong>and</strong> 190 TFT are state of the art high-tech flat panel TFT<br />
monitors, <strong>in</strong>corporat<strong>in</strong>g high quality TFT-LCD panels with maximum resolution of 1280x1024 (17”, 18.1” &<br />
19”) <strong>and</strong> 1024x768 (15”). They are based on the newest technology with high brightness 4-lamp CCFL<br />
backlight units. The very fast response time provides excellent suitability for <strong>video</strong> <strong>and</strong> gam<strong>in</strong>g applications. The<br />
monitors are made of steel <strong>and</strong> hardened glass provid<strong>in</strong>g excellent stability <strong>and</strong> strength. The <strong>in</strong>tegrated h<strong>in</strong>ge<br />
<strong>and</strong> high adjustment means you are able to manouvre the monitors for optimal view<strong>in</strong>g angle <strong>and</strong> comfort. The<br />
monitors are fully DDC 2 compliant, which makes <strong>in</strong>stallation very easy.<br />
Panel technology:<br />
• ventura 150 TFT Video-IN: TN (Twisted Nematic)<br />
• ventura 170 TFT Video-IN: ACE (Advanced Coplanar Electrode)<br />
• ventura 181/190 TFT Video-IN: PVA (Patterned Vertical Alignment)<br />
Connections:<br />
• Analog <strong>VGA</strong> (D-Sub connector via <strong>in</strong>tegrated cable)<br />
• Audio <strong>in</strong>put (M<strong>in</strong>i Jack)<br />
• S-Video (Y/C) (M<strong>in</strong>i-DIN connector via <strong>in</strong>tegrated cable)<br />
• Composite (CVBS) (RCA connector via <strong>in</strong>tegrated cable)<br />
• +12 Volt DC Power (2.5 mm Jack via <strong>in</strong>tegrated cable)<br />
Features:<br />
• State of the art high performance picture quality design<br />
• Analog <strong>VGA</strong> <strong>in</strong>terface<br />
• Composite (x1) <strong>and</strong> S-Video (x1) <strong>in</strong>puts<br />
• Full CRT multi-sync monitor compatibility<br />
• Multi-sync capability up to SXGA resolution, 75Hz max., compatible st<strong>and</strong>ard DOS, <strong>VGA</strong>, S<strong>VGA</strong>, XGA <strong>and</strong> SXGA<br />
VESA tim<strong>in</strong>g (SXGA resolution does not apply to 15” monitor.)<br />
• Exp<strong>and</strong> DOS, <strong>VGA</strong>, S<strong>VGA</strong> <strong>and</strong> XGA to full screen display<br />
• 24 bit (16.7 million) true color data process<strong>in</strong>g <strong>and</strong> display driv<strong>in</strong>g<br />
• S<strong>in</strong>gle control operated & transparent On-Screen-Display (hereafter ‘OSD’) user <strong>in</strong>terface<br />
• Full control of all relevant display <strong>and</strong> <strong>in</strong>terface parameters via OSD<br />
• Multi language support<br />
• VESA DDC1/2B compliant<br />
• Compatible with VESA DPMS power sav<strong>in</strong>g modes<br />
• +12VDC s<strong>in</strong>gle power: 45watts AC/DC power adapter recommended. (Supplied)<br />
• Operat<strong>in</strong>g temperature: 0 to 50°C<br />
• Internal passive speakers (2watt x 2 ch. / 8 ohms)<br />
2. Important Information<br />
• When us<strong>in</strong>g the ventura 150 TFT, ventura 170 TFT, ventura 181 TFT or 190 TFT with W<strong>in</strong>dows NT, the<br />
computer needs to be started <strong>in</strong> <strong>VGA</strong> mode the first time. Log on as adm<strong>in</strong>istrator <strong>and</strong> set the resolution to<br />
1280x1024 (17”, 18.1” & 19”) or 1024x768 (15”). Set the refresh rate to 60 Hz. The computer can then be<br />
started <strong>in</strong> normal mode.<br />
• Please save the packag<strong>in</strong>g. It has been designed to provide optimal support <strong>and</strong> protection for the monitor<br />
dur<strong>in</strong>g transportation.<br />
Page 3 of 18
<strong>mermaid</strong> ventura 150/170/181/190 TFT Video Models - Users Manual Version 3.0a<br />
___________________________________________________________________________________<br />
3. Content of the Box<br />
• ventura 150 TFT (15”), ventura 170 TFT (17”), ventura 181 TFT (18.1”) or ventura 190 TFT (19”)<br />
• ”Quickstart” card<br />
Accessories bag <strong>in</strong>clud<strong>in</strong>g:<br />
• PSU (45 Watt)<br />
• Powercord (Country specific)<br />
• Speaker cable<br />
• Users manual<br />
• Glass cleaner & screen wip<strong>in</strong>g cloth<br />
4. Unpack<strong>in</strong>g, Placement <strong>and</strong> Setup (PC)<br />
Note: To avoid condensation, please wait ½-1 hour, before operat<strong>in</strong>g the unit.<br />
After the box has been opened, remove the accessories bag.<br />
Bend the cardboard flaps outward <strong>and</strong> turn the box upside down, which will ensure the <strong>in</strong>lay foam with the<br />
monitor is able to slide out. Do not drop the content on the floor.<br />
Remove the foam side pieces <strong>and</strong> the plastic bag.<br />
The monitor needs to be placed on a smooth <strong>and</strong> stable surface. This surface must be able to safely support 15 kg<br />
(17”, 18.1” & 19”) or 10 kg (15”).<br />
Make sure both the computer <strong>and</strong> monitor are turned off before connect<strong>in</strong>g the monitor.<br />
• Connect the monitor to the computer by means of the supplied <strong>VGA</strong> cable. (Attached to the monitor)<br />
• Connect the PSU to the monitor <strong>and</strong> AC outlet.<br />
• Turn on the computer <strong>and</strong> monitor.<br />
OSD panel is located<br />
beneath the monitor<br />
• ventura 150 TFT, ventura 170 TFT, ventura 181 TFT <strong>and</strong> ventura 190 TFT are plug & play compatible via<br />
VESA DDC1/2B. W<strong>in</strong>dows 98, ME <strong>and</strong> XP will recognise this <strong>and</strong> self configure.<br />
• When us<strong>in</strong>g the ventura 150 TFT, ventura 170 TFT, ventura 181 TFT or ventura 190 TFT with W<strong>in</strong>dows<br />
NT, the computer needs to be started <strong>in</strong> <strong>VGA</strong> mode the first time. Log on as adm<strong>in</strong>istrator <strong>and</strong> set the<br />
resolution to 1280x1024 (17”, 18.1” & 19”) or 1024x768 (15”). Set the refresh rate to 60 Hz. The computer<br />
can then be started <strong>in</strong> normal mode.<br />
Page 4 of 18
<strong>mermaid</strong> ventura 150/170/181/190 TFT Video Models - Users Manual Version 3.0a<br />
___________________________________________________________________________________<br />
5. OSD Key Functions<br />
4-button OSD Panel<br />
Auto Config:<br />
(Hot key)<br />
Source select:<br />
(Hot key)<br />
Select OSD Menu:<br />
(Hot key)<br />
OSD Menu selected:<br />
Enter/<br />
Escape<br />
Down Decrease(-) Increase (+)<br />
= key(s) which are pressed<br />
Function<br />
Menu (Hot Key)<br />
Auto Config (Hot Key)<br />
Source Select *<br />
Enter/Escape<br />
Decrease (-)<br />
Increase (+)<br />
Description<br />
Activates the OSD<br />
Auto calibrate the monitor for optimal performance<br />
When both keys are pressed, the monitor selects the next source<br />
<strong>VGA</strong> Composite S-Video<br />
Enters or Escapes the highlighted menu.<br />
Moves the cursor down to the next menu item<br />
Increases the value of the selected.<br />
Select the next lower level menu.<br />
* When the monitor is turned on, it automatically scans the three different <strong>in</strong>puts (<strong>VGA</strong>, CVBS, Y/C) for a valid signal,<br />
It then stops at the first valid <strong>in</strong>put. The scan rout<strong>in</strong>e starts from the last used <strong>in</strong>put.<br />
Page 5 of 18
<strong>mermaid</strong> ventura 150/170/181/190 TFT Video Models - Users Manual Version 3.0a<br />
___________________________________________________________________________________<br />
6. OSD Functions & Adjustments<br />
RGB Ma<strong>in</strong> Menu<br />
Picture<br />
Advanced<br />
Options<br />
Utilities<br />
Several picture adjustments like brightness, contrast picture position etc.<br />
Advanced picture adjustments<br />
Monitor setup<br />
Monitor setup<br />
RGB Picture Menu<br />
Brightness<br />
Contrast<br />
H-Position<br />
V-Position<br />
Phase<br />
Frequency<br />
Adjustment of brightness<br />
Adjustment of contrast<br />
Adjustment of horizontal picture position<br />
Adjustment of vertical picture position<br />
The phase sett<strong>in</strong>g allows slight picture disturbances<br />
(snow & shimmer<strong>in</strong>g) to be elim<strong>in</strong>ated.<br />
The frequency sett<strong>in</strong>g allows the pixel clock frequency to be adjusted.<br />
This will only have to be adjusted, if the automatic alignment was unable<br />
to determ<strong>in</strong>e the correct pixel clock frequency.<br />
Page 6 of 18
<strong>mermaid</strong> ventura 150/170/181/190 TFT Video Models - Users Manual Version 3.0a<br />
___________________________________________________________________________________<br />
RGB Advanced Menu<br />
Sharpness<br />
Gamma<br />
Adjustment of picture sharpness<br />
5 = “Sharp” picture<br />
1 = “Soft” picture<br />
Selection of the appropriate “Gamma curve”<br />
Two different curves “l<strong>in</strong>ear” <strong>and</strong> “crt” are available.<br />
The “l<strong>in</strong>ear” gamma curve does not correct any color <strong>in</strong>formation,<br />
which will be directly transferred to the display panel.<br />
The “crt” gamma curve processes the color <strong>in</strong>formation accord<strong>in</strong>g<br />
to the scheme below, before it is transferred to the display panel.<br />
Page 7 of 18
<strong>mermaid</strong> ventura 150/170/181/190 TFT Video Models - Users Manual Version 3.0a<br />
___________________________________________________________________________________<br />
RGB Advanced Menu - Cont<strong>in</strong>ued<br />
Color temp<br />
Adjustment of the color temperature.<br />
Select between 3 pre-def<strong>in</strong>ed temperature (6500K, 7300K or 9000K)<br />
Or use the “User” sett<strong>in</strong>g to select the appropriate values yourself.<br />
RGB Utility Menu<br />
OSD<br />
OSD h-pos<br />
OSD v-pos<br />
Language<br />
dpms<br />
Selection of n<strong>in</strong>e predef<strong>in</strong>ed OSD positions.<br />
Variable OSD position - horizontal<br />
Variable OSD position - vertical<br />
Select OSD language (English/German)<br />
Activates/deactivates the power management If the DPMS is active,<br />
then the monitor switches off automatically, when there is no sync<br />
signal, eg. When you turn of the computer. Before the monitr turns off,<br />
a “No signal” message is displayed.<br />
If the DPMS is not active,<br />
the “No signal” message is<br />
shown until a valid <strong>video</strong><br />
signal is applied to the monitor.<br />
Info l<strong>in</strong>e<br />
Activates automatic source scan.<br />
Page 8 of 18
<strong>mermaid</strong> ventura 150/170/181/190 TFT Video Models - Users Manual Version 3.0a<br />
___________________________________________________________________________________<br />
RGB Utilities Menu<br />
OSD timeout<br />
OSD background<br />
Factory reset<br />
Adjustment of OSD turn off time after last key pressed.<br />
You can select values between 5 <strong>and</strong> 60 sec. (5 sec. steps)<br />
Changes type of the OSD background<br />
Translucent = tranparanet<br />
Opaque = solid (not transparent)<br />
Resets all functions to factory default.<br />
Video Picture Menu<br />
When the signal source is either CVBS or S-<strong>video</strong>, the “picture”menu has other functions implemented.<br />
Brightness<br />
Contrast<br />
Color<br />
T<strong>in</strong>t<br />
Sharpness<br />
Scal<strong>in</strong>g<br />
Adjustment of the brightness<br />
Adjustment of the contrats<br />
Adjustment of the colorsaturation<br />
Adjustment of the t<strong>in</strong>t<br />
Adjustment of the picture sharpness<br />
Selects between different ways to scale the <strong>video</strong> <strong>in</strong>put<br />
Page 9 of 18
<strong>mermaid</strong> ventura 150/170/181/190 TFT Video Models - Users Manual Version 3.0a<br />
___________________________________________________________________________________<br />
7. Warranty Terms<br />
<strong>mermaid</strong> ventura 150 TFT Video-In, 170 TFT Video-In, ventura 181 TFT Video-In <strong>and</strong> ventura 190 TFT Video-<br />
In are all covered by a 3-years send-<strong>in</strong> warranty.<br />
Repair<br />
If your <strong>mermaid</strong> ventura needs repair<strong>in</strong>g, please visit www.<strong>mermaid</strong>.dk <strong>and</strong> fill-<strong>in</strong> the RMA-request. You will<br />
then receive an RMA-number, which you must attach outside the monitor pack<strong>in</strong>g before you ship your product<br />
to <strong>mermaid</strong>. We will return the product to you with<strong>in</strong> 10 to 14 work<strong>in</strong>g days.<br />
The guarantee terms set out above apply to Europe only.<br />
8. If you need to contact us!<br />
Contact <strong>mermaid</strong> customer support.<br />
If you need to get <strong>in</strong> touch with <strong>mermaid</strong> technology, please contact us via phone or mail:<br />
Phone<br />
<strong>mermaid</strong> customer support open<strong>in</strong>g hours are Monday to Friday 14.00-16.30.<br />
By mail<br />
<strong>mermaid</strong> technology a/s<br />
Att.: Customer Support<br />
Symfonivej 34-36<br />
DK-2730 Herlev<br />
Denmark<br />
Telephone<br />
+45 44 52 92 00<br />
Telefax<br />
+45 44 52 92 65<br />
E-mail<br />
kundeservice@<strong>mermaid</strong>.dk<br />
Internet<br />
http://www.<strong>mermaid</strong>.dk<br />
Page 10 of 18
<strong>mermaid</strong> ventura 150/170/181/190 TFT Video Models - Users Manual Version 3.0a<br />
___________________________________________________________________________________<br />
9. Troubleshoot<strong>in</strong>g<br />
If you have troubles us<strong>in</strong>g your ventura monitor, please refer to follow<strong>in</strong>g suggestions for troubleshoot<strong>in</strong>g.<br />
If you can not rectify the problem yourself, please contact your distributor or place of purchase.<br />
Symptom<br />
Screen is blank<br />
“Check signal cable”<br />
message<br />
“Sync out of range”<br />
message<br />
The image is too dark or<br />
bright<br />
Horizontal bars appear<br />
to flicker, jitter or<br />
shimmer on the image<br />
Vertical bars appear<br />
to flicker, jitter or<br />
shimmer on the image<br />
Screen is blank<br />
Image is not stable <strong>and</strong><br />
may appear to vibrate<br />
Image is not centered on<br />
the screen<br />
Suggestions<br />
Ensure that the power cord is connected<br />
<strong>and</strong> the monitor is on.<br />
Ensure that the signal cable is connected<br />
firmly to the signal source.<br />
Ensure that the signal source is turned on.<br />
Check the maximum resolution <strong>and</strong> the<br />
frequency of the <strong>video</strong> adapter.<br />
Adjust the brightness <strong>and</strong> contrast.<br />
Adjust the “Phase”.<br />
Select “Auto Adjust” <strong>in</strong> OSD menu.<br />
The system activates power management<br />
mode. Just press the PC keyboard or move<br />
the PC mouse.<br />
Check the display resolution <strong>and</strong> frequency<br />
from your PC or <strong>video</strong> board is <strong>in</strong> available<br />
mode for your monitor. On your PC, check<br />
“Control Panel -> Display -> Sett<strong>in</strong>gs”<br />
If the sett<strong>in</strong>g is <strong>in</strong>correct, you may change the<br />
sett<strong>in</strong>g us<strong>in</strong>g PC utility program.<br />
Adjust the “Image Position / H-Position or<br />
V-Position”.<br />
Page 11 of 18
<strong>mermaid</strong> ventura 150/170/181/190 TFT Video Models - Users Manual Version 3.0a<br />
___________________________________________________________________________________<br />
Appendix A: Connector Specifications<br />
Analog RGB <strong>in</strong><br />
Analog RGB Input Connector : D-Sub 15p<strong>in</strong><br />
p<strong>in</strong> no Symbol Symbol p<strong>in</strong> no Symbol Symbol<br />
1 RED Analog Red 9 NC +5Vdc<br />
2 GREEN Analog Green 10 SGND Sync GND<br />
3 BLUE Analog Blue 11 NC Reserved<br />
4 GND Reserved 12 SDA DDC Serial Data<br />
5 GND Digital GND 13 HSYNC Horizontal Sync<br />
6 RGND Red Return 14 VSYNC Vertical Sync.<br />
7 GGND Green Return 15 SCL DDC Data Clock<br />
8 BGND Blue Return<br />
S-<strong>video</strong> <strong>in</strong><br />
S-<strong>video</strong> Input Connector: 4p<strong>in</strong> m<strong>in</strong>iD<strong>in</strong><br />
P<strong>in</strong> no Function P<strong>in</strong> no Symbol<br />
1 Ground 3 Luma<br />
2 Ground 4 Chroma<br />
CVBS <strong>video</strong> <strong>in</strong><br />
Composite <strong>video</strong> Connector: RCA<br />
P<strong>in</strong> no Function P<strong>in</strong> no Symbol<br />
1 CVBS 2 Ground<br />
1<br />
2<br />
Power <strong>in</strong><br />
Power <strong>in</strong>put connector: 2.5 mm DC jack<br />
1<br />
2<br />
P<strong>in</strong> no Function P<strong>in</strong> no Symbol<br />
1 CVBS 2 Ground<br />
Page 12 of 18
<strong>mermaid</strong> ventura 150/170/181/190 TFT Video Models - Users Manual Version 3.0a<br />
___________________________________________________________________________________<br />
Appendix B: Power Management Mode: VESA DPMS protocol applied<br />
Mode Horizontal sync Vertical sync Video signal Power Consumption (max)<br />
On Active Active Active 27,5W (15”) 40 W (17”-19”)<br />
St<strong>and</strong>.by Inactive Active Blanked<br />
Suspend Active Inactive Blanked<br />
< 3 Watts<br />
Off Inactive Inactive Blanked<br />
Appendix C: Technical Specifications<br />
Input Video <strong>and</strong> sync signal<br />
Parameter Value Unit<br />
Max. Output Resolution (15”) 1024x768 Pixels<br />
Max. Output Resolution (17”, 18.1” & 19”) 1280x1024 Pixels<br />
Data Process<strong>in</strong>g 24 Bits<br />
Input impedance<br />
• Video<br />
• Sync<br />
75<br />
470<br />
Sync Polarities +/-<br />
Sync Levels<br />
Ohms<br />
Ohms<br />
TTL<br />
compatible<br />
Max. Number of colors 16.7 Mill. Colors<br />
Electrical Parameters<br />
reference : t A 25 ° C<br />
Symbol Description M<strong>in</strong> Typ Max Unit<br />
V DD +12V DC power supply 10.8 12.0 13.2 V<br />
V i(RGB) Video <strong>in</strong>put signal (w.r.t. GND) 0.5 0.7 1.0 V PP<br />
f S Video sample rate 80 MHz<br />
f HS Horizontal sync frequency 30 60 KHz<br />
f vs Vertical sync frequency 56 75 Hz<br />
F SIH Sync <strong>in</strong>put high level 2.5 V<br />
V SIL Sync <strong>in</strong>put low level 0.8 VDC<br />
I DD2 Supply current @ +12V , ventura 150 TFT 2.3 A<br />
I DD2 Supply current @ +12V , ventura 170 TFT 3.0 3.3 A<br />
I DD2 Supply current @ +12V , ventura 181 TFT 3.3 A<br />
I DD2 Supply current @ +12V , ventura 190 TFT 3.3 A<br />
Note 1. Power consumption measur<strong>in</strong>g condition is 2pixel checkerboard pattern @ XGA 75Hz <strong>and</strong> maximum<br />
brightness at t A 25°C.<br />
Page 13 of 18
<strong>mermaid</strong> ventura 150/170/181/190 TFT Video Models - Users Manual Version 3.0a<br />
___________________________________________________________________________________<br />
Appendix D: Video Mode Support<br />
The ventura 150 TFT <strong>video</strong>-<strong>in</strong>, ventura 170 TFT <strong>video</strong>-<strong>in</strong>, ventura 181 TFT <strong>video</strong>-<strong>in</strong> <strong>and</strong> ventura 190 TFT<br />
<strong>video</strong>-<strong>in</strong> support any <strong>video</strong> mode at <strong>in</strong>puts with<strong>in</strong> the follow<strong>in</strong>g ranges:<br />
• The signal sample frequency on the <strong>in</strong>put ≤ 80MHz<br />
• The horizontal sync frequency between 30KHz <strong>and</strong> 60KHz<br />
The modes are detected when presented to the <strong>in</strong>put <strong>and</strong> previous alignments for setup are<br />
automatically recalled. A true multi-sync monitor emulation is implemented.<br />
The factory preset supported modes <strong>in</strong>clude:<br />
Mode *1<br />
Resolution<br />
Refresh rate<br />
H-freq.<br />
Pixel freq.<br />
Remarks *1<br />
<strong>VGA</strong><br />
640 x 350<br />
70Hz<br />
31.47KHz<br />
25.175MHz<br />
VESA St<strong>and</strong>ard<br />
<strong>VGA</strong><br />
720 x 400<br />
59.940HZ<br />
31.469KHZ<br />
25.175MHZ<br />
IBM <strong>VGA</strong> 3H<br />
<strong>VGA</strong><br />
640 x 480<br />
60Hz<br />
31.5KHz<br />
25.175MHz<br />
Industry St<strong>and</strong>ard<br />
<strong>VGA</strong><br />
640 x 480<br />
72Hz<br />
37.9KHz<br />
31.500MHz<br />
VESA St<strong>and</strong>ard<br />
<strong>VGA</strong><br />
640 x 480<br />
75HZ<br />
37.5KHZ<br />
31.500MHZ<br />
VESA St<strong>and</strong>ard<br />
S<strong>VGA</strong><br />
800 x 600<br />
60Hz<br />
37.9KHz<br />
40.000MHz<br />
VESA Guidel<strong>in</strong>es<br />
S<strong>VGA</strong><br />
800 x 600<br />
72Hz<br />
48.1KHz<br />
50.000MHz<br />
VESA St<strong>and</strong>ard<br />
S<strong>VGA</strong><br />
800 x 600<br />
75HZ<br />
46.9KHZ<br />
49.500MHZ<br />
VESA St<strong>and</strong>ard<br />
XGA<br />
1024 x 768<br />
60Hz<br />
48.4KHz<br />
65.000MHz<br />
VESA Guidel<strong>in</strong>es<br />
XGA<br />
1024 x 768<br />
70Hz<br />
56.5KHz<br />
75.000MHz<br />
VESA St<strong>and</strong>ard<br />
XGA<br />
1024 x 768 75HZ<br />
60KHZ<br />
78.750MHZ<br />
VESA St<strong>and</strong>ard<br />
SXGA 1) 1280 x 1024 60Hz 64KHZ 108.000 MHZ VESA St<strong>and</strong>ard<br />
1) SXGA mode does not apply to ventura 150 TFT Video-<strong>in</strong><br />
Page 14 of 18
<strong>mermaid</strong> ventura 150/170/181/190 TFT Video Models - Users Manual Version 3.0a<br />
___________________________________________________________________________________<br />
Appendix E: Optical Characteristics – ventura 150 TFT Video-<strong>in</strong><br />
Page 15 of 18
<strong>mermaid</strong> ventura 150/170/181/190 TFT Video Models - Users Manual Version 3.0a<br />
___________________________________________________________________________________<br />
Appendix F: Optical Characteristics – ventura 170 TFT Video-<strong>in</strong><br />
Page 16 of 18
<strong>mermaid</strong> ventura 150/170/181/190 TFT Video Models - Users Manual Version 3.0a<br />
___________________________________________________________________________________<br />
Appendix G: Optical Characteristics – ventura 181 TFT Video-<strong>in</strong><br />
Page 17 of 18
<strong>mermaid</strong> ventura 150/170/181/190 TFT Video Models - Users Manual Version 3.0a<br />
___________________________________________________________________________________<br />
Appendix H: Optical Characteristics – ventura 190 TFT Video-<strong>in</strong><br />
Page 18 of 18