Download Owners Manual - Currie Technologies
Download Owners Manual - Currie Technologies
Download Owners Manual - Currie Technologies

Create successful ePaper yourself
Turn your PDF publications into a flip-book with our unique Google optimized e-Paper software.
Contents<br />
Customer Service.................................................................................3<br />
Technical Information..........................................................................4<br />
Scooter Components...........................................................................5<br />
Scooter Assembly...........................................................................6-11<br />
Tire inflation........................................................................................8<br />
Quick release levers/clamps.......................................................10-11<br />
Scooter Use........................................................................................12<br />
Safety............................................................................................. 13-15<br />
Battery Care.................................................................................. 16-19<br />
Battery charging...............................................................................19<br />
Maintenance.................................................................................. 20-23<br />
Brake adjustment....................................................................... 21-23<br />
Troubleshooting........................................................................... 24-25<br />
Limited Warranty.......................................................................... 26-27<br />
Additional Instructions and Warnings........................................ 28-29<br />
2<br />
e4.5 Owner's <strong>Manual</strong>.indd, Last Modified: December 28, 2012 10:49 AM
PLEASE DO NOT RETURN<br />
THIS SCOOTER TO THE STORE.<br />
For questions or assistance on assembly, contact<br />
<strong>Currie</strong> <strong>Technologies</strong> ® Customer Service toll free at<br />
(800) 377-4532<br />
Monday - Friday<br />
8:00 am - 4:00 pm (PST)<br />
Retain this manual along with the original sales receipt. Record the product serial number (S/N), place of purchase and date<br />
of purchase below.<br />
Model Name : __________________________________________<br />
S/N : __________________________________________________<br />
(Stamped on scooter frame, between front wheels)<br />
Place of Purchase : ______________________________________<br />
Date of Purchase : _______________________________________<br />
3
Technical Information<br />
Minimum Rider<br />
Age<br />
Maximum Rider<br />
Weight<br />
Maximum Speed*<br />
Maximum range*<br />
Battery<br />
Charging time**<br />
13 years old<br />
180 lbs. (81.6 kg)<br />
12 mph (19 kph)<br />
5 miles (8 km)<br />
24V 7Ah, SLA<br />
4-6 hours<br />
*Maximum range and speed varies based on rider weight and terrain<br />
**Charge time is based on new batteries charged with a standard charger<br />
4<br />
e4.5 Owner's <strong>Manual</strong>.indd, Last Modified: December 28, 2012 10:49 AM
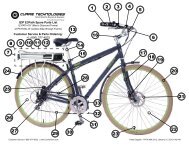
Scooter Components<br />
“Top cap”<br />
Handlebar<br />
Brake lever<br />
Saddle<br />
Throttle<br />
Seat mast<br />
Steering mast<br />
Locking pin<br />
Quick release<br />
Battery & controller compartments<br />
(underneath deck)<br />
On/Off switch<br />
Charger port<br />
(XLR-3 plug type)<br />
Chain guard with<br />
access door for<br />
tire inflation<br />
5
Assembling your e4.5<br />
1. Slide the steering mast onto the scooter frame. Make sure the silver locking pin engages, then close the quick<br />
release securely to hold the mast in place. See the next section of this manual for more information on properly<br />
tightening quick release clamps.<br />
1a<br />
1b<br />
Steering mast<br />
Locking pin<br />
6<br />
e4.5 Owner's <strong>Manual</strong>.indd, Last Modified: December 28, 2012 10:49 AM
2. Install the seat mast into the frame. The mast should go all the way down to the base of the scooter, as shown in<br />
photo 2a. You may need to twist the mast to work it into position. With the mast fully inserted, twist the saddle so it is<br />
facing forward, parallel to the scooter, then tighten the binder bolt as show in photo 2b. When the binder bolt is properly<br />
tightened, the seat mast will not be able to twist out of position or pull out of the scooter.<br />
2a<br />
2b<br />
3. Before riding for the first time, you should check the tightness of all nuts and bolts on the scooter. Most important are<br />
the front wheel axle nuts, any nuts or bolts around the rear brake, the motor, and the rear wheel. Make sure the brake<br />
levers and throttle are secure on the handlebars. If they can be twisted out of alignment, their mounting bolts need to be<br />
tightened.<br />
7
Inflating your scooter’s tires<br />
Both the front and rear tires on the e4.5 are pneumatic, meaning they need to be kept inflated at the proper air pressure to<br />
work properly. Just like a car tire, the proper inflation pressure is molded into the sidewall of the tire. Unlike a car, it is best<br />
to inflate your scooter’s tires with a hand pump (usually sold for inflating bicycle tires), to avoid overfilling.<br />
To inflate the front tire:<br />
1. Remove the valve cap from the air valve.<br />
2. Add air as needed, checking the pressure regularly to avoid overfilling.<br />
3. Reinstall the valve cap.<br />
To inflate the rear tire:<br />
1. Move aside the door on the chainguard covering the valve. Align the tire valve with the hole in the chainguard, and<br />
remove the valve cap.<br />
2. Install the supplied valve extender.<br />
3. Add air as needed, checking the pressure regularly to avoid overfilling.<br />
4. Remove the valve extender, reinstall the valve cap, and close the cover door.<br />
8<br />
e4.5 Owner's <strong>Manual</strong>.indd, Last Modified: December 28, 2012 10:49 AM
Attention!<br />
Before riding your scooter for the first time, you must<br />
connect the battery, located under the deck plate<br />
2<br />
1<br />
3<br />
9
Properly adjusting the steering mast quick release clamp<br />
On the E4.5, the steering mast is clamped in place by the force of the<br />
quick release cam lever pushing against one side of the clamp and<br />
pulling the tension adjusting nut, by way of the skewer, against the other.<br />
The amount of clamping force is controlled by the tension adjusting nut.<br />
Turning the tension adjusting nut clockwise while keeping the cam lever<br />
from rotating increases clamping force; turning it counterclockwise while<br />
keeping the cam lever from rotating reduces clamping force. Less than half<br />
a turn of the tension adjusting nut can make the difference between safe<br />
clamping force and unsafe clamping force.<br />
1. With the quick release clamp in the OPEN position, position the<br />
steering mast so that the handlebar is perpendicular to the front axle.<br />
2. Swing the quick release lever into the CLOSED position.<br />
3. While holding the front wheel in place, grab the handlebar with both<br />
hands and attempt to rotate it out of alignment.<br />
Skewer<br />
open<br />
Tension adjusting<br />
nut<br />
Cam lever<br />
10<br />
Closed<br />
e4.5 Owner's <strong>Manual</strong>.indd, Last Modified: December 28, 2012 10:49 AM
4. If you are able to force the handlebar out of alignment with the front wheel, the clamp needs to be adjusted. Holding<br />
the quick release lever in the OPEN position with one hand, tighten the tension adjusting nut with your other hand<br />
about 1/2 turn clockwise.<br />
5. Attempt to swing the lever into the CLOSED position. If the lever cannot be pushed all the way to the CLOSED<br />
position, return the lever to the OPEN position, then turn the tension adjusting nut counterclockwise one-quarter turn<br />
and try tightening the lever again. Repeat steps 3, 4 & 5 until proper quick release tension is achieved.<br />
11
Scooter Use<br />
Before riding your scooter for the first time, you should fully charge the battery. This may take up to 6 hours. See the section<br />
of this manual on battery charging for more information.<br />
Turn the scooter on by flipping the power switch on the deck.<br />
1. To get going, just twist the throttle on the right side of the handlebars.<br />
2. To stop, pull the left-hand brake lever to slow the rear wheel. Try not to skid the wheel; the tire can develop flat spots<br />
and cause a bumpy ride.<br />
In order to ensure your scooter’s battery lasts as long as possible, you should fully charge the battery<br />
after each and every ride. Please see the section of this manual on battery care for more information.<br />
12<br />
e4.5 Owner's <strong>Manual</strong>.indd, Last Modified: December 28, 2012 10:49 AM
Safety Guidelines<br />
Limitations of Safety and Warning Notices<br />
This owner’s manual includes important safety guidelines and maintenance instructions. Failure to read, understand and<br />
follow the instructions in this manual may lead to serious injury or even death.<br />
INSURANCE NOTICE<br />
Your insurance policies may not provide coverage for accidents<br />
involving the use of this electric scooter. To determine if coverage is<br />
provided, you should contact your insurance company or agent.<br />
»»<br />
This product is intended for use under adult supervision only. Even under adult supervision serious injuries or<br />
even death can occur.<br />
»»<br />
Always ride within your capabilities and use common sense, do not ride at night. You are using this product at<br />
your own risk. Never operate this product at a speed which is too fast for your skills. Always drive at low speed on<br />
dusty surfaces.<br />
»»<br />
This product is not intended, designed or licensed for roadway use. This product is intended for use outdoors<br />
and on a private, closed course only. Ride only on dry, smooth, solid paved surfaces without motor vehicle<br />
traffic. Never use this product on roadways (paved, gravel or dirt), sidewalks, driveways, parking lots near motor<br />
vehicles, on or near steep inclines or steps, swimming pools or other bodies of water.<br />
»»<br />
This product is not regulated by transportation regulations (that is, the Department of Transportation (DOT)) or<br />
state law.<br />
»»<br />
The laws and ordinances vary greatly from municipality to municipality. It is your responsibility to know and abide<br />
by your local restrictions. We recommend you contact your local police or Department of Motor Vehicles to find 13<br />
out about any special laws or rules governing the use of this product where you live.
Never operate this product without proper training or instructions.<br />
A child under 13 years old should never operate this product. Rider age does not necessarily mean that they are<br />
qualified to operate this product. A parent should never allow this product to be used by an individual not having the<br />
ability, coordination, maturity, skills and strength to operate it safely and in a controlled manner.<br />
Maximum rider weight is 180 lbs (81.6 kg); never exceed it. Rider weight does not necessarily mean that they are<br />
qualified to operate this product.<br />
Never modify this product through improper installation, modification of existing parts or use of non-authorized<br />
accessories. Doing so may result in denied warranty claims.<br />
Before every ride, make sure the handlebars are properly secured to the scooter as instructed in the assembly<br />
portion of this product manual.<br />
This product is designed to be used by only one person at a time. Never carry passengers or allow more than one<br />
person to use this product at a time.<br />
Always wear an approved helmet that fits and is worn properly when using this product. Also recommended is to<br />
always wear knee pads, elbow pads, eye protection (goggles or face shield), gloves, boots, long sleeved shirt or<br />
jacket and long pants. Never operate this product barefoot or in sandals as this increases the risk of injury.<br />
Always keep both hands on the handlebars (hand grips) during operation.<br />
Always drive slowly and pay extra attention when operating on unfamiliar terrain. Always be alert to changing<br />
terrain conditions when operating this product.<br />
Never operate on excessively rough, slippery or loose terrain.<br />
14<br />
e4.5 Owner's <strong>Manual</strong>.indd, Last Modified: December 28, 2012 10:49 AM
Practice turning at low speeds before attempting to turn at faster speeds. Do not turn at excessive speed as this<br />
could increase the risk of injury.<br />
Always check for obstacles before operating in a new area. Never attempt to operate over large obstacles, such as<br />
large rocks or fallen trees.<br />
Do not ride with headphones. They mask traffic sounds and emergency vehicle sirens, distract you from<br />
concentrating on what is going on around you, and their wires can tangle in the moving parts of the scooter, causing<br />
you to lose control.<br />
Do not do stunts, wheelies, jumps or any other type of dangerous riding. They can cause severe injury to you and<br />
damage your scooter.<br />
Do not lean the scooter excessively as this may allow parts of the scooter to contact the ground and may result in<br />
lose of control or damage to the scooter.<br />
Do not touch the motor or brakes as they can become hot from use.<br />
WET WEATHER RIDING<br />
This product is not meant for use in the water (damp roads, puddles, rain, streams, etc.). Never immerse this product in<br />
water as the electrical and brake systems may be damaged.<br />
BATTERY CHARGER<br />
The charger and charger port should be regularly inspected for damage (cord, plug, enclosure, etc.). If damage is found<br />
stop using the charger until it can repaired or replaced.<br />
The charger is not a toy and should be kept out of reach of children at all times.<br />
Always disconnect the charger from the wall outlet and the charger port on the scooter when not using it.<br />
Do not charge your battery for more than 24 hours continuously.<br />
15
Battery care<br />
Proper maintenance of batteries will maximize their lifespan and capacity. <strong>Currie</strong> <strong>Technologies</strong>® warranties your new<br />
batteries from the date of purchase only if properly cared for—refer to the limited warranty for details.<br />
<strong>Currie</strong> uses SLA (Sealed Lead Acid) batteries in the E4.5 scooter. This is a very user-friendly type of battery when cared<br />
for properly.<br />
Care<br />
Even with proper care, rechargeable batteries do not last forever. Every time the battery is discharged and subsequently<br />
recharged, its relative capacity decreases by a small percentage. You can maximize the life of your battery by following<br />
the instructions in this guide.<br />
• Batteries should be fully charged immediately when they are received for the full recommended charge times.<br />
E4.5 (SLA) recommended charge time: 4-6 hours<br />
• Never charge batteries for longer than 24 hours continuously.<br />
• Do not mix old and new batteries. Do not mix alkaline, standard (carbon-zinc), or rechargeable (ni-cad, ni-mh, etc.)<br />
batteries.<br />
• SLA batteries do not have a “memory.” Partial discharge/charge cycles will not harm the batteries’ capacity or<br />
performance.<br />
16<br />
e4.5 Owner's <strong>Manual</strong>.indd, Last Modified: December 28, 2012 10:49 AM
• The rated output capacity of a battery is measured at 77°F (25°C). Any variation in this temperature will alter the<br />
performance of the battery, and shorten its expected life. High temperatures especially reduce overall battery life & run<br />
time.<br />
• Always be sure to turn the bike/scooter power switch to “OFF” after each use. If you leave the power switch in the<br />
“ON” position, or your product has not been charged for a long period of time, the batteries may reach a stage at which<br />
they will no longer hold a charge.<br />
• Be friendly to the environment! Be sure to recycle your old batteries at a local battery-recycling center. Do not throw<br />
them in the garbage! Check www.call2recycle.org for more information on free battery dropoff locations.<br />
Storage<br />
When storing your batteries for a long period of time (longer than two months):<br />
• Charge your batteries every 90 days to avoid capacity loss. Batteries slowly self-discharge when left unused for a<br />
long period of time; if the battery cells are allowed to reach a critically low voltage, their lifespan and capacity will be<br />
permanently reduced.<br />
• Always disconnect your charger from the wall outlet and battery before storing the battery.<br />
• Avoid storing your batteries in extreme temperatures, whether hot or cold.<br />
• Batteries are best kept in a cool, dry place. Do not allow batteries to accumulate condensation, as this could cause<br />
shorting or corrosion.<br />
• The recommended storage temperature for both SLA and Li-Ion batteries is between 32-77 °F (0-25°C).<br />
• Avoid exposing the battery to extreme heat (104°F (40°C) or higher) for long periods of time.<br />
17
Battery FAQ<br />
Q: Do I need to “break-in” my batteries?<br />
A: Yes, it is recommended that you perform a “break-in” cycle consisting of ~ three discharge/charge cycles to allow your<br />
batteries to reach optimum performance. This involves three complete discharges and three complete recharges. After<br />
this initial “break-in” cycle the batteries will have maximum possible performance and less line voltage fluctuations under<br />
load.<br />
Q: Is it normal that the batteries get warm when recharging?<br />
A: Yes, it is normal that the batteries will become warm to the touch during the recharging process. This is because the<br />
increase of internal resistance and lower energy conversion efficiency from electric energy to chemical energy.<br />
Q: How long will my batteries last before needing replacement?<br />
A: Average battery life depends on use and conditions. Even with proper care, rechargeable batteries do not last<br />
forever. Conservatively, an SLA battery will come to the end of its useful life after ~200 full discharge/charge cycles. A<br />
partial charge/discharge counts fractionally against those numbers; running the battery down halfway then recharging it<br />
completely uses up one half of a charge cycle.<br />
“End of useful life” refers to the point at which a battery can no longer supply 80% of its original rated capacity in<br />
ampere-hours. After this point, the aging process will accelerate and the battery will need to be replaced.<br />
18<br />
e4.5 Owner's <strong>Manual</strong>.indd, Last Modified: December 28, 2012 10:49 AM
Battery charging<br />
Plug the battery charger into a wall outlet, then into the charger port on the neck of the scooter. The indicator light on the<br />
face of the charger will turn red, showing that charging has started. When charging is complete, the indicator light will turn<br />
green. A full charge will take 4-6 hours, however if the battery is not empty charging may take much less time. Always<br />
unplug the charger after use. Always store the scooter with the power switched turned OFF.<br />
19
Maintenance<br />
Regularly checking your scooter and performing maintenance will greatly extend its useful life, and ensure the scooter<br />
remains safe to ride.<br />
Before each ride, make sure that...<br />
...the steering mast quick release is tight, and the handlebar cannot turn away from the wheels.<br />
...the front wheel axle nuts are tight.<br />
...the front and rear wheels are not cracked or damaged.<br />
...the rear brake operates normally.<br />
...the brake lever is tightened securely to bar, and the lever cannot rotate on the handlebar.<br />
...the handlebar clamp bolts are tight, and the handlebar cannot move or twist out of alignment with the front wheel.<br />
If the scooter is being used regularly, every month you should...<br />
...clean the drive chain and lubricate it with a light oil.<br />
...check the drive chain for broken or damaged links.<br />
...inspect the frame, especially the steering mechanism for cracks or wear.<br />
...check that the tires are inflated to the pressure indicated on their sidewalls.<br />
20<br />
e4.5 Owner's <strong>Manual</strong>.indd, Last Modified: December 28, 2012 10:49 AM
Brake adjustment<br />
Although the brake on your scooter is set at the factory, you may need to adjust it slightly as the brake pad wears over<br />
time.<br />
Find the rear brake on the left side of the scooter, attached to the rear wheel.<br />
The brake barrel adjuster is shown in the photo below. This adjuster simply increases or decreases the tension on the<br />
brake cable, setting the brake pad’s initial position.<br />
To increase braking power:<br />
Turn the barrel adjuster nut counter-clockwise, unscrewing it<br />
about 1/2 turn at a time. Spin the rear wheel after each turn<br />
of the barrel, checking for brake drag, then use the handlebar<br />
brake lever to test stopping power.<br />
Ferrule<br />
Pinch nut/bolt<br />
Barrel Adjuster<br />
As the barrel adjuster nut is unscrewed braking power will<br />
increase, but if it is turned too far brake drag will occur. The<br />
goal of adjusting the brake is to find a setting where the rear<br />
wheel spins freely, then stops powerfully when the hand brake<br />
is applied.<br />
Use caution when adjusting the brake! If the barrel adjuster<br />
nut is unscrewed too far, it will become detached and the<br />
brake will no longer be effective. If this happens, screw the<br />
barrel back into its hole a few turns.<br />
21
Replacing the brake cable:<br />
If the brake lever on your scooter becomes stiff and difficult to operate, the brake cable may have become rusted or<br />
dirty inside its housing. You can easily replace the brake cable to get back to “like new” performance. The E4.5 uses a<br />
standard bicycle brake cable and cable housing that can be purchased inexpensively at any bike shop.<br />
To replace the brake cable, first remove the ferrule from the end of<br />
the cable with a pair of pliers (see photo on page 21), then loosen<br />
the pinch nut enough to remove the brake cable from the brake<br />
arm. Pull the cable out of the scooter, starting at the brake lever.<br />
1<br />
Apply a small amount of grease to the new cable if available (to<br />
prevent rust), then push the new brake cable through the housing.<br />
Secure the “lollipop” shaped cable end into the brake lever (see<br />
photo 1), then pull the cable through the lever body.<br />
Thread the new cable through the small hole in the pinch bolt.<br />
Before tightening the pinch bolt, screw the brake barrel adjuster<br />
in completely (clockwise) so it can be adjusted later. Tighten the<br />
pinch nut, then install a new ferrule to prevent fraying (a few cents<br />
at any bike shop).<br />
Cable end fits into brake lever body<br />
Follow the steps on page 21 for adjusting the brake to restore<br />
normal stopping power.<br />
22<br />
e4.5 Owner's <strong>Manual</strong>.indd, Last Modified: December 28, 2012 10:49 AM
2<br />
Lever barrel adjuster<br />
3<br />
Cable is drawn through brake lever. Note the gap in the<br />
barrel adjuster that allows the cable to pass through.<br />
Barrel adjuster is rotated to close gap. Cable housing fits<br />
into end of barrel adjuster.<br />
23
Troubleshooting<br />
Scooter will not function<br />
• Charge battery for the full recommended time (4-6 hours)<br />
• Check connections to the scooter controller, located under the deck near the battery.<br />
Scooter suddenly stops working during use<br />
• Check fuse, located near the controller inside the battery compartment. If the fuse has burned out,<br />
replace it with a standard automotive fuse of the indicated amperage.<br />
Scooter only runs for a short amount of time<br />
• Your battery may have aged past its useful life. See the Battery Care section of this manual for more<br />
information<br />
• The rear brake may be rubbing, forcing the motor to work much harder than normal to propel the<br />
scooter. See the section of this manual discussing brake adjustment for more information.<br />
Scooter makes grinding noises under power<br />
• Check that the chain is not rubbing the scooter frame or chainguard.<br />
• Lubricate the chain (see Maintenance section)<br />
After owning the scooter for a while, the brake lever becomes stiff and difficult to operate<br />
• See instructions on page 22 for help cleaning or replacing your brake cable.<br />
For instructions on more advanced troubleshooting, please call our customer service department in California at<br />
800-377-4532<br />
24<br />
e4.5 Owner's <strong>Manual</strong>.indd, Last Modified: December 28, 2012 10:49 AM
This page intentionally left blank<br />
25
LIMITED WARRANTY<br />
EZIP ELECTRIC SCOOTERS<br />
Purchased within the United States<br />
<strong>Currie</strong> Tech Corp. D/B/A <strong>Currie</strong> <strong>Technologies</strong> (“<strong>Currie</strong>”) warranties to the original owner of each new EZIP brand electric scooter, when purchased<br />
directly from an authorized <strong>Currie</strong> reseller, to be complete and that the following components will be free from defects in material and workmanship for<br />
the period indicated below.<br />
WARRANTY DOES NOT COVER NORMAL WEAR AND TEAR, SHIPPING DAMAGE, ALTERATIONS, MODIFICATIONS, MISUSE, NEGLECT OR<br />
ABUSE.<br />
Warranty<br />
<br />
<br />
EZIP branded electric scooters: Three months (90 days) from purchase date by the original owner.<br />
<strong>Currie</strong> replacement or maintenance parts & accessories: One month (30 days) from purchase date when purchased directly from <strong>Currie</strong>.<br />
Specific Warranty Items<br />
<br />
<br />
Tires and inner tubes are warrantied to be free from manufacturing and material defects for One month (30 days). The tire and inner tube<br />
warranty does not include damage from normal road hazards, flat tires, tire cuts and the like, skid wear or blowouts from over inflation or other<br />
such misuse, or normal wear.<br />
Batteries (factory-installed in an EZIP scooter) are warrantied to the original owner to be free from defects in materials and workmanship for<br />
a period of Three months (90 days) from the date of purchase by the original owner. The battery warranty does not include damage from<br />
power surges, use of improper charger, improper maintenance or other such misuse, or normal wear. Batteries purchased as maintenance or<br />
accessory parts are warrantied for One month (30 days) from the date of purchase by the original owner, when purchased directly from <strong>Currie</strong>.<br />
Items Not Covered<br />
Warranties are limited to replacement of parts and/or products determined by <strong>Currie</strong>, at its sole discretion, to be defective. In cases where multiple<br />
components are missing, you may be redirected to the retailer for assistance. <strong>Currie</strong> will not be responsible for labor costs or repairs.<br />
26<br />
e4.5 Owner's <strong>Manual</strong>.indd, Last Modified: December 28, 2012 10:49 AM
<strong>Currie</strong>’s Limited Warranty does not cover or apply to the following: Normal wear and tear; any damage, failure and/or loss caused by accident, shipping<br />
damage, misuse, neglect, abuse and/or failure to follow instructions or warnings as stated on the product or in the applicable owner’s manual or other<br />
printed materials provided with the product; damage, failure and/or loss caused by the use of the product for stunt riding, ramp jumping, competition, offroad<br />
use, acrobatics, trick riding or other similar activities, or use in any other manner for which such products were not specifically designed.<br />
This warranty does not apply to any products or components, mechanical and/or electrical, which have in any way been altered from their original<br />
configuration by any person. <strong>Currie</strong> will not be liable and/or responsible for any damage, failure or loss caused by any unauthorized service or use of<br />
unauthorized parts.<br />
The <strong>Currie</strong>’s Limited Warranty does not cover or apply to any <strong>Currie</strong> product used for rental or commercial purposes unless the specific product is<br />
designated, labeled or marketed by <strong>Currie</strong> as acceptable for rental or commercial use.<br />
The <strong>Currie</strong> Limited Warranty does not cover or apply to any <strong>Currie</strong> product sold by a non-authorized reseller or retailer. The <strong>Currie</strong> Limited Warranty<br />
does not cover or apply to any replacement, maintenance or accessory parts not sold directly by <strong>Currie</strong> to the original retail purchaser.<br />
Warranty Claims<br />
Those parts and/or products which are determined by <strong>Currie</strong> to be defective and to qualify for warranty replacement will be provided at no charge,<br />
only after a valid warranty claim is processed by <strong>Currie</strong> Customer Service Department. Warranty claims must be made by the original purchaser by<br />
contacting the <strong>Currie</strong> Customer Service Call Center (800-377-4532) within the warranty period (stated above). Standard Shipping & Handling fees will<br />
apply to all orders placed for warranty parts and/or products and will be charged to the customer/warranty claimant at the time said parts and/or products<br />
are shipped from <strong>Currie</strong>.<br />
<strong>Currie</strong>, at its sole discretion, has the option of replacing with a new part, or factory re-certified part. The Limited Warranty stated herein is in lieu of and<br />
expressly excludes all other warranties not expressly set forth herein, whether expressed or implied by law or otherwise, including, but not limited to, any<br />
warranties for merchantability and/or fitness for any particular purpose. <strong>Currie</strong> shall in no event be liable or responsible for incidental or consequential<br />
losses, damages or expenses in connection with their products. The liability of <strong>Currie</strong> hereunder is expressly limited to the replacement of goods<br />
complying with this warranty or at the sole discretion of <strong>Currie</strong> to the repayment of an amount equivalent to the purchase price of the product in question.<br />
Shipping & Handling fees will apply to all claims made under this warranty and will be charged to the claimant at the time products are<br />
shipped from <strong>Currie</strong>’s distribution center.<br />
<strong>Currie</strong> <strong>Technologies</strong> ® , 3850A Royal Avenue, Simi Valley, CA 93063<br />
1-800-377-4532<br />
27
Addt’l SAFETY INSTRUCTIONS<br />
!<br />
These instructions update the owner’s manual to ASTM F2642 standard. Failure to read, understand and follow<br />
the instructions in this manual may lead to serious injury or even death.<br />
»»<br />
Do not allow hands, feet, hair, body parts, clothing, or similar articles to come in contact with moving parts, wheels or<br />
drivetrain, while the motor is running.<br />
»»<br />
Make sure that the areas that the scooter is to be used in is safe and suitable for safe operation.<br />
»»<br />
Make sure that all safety labels are in place and understood by the rider. No passengers are allowed on the scooter<br />
»»<br />
Make sure that any and all axle guards, chain guards, or other covers or guards supplied with the scooter are in place and in<br />
good working condition.<br />
»»<br />
Make sure that tires are in good condition, inflated properly, and have sufficient tread remaining.<br />
»»<br />
Persons with following conditions are cautioned not to operate the scooter:<br />
Those with heart conditions<br />
Pregnant women<br />
»»<br />
Those with head, back, or neck ailments, or prior surgeries to those areas of the body<br />
WARNING<br />
»»<br />
Those with any mental or physical conditions that may make them susceptible to injury or impair their physical dexterity<br />
or mental capacities to recognize, understand and perform all of the safety instructions and to be able to assume the<br />
hazards inherent in operating the scooter.<br />
SAFETY INSTRUCTIONS (INSERT)<br />
28<br />
e4.5 Owner's <strong>Manual</strong>.indd, Last Modified: December 28, 2012 10:49 AM
FCC instructions<br />
FCC Warning for the battery charger<br />
Warning: Changes or modifications to the charger not expressly approved by the party responsible for compliance could void the user’s<br />
authority to operate the equipment.<br />
NOTE: This equipment has been tested and found to comply with the limits for a Class B digital device, pursuant to Part 15 of the<br />
FCC Rules. These limits are designed to provide reasonable protection against harmful interference in a residential installation. This<br />
equipment generates, uses and can radiate radio frequency energy and, if not installed and used in accordance with the instructions,<br />
may cause harmful interference to radio communications. However, there is no guarantee that interference will not occur in a particular<br />
installation. If this equipment does cause harmful interference to radio or television reception, which can be determined by turning the<br />
equipment off and on, the user is encouraged to try to correct the interference by one or more of the following measures:<br />
* Reorient or relocate the receiving antenna.<br />
* Increase the separation between the equipment and receiver.<br />
* Connect the equipment into an outlet on a circuit different from that to which the receiver is connected.<br />
* Consult the dealer or an experienced radio/TV technician for help.<br />
ADDT’L Maintenance instructionS<br />
These instructions update the owner’s manual to ASTM F2642 standard.<br />
Inflate tires to the pressure molded into the tire sidewalls.<br />
»»<br />
No lubrication is required except for the chain. Use chain lube.<br />
29
3850A Royal Ave<br />
Simi Valley, CA 93063<br />
Phone: +1 800.377.4532<br />
Fax: +1 805.915.4321<br />
www.<strong>Currie</strong>Tech.com