


Create successful ePaper yourself
Turn your PDF publications into a flip-book with our unique Google optimized e-Paper software.
<strong>SAP2000</strong> ®<br />
Integrated<br />
Finite Elements Analysis<br />
and<br />
Design of Structures<br />
<strong>SAP2000</strong> <strong>Web</strong> <strong>Tutorial</strong> 1<br />
DETAILED TUTORIAL INCLUDING<br />
PUSHOVER ANALYSIS<br />
Computers and Structures, Inc.<br />
Berkeley, California, USA<br />
Issue Date: June 1998<br />
Revision Number : 0<br />
Revision Date: N/A
COPYRIGHT<br />
The computer program <strong>SAP2000</strong> and all associated documentation are proprietary<br />
and copyrighted products. Worldwide rights of ownership rest with Computers<br />
and Structures, Inc. Unlicensed use of the program or reproduction of the<br />
documentation in any form, without prior written authorization from Computers<br />
and Structures, Inc., is explicitly prohibited.<br />
Further information may be obtained from:<br />
Computers and Structures, Inc<br />
1995 University Avenue<br />
Berkeley, California 94704 USA<br />
tel: (510) 845-2177<br />
fax: (510) 845-4096<br />
e-mail: support@csiberkeley.com<br />
web: www.csiberkeley.com<br />
© Copyright Computers and Structures, Inc., 1978-1997.<br />
The CSI Logo is a registered trademark of Computers and Structures, Inc.<br />
<strong>SAP2000</strong> is a registered trademark of Computers and Structures, Inc.<br />
Windows is a registered trademark of Microsoft Corporation.
DISCLAIMER<br />
CONSIDERABLE TIME, EFFORT AND EXPENSE HAVE GONE INTO THE<br />
DEVELOPMENT AND DOCUMENTATION OF <strong>SAP2000</strong>. THE PROGRAM HAS<br />
BEEN THOROUGHLY TESTED AND USED. IN USING THE PROGRAM,<br />
HOWEVER, THE USER ACCEPTS AND UNDERSTANDS THAT NO WARRANTY<br />
IS EXPRESSED OR IMPLIED BY THE DEVELOPERS OR THE DISTRIBUTORS<br />
ON THE ACCURACY OR THE RELIABILITY OF THE PROGRAM.<br />
THE USER MUST EXPLICITLY UNDERSTAND THE ASSUMPTIONS OF THE<br />
PROGRAM AND MUST INDEPENDENTLY VERIFY THE RESULTS.
Table Of Contents<br />
A. Introduction ...................................................................................................................1<br />
B. Description of Building Model ......................................................................................3<br />
C. <strong>Tutorial</strong> Part 1 - Creating, Analyzing and Designing the Basic Model .......................8<br />
1a. Setting up the model geometry starting from a template............................................8<br />
1b. Setting up the model geometry starting from scratch, including restraints...............18<br />
2. Relabeling joint, frame and shell elements..............................................................28<br />
3. Defining material properties ...................................................................................30<br />
4. Defining frame sections..........................................................................................32<br />
5. Defining shell sections............................................................................................34<br />
6. Assigning groups....................................................................................................35<br />
7. Assigning frame sections........................................................................................41<br />
8. Assigning shell sections..........................................................................................47<br />
9. Assigning frame end releases..................................................................................48<br />
10. Defining static load cases .......................................................................................51<br />
11. Assigning frame static loads ...................................................................................53<br />
12. Assigning shell static loads.....................................................................................61<br />
13. Assigning joint static loads.....................................................................................63<br />
14. Assigning joint masses ...........................................................................................67<br />
15. Assigning diaphragm constraints ............................................................................70<br />
16. Static and dynamic analysis (not pushover) ............................................................71<br />
17. Reviewing mode shapes .........................................................................................74<br />
18. Reviewing deformed shapes ...................................................................................75<br />
19. Reviewing element forces and stresses ...................................................................77<br />
20. Performing a steel design stress check ....................................................................81<br />
D. <strong>Tutorial</strong> Part 2 - Pushover Analysis............................................................................86<br />
1. Defining hinge properties (pushover)......................................................................86<br />
2. Assigning hinge properties (pushover)....................................................................90<br />
3. Viewing generated hinge properties (pushover) ......................................................94<br />
4. Defining static pushover cases................................................................................98<br />
5. Running the pushover analysis..............................................................................105<br />
6. Displaying the pushover deformed shape and the sequence of hinge formation.....106<br />
7. Displaying frame element forces at each step of the pushover...............................110<br />
8. Displaying the pushover and capacity spectrum curves.........................................112<br />
E. Final Comments.........................................................................................................123<br />
i
A. Introduction<br />
This tutorial is quite detailed. It is intended to introduce and demonstrate many of the capabilites<br />
of <strong>SAP2000</strong>. Because we are trying to demonstrate as many different capabilities as reasonable,<br />
the example problem is not necessarily created and the results are not necessarily reviewed in the<br />
most efficient and expedient manner. Often with computer programs, what is efficient for one<br />
person may not be the best method for the next person. It is assumed that once introduced to the<br />
<strong>SAP2000</strong> capabilities and methods in this tutorial, users will decide which methods work best for<br />
them in their particular circumstances. Following is an outline of this tutorial (see the Table of<br />
Contents for a more complete outline):<br />
A. Introduction<br />
B. Description of Building Model<br />
C. <strong>Tutorial</strong> Part 1 - Creating and Analyzing the Basic Model<br />
D. <strong>Tutorial</strong> Part 2 - Pushover Analysis<br />
E. Discussion of Additional Pushover Cases<br />
If you are not interested in the pushover portion of the tutorial, you can skip parts D and E.<br />
If you are only interested in the pushover tutorial, then you can read parts A and B, skip part C,<br />
and then open the already created model (without the pushover data) named Sapwb01c.sdb,<br />
which is supplied with this tutorial, and start with Step D.<br />
Note: You must have <strong>SAP2000</strong> Version 6.20 or later to read files Sapwb01c.sdb and<br />
Sapwb01d.sdb. These files are not compatible with earlier versions of <strong>SAP2000</strong>.<br />
Finally, if you are not interested in working through the tutorial at this time, but want to see the<br />
results of the pushover analysis, then you can read parts A and B, skip part C and the first five<br />
steps of part D, and then open the already created model (with the pushover data) named<br />
Sapwb01d.sdb, which is supplied with this tutorial. You should then run the linear static and<br />
dynamic analysis by clicking Run on the Analyze menu. Next select Run Static Pushover from<br />
the Analysis menu to perform the pushover analysis. The results are now ready for viewing. See<br />
steps 6, 7 and 8 in part D for information on viewing results. See part E for additional discussion<br />
of results. Note that for real problems (as contrasted with tutorial problems) you should always<br />
run and review the results of a basic static analysis (and maybe also dynamic analysis, at least for<br />
mode shapes) to verify that your model is behaving as you intend.<br />
<strong>SAP2000</strong> has extensive online help that can help answer many of your questions. One of the<br />
most useful ways to access the online help is to press the F1 key on the keyboard from within<br />
most dialog boxes. Pressing the F1 key will bring up context sensitive help pertaining to the<br />
<strong>SAP2000</strong> <strong>Web</strong> <strong>Tutorial</strong> 1 1
dialog box that is open. You may find it useful to use this option throughout this tutorial to get<br />
more information.<br />
If you require further technical assistance concerning this tutorial, or other aspects of <strong>SAP2000</strong>,<br />
you can contact CSI by phone at (510) 845-2177, or by e-mail at support@csiberkeley.com.<br />
<strong>SAP2000</strong> <strong>Web</strong> <strong>Tutorial</strong> 1 2
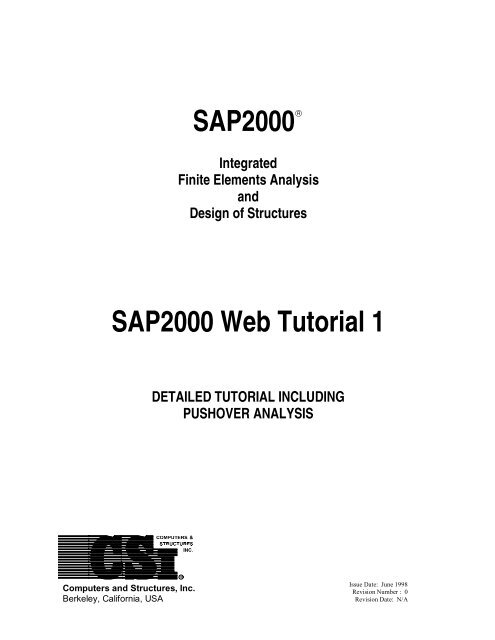
B. Description of Building Model<br />
The example problem for this tutorial is a steel-frame building two bays wide by two bays deep,<br />
and two stories high. The plans and elevation in Figure B-1 show the basic dimensions and<br />
member sizes for the model. The building has a moment frame lateral force-resisting system in<br />
the X-direction and a braced frame lateral force-resisting system in the Y-direction. All steel is<br />
Fy = 36 ksi. The second floor is concrete over metal deck, and is assumed to be a rigid<br />
diaphragm in the model. The roof deck has no concrete, so it is not modeled as rigid.<br />
W8X58<br />
A<br />
W14X132<br />
W14X132<br />
W8X58<br />
A<br />
W8X31<br />
Y<br />
X<br />
W8X58<br />
Note: All column<br />
bases are pinned.<br />
24’ 24’<br />
A<br />
TS4X4X1/4<br />
TS5X5X1/4<br />
TS4X4X1/4<br />
TS5X5X1/4<br />
12’ 12’<br />
W14X132<br />
W14X132<br />
W8X58<br />
24’ 24’<br />
Column Layout Plan<br />
A<br />
24’<br />
Elevation A-A<br />
W16X26<br />
W24X55<br />
W16X26<br />
W24X55<br />
TS4X4X1/4<br />
Chevron Brace<br />
TS5X5X1/4<br />
X-Brace<br />
W18X35<br />
W18X35<br />
Infill Beam<br />
W16X26<br />
Metal Deck<br />
Infill Beam<br />
W21X44<br />
W21X44<br />
Infill Beam<br />
W16X26<br />
TS4X4X1/4<br />
Chevron Braces<br />
Infill Beam<br />
W18X35<br />
W18X35<br />
24’ 24’<br />
W18X40<br />
W18X40<br />
Infill Beam<br />
W18X40<br />
Conc. Fill Over<br />
Metal Deck<br />
Infill Beam<br />
W24X62<br />
W24X62<br />
Infill Beam<br />
W18X40<br />
TS5X5X1/4<br />
X- Brace<br />
Infill Beam<br />
W18X40<br />
W18X40<br />
24’ 24’<br />
W24X55<br />
W16X26<br />
W24X55<br />
W16X26<br />
24’ 24’<br />
24’ 24’<br />
Roof Plan<br />
Second Floor Plan<br />
Figure B-1: Example Building Plans and Braced Frame Elevation<br />
<strong>SAP2000</strong> <strong>Web</strong> <strong>Tutorial</strong> 1 3
Figure B-2 shows perspective views of the computer model that include joint labels and frame<br />
element labels. Figure B-3 includes plan views of the computer model with frame element<br />
labels. Note that the infill beams are not specifically included in the computer model. These<br />
figures may be useful for reference when you are working through the tutorial.<br />
Z<br />
Y<br />
X<br />
Perspective View Showing Joint Labels<br />
Z<br />
Y<br />
X<br />
Perspective View Showing Frame Element Labels<br />
Figure B-2: Views of Computer Model Showing Joint and Frame Element Labels<br />
<strong>SAP2000</strong> <strong>Web</strong> <strong>Tutorial</strong> 1 4
Roof Level<br />
Second Floor Level<br />
Figure B-3: Plan Views of Computer Model Showing Frame Element Labels<br />
<strong>SAP2000</strong> <strong>Web</strong> <strong>Tutorial</strong> 1 5
The following assumptions are used for dead and live loads:<br />
Roof:<br />
Second Floor:<br />
Perimeter Wall:<br />
DL = 40 psf<br />
LL = 20 psf<br />
DL = 80 psf<br />
LL = 50 psf<br />
DL = 20 psf<br />
These loads are assumed to include the self-weight of the structural elements. Figure B-4 shows<br />
the beam span loads that are applied to each beam in the <strong>SAP2000</strong> model.<br />
Roof Beams 39, 40, 51, 52<br />
0.40 klf DL<br />
0.12 klf LL<br />
Second Floor Beams 14, 15, 24, 25<br />
0.72 klf DL<br />
0.30 klf LL<br />
Roof Beams 41/44, 42, 47/50, 49 Second Floor Beams 16, 18, 21, 23<br />
5.76 k DL<br />
11.52 k DL<br />
0.16 klf DL<br />
2.88 k LL<br />
0.24 klf DL<br />
7.20 k LL<br />
Roof Beams 45, 46<br />
0.48 klf DL<br />
0.24 klf LL<br />
Second Floor Beams 19, 20<br />
0.96 klf DL<br />
0.60 klf LL<br />
Roof Beams 43, 48<br />
11.52 k DL<br />
5.76 k LL<br />
Second Floor Beams 17, 22<br />
23.04 k DL<br />
14.40 k LL<br />
Figure B-4: Beam Span Loads Used In <strong>SAP2000</strong> Model<br />
<strong>SAP2000</strong> <strong>Web</strong> <strong>Tutorial</strong> 1 6
For this model, all mass is input at the joints. Table B-1 defines the joint masses used in the<br />
model. The bottom portion of the table defines the masses, the top portion of the table defines<br />
which joints are referred to as the center, corner and edge joints. Note that no mass is assigned<br />
to joints 22 and 26 at the roof level. These are the joints at the top of the chevron braces.<br />
Joint Labels at Center, Edge and Corner Joints<br />
Level Center Joint Edge Joints Corner Joints<br />
Roof 24 20, 23, 25, 28 19, 21, 27, 29<br />
Second 14 11, 13, 15, 17 10, 12, 16, 18<br />
Joint Masses at Center, Edge and Corner Joints (k-sec 2 / ft)<br />
Level Center Joint Edge Joints Corner Joints<br />
Roof 0.72 0.48 0.30<br />
Second 1.45 0.90 0.55<br />
Table B-1: Joint Masses Used In Computer Model<br />
The lateral earthquake loads are assumed to be 17 kips (0.0074ksf) at the roof level and 16 kips<br />
at the second level for the X-direction (moment frame direction), and 26 kips (0.0113 ksf) at the<br />
roof level and 23 kips at the second level for the Y-direction (braced frame direction). These<br />
forces are assigned as shell static uniform loads at the roof level and as joint loads at the second<br />
level. The second level forces are broken down into joint loads as shown in Table B-2.<br />
Joint Loads at Center, Edge and Corner Joints (k) For Second Level<br />
Earthquake<br />
Direction<br />
Center Joint<br />
14<br />
Edge Joints<br />
11, 13, 15, 17<br />
Corner Joints<br />
10, 12, 16, 18<br />
EQX 2.67 2.00 1.33<br />
EQY 3.83 2.88 1.92<br />
Table B-2: Joint Forces Used In Computer Model For Static Earthquake Loading At Second<br />
Floor Level In X and Y Direction<br />
<strong>SAP2000</strong> <strong>Web</strong> <strong>Tutorial</strong> 1 7
C. <strong>Tutorial</strong> Part 1 - Creating, Analyzing and Designing the Basic Model<br />
This tutorial steps through setting up the model geometry both from a built-in template (step 1a),<br />
and from scratch (step 1b). It is not necessary to do both of these steps, in order to complete the<br />
tutorial; one or the other is sufficient. However, it may be helpful to see the process and<br />
techniques used in completing both steps. We recommend that to obtain additional information<br />
during the course of this tutorial you refer liberally to the online help available in <strong>SAP2000</strong> by<br />
pressing the F1 key from within almost any dialog box to obtain context-sensitive help.<br />
Step 1a: Setting Up the Model Geometry From a Template<br />
1. Click the drop down box in the status bar to change the units to kip-ft.<br />
2. From the File menu select New Model from Template…. This displays the Model<br />
Templates dialog box.<br />
3. In this dialog box:<br />
• Click on the Space Frame template. This will display the Space Frame<br />
dialog box (see Figure C-1).<br />
• In this dialog box:<br />
Figure C-1: Space Frame Dialog Box<br />
ä Change the Number of Bays along X to 2.<br />
<strong>SAP2000</strong> <strong>Web</strong> <strong>Tutorial</strong> 1 8
ä Check the Restraints box if it is not already checked.<br />
ä Check the Gridlines box if it is not already checked.<br />
ä Accept the remainder of the default values.<br />
ä Click the OK button.<br />
4. The screen will refresh and display a 3-D and a 2-D (XY Plane @ Z=24) view of the model<br />
in vertically tiled adjoining windows.<br />
Figure C-2: Initial Screen From Space Frame Template<br />
5. Note that the default restraints provided when the Restraints box is checked in the Space<br />
Frame dialog box are pinned supports.<br />
6. Click in the window labeled X-Y Plane @ Z=24 to make sure it is active. Note when the<br />
window is active, its title bar will be highlighted.<br />
7. Click the yz 2D View button on the main toolbar to change the view to an elevation in<br />
the YZ plane. Note that the title of the window reads YZ Plane @ X=24. This same title<br />
also occurs on the left-hand side of the status bar at the bottom of the <strong>SAP2000</strong> window.<br />
8. Click the roof level beam on the left side of the elevation to select it. From the Edit menu,<br />
click Divide Frames… to display the Divide Selected Frames dialog box.<br />
<strong>SAP2000</strong> <strong>Web</strong> <strong>Tutorial</strong> 1 9
9. Accept the default values in this dialog box and click the OK button. The roof beam is<br />
divided into two beams, thus providing a node for the top of the chevron brace.<br />
10. Click the Draw Frame Element button on the side toolbar, or select Draw Frame<br />
Element from the Draw menu. The program is now in Draw Mode.<br />
Note: If you hold the pointer over a toolbar button for a few seconds, a text box<br />
including the name of the button will appear.<br />
11. Make sure that the Snap to Joints and Grid Points button on the side tool bar is<br />
depressed. Place the mouse pointer on the joint labeled “A” in Figure C-3 and click on the<br />
left mouse button. Note that when the mouse pointer is near the joint, it snaps to the joint,<br />
and a text box that says “Grid Intersection” appears. This is the effect of the Snap to Joints<br />
and Grid Points feature.<br />
Note: Other snap options included in <strong>SAP2000</strong> include Snap to Midpoints and Ends,<br />
Snap to Element Intersections, Snap to Perpendicular, and Snap to Lines and Edges.<br />
The buttons for these features are located on the side toolbar just below the Snap to<br />
Joints and Grid Points button. Note that all of the snap features can also be<br />
accessed through the Snap To… option on the Draw menu. For more information on<br />
the snap capabilities of <strong>SAP2000</strong>, refer to the topic titled Snap Tools in the <strong>SAP2000</strong><br />
online help. Click on the Help menu and select the Search for Help on… option to<br />
access the online help in <strong>SAP2000</strong>.<br />
B<br />
A<br />
C<br />
D<br />
Figure C-3: Joint Labels For Drawing Chevron Brace<br />
<strong>SAP2000</strong> <strong>Web</strong> <strong>Tutorial</strong> 1 10
12. Place the mouse pointer near the joint labeled “B” in Figure C-3 and note that in this case the<br />
Snap To option text box just says “Point” because the joint does not occur at a grid<br />
intersection. Click on the left mouse button to draw the chevron brace element.<br />
Note: If you wanted to, at this point you could just click on point C in Figure C-3 to<br />
draw the second brace element. If we were to do that, the start point for the brace<br />
would be at the top (point B) and the bottom point would be at the bottom (point C).<br />
Though not necessarily a problem, this would be inconsistent with how we input the<br />
first brace. In this example we will opt for consistency.<br />
Note: If you wanted to, at this point you could move the mouse pointer into the 3D View<br />
window, and select the second joint for the next frame element there. Try moving the<br />
mouse pointer over the 3D View window, but for this example don’t actually click to<br />
define the second frame member.<br />
13. Press the Enter key on the keyboard to stop drawing the second frame member. Note that the<br />
Draw Frame Element button is still depressed, i.e., the program is still in Draw Mode and<br />
ready to draw another frame element.<br />
14. Click on the joint labeled “C” and then the joint labeled “B” in Figure C-3, and then press the<br />
Enter key on the keyboard to draw the second chevron brace member.<br />
15. Click the Quick Draw Frame Element button on the side toolbar. Then click in the<br />
area labeled “D” in Figure C-3 to enter the X-braces. The model now appears as shown in<br />
Figure C-4.<br />
Note: The X-braces could also have been entered using the same technique that was<br />
employed for the chevron braces.<br />
Note: Both the Draw Frame Element and the Quick Draw Frame Element options are<br />
also available on the Draw menu.<br />
Note: The Quick Draw Frame Element option works two different ways. You can click<br />
on a grid segment to quickly draw a single frame element between the two adjacent<br />
perpendicular grid lines. Alternatively, you can click in a space bounded by four grid<br />
lines to quickly draw a cross brace as was done here.<br />
16 Click the Down One Gridline button on the main toolbar twice to display the YZ<br />
elevation at X=-24. Note the window title changes to Y-Z Plane @ X=-24. The model<br />
appears as shown in Figure C-5.<br />
17. We will use a different method to locate these chevron braces. Click the Snap to Midpoints<br />
and Ends button to activate this snapping option. Click the Draw Frame Element<br />
button on the side toolbar, or select Draw Frame Element from the Draw menu. The<br />
program is now in Draw Mode.<br />
<strong>SAP2000</strong> <strong>Web</strong> <strong>Tutorial</strong> 1 11
Figure C-4: Model After Inputting First Set of Braces<br />
B<br />
A<br />
C<br />
D<br />
Figure C-5: Model Ready To Draw Second Set of Braces<br />
<strong>SAP2000</strong> <strong>Web</strong> <strong>Tutorial</strong> 1 12
18. Place the mouse pointer on the joint labeled “A” in Figure C-5 and click on the left mouse<br />
button.<br />
19. Move the mouse pointer over to the center of the beam element at the point labeled “B” in<br />
Figure C-5. When the Snap To feature text box appears saying “Midpoint” click the left<br />
mouse button to input the brace element. Then press the Enter key on the keyboard.<br />
20. Click the Snap to Midpoints and Ends button to deactivate this snapping option.<br />
21. Click on the joint labeled “C” and then the joint labeled “B” in Figure C-5, and then press the<br />
Enter key on the keyboard to draw the second chevron brace member.<br />
22. Click the Quick Draw Frame Element button on the side toolbar. Then click in the<br />
area labeled “D” in Figure C-5 to enter the X-braces.<br />
23. Click the Pointer button to exit Draw Mode and enter Select Mode.<br />
24. Click the roof beam at the top of the braced frame to select it. Also click the joint at the top<br />
of the chevron brace (center of braced frame roof beam) to select it.<br />
25. From the Edit menu select Divide Frames... to display the Divide Selected Frames dialog<br />
box.<br />
26. In this dialog box:<br />
• Select the Break At Intersections With Selected Frames and Joints option.<br />
• Click the OK button.<br />
Note: This completes inputting of the frame element geometry. Now we will input shell<br />
element geometry. We will use shell elements to model the roof diaphragm. We will<br />
demonstrate three different options for inputting the shell elements.<br />
27. Click the xy 2D View button on the main toolbar to change the view to a plan in the<br />
XY plane. Note that the title of the window reads XY Plane @ Z=24.<br />
28. Click the Quick Draw Rectangular Shell Element button on the side toolbar (or select<br />
Quick Draw Rectangular Shell Element from the Draw menu).<br />
29. Click in the area labeled “A” in Figure C-6 to input the first shell element. Note that a quick<br />
Shell element is drawn by clicking in a grid space, bounded by four grid lines.<br />
30. Note that just the outline of the shell element is shown. Sometimes when working with shell<br />
elements it is easier if you can view the shell element filled in. Click the Set Elements<br />
<strong>SAP2000</strong> <strong>Web</strong> <strong>Tutorial</strong> 1 13
utton on the main toolbar (or select Set Elements… from the View menu). This<br />
displays the Set Elements Dialog box.<br />
31. Check the box labeled Fill Elements and click the OK button to display the shell elements<br />
filled.<br />
32. Click in the area labeled “B” in Figure C-6 to input a second shell element. Note that this<br />
element will be reshaped in a subsequent step.<br />
33. Click the Draw Rectangular Shell Element button on the side toolbar (or select Draw<br />
Rectangular Shell Element from the Draw menu). Make sure that the Snap to Joints and<br />
Grid Points button on the side tool bar is selected (depressed).<br />
E<br />
F<br />
H<br />
A<br />
C<br />
G<br />
B<br />
D<br />
Figure C-6: Shell Element Input<br />
34. Click on the point labeled “C” in Figure C-6 and then click the point labeled “D” to input the<br />
next shell element. Note that a rectangular Shell element is drawn by clicking to define two<br />
corners that are diagonally opposite of each other.<br />
35. Click the Draw Quadrilateral Shell Element button on the side toolbar (or select<br />
Draw Quad Shell Element from the Draw menu).<br />
36. Click on the points labeled “E”, “F”, “G” and “H” in Figure C-6, in that order, to draw a<br />
quadrilateral shell element.<br />
<strong>SAP2000</strong> <strong>Web</strong> <strong>Tutorial</strong> 1 14
37. Click on the points labeled “H”, “G”, “C” and “H” in Figure C-6, in that order, to draw a<br />
triangular shell element.<br />
Note: Shell elements may be either four-sided, or three-sided. In general, four-sided<br />
elements are recommended.<br />
38. Click the Reshaper button on the side toolbar (or select Reshape Element from the<br />
Draw menu).<br />
39. Click once on the shell element in the lower right-hand corner (drawn in item 29 in the area<br />
labeled “B” in Figure C-6) to highlight it. Note that member end handles appear on the shell<br />
element as shown in Figure C-7.<br />
C<br />
A<br />
B<br />
Figure C-7: Reshape Shell Element<br />
40. Click on the point labeled “A” in Figure C-7, and while holding down the left mouse button,<br />
drag the member end handle to point “B”.<br />
41. Click the Refresh Window button on the main toolbar (or select Refresh Window<br />
from the View menu) to see the results of reshaping the element.<br />
42. .Click the Draw Quadrilateral Shell Element button on the side toolbar (or select<br />
Draw Quad Shell Element from the Draw menu). Then click on the points labeled “C”,<br />
“A”, “B” and “C” in Figure C-7, in that order, to draw a triangular shell element.<br />
43. Click the Pointer button to exit Draw Mode and enter Select Mode.<br />
<strong>SAP2000</strong> <strong>Web</strong> <strong>Tutorial</strong> 1 15
44. Now we will return the shell element view to unfilled elements. Click the Set Elements<br />
button on the main toolbar (or select Set Elements… from the View menu). This<br />
displays the Set Elements Dialog box.<br />
45. Uncheck the box labeled Fill Elements and click the OK button to display the shell elements<br />
not filled. The display should appear as shown in Figure C-8.<br />
Figure C-8: Model With All Geometry Input<br />
46. From the File menu choose Save and input a new name to save your file.<br />
Note: It is a good idea to save your file often.<br />
This completes the input of the model geometry. Now you can do one of the following:<br />
If you started the model from a template, and do not want to try starting the model from<br />
scratch, then skip to Step 2.<br />
If you started the model from a template and now want to try starting it from scratch, then<br />
continue on to Step 1b.<br />
If you started the model from scratch, and do not want to try starting the model from a<br />
template, then skip to Step 2.<br />
<strong>SAP2000</strong> <strong>Web</strong> <strong>Tutorial</strong> 1 16
If you started the model from scratch, and now want to try starting it from a template,<br />
then return to the beginning of Step 1a.<br />
If you want to stop working on the tutorial for now, and close <strong>SAP2000</strong>, make sure that<br />
you have saved your file as outlined in item 46, and then from the File menu select Exit.<br />
<strong>SAP2000</strong> <strong>Web</strong> <strong>Tutorial</strong> 1 17
Step 1b: Setting Up the Model Geometry From Scratch<br />
This tutorial steps through setting up the model geometry both from a built-in template (step 1a),<br />
and from scratch (step 1b). It is not necessary to do both of these steps in order to complete the<br />
tutorial; one or the other is sufficient. However, each of them has some unique information.<br />
1. Click the drop down box in the status bar to change the units to kip-ft.<br />
2. From the File menu select New Model…. This displays the Coordinate System Definition<br />
dialog box.<br />
3. In this dialog box:<br />
• Select the Cartesian tab.<br />
• Set the Number of Grid Spaces in X direction to 2.<br />
• Set the Number of Grid Spaces in Y direction to 4.<br />
• Set the Number of Grid Spaces in Z direction to 2.<br />
• Set the Grid Spacing in the X direction to 24.<br />
• Set the Grid Spacing in the Y direction to 12.<br />
• Set the Grid Spacing in the Z direction to 12.<br />
• Click the OK button to accept the grid definition.<br />
4. The screen will refresh and display a 3-D and a 2-D (XY Plane @ Z=24) view in verticallytiled<br />
adjoining windows.<br />
5. Click in the window labeled X-Y Plane @ Z=24 to make sure it is active. Note when the<br />
window is active, its title bar will be highlighted.<br />
6. Click the Quick Draw Frame Element button on the side toolbar (or select Quick<br />
Draw Frame Element from the Frame menu).<br />
Note: If you hold the pointer over a toolbar button for a few seconds, a text box<br />
including the name of the button will appear.<br />
7. In the window labeled X-Y Plane @ Z=24, to enter a beam element click on a grid line. The<br />
Quick Draw Frame Element tool will then create a beam element on that grid line spanning<br />
between the closest perpendicular grid lines on either side of the point where you clicked.<br />
<strong>SAP2000</strong> <strong>Web</strong> <strong>Tutorial</strong> 1 18
Thus click the ten locations designated by an O in Figure C-9 to draw some of the roof level<br />
beams.<br />
Figure C-9: Quick Drawing Roof Level Beams<br />
C<br />
A<br />
F<br />
D<br />
B<br />
G<br />
E<br />
Figure C-10: Drawing Remaining Roof Level Beams<br />
<strong>SAP2000</strong> <strong>Web</strong> <strong>Tutorial</strong> 1 19
Note: If you miss slightly when clicking on a grid line, the program may assume you were<br />
attempting to input two diagonal braces in the bay bounded by the grid lines. If this<br />
happens, simply click the Undo button on the main toolbar twice, or select Undo<br />
Frame Add from the Edit menu twice.<br />
8. Click the Draw Frame Element button on the side toolbar. The program is now in<br />
Draw Mode.<br />
9. Make sure that the Snap to Joints and Grid Points button on the side tool bar is<br />
depressed. Place the mouse pointer on the joint labeled “A” in Figure C-10 and click on the<br />
left mouse button. Note that when the mouse pointer is near the joint, it snaps to the joint,<br />
and a text box that says “Grid Intersection” appears. This is the effect of the Snap to Joints<br />
and Grid Points feature.<br />
Note: Other snap options included in <strong>SAP2000</strong> include Snap to Midpoints and Ends,<br />
Snap to Element Intersections, Snap to Perpendicular, and Snap to Lines and Edges.<br />
The buttons for these features are located on the side toolbar just below the Snap to<br />
Joints and Grid Points button. Note that all of the snap features can also be<br />
accessed through the Snap To… option on the Draw menu. For more information on<br />
the snap capabilities of <strong>SAP2000</strong>, refer to the topic titled Snap Tools in the <strong>SAP2000</strong><br />
online help. Click on the Help menu and select the Search for Help on… option to<br />
access the <strong>SAP2000</strong> online help.<br />
10. Place the mouse pointer near the joint labeled “B” in Figure C-10 and Click on the left mouse<br />
button to draw the roof beam element.<br />
Note: We couldn’t use the Quick Draw Frame Element tool to draw this beam because<br />
the beam crosses a grid line.<br />
11. By default the program is now ready to draw another frame element starting from point “B”.<br />
Press the Enter key on the keyboard to stop from drawing the second frame member at this<br />
location.<br />
12. Place the mouse pointer on the joint labeled “C” in Figure C-10 and click on the left mouse<br />
button. Click in sequence on joints “D” and “E” and then press the Enter key to draw the<br />
next two roof beams.<br />
13. We will now edit the grid lines so that we can use the Quick Draw Frame Element tool to<br />
enter the last roof beam that will span from point “F” to point “G” in Figure C-10.<br />
14. From the Draw menu select Edit Grid…. This displays the Modify Grid Lines dialog box.<br />
15. In this dialog box:<br />
Click the Y option in the Direction area.<br />
<strong>SAP2000</strong> <strong>Web</strong> <strong>Tutorial</strong> 1 20
Highlight -12 in the Y Location list box and click the Delete Grid Line button.<br />
Highlight 12 in the Y Location list box and click the Delete Grid Line button.<br />
Click the OK button.<br />
16. Click the Quick Draw Frame Element button on the side toolbar (or select Quick<br />
Draw Frame Element from the Frame menu).<br />
17. Click on the grid line between points “F” and “G” in Figure C-10 to enter the last roof beam.<br />
The model now appears as shown in Figure C-11.<br />
Figure C-11: Model After All Roof Level Beams Have Been Drawn<br />
18. Select all of the roof level frame elements and joints in the X-Y Plane @ Z=24 by<br />
“windowing.” To do this:<br />
• Click the Pointer button on the side toolbar to activate the Select Mode.<br />
• Move the pointer above and to the left of the frame elements and joints.<br />
• Click and hold the left mouse button.<br />
• While holding, move the pointer below and to the right of the frame elements and joints.<br />
A “rubber-band” window will show the region selected.<br />
<strong>SAP2000</strong> <strong>Web</strong> <strong>Tutorial</strong> 1 21
• Release the left mouse button to select all elements in this window.<br />
19. From the Edit menu, choose Copy.<br />
20. From the Edit menu, choose Paste. This will display the Paste Coordinates dialog box.<br />
21. In this dialog box input 0 for Delta X, 0 for Delta Y and -12 for Delta Z.<br />
22. Click the OK button and the geometry for the roof level is copied to the second level.<br />
23. Click the Down One Gridline button on the main toolbar to display the plan view at<br />
the second floor level, Z=12. Note the window title changes to X-Y Plane @ Z=12. The<br />
model now appears as shown in Figure C-12.<br />
A<br />
B<br />
C<br />
D<br />
Figure C-12: Model After All Roof Level Beams Copied To Second Level<br />
Note: The second level beams at the braced frames do not need a joint at the center to<br />
receive a brace. Thus we will delete the center joints.<br />
24. Click the second level beams labeled “A” and “B” in Figure C-12 to select them.<br />
25. From the Edit menu select Join Frames to combine these two elements into a single element<br />
and remove unused joints left over from the joining process.<br />
<strong>SAP2000</strong> <strong>Web</strong> <strong>Tutorial</strong> 1 22
26. Click anywhere on the combined frame member to select it. Note that the entire member is<br />
highlighted thus verifying that the members have been joined.<br />
27. Click the Clear Selection button on the side toolbar (or select Clear Selection from the<br />
Select menu) to deselect the beam.<br />
28. Click the second level beams labeled “C” and “D” in Figure C-12 to select them. From the<br />
Edit menu select Join Frames to combine these two elements into a single element.<br />
29. Click in the window labeled X-Y Plane @ Z=12 to make sure it is active. Note when the<br />
window is active, its title bar will be highlighted.<br />
30. Click the yz 2D View button on the main toolbar to change the view to an elevation in<br />
the YZ plane. Note that the title of the window reads YZ Plane @ X=24. This same title<br />
also occurs on the left-hand side of the status bar at the bottom of the <strong>SAP2000</strong> window. The<br />
model appears as shown in Figure C-13.<br />
B<br />
A<br />
C<br />
D<br />
Figure C-13: Y-Z Elevation<br />
31. Click the Draw Frame Element button on the side toolbar. The program is now in<br />
Draw Mode.<br />
32. Make sure that the Snap to Joints and Grid Points button on the side tool bar is<br />
depressed. Place the mouse pointer on the joint labeled “A” in Figure C-13 and click on the<br />
left mouse button. Note that when the mouse pointer is near the joint, it snaps to the joint,<br />
<strong>SAP2000</strong> <strong>Web</strong> <strong>Tutorial</strong> 1 23
and a text box that says “Grid Intersection” appears. This is the effect of the Snap to Joints<br />
and Grid Points feature.<br />
33. Place the mouse pointer near the joint labeled “B” in Figure C-13 and note that in this case<br />
the Snap To option text box just says “Point” because the joint does not occur at a grid<br />
intersection. Click on the left mouse button to draw the chevron brace element.<br />
Note: If you wanted to, at this point you could just click on point C in Figure C-12 to<br />
draw the second brace element. If we were to do that, the start point for the brace<br />
would be at the top (point B) and the bottom point would be at the bottom (point C).<br />
Though not necessarily a problem, this would be inconsistent with how we input the<br />
first brace. In this example we will opt for consistency.<br />
Note: If you wanted to, at this point you could move the mouse pointer into the 3D View<br />
window, and select the second joint for the next frame element. Try moving the<br />
mouse pointer over the 3D View window, but for this example don’t actually click to<br />
define the second frame member.<br />
34. Press the Enter key on the keyboard to stop drawing the second frame member. Note that the<br />
Draw Frame Element button is still depressed, i.e., the program is still in Draw Mode and<br />
ready to draw another frame element.<br />
35. Click on the joint labeled “C” and then the joint labeled “B” in Figure C-13, and then press<br />
the Enter key on the keyboard to draw the second chevron brace member.<br />
36. Click the Quick Draw Frame Element button on the side toolbar. Then click in the<br />
area labeled “D” in Figure C-13 to enter the X-braces.<br />
Note: The Quick Draw Frame Element option works two different ways. You can click<br />
on a grid segment to quickly draw a quick single frame element between the two<br />
adjacent perpendicular grid lines. Alternatively, you can click in a space bounded by<br />
four grid lines to draw a cross brace as was done here.<br />
Note: The X-braces could also have been entered using the same technique that was<br />
employed for the chevron braces.<br />
Note: Both the Draw Frame Element and the Quick Draw Frame Element options are<br />
also available on the Draw menu.<br />
37. Click the Down One Gridline button on the main toolbar twice to display the<br />
elevation view at X=-24. Note the window title changes to Y-Z Plane @ X=-24.<br />
38. Repeat steps 32 through 36 to draw the second set of braces. Note that the second set of<br />
braces occurs on the right-hand side of the elevation. The model now appears as shown in<br />
Figure C-14.<br />
<strong>SAP2000</strong> <strong>Web</strong> <strong>Tutorial</strong> 1 24
Figure C-14: Model After Braces Have Been Drawn<br />
39. Now we will draw the columns. Click the six column grid line locations designated with an<br />
O in Figure C-14 to define the first line of columns.<br />
40. Click the Pointer button to exit Draw Mode and enter Select Mode. Click on the six<br />
columns just entered to select them.<br />
Note: A message on the left-hand side of the status bar at the bottom of the <strong>SAP2000</strong><br />
window tells you how many of each type of element are currently selected.<br />
41. From the Edit menu, choose Replicate. This will display the Replicate dialog box.<br />
42. In this dialog box select the Linear tab, input 24 for X, 0 for Y and 0 for Z. Input 2 for the<br />
number.<br />
43. Click the OK button and the geometry for the columns will be replicated twice at a 24-foot<br />
spacing.<br />
Note: In addition to linear replication, the Replicate option also allows radial<br />
replication and mirroring. Refer to the topic replicate in the online help for more<br />
information. The online help can be accessed by clicking on the Help menu and<br />
selecting the Search for Help on… option or you can access it by pressing the F1 key<br />
on the keyboard when the Replicate dialog box is open.<br />
<strong>SAP2000</strong> <strong>Web</strong> <strong>Tutorial</strong> 1 25
44. Now we will apply the base restraints. Click in the window labeled Y-Z Plane @ X=-24 to<br />
make sure it is active. Note when the window is active, its title bar will be highlighted.<br />
45. From the View menu select Set 2D View…. This will display the Set 2D View dialog box.<br />
46. Make sure the X-Y plane option button is selected and enter 0 in the Z = edit box.<br />
47. Click the OK button, and the window will now display the X-Y Plane @ Z=0.<br />
48. Select all of the joints in the X-Y Plane @ Z=0 by “windowing.” To do this:<br />
• Click the Pointer button on the side toolbar left side of the screen.<br />
• Move the pointer above and to the left of the support joints.<br />
• Click and hold the left mouse button.<br />
• While holding, move the pointer below and to the right of the support joints. A “rubberband”<br />
window will show the region selected.<br />
• Release the left mouse button to select all elements (joints) in this window.<br />
49. From the Assign menu, choose Joint, and then Restraints…from the submenu. This will<br />
display the Joint Restraints dialog box.<br />
50. In this dialog box:<br />
• Click the pinned base fast restraint button to set all translational degrees of<br />
freedom (U1, U2 and U3) as restrained.<br />
• Click the OK button<br />
51. Click in the window labeled 3-D View to make sure it is active.<br />
52. Click the Refresh Window button on the main toolbar (or select Refresh Window<br />
from the View menu) to see the restraints in the 3-D View window.<br />
53. Click in the plan view window currently labeled Joint Restraints to make sure it is active.<br />
54. Click the Show Undeformed Shape button to reset the view and to return the window<br />
label to X-Y Plane @ Z=0.<br />
55. Click the Up One Gridline button on the main toolbar twice to display the elevation<br />
view at Z=24.<br />
<strong>SAP2000</strong> <strong>Web</strong> <strong>Tutorial</strong> 1 26
56. To finish defining the model geometry, complete items 25 through 46 in Step 1a , i.e., the<br />
previous step. When finished, return to this point.<br />
This completes the input of the model geometry from scratch. Now you can do one of the<br />
following:<br />
If you started the model from scratch, and do not want to try starting the model from a<br />
template, then go on to Step 2.<br />
If you started the model from scratch, and now want to try starting it from a template,<br />
then return to the beginning of Step 1a.<br />
If you want to stop working on the tutorial for now, and close <strong>SAP2000</strong>, make sure that<br />
you have saved your file as outlined in item 46 of Step 1a, and then from the File menu<br />
select Exit.<br />
<strong>SAP2000</strong> <strong>Web</strong> <strong>Tutorial</strong> 1 27
Step 2: Relabeling Joint, Frame and Shell Elements<br />
1. Click in the window labeled 3-D View to make sure it is active. Note when the window is<br />
active, its title bar will be highlighted.<br />
2. Click the Set Elements button on the main toolbar (or select Set Elements… from the<br />
View menu). This displays the Set Elements Dialog box.<br />
3. In this dialog box:<br />
• In the Joints area check the Labels box.<br />
• In the Frames area check the Labels box.<br />
• In the Shells area check the Labels box.<br />
• Click the OK button.<br />
Note: We are turning on the element labels so that we can see the effect of the element<br />
relabeling. It is not necessary to turn on element labels in order to relabel them.<br />
4. From the Select menu choose Select, and then All from the submenu. All elements in the<br />
model (joints, frame elements and shell elements) are selected.<br />
5. From the Edit menu choose Change Labels to display the Relabel Selected Items dialog<br />
box.<br />
6. In this dialog box:<br />
• Press the F1 key to display the contextsensitive<br />
online help for this dialog<br />
box.<br />
• When finished reading the online help,<br />
click the “X” in the top right-hand<br />
corner of the Help window, or select<br />
Exit from the File menu on the Help<br />
window to close it.<br />
• In the Change Label Initialization area<br />
of the dialog box type 1 in the Next<br />
Number edit boxes for Joint, Frame and<br />
Shell elements.<br />
<strong>SAP2000</strong> <strong>Web</strong> <strong>Tutorial</strong> 1 28
• Accept the rest of the default values in the dialog box.<br />
• Click the OK button to make the changes.<br />
Note: It is not typically necessary to renumber the elements. It is done here to<br />
illustrate the process, and to make sure all tutorial users have the same<br />
numbering system, whether they started the model from a template, or from<br />
scratch, since we will refer to joint and frame elements by their labels later in this<br />
tutorial.<br />
Note: Joint, Frame and Shell element labels can be given alphanumeric prefixes.<br />
These prefixes can be input in the Prefix edit boxes on the Relabel Selected Items<br />
dialog box.<br />
Note: It is not necessary to select all elements to relabel. You could select only a few<br />
elements, of any type, and relabel only the selected elements.<br />
7. Click the Set Elements button on the main toolbar (or select Set Elements… from the<br />
View menu). This displays the Set Elements Dialog box.<br />
8. In this dialog box:<br />
• In the Joints area uncheck the Labels box.<br />
• In the Frames area uncheck the Labels box.<br />
• In the Shells area uncheck the Labels box.<br />
• Click the OK button.<br />
9. Click the Save Model button on the main toolbar, or select Save from the File menu to<br />
save the file.<br />
This completes relabeling the joint, frame and shell elements.<br />
<strong>SAP2000</strong> <strong>Web</strong> <strong>Tutorial</strong> 1 29
Step 3: Defining Material Properties<br />
In this tutorial we will use default material properties, except that we will not use the self-weight<br />
and self mass. In this step we will first review the default material properties (items 1 through<br />
14) and then we will change the material properties to set the self-weight and self mass to zero<br />
(items 15 through 21).<br />
1. From the Define menu choose Materials…. This displays the Define Materials dialog box.<br />
2. Highlight CONC in the Materials area and click the Modify/Show Material button. This<br />
will display the Material Property Data dialog box.<br />
Note: To add a new material property, click the Add New Material button.<br />
3. Note the material properties shown, and notice that they are in units of kips and feet.<br />
4. Click the Cancel button to exit the Material Property Data dialog box without making any<br />
changes.<br />
5. Click the Cancel button to exit the Define Materials dialog box without making any changes.<br />
6. Click the drop down box in the status bar to change the units to kip-in.<br />
7. From the Define menu choose Materials…. This again displays the Define Materials dialog<br />
box.<br />
8. Highlight CONC in the Materials area, if it is not already highlighted, and click the<br />
Modify/Show Material button. This displays the Material Property Data dialog box for the<br />
material named CONC.<br />
9. Note the material properties shown, and notice that they are in units of kips and inches.<br />
10. Click the Cancel button to exit the Define Materials dialog box without making any changes.<br />
11. Highlight STEEL in the Materials area and click the Modify/Show Material button. This<br />
will display the Material Property Data dialog box.<br />
12. Note the material properties shown, and notice that they are in units of kips and inches.<br />
13. Click the Cancel button twice to exit the Material Property Data dialog box and the Define<br />
Materials dialog box without making any changes.<br />
14. Click the drop down box in the status bar to change the units back to kip-ft.<br />
15. From the Define menu choose Materials…. This displays the Define Materials dialog box.<br />
<strong>SAP2000</strong> <strong>Web</strong> <strong>Tutorial</strong> 1 30
16. Highlight CONC in the Materials area and click the Modify/Show Material button. This<br />
will display the Material Property Data dialog box.<br />
17. In this dialog box:<br />
• In the Analysis Property Data area type 0 in the Mass Per Unit Volume edit box.<br />
• In the Analysis Property Data area type 0 in the Weight Per Unit Volume edit box.<br />
• Click the OK button.<br />
18. Highlight STEEL in the Materials area and click the Modify/Show Material button. This<br />
will display the Material Property Data dialog box.<br />
19. In this dialog box:<br />
• In the Analysis Property Data area type 0 in the Mass Per Unit Volume edit box.<br />
• In the Analysis Property Data area type 0 in the Weight Per Unit Volume edit box.<br />
• Click the OK button.<br />
20. Click the OK button to close the Define Materials dialog box.<br />
21. Click the Save Model button on the main toolbar, or select Save from the File menu to<br />
save the file.<br />
This completes the review and definition of material properties.<br />
<strong>SAP2000</strong> <strong>Web</strong> <strong>Tutorial</strong> 1 31
Step 4: Defining Frame Sections<br />
We will use nine different wide flange sections (W24X62, W24X55, W21X44, W18X40,<br />
W18X35, W16X26, W14X132, W8X58 and W8X31) and two different structural tube sections<br />
(TS5X5X1/4 and TS4X4X1/4) for this model. We will use the structural sections data file<br />
provided with <strong>SAP2000</strong>. The file is called SECTIONS.PRO and resides in the same directory as<br />
<strong>SAP2000</strong>.<br />
1. From the Define menu choose Frame Sections…. This will display the Define Frame<br />
Sections dialog box.<br />
2. In this dialog box:<br />
• Click on the Import drop-down box.<br />
• Click on Import I/Wide Flange. This will display the Section Property File dialog box.<br />
• In this dialog box:<br />
ä Locate the SECTIONS.PRO data file. It is typically located in the directory where<br />
you installed <strong>SAP2000</strong>.<br />
ä Open the SECTIONS.PRO data file by highlighting it and clicking on the Open<br />
button or by double clicking on the file name.<br />
ä This will display a dialog box that includes a scrolling list box showing all the I/wide<br />
flange sections available in the data file. The title bar of this box displays the full<br />
path to the data file.<br />
Note: In a <strong>SAP2000</strong> session you only have to locate<br />
and open the SECTIONS.PRO data file once. You have<br />
the option to select another data file at any time by<br />
choosing Preferences in the Options menu and<br />
selecting the Steel tab.<br />
ä In the list box:<br />
À Use the Scroll buttons to locate the W24X62<br />
frame section. Click once on this section to<br />
highlight it.<br />
À Use the Scroll buttons to locate the W24X55<br />
frame section. While holding down the Ctrl key<br />
on the keyboard, click once on this section to<br />
highlight it and add it to the selection.<br />
<strong>SAP2000</strong> <strong>Web</strong> <strong>Tutorial</strong> 1 32
Note: Frame sections may be selected one at a time or they may be selected<br />
in groups as shown in this example. To select multiple frame sections that<br />
are next to each other, hold down the Shift key and click on the first and<br />
last frame element in the group. To select multiple frame sections that are<br />
not next to each other, hold down the Ctrl key and click each section you<br />
want to select, as is done here.<br />
À Use the Scroll buttons to locate the W21X44, W18X40, W18X35, W16X26,<br />
W14X132, W8X58 and W8X31 frame sections. While holding down the Ctrl key<br />
on the keyboard, click once on each section to highlight it and add it to the<br />
selection.<br />
À Click the OK button. This will display the I/Wide Flange Section dialog box<br />
which shows a schematic view of the last selected section (W8X31), section<br />
dimensions, and STEEL as the default material type.<br />
ä Click the OK button. This will close the I/Wide Flange Section dialog box and return<br />
to the Define Frame Sections dialog box. Notice that in the dialog box the labels of<br />
the selected frame elements are added to the default section name (FSEC1) in the<br />
Frame Section area.<br />
• Click on the Import drop-down box.<br />
• Click on Import Box/Tube. This will display a scrolling list box showing all the box/tube<br />
sections available in the data file.<br />
• In this dialog box:<br />
ä Use the Scroll buttons to locate the TS5X5X1/4 frame section. Click once on this<br />
section to highlight it.<br />
ä Use the Scroll buttons to locate the TS4X4X1/4 frame section. While holding down<br />
the Ctrl key on the keyboard, click once on this section to highlight it and add it to the<br />
selection.<br />
ä Click the OK button. This will display the Box/Tube Section dialog box that shows a<br />
schematic view of the last selected section (TS4X4X1/4), section dimensions, and<br />
STEEL as the default material type.<br />
• Click the OK button. This will close the Box/Tube Section dialog box and return to the<br />
Define Frame Sections dialog box. Notice that in the dialog box the labels of the selected<br />
frame elements are added to the previously defined frame sections.<br />
3. Click the OK button to close the Define Frame Sections dialog box.<br />
This completes the definition of frame sections.<br />
<strong>SAP2000</strong> <strong>Web</strong> <strong>Tutorial</strong> 1 33
Step 5: Defining Shell Sections<br />
We will use one shell section property in the model to model the roof diaphragm. We will<br />
assume the roof diaphragm to be equivalent to a 1" thick concrete diaphragm. This is not a<br />
recommended way to approximate a metal deck diaphragm, it is just a simple and expedient<br />
method to use for this example.<br />
1. From the Define menu choose Shell Sections…. This will display the Define Shell Sections<br />
dialog box.<br />
2. In this dialog box:<br />
• Click the Add New Section button. This will display the Shell Sections dialog box.<br />
• In this dialog box:<br />
ä Type ROOF in the Section Name edit box.<br />
ä Accept the default material CONC.<br />
ä In the thickness area type 0.0833 in both the Membrane and Bending edit boxes.<br />
ä In the Type area, select the Membrane option.<br />
Note: In general we recommend using the Shell type option for shell elements.<br />
ä Click the OK button.<br />
3. Click the OK button to close the Define Shell Sections dialog box.<br />
4. Click the Save Model button on the main toolbar, or select Save from the File menu<br />
to save the file.<br />
This completes the definition of shell sections.<br />
<strong>SAP2000</strong> <strong>Web</strong> <strong>Tutorial</strong> 1 34
Step 6: Assigning Groups<br />
Groups can be a powerful tool for selecting elements for both assignments and display. In this<br />
step we will create nine groups, as shown in the table below:<br />
Group Name<br />
ROOF<br />
2ND<br />
COLS<br />
FRCOLS<br />
BRCOLS<br />
BRACE1<br />
BRACE2<br />
FRMGIRD<br />
BASE<br />
Description<br />
All roof level joints, frame elements and shell elements<br />
All second level joints, frame elements and shell elements<br />
All column elements<br />
All moment frame columns<br />
All braced frame columns<br />
All braces between the first and second level<br />
All braces between the second level and the roof level<br />
All moment frame girders<br />
All bottom level columns and support joints<br />
Note: By default the program creates a group named ALL which includes all elements in<br />
the model (joint elements included).<br />
1. Click in the window labeled X-Y Plane @ Z=24 to make sure it is active. Note when the<br />
window is active, its title bar will be highlighted.<br />
2. Click the Pointer button on the side toolbar and select all of the elements in the X-Y<br />
Plane @ Z=24 by “windowing.”<br />
Note: To add more joints and/or elements to an already assigned group, first select the<br />
group, then select more joints and/or elements, and finally assign them to the group.<br />
Group assignment always replaces the existing elements in that group.<br />
3. From the Assign menu choose Group Name…. This will display the Assign Group dialog<br />
box.<br />
4. In this dialog box:<br />
• Type ROOF in the edit box at the top of the Groups area.<br />
• Click the Add New Group Name button to define a group named ROOF.<br />
Note: A common error is to forget to click the Add New Group Name button before<br />
pressing the OK button.<br />
• Click the OK button to assign the selected elements to the group named ROOF.<br />
5. Click the Down One Gridline button on the main toolbar to display the plan view at<br />
Z=12. Note the window title changes to X-Y Plane @ Z=12.<br />
<strong>SAP2000</strong> <strong>Web</strong> <strong>Tutorial</strong> 1 35
6. Select all of the elements in the X-Y Plane @ Z=12 by “windowing.”<br />
7. From the Assign menu choose Group Name…. This will display the Assign Group dialog<br />
box.<br />
8. In this dialog box:<br />
• Type 2ND in the edit box at the top of the Groups area.<br />
• Click the Add New Group Name button to define a group named 2ND.<br />
• Click the OK button to assign the selected elements to the group named 2ND.<br />
9. Click on the xz button on the main toolbar to view an elevation in the X-Z plane. Note<br />
the title of the window is probably X-Z Plane @ Y=24; it depends on the sequence of steps<br />
you followed in creating the model. If the window title is not X-Z Plane @ Y=24, click the<br />
Up One Gridline button on the main toolbar or the Down One Gridline button on<br />
the main toolbar until the title of the window is X-Z Plane @ Y=24.<br />
10. Click on the six column elements in this view to select them.<br />
Note: <strong>SAP2000</strong> will display the number and type of elements you have selected on the<br />
left-hand side of the status bar at the bottom of the <strong>SAP2000</strong> window.<br />
Note: You can click again on a single selected element to deselect it. If you want to<br />
deselect all elements at once, then click the Clear Selection button on the side<br />
toolbar, or choose Clear Selection from the Select menu.<br />
11. Click the Down One Gridline button on the main toolbar to display the elevation at<br />
Y=0. Note the window title changes to X-Z Plane @ Y=0.<br />
12. Select the bottom level columns by intersection. To do this:<br />
• Click the Pointer button<br />
on the side toolbar.<br />
• Click the Set Intersecting Line Select Mode button on the side toolbar.<br />
• Move the pointer to the left of the columns you want to select.<br />
• Click and hold the left mouse button.<br />
• While holding, move the pointer to the right of the members you want to select. A<br />
“rubber band” will show the intersecting line.<br />
• Release the left mouse button to select all members that intersect this line.<br />
<strong>SAP2000</strong> <strong>Web</strong> <strong>Tutorial</strong> 1 36
13. Click the Set Intersecting Line Select Mode button again and select the top level columns.<br />
14. Click the Down One Gridline button on the main toolbar to display the elevation at Y=-<br />
24. Note the window title changes to X-Z Plane @ Y=-24.<br />
15. Use the Intersecting Line mode to select the six column elements in this elevation. There<br />
should now be a total of 18 frame elements selected. You can confirm this by looking on the<br />
left-hand side of the status bar at the bottom of the <strong>SAP2000</strong> window.<br />
16. From the Assign menu choose Group Name…. This will display the Assign Group dialog<br />
box.<br />
17. In this dialog box:<br />
• Type COLS in the edit box at the top of the Groups area.<br />
• Click the Add New Group Name button to define a group named COLS.<br />
• Click the OK button to assign the selected elements to the group named COLS.<br />
18. Now we will assign the moment frame columns to a group. Click on the left-hand column<br />
and the center column (4 elements total) to select them.<br />
19. Click the Up One Gridline button on the main toolbar twice to display the elevation at<br />
Y=24. Note the window title changes to X-Z Plane @ Y=24.<br />
20. Click on the right-hand column and the center column (4 elements total) to select them.<br />
There should now be eight frame elements selected.<br />
21. From the Assign menu choose Group Name…. This will display the Assign Group dialog<br />
box.<br />
22. In this dialog box:<br />
• Type FRCOLS in the edit box at the top of the Groups area.<br />
• Click the Add New Group Name button to define a group named FRCOLS.<br />
• Click the OK button to assign the selected elements to the group named FRCOLS.<br />
23. Now we will assign the braced frame columns to a group. Click on the yz button on the<br />
main toolbar to view an elevation in the Y-Z plane. If necessary, click the Up One<br />
Gridline button on the main toolbar until the title of the window is Y-Z Plane @ X=24.<br />
24. Click on the four column elements at the braced frame to select them.<br />
<strong>SAP2000</strong> <strong>Web</strong> <strong>Tutorial</strong> 1 37
25. Click the Down One Gridline button on the main toolbar twice to display the elevation<br />
at X=-24.<br />
26. Click on the four column elements at the braced frame to select them. There should now be<br />
eight frame elements selected.<br />
27. From the Assign menu choose Group Name…. This will display the Assign Group dialog<br />
box.<br />
28. In this dialog box:<br />
• Type BRCOLS in the edit box at the top of the Groups area.<br />
• Click the Add New Group Name button to define a group named BRCOLS.<br />
• Click the OK button to assign the selected elements to the group named BRCOLS.<br />
29. Now we will assign the bottom level braced frame braces to a group. Click on two bottom<br />
level braces to select them.<br />
30. Click the Up One Gridline button on the main toolbar twice to display the elevation at<br />
X=24.<br />
31. Click on two bottom level braces to select them. There should now be four frame elements<br />
selected.<br />
32. From the Assign menu choose Group Name…. This will display the Assign Group dialog<br />
box.<br />
33. In this dialog box:<br />
• Type BRACE1 in the edit box at the top of the Groups area.<br />
• Click the Add New Group Name button to define a group named BRACE1.<br />
• Click the OK button to assign the selected elements to the group named BRACE1.<br />
34. Now we will assign the top level braced frame braces to a group. Click on two top level<br />
braces to select them.<br />
35. Click the Down One Gridline button on the main toolbar twice to display the elevation<br />
at X=-24.<br />
36. Click on two top level braces to select them. There should now be four frame elements<br />
selected.<br />
<strong>SAP2000</strong> <strong>Web</strong> <strong>Tutorial</strong> 1 38
37. From the Assign menu choose Group Name…. This will display the Assign Group dialog<br />
box.<br />
38. In this dialog box:<br />
• Type BRACE2 in the edit box at the top of the Groups area.<br />
• Click the Add New Group Name button to define a group named BRACE2.<br />
• Click the OK button to assign the selected elements to the group named BRACE2.<br />
39. Now we will assign the moment frame girders to a group. Click on the xz button on the<br />
main toolbar to view an elevation in the X-Z plane. Note the title of the window is X-Z<br />
Plane @ Y=24.<br />
40. Click on the roof level and second level beam on the right side of this elevation to select<br />
them.<br />
41. Click the Down One Gridline button on the main toolbar twice to display the elevation<br />
at Y=-24.<br />
42. Click on the roof level and second level beam on the left side of this elevation to select them.<br />
There should now be four frame elements selected.<br />
43. From the Assign menu choose Group Name…. This will display the Assign Group dialog<br />
box.<br />
44. In this dialog box:<br />
• Type FRMGIRD in the edit box at the top of the Groups area.<br />
• Click the Add New Group Name button to define a group named FRMGIRD.<br />
• Click the OK button to assign the selected elements to the group named FRMGIRD.<br />
45. Finally we will assign the lower level columns, braces and the base joints to a group. This<br />
group can be used in the Group Joint Force Sum option (on the Display menu) to display the<br />
base shear. Click the Perspective Toggle button on the main toolbar. A perspective<br />
view of the X-Z elevation is displayed.<br />
46. Click the Set Intersecting Line Select Mode button and select all of the bottom level<br />
columns. Note that in doing so you will also select the bottom level braces.<br />
47. Click on the xy button on the main toolbar to view an elevation in the X-Y plane. Note<br />
the title of the window is X-Y Plane @ Y=12.<br />
<strong>SAP2000</strong> <strong>Web</strong> <strong>Tutorial</strong> 1 39
48. Click the Down One Gridline button on the main toolbar to display the plan at Z=0.<br />
49. Select all of the joints at this level by “windowing”. There should now be 9 joints and 13<br />
frame elements selected.<br />
50. From the Assign menu choose Group Name…. This will display the Assign Group dialog<br />
box.<br />
51. In this dialog box:<br />
• Type BASE in the edit box at the top of the Groups area.<br />
• Click the Add New Group Name button to define a group named BASE.<br />
• Click the OK button to assign the selected elements to the group named BASE.<br />
Note: The BASE group will be useful for determining base shears, overturning moments,<br />
total vertical loads.<br />
52. Click the Save Model button on the main toolbar, or select Save from the File menu to<br />
save the file.<br />
This completes the assignment of groups.<br />
<strong>SAP2000</strong> <strong>Web</strong> <strong>Tutorial</strong> 1 40
Step 7: Assigning Frame Sections<br />
Refer to Figure B-1 for the beam, column and brace element sections.<br />
1. Click in the window labeled 3-D View to make sure it is active. Note when the window is<br />
active, its title bar will be highlighted.<br />
2. Click the Set Elements button on the main toolbar (or select Set Elements… from the<br />
View menu). This displays the Set Elements Dialog box.<br />
3. In this dialog box:<br />
• In the Frames area check the Labels box.<br />
• In the Shells area check the Hide box.<br />
• Click the OK button.<br />
4. Click in the window labeled X-Y Plane @ Z=0 to make sure it is active. Note when the<br />
window is active, its title bar will be highlighted.<br />
5. Click the Up One Gridline button on the main toolbar twice to display the roof level<br />
plan at Z=24.<br />
6. Click the Set Elements button on the main toolbar (or select Set Elements… from the<br />
View menu). This displays the Set Elements Dialog box.<br />
7. In this dialog box:<br />
• In the Frames area check the Labels box.<br />
• In the Shells area check the Hide box.<br />
• Click the OK button.<br />
8. In the window labeled X-Y Plane @ Z=24, click on frame elements 40, 45, 46 and 51 to<br />
select them.<br />
Note: You can refer to Figures B-2 and B-3, as well as the screen, to identify the frame<br />
element numbers.<br />
9. From the Assign menu select Frame and then Sections… from the submenu. This will<br />
display the Define Frame Sections dialog box.<br />
<strong>SAP2000</strong> <strong>Web</strong> <strong>Tutorial</strong> 1 41
Figure C-15: Frame Element Labels<br />
10. In the Frame Sections area click on the W16X26 name once to highlight it and then click the<br />
OK button. This assigns the W16X26 property to the selected frame elements. Note the<br />
other frame elements have the default FSEC1 assigned.<br />
11. Click the Show Undeformed Shape button to clear the display of the assigned sections<br />
so that you can see the frame element labels again.<br />
12. In the plan view, click on frame elements 41, 42, 44, 47, 49 and 50 to select them.<br />
13. From the Assign menu select Frame and then Sections… from the submenu. This will<br />
display the Define Frame Sections dialog box.<br />
14. In the Frame Sections area click on the W18X35 name once to highlight it and then click the<br />
OK button.<br />
15. Click the Show Undeformed Shape button to clear the display of the assigned sections<br />
so that you can see the frame element labels again.<br />
16. In the plan view, click on frame elements 43 and 48 to select them.<br />
17. From the Assign menu select Frame and then Sections… from the submenu. This will<br />
display the Define Frame Sections dialog box.<br />
<strong>SAP2000</strong> <strong>Web</strong> <strong>Tutorial</strong> 1 42
18. In the Frame Sections area click on the W21X44 name once to highlight it and then click the<br />
OK button.<br />
19. From the Select menu select Select and then Groups… from the submenu. This will display<br />
the Select Groups dialog box.<br />
20. Click on the group name FRMGIRD once to highlight it and then click the OK button.<br />
21. From the Assign menu select Frame and then Sections… from the submenu. This will<br />
display the Define Frame Sections dialog box.<br />
22. In the Frame Sections area click on the W24X55 name once to highlight it and then click the<br />
OK button.<br />
23. Click the Show Undeformed Shape button to clear the display of the assigned sections<br />
so that you can see the frame element labels again.<br />
24. Click in the window labeled X-Y Plane @ Z=24 to make sure it is active.<br />
25. Click the Down One Gridline button on the main toolbar to display the second floor plan<br />
at Z=12.<br />
26. From the Select menu select Select and then Labels from the submenu. This will display the<br />
Select by Labels dialog box.<br />
27. Click the Element Type drop-down box and select Frame.<br />
Click the Element Type drop-down box and select Frame.<br />
Type 15 in the Start Label edit box, 24 in the End Label edit box and 9 in the Increment<br />
edit box.<br />
Click the OK button.<br />
28. From the Assign menu select Frame and then Sections… from the submenu. This will<br />
display the Define Frame Sections dialog box.<br />
29. In the Frame Sections area click on the W16X26 name once to highlight it and then click the<br />
OK button.<br />
30. In the plan view, click on frame elements 16, 18, 19, 20, 21 and 23 to select them.<br />
31. From the Assign menu select Frame and then Sections… from the submenu. This will<br />
display the Define Frame Sections dialog box.<br />
<strong>SAP2000</strong> <strong>Web</strong> <strong>Tutorial</strong> 1 43
32. In the Frame Sections area click on the W18X40 name once to highlight it and then click the<br />
OK button.<br />
33. In the plan view, click on frame elements 17 and 22 to select them.<br />
34. From the Assign menu select Frame and then Sections… from the submenu. This will<br />
display the Define Frame Sections dialog box.<br />
35. In the Frame Sections area click on the W24X62 name once to highlight it and then click the<br />
OK button.<br />
36. From the Assign menu select Clear Display of Assigns to clear the display of frame assigns<br />
from the plan view.<br />
37. Click in the window labeled 3-D View to make sure it is active. Note when the window is<br />
active, its title bar will be highlighted.<br />
38. Click the Set Elements button on the main toolbar (or select Set Elements… from the<br />
View menu). This displays the Set Elements Dialog box.<br />
39. In this dialog box:<br />
• In the Frames area uncheck the Labels box.<br />
• Click the OK button.<br />
40. From the Select menu select Select and then Groups… from the submenu. This will display<br />
the Select Groups dialog box.<br />
41. Click on the group name BRACE1 once to highlight it and then click the OK button.<br />
42. From the Assign menu select Frame and then Sections… from the submenu. This will<br />
display the Define Frame Sections dialog box.<br />
43. In the Frame Sections area click on the TS5X5X1/4 name once to highlight it and then click<br />
the OK button.<br />
44. From the Select menu select Select and then Groups… from the submenu. This will display<br />
the Select Groups dialog box.<br />
45. Click on the group name BRACE2 once to highlight it and then click the OK button.<br />
46. From the Assign menu select Frame and then Sections… from the submenu. This will<br />
display the Define Frame Sections dialog box.<br />
<strong>SAP2000</strong> <strong>Web</strong> <strong>Tutorial</strong> 1 44
47. In the Frame Sections area click on the TS4X4X1/4 name once to highlight it and then click<br />
the OK button.<br />
48. From the Select menu select Select and then Groups… from the submenu. This will display<br />
the Select Groups dialog box.<br />
49. Click on the group name FRCOLS once to highlight it and then click the OK button.<br />
50. From the Assign menu select Frame and then Sections… from the submenu. This will<br />
display the Define Frame Sections dialog box.<br />
51. In the Frame Sections area click on the W14X132 name once to highlight it and then click<br />
the OK button.<br />
52. From the Select menu select Select and then Groups… from the submenu. This will display<br />
the Select Groups dialog box.<br />
53. Click on the group name BRCOLS once to highlight it and then click the OK button.<br />
54. From the Assign menu select Frame and then Sections… from the submenu. This will<br />
display the Define Frame Sections dialog box.<br />
55. In the Frame Sections area click on the W8X58 name once to highlight it and then click the<br />
OK button.<br />
56. From the Select menu select Select and then Groups… from the submenu. This will display<br />
the Select Groups dialog box.<br />
57. Click on the group name COLS once to highlight it and then click the OK button.<br />
58. From the Select menu select Deselect and then Groups… from the submenu. This will<br />
display the Select Groups dialog box.<br />
59. In this dialog box:<br />
• Click on the group name FRCOLS once to select (highlight) it.<br />
• Hold down the Ctrl key on the keyboard and click on the BRCOLS group name once to<br />
highlight it and add it to the selection.<br />
• Click the OK button.<br />
60. From the Assign menu select Frame and then Sections… from the submenu. This will<br />
display the Define Frame Sections dialog box.<br />
<strong>SAP2000</strong> <strong>Web</strong> <strong>Tutorial</strong> 1 45
61. In the Frame Sections area click on the W8X31 name once to highlight it and then click the<br />
OK button.<br />
62. From the Assign menu select Clear Display of Assigns to clear the display of frame assigns<br />
from the 3-D view.<br />
63. Click the Save Model button on the main toolbar, or select Save from the File menu to<br />
save the file.<br />
This completes the assignment of frame section properties.<br />
<strong>SAP2000</strong> <strong>Web</strong> <strong>Tutorial</strong> 1 46
Step 8: Assigning Shell Sections<br />
1. Click in the window labeled 3-D View to make sure it is active. Note when the window is<br />
active, its title bar will be highlighted.<br />
2. Click the Set Elements button on the main toolbar (or select Set Elements… from the<br />
View menu). This displays the Set Elements Dialog box.<br />
3. In this dialog box:<br />
• In the Shells area uncheck the Hide box.<br />
• Click the OK button.<br />
4. Click in the window labeled X-Y Plane @ Z=12 to make sure it is active. Note when the<br />
window is active, its title bar will be highlighted.<br />
5. Click the Set Elements button on the main toolbar (or select Set Elements… from the<br />
View menu). This displays the Set Elements Dialog box.<br />
6. In this dialog box:<br />
• In the Shells area uncheck the Hide box.<br />
• Click the OK button.<br />
7. Click the Up One Gridline button on the main toolbar to display the roof level plan at<br />
Z=24.<br />
8. From the Select menu select Select and then Groups… from the submenu. This will display<br />
the Select Groups dialog box.<br />
9. Click on the group name ROOF once to highlight it and then click the OK button.<br />
10. From the Assign menu select Shell and then Sections… from the submenu. This will display<br />
the Define Shell Sections dialog box.<br />
11. In the Shell Sections area click on the ROOF name once to highlight it and then click the OK<br />
button.<br />
12. From the Assign menu select Clear Display of Assigns to clear the display of shell assigns<br />
from the plan view.<br />
13. Click the Save Model button on the main toolbar to save the file.<br />
This completes the assignment of shell section properties.<br />
<strong>SAP2000</strong> <strong>Web</strong> <strong>Tutorial</strong> 1 47
Step 9: Assigning Frame End Releases<br />
We will release the M3 and M2 moment at the ends of all non-moment frame girders, and release<br />
M3, M2 and torsional moment at the ends of all braces.<br />
1. Click in the window labeled X-Y Plane @ Z=24 to make sure it is active. Note when the<br />
window is active, its title bar will be highlighted.<br />
2. From the Select menu select Select and then Groups… from the submenu. This will display<br />
the Select Groups dialog box.<br />
3. Click on the group name ROOF once to highlight it, then, holding down the Ctrl key, click<br />
on the Group Named 2ND to add it to the selection. Click the OK button.<br />
4. From the Select menu select Deselect and then Groups… from the submenu. This will<br />
display the Select Groups dialog box.<br />
5. Click on the group name FRMGIRD once to highlight it and then click the OK button.<br />
6. From the Assign menu select Frame and then Releases… from the submenu. This will<br />
display the Frame Releases dialog box.<br />
Note: The end releases will be applied incorrectly to the roof beams at the braced frames as<br />
a result of this selection. We will fix that in items 8 through 18.<br />
7. In this dialog box:<br />
Check the Start and End boxes for Moment M22 (Minor) and Moment M33 (Major).<br />
Click the OK button to apply the releases.<br />
8. Note that releases are applied at the center of the braced frame roof beams. This is not<br />
correct since the braced frame roof beams are continuous over the top of the chevron brace.<br />
9. Click the Set Elements button on the main toolbar (or select Set Elements… from the<br />
View menu). This displays the Set Elements Dialog box.<br />
10. In this dialog box check the Local Axes box and the Labels box in the Frames area and click<br />
the OK button. The local axes arrows appear as shown in Figure C-16.<br />
<strong>SAP2000</strong> <strong>Web</strong> <strong>Tutorial</strong> 1 48
Figure C-16: Frame Element Local Axes Arrows<br />
Note: The local axes arrows are color-coded red, white and blue. The red arrow is always<br />
local axis 1, the white arrow is always local axis 2, and the blue arrow is always local<br />
axes 3. In the plan view, local axis 2 is pointing straight up and thus we can not see that<br />
arrow.<br />
Note: For frame elements, local axis 1 always points along the longitudinal axis of the<br />
member from the start joint to the end joint. Thus we can use the local axes to tell which<br />
end is the start end for any frame element.<br />
11. Click on frame elements 41 and 47 to select them. Note that for these elements, moments<br />
will be released at the start end only.<br />
12. From the Assign menu select Frame and then Releases… from the submenu. This will<br />
display the Frame Releases dialog box.<br />
13. In this dialog box:<br />
Check the Start box for Moment M22 (Minor) and Moment M33 (Major).<br />
Click the OK button to apply the releases.<br />
14. Click on frame elements 44 and 50 to select them. Note that for these elements, moments<br />
will be released at the end joint only.<br />
<strong>SAP2000</strong> <strong>Web</strong> <strong>Tutorial</strong> 1 49
15. From the Assign menu select Frame and then Releases… from the submenu. This will<br />
display the Frame Releases dialog box.<br />
16. In this dialog box:<br />
Check the End box for Moment M22 (Minor) and Moment M33 (Major).<br />
Click the OK button to apply the releases.<br />
17. The member end releases have now been corrected. Click the Set Elements button on<br />
the main toolbar (or select Set Elements… from the View menu). This displays the Set<br />
Elements Dialog box.<br />
18. In this dialog box uncheck the Local Axes box and the Labels box in the Frames area and<br />
click the OK button.<br />
19. From the Select menu select Select and then Groups… from the submenu. This will display<br />
the Select Groups dialog box.<br />
20. Click on the group name BRACE1 once to highlight it, then, holding down the Ctrl key, click<br />
on the Group Named BRACE2 to add it to the selection. Click the OK button.<br />
21. From the Assign menu select Frame and then Releases… from the submenu. This will<br />
display the Frame Releases dialog box.<br />
22. In this dialog box:<br />
Check the Start and End boxes for Moment M22 (Minor), Moment M33 (Major) and the<br />
Start box for Torsion.<br />
Note: You can apply a torsional release at one end of the frame element or the other, but not<br />
both simultaneously. If you applied a torsion release to both ends, the frame element<br />
would be free to spin about its longitudinal axis, and thus the structure would be<br />
unstable.<br />
Click the OK button to apply the releases.<br />
23. From the Assign menu select Clear Display of Assigns to clear the display of frame releases<br />
from the plan view.<br />
24. Click the Save Model button on the main toolbar, or select Save from the File menu to<br />
save the file.<br />
This completes the assignment of frame element end releases.<br />
<strong>SAP2000</strong> <strong>Web</strong> <strong>Tutorial</strong> 1 50
Step 10: Defining Static Load Cases<br />
We will define five static load cases. They are dead load, live load, earthquake in the X-<br />
direction, earthquake in the Y-direction and a load pattern to be used in the pushover analysis.<br />
1. From the Define menu select Static Load Cases…. This will display the Define Static Load<br />
Case Names dialog box.<br />
2. In this dialog box:<br />
• Type DL in the Load edit box.<br />
• Select Dead from the Type drop-down box.<br />
• Type 0 in the Self Weight Multiplier edit box.<br />
• Click the Change Load button.<br />
Note: In this example, if we had wanted the program to automatically include the selfweight<br />
of the structural members, we would have specified a non zero weight per unit<br />
volume in the Material data, and we would have put a self-weight multiplier of 1 on<br />
the DL load case only.<br />
• Type LL in the Load edit box.<br />
• Select Live from the Type drop-down box.<br />
• Type 0 in the Self Weight Multiplier edit box.<br />
• Click the Add New Load button.<br />
• Type EQX in the Load edit box.<br />
• Select Quake from the Type drop-down box.<br />
• Type 0 in the Self Weight Multiplier edit box.<br />
• Click the Add New Load button.<br />
• Type EQY in the Load edit box.<br />
• Select Quake from the Type drop-down box.<br />
• Type 0 in the Self Weight Multiplier edit box.<br />
• Click the Add New Load button.<br />
<strong>SAP2000</strong> <strong>Web</strong> <strong>Tutorial</strong> 1 51
• Type PUSHPAT in the Load edit box.<br />
• Select OTHER from the Type drop-down box.<br />
• Type 0 in the Self Weight Multiplier edit box.<br />
• Click the Add New Load button.<br />
3. Click the OK button.<br />
4. Click the Save Model button on the main toolbar, or select Save from the File menu to<br />
save the file.<br />
This completes the definition of static load cases.<br />
<strong>SAP2000</strong> <strong>Web</strong> <strong>Tutorial</strong> 1 52
Step 11: Assigning Frame Static Loads<br />
Note that the beam span loading is indicated in Figure B-4.<br />
1. Click in the window labeled X-Y Plane @ Z=24 to make sure it is active. Note when the<br />
window is active, its title bar will be highlighted.<br />
2. Click the Set Elements button on the main toolbar (or select Set Elements… from the<br />
View menu). This displays the Set Elements Dialog box.<br />
3. In this dialog box check the Labels box in the Frames area, check the Hide box in the Shells<br />
area and click the OK button.<br />
4. Click the Perspective Toggle button on the main toolbar. A perspective view of the X-<br />
Y plan is displayed.<br />
5. From the View menu select Set Limits…. This displays the Set limits dialog box.<br />
6. In this dialog box type 23 in the Min edit box in the Set Z-Axis Limits area and click the OK<br />
button to change the limits such that only the roof beam elements show.<br />
7. Select roof beams 39, 40, 51 and 52 by clicking on them.<br />
8. From the Assign menu select Frame Static Loads… and then Point and Uniform… from<br />
the submenu. This will display the Point and Uniform Span Loads dialog box.<br />
9. In this dialog box:<br />
Select DL from the Load Case Name drop-down box.<br />
In the Load Type and Direction area, select the Forces option, and select Global Z from<br />
the drop-down Direction box.<br />
In the Options area, select the Add to Existing Loads option.<br />
In the Uniform Load area, type -0.40, or just type -.4.<br />
Note: Take care to make sure you enter the minus sign with the load. The load is input in<br />
the global Z direction, thus the minus sign indicates a downward load.<br />
Click the OK button to apply the load.<br />
10. Click the Restore Previous Selection button on the side toolbar (or select Get<br />
Previous Selection from the Select menu).<br />
<strong>SAP2000</strong> <strong>Web</strong> <strong>Tutorial</strong> 1 53
11. From the Assign menu select Frame Static Loads… and then Point and Uniform… from<br />
the submenu. This will display the Point and Uniform Span Loads dialog box.<br />
12. In this dialog box:<br />
Select LL from the Load Case Name drop-down box.<br />
In the Uniform Load area, type -.12. Don’t forget the minus sign.<br />
Click the OK button to apply the load.<br />
13. Select roof beams 41, 42, 44, 47, 49 and 50 by clicking on them.<br />
14. From the Assign menu select Frame Static Loads… and then Point and Uniform… from<br />
the submenu. This will display the Point and Uniform Span Loads dialog box.<br />
15. In this dialog box:<br />
Select DL from the Load Case Name drop-down box.<br />
In the Uniform Load area, type -.16.<br />
Click the OK button to apply the load.<br />
Note: The point load for beams 41/44 and 47/50 can either be input as a joint load, or as a<br />
beam span load at the end of a beam. We will input it as a beam span load.<br />
16. Select roof beams 41 and 47 by clicking on them.<br />
17. From the Assign menu select Frame Static Loads… and then Point and Uniform… from<br />
the submenu. This will display the Point and Uniform Span Loads dialog box.<br />
18. In this dialog box:<br />
Select DL from the Load Case Name<br />
drop-down box.<br />
In the Options area, select the Add to<br />
Existing Loads option.<br />
In the Point Loads area there are four sets<br />
of Distance and Load boxes labeled 1<br />
through 4. In the first set of boxes input 1<br />
in the Distance box and -5.76 in the Load<br />
box. Make sure the Relative Distance<br />
From End I option is selected.<br />
<strong>SAP2000</strong> <strong>Web</strong> <strong>Tutorial</strong> 1 54
In the Uniform Load area, type 0.<br />
Click the OK button to apply the load.<br />
19. Click the Restore Previous Selection button on the side toolbar (or select Get<br />
Previous Selection from the Select menu).<br />
20. From the Assign menu select Frame Static Loads… and then Point and Uniform… from<br />
the submenu. This will display the Point and Uniform Span Loads dialog box.<br />
21. In this dialog box:<br />
Select LL from the Load Case Name drop-down box.<br />
In the Point Loads area type 1 in the first Distance box and -2.88 in the first Load box.<br />
Click the OK button to apply the load.<br />
22. Select roof beams 42 and 49 by clicking on them.<br />
23. From the Assign menu select Frame Static Loads… and then Point and Uniform… from<br />
the submenu. This will display the Point and Uniform Span Loads dialog box.<br />
24. In this dialog box:<br />
Select DL from the Load Case Name drop-down box.<br />
In the Point Loads area type .5 in the first Distance box and -5.76 in the first Load box.<br />
Click the OK button to apply the load.<br />
25. Click the Restore Previous Selection button on the side toolbar (or select Get<br />
Previous Selection from the Select menu).<br />
26. From the Assign menu select Frame Static Loads… and then Point and Uniform… from<br />
the submenu. This will display the Point and Uniform Span Loads dialog box.<br />
27. In this dialog box:<br />
Select LL from the Load Case Name drop-down box.<br />
In the Point Loads area type -2.88 in the first Load box.<br />
Click the OK button to apply the load.<br />
<strong>SAP2000</strong> <strong>Web</strong> <strong>Tutorial</strong> 1 55
28. Select roof beams 45 and 46 by clicking on them.<br />
29. From the Assign menu select Frame Static Loads… and then Point and Uniform… from<br />
the submenu. This will display the Point and Uniform Span Loads dialog box.<br />
30. In this dialog box:<br />
Select DL from the Load Case Name drop-down box.<br />
In the Point Loads area type 0 in the first Distance box and 0 in the first Load box.<br />
In the Uniform Load area, type -.48.<br />
Click the OK button to apply the load.<br />
Note: Because of the perspective view, you will not see this load after it is applied. To see it,<br />
click the 3-D View button. To return to the perspective view, click the xy 2-D View<br />
button and then click the Perspective Toggle button.<br />
31. Click the Restore Previous Selection button on the side toolbar (or select Get<br />
Previous Selection from the Select menu).<br />
32. From the Assign menu select Frame Static Loads… and then Point and Uniform… from<br />
the submenu. This will display the Point and Uniform Span Loads dialog box.<br />
33. In this dialog box:<br />
Select LL from the Load Case Name drop-down box.<br />
In the Uniform Load area, type -.24.<br />
Click the OK button to apply the load.<br />
34. Select roof beams 43 and 48 by clicking on them.<br />
35. From the Assign menu select Frame Static Loads… and then Point and Uniform… from<br />
the submenu. This will display the Point and Uniform Span Loads dialog box.<br />
36. In this dialog box:<br />
Select DL from the Load Case Name drop-down box.<br />
In the Point Loads area type .5 in the first Distance box and -11.52 in the first Load box.<br />
In the Uniform Load area, type 0.<br />
<strong>SAP2000</strong> <strong>Web</strong> <strong>Tutorial</strong> 1 56
Click the OK button to apply the load.<br />
37. Click the Restore Previous Selection button on the side toolbar (or select Get<br />
Previous Selection from the Select menu).<br />
38. From the Assign menu select Frame Static Loads… and then Point and Uniform… from<br />
the submenu. This will display the Point and Uniform Span Loads dialog box.<br />
39. In this dialog box:<br />
Select LL from the Load Case Name drop-down box.<br />
In the Point Loads area type -5.76 in the first Load box.<br />
Click the OK button to apply the load.<br />
40. From the View menu select Set Limits…. This displays the Set limits dialog box.<br />
41. In this dialog box type 11 in the Min edit box and 13 in the Max edit box in the Set Z-Axis<br />
Limits area and click the OK button to change the limits such that only the second floor<br />
beam elements show.<br />
Figure C-17: 3-D View With Limits Set To Show Second Level<br />
<strong>SAP2000</strong> <strong>Web</strong> <strong>Tutorial</strong> 1 57
42. Click on the 3-D View button to change the view to a three dimensional view. See<br />
Figure C-17.<br />
43. Select second level beams 14, 15, 24 and 25 by clicking on them.<br />
44. From the Assign menu select Frame Static Loads… and then Point and Uniform… from<br />
the submenu. This will display the Point and Uniform Span Loads dialog box.<br />
45. In this dialog box:<br />
Select DL from the Load Case Name drop-down box.<br />
In the Point Loads area type 0 in the first Distance box and 0 in the first Load box.<br />
In the Uniform Load area, type -.72.<br />
Click the OK button to apply the load.<br />
46. Click the Restore Previous Selection button on the side toolbar (or select Get<br />
Previous Selection from the Select menu).<br />
47. From the Assign menu select Frame Static Loads… and then Point and Uniform… from<br />
the submenu. This will display the Point and Uniform Span Loads dialog box.<br />
48. In this dialog box:<br />
Select LL from the Load Case Name drop-down box.<br />
In the Uniform Load area, type -.3.<br />
Click the OK button to apply the load.<br />
49. Select second level beams 16, 18, 21 and 23 by clicking on them.<br />
50. From the Assign menu select Frame Static Loads… and then Point and Uniform… from<br />
the submenu. This will display the Point and Uniform Span Loads dialog box.<br />
51. In this dialog box:<br />
Select DL from the Load Case Name drop-down box.<br />
In the Point Loads area type .5 in the first Distance box and -11.52 in the first Load box.<br />
In the Uniform Load area, type -.24.<br />
Click the OK button to apply the load.<br />
<strong>SAP2000</strong> <strong>Web</strong> <strong>Tutorial</strong> 1 58
52. Click the Restore Previous Selection button on the side toolbar (or select Get<br />
Previous Selection from the Select menu).<br />
53. From the Assign menu select Frame Static Loads… and then Point and Uniform… from<br />
the submenu. This will display the Point and Uniform Span Loads dialog box.<br />
54. In this dialog box:<br />
Select LL from the Load Case Name drop-down box.<br />
In the Point Loads area type -7.2 in the first Load box.<br />
In the Uniform Load area, type 0.<br />
Click the OK button to apply the load.<br />
55. Select second level beams 19 and 20 by clicking on them.<br />
56. From the Assign menu select Frame Static Loads… and then Point and Uniform… from<br />
the submenu. This will display the Point and Uniform Span Loads dialog box.<br />
57. In this dialog box:<br />
Select DL from the Load Case Name drop-down box.<br />
In the Point Loads area type 0 in the first Distance box and 0 in the first Load box.<br />
In the Uniform Load area, type -.96.<br />
Click the OK button to apply the load.<br />
58. Click the Restore Previous Selection button on the side toolbar (or select Get<br />
Previous Selection from the Select menu).<br />
59. From the Assign menu select Frame Static Loads… and then Point and Uniform… from<br />
the submenu. This will display the Point and Uniform Span Loads dialog box.<br />
60. In this dialog box:<br />
Select LL from the Load Case Name drop-down box.<br />
In the Uniform Load area, type -0.6.<br />
Click the OK button to apply the load.<br />
<strong>SAP2000</strong> <strong>Web</strong> <strong>Tutorial</strong> 1 59
61. Select second level beams 17 and 22 by clicking on them.<br />
62. From the Assign menu select Frame Static Loads… and then Point and Uniform… from<br />
the submenu. This will display the Point and Uniform Span Loads dialog box.<br />
63. In this dialog box:<br />
Select DL from the Load Case Name drop-down box.<br />
In the Point Loads area type 0.5 in the first Distance box and -23.04 in the first Load box.<br />
In the Uniform Load area, type 0.<br />
Click the OK button to apply the load.<br />
64. Click the Restore Previous Selection button on the side toolbar (or select Get<br />
Previous Selection from the Select menu).<br />
65. From the Assign menu select Frame Static Loads… and then Point and Uniform… from<br />
the submenu. This will display the Point and Uniform Span Loads dialog box.<br />
66. In this dialog box:<br />
Select LL from the Load Case Name drop-down box.<br />
In the Point Loads area type -14.4 in the first Load box.<br />
Click the OK button to apply the load.<br />
67. From the View menu select Set Limits…. This displays the Set limits dialog box.<br />
68. In this dialog box click the Show All button in the Set Z-Axis Limits area and click the OK<br />
button to change the limits such that the entire model is displayed.<br />
69. From the Assign menu select Clear Display of Assigns to clear the display of beam span<br />
loading. Note that the frame element labels remain because they were turned on using the<br />
Set Elements command.<br />
70. Click the xy 2-D View button on the main toolbar to return to a plan view. Note the the<br />
window title is X-Y Plane @ Z=24.<br />
71. Click the Save Model button on the main toolbar, or select Save from the File menu to<br />
save the file.<br />
This completes the assignment of frame static loads.<br />
<strong>SAP2000</strong> <strong>Web</strong> <strong>Tutorial</strong> 1 60
Step 12: Assigning Shell Static Loads<br />
The roof level lateral earthquake loads are assigned as shell static loads.<br />
1. Click in the window labeled X-Y Plane @ Z=24 to make sure it is active. Note when the<br />
window is active, its title bar will be highlighted.<br />
2. Click the Set Elements button on the main toolbar (or select Set Elements… from the<br />
View menu). This displays the Set Elements Dialog box.<br />
3. In this dialog box uncheck the Hide box in the Shells area and click the OK button.<br />
4. From the Select menu select Select and then Groups… from the submenu. This will display<br />
the Select Groups dialog box.<br />
5. Click on the group name ROOF once to highlight it then click the OK button.<br />
6. From the Assign menu select Shell Static Loads… and then Uniform… from the submenu.<br />
This will display the Shell Uniform Loads dialog box.<br />
7. In this dialog box:<br />
Select EQX from the Load Case Name drop-down box.<br />
In the Uniform Load area type .0074 in the Load box and select Global X from the dropdown<br />
Dir box.<br />
Select Add To Existing Loads in the Options area.<br />
Click the OK button to apply the load.<br />
8. Click the Restore Previous Selection button on the side toolbar (or select Get<br />
Previous Selection from the Select menu).<br />
9. From the Assign menu select Shell Static Loads… and then Uniform… from the submenu.<br />
This will display the Shell Uniform Loads dialog box.<br />
10. In this dialog box:<br />
Select EQY from the Load Case Name drop-down box.<br />
In the Uniform Load area type .0113 in the Load box and select Global Y from the dropdown<br />
Dir box.<br />
Click the OK button to apply the load.<br />
<strong>SAP2000</strong> <strong>Web</strong> <strong>Tutorial</strong> 1 61
11. Click the drop down box in the status bar to change the units to lb-ft. Observe<br />
that the shell load shown on the screen is now 11.30 instead of 0.01. Sometimes it is<br />
convenient to change units when viewing input loads and output results.<br />
12. Click the drop down box in the status bar to change the units back to kip-ft.<br />
13. From the Assign menu select Clear Display of Assigns to clear the display of shell loading.<br />
14. Click the Save Model button on the main toolbar to save the file.<br />
This completes the assignment of shell static loads.<br />
<strong>SAP2000</strong> <strong>Web</strong> <strong>Tutorial</strong> 1 62
Step 13: Assigning Joint Static Loads<br />
The second level lateral earthquake loads (load cases EQX and EQY) are assigned as joint static<br />
loads. Also the static load pattern to be used in the pushover analysis, PUSHPAT is assigned as<br />
joint static loads.<br />
Note the static load pattern for the pushover analysis could be any combination of joint,<br />
frame and shell loading.<br />
1. Click in the window labeled X-Y Plane @ Z=24 to make sure it is active. Note when the<br />
window is active, its title bar will be highlighted.<br />
2. Click the Down One Gridline button on the main toolbar to display the second floor plan<br />
at Z=12.<br />
3. Click the Set Elements button on the main toolbar (or select Set Elements… from the<br />
View menu). This displays the Set Elements Dialog box.<br />
4. In this dialog box uncheck the Labels box in the Frames area, check the Labels box in the<br />
Joints area and click the OK button. Note we are leaving the Restraints box in the Joints area<br />
checked.<br />
5. Click joint 14 to select it.<br />
6. From the Assign menu select Joint Static Loads… and then Forces… from the submenu.<br />
This will display the Joint Forces dialog box.<br />
7. In this dialog box:<br />
Select EQX from the Load Case Name drop-down box.<br />
In the Options area, select the Add to Existing Loads option.<br />
In the Loads area type 2.67 in the Force Global X edit box.<br />
Click the OK button to apply the load.<br />
8. Click the Restore Previous Selection button on the side toolbar (or select Get<br />
Previous Selection from the Select menu).<br />
9. From the Assign menu select Joint Static Loads… and then Forces… from the submenu.<br />
This will display the Joint Forces dialog box.<br />
10. In this dialog box:<br />
Select EQY from the Load Case Name drop-down box.<br />
<strong>SAP2000</strong> <strong>Web</strong> <strong>Tutorial</strong> 1 63
In the Loads area type 0 in the Force Global X edit box.<br />
In the Loads area type 3.83 in the Force Global Y edit box.<br />
Click the OK button to apply the load.<br />
11. Click on joints 11, 13, 15 and 17 to select them.<br />
12. From the Assign menu select Joint Static Loads… and then Forces… from the submenu.<br />
This will display the Joint Forces dialog box.<br />
13. In this dialog box:<br />
Select EQX from the Load Case Name drop-down box.<br />
In the Options area, select the Add to Existing Loads option.<br />
In the Loads area type 2 in the Force Global X edit box.<br />
In the Loads area type 0 in the Force Global Y edit box.<br />
Click the OK button to apply the load.<br />
14. Click the Restore Previous Selection button on the side toolbar (or select Get<br />
Previous Selection from the Select menu).<br />
15. From the Assign menu select Joint Static Loads… and then Forces… from the submenu.<br />
This will display the Joint Forces dialog box.<br />
16. In this dialog box:<br />
Select EQY from the Load Case Name drop-down box.<br />
In the Loads area type 0 in the Force Global X edit box.<br />
In the Loads area type 2.88 in the Force Global Y edit box.<br />
Click the OK button to apply the load.<br />
17. Click on joints 10, 12, 16 and 18 to select them.<br />
18. From the Assign menu select Joint Static Loads… and then Forces… from the submenu.<br />
This will display the Joint Forces dialog box.<br />
19. In this dialog box:<br />
<strong>SAP2000</strong> <strong>Web</strong> <strong>Tutorial</strong> 1 64
Select EQX from the Load Case Name drop-down box.<br />
In the Options area, select the Add to Existing Loads option.<br />
In the Loads area type 1.33 in the Force Global X edit box.<br />
In the Loads area type 0 in the Force Global Y edit box.<br />
Click the OK button to apply the load.<br />
20. Click the Restore Previous Selection button on the side toolbar (or select Get<br />
Previous Selection from the Select menu).<br />
21. From the Assign menu select Joint Static Loads… and then Forces… from the submenu.<br />
This will display the Joint Forces dialog box.<br />
22. In this dialog box:<br />
Select EQY from the Load Case Name drop-down box.<br />
In the Loads area type 0 in the Force Global X edit box.<br />
In the Loads area type 1.92 in the Force Global Y edit box.<br />
Click the OK button to apply the load.<br />
23. We will now define the PUSHPAT load pattern that will be used in the pushover analysis. It<br />
will be a triangular distribution of load over the height of the building. From the Select menu<br />
select Select and then Groups… from the submenu. This will display the Select Groups<br />
dialog box.<br />
Note: Our purpose here is to input an inverted triangular loading pattern over the height of<br />
the building. Thus we will put 1 kip loads at 9 second level joints (9 kips total) and 2 kip<br />
loads at 9 roof level joints (18 kips total). We could assign the 9 kips at the second level<br />
and 18 kips at the roof level to the joints on a tributary area basis, or some other basis,<br />
but we will not consider any such refinement in this example.<br />
24. Click on the group name 2ND and then click the OK button.<br />
25. From the Assign menu select Joint Static Loads… and then Forces… from the submenu.<br />
This will display the Joint Forces dialog box.<br />
26. In this dialog box:<br />
Select PUSHPAT from the Load Case Name drop-down box.<br />
<strong>SAP2000</strong> <strong>Web</strong> <strong>Tutorial</strong> 1 65
In the Loads area type 1 in the Force Global X edit box.<br />
In the Loads area type 0 in the Force Global Y edit box.<br />
Click the OK button to apply the load.<br />
27. Click the Up One Gridline button on the main toolbar to display the roof level plan at<br />
Z=24.<br />
28. From the Select menu select Select and then Groups… from the submenu. This will display<br />
the Select Groups dialog box.<br />
29. Click on the group name ROOF and then click the OK button.<br />
30. Click on joints 22 and 26 to deselect them.<br />
31. From the Assign menu select Joint Static Loads… and then Forces… from the submenu.<br />
This will display the Joint Forces dialog box.<br />
32. In this dialog box:<br />
Select PUSHPAT from the Load Case Name drop-down box.<br />
In the Loads area type 2 in the Force Global X edit box.<br />
Click the OK button to apply the load.<br />
33. From the Assign menu select Clear Display of Assigns to clear the display of joint loads.<br />
Note that the joint element labels remain because they were turned on using the Set Elements<br />
command.<br />
34. Click the Save Model button on the main toolbar, or select Save from the File menu to<br />
save the file.<br />
This completes the assignment of joint static loads.<br />
<strong>SAP2000</strong> <strong>Web</strong> <strong>Tutorial</strong> 1 66
Step 14: Assigning Joint Masses<br />
We will add joint masses consistent with those shown in Table B-1.<br />
1. Click in the window labeled X-Y Plane @ Z=24 to make sure it is active. Note when the<br />
window is active, its title bar will be highlighted.<br />
2. Click joint 24 to select it.<br />
3. From the Assign menu select Joint and then Masses… from the submenu. This will display<br />
the Joint Masses dialog box.<br />
4. In this dialog box:<br />
Type .72 in the Direction 1 edit box in the Masses in Local Directions area.<br />
Type .72 in the Direction 2 edit box in the Masses in Local Directions area.<br />
In the Options area, select the Add to Existing Masses option.<br />
Click the OK button to apply the mass.<br />
Note: If we wanted to obtain vertical direction mode shapes we should include a Direction 3<br />
mass as well.<br />
5. Click joints 20, 23, 25 and 28 to select them.<br />
6. From the Assign menu select Joint and then Masses… from the submenu. This will display<br />
the Joint Masses dialog box.<br />
7. In this dialog box:<br />
Type .48 in both the Direction 1 edit box and the Direction 2 edit box in the Masses in<br />
Local Directions area.<br />
Click the OK button to apply the mass.<br />
8. Click joints 19, 21, 27 and 29 to select them.<br />
9. From the Assign menu select Joint and then Masses… from the submenu. This will display<br />
the Joint Masses dialog box.<br />
10. In this dialog box:<br />
Type .3 in both the Direction 1 edit box and the Direction 2 edit box in the Masses in<br />
Local Directions area.<br />
<strong>SAP2000</strong> <strong>Web</strong> <strong>Tutorial</strong> 1 67
Click the OK button to apply the mass.<br />
11. Click the Down One Gridline button on the main toolbar to display the second floor plan<br />
at Z=12.<br />
12. Click joint 14 to select it.<br />
13. From the Assign menu select Joint and then Masses… from the submenu. This will display<br />
the Joint Masses dialog box.<br />
14. In this dialog box:<br />
Type 1.45 in both the Direction 1 edit box and the Direction 2 edit box in the Masses in<br />
Local Directions area.<br />
Click the OK button to apply the mass.<br />
15. Click joints 11, 13, 15 and 17 to select them.<br />
16. From the Assign menu select Joint and then Masses… from the submenu. This will display<br />
the Joint Masses dialog box.<br />
17. In this dialog box:<br />
Type .9 in both the Direction 1 edit box and the Direction 2 edit box in the Masses in<br />
Local Directions area.<br />
Click the OK button to apply the mass.<br />
18. Click joints 10, 12, 16 and 18 to select them.<br />
19. From the Assign menu select Joint and then Masses… from the submenu. This will display<br />
the Joint Masses dialog box.<br />
20. In this dialog box:<br />
Type .55 in both the Direction 1 edit box and the Direction 2 edit box in the Masses in<br />
Local Directions area.<br />
Click the OK button to apply the mass.<br />
21. From the Assign menu select Clear Display of Assigns to clear the display of joint masses.<br />
Note that the joint element labels remain because they were turned on using the Set Elements<br />
command.<br />
<strong>SAP2000</strong> <strong>Web</strong> <strong>Tutorial</strong> 1 68
22. Click the Set Elements button on the main toolbar (or select Set Elements… from the<br />
View menu). This displays the Set Elements Dialog box.<br />
23. In this dialog box uncheck the Labels box in the Joints area and click the OK button. This<br />
will turn off the display of joint labels.<br />
24. Click the Save Model button on the main toolbar, or select Save from the File menu to<br />
save the file.<br />
This completes the assignment of joint masses.<br />
<strong>SAP2000</strong> <strong>Web</strong> <strong>Tutorial</strong> 1 69
Step 15: Assigning Diaphragm Constraints<br />
We will assign a diaphragm constraint at the second level to simulate a rigid diaphragm.<br />
1. Click in the window labeled X-Y Plane @ Z=12 to make sure it is active. Note when the<br />
window is active, its title bar will be highlighted.<br />
2. Select all elements at the second level by “windowing”.<br />
3. From the Assign menu choose Joint, and then Constraints…from the submenu. This will<br />
display the Constraints dialog box.<br />
4. In this dialog box:<br />
• In the Click To area, click the drop-down box and select Add Diaphragm. This will<br />
display the Diaphragm Constraint dialog box.<br />
• In this dialog box:<br />
ä Type 2NDDIA in the Constraint Name edit box.<br />
ä Select the Z Axis option in the Constraint Axis area.<br />
ä Click the OK button.<br />
• Click the OK button to exit the Constraints dialog box and assign the second floor level<br />
diaphragm constraint.<br />
Note: The joints change colors indicating the constraint has been assigned.<br />
5. From the Assign menu select Clear Display of Assigns to clear the display of joint<br />
constraints.<br />
6. Click the Save Model button on the main toolbar, or select Save from the File menu to<br />
save the file.<br />
This completes the assigning of diaphragm constraints.<br />
<strong>SAP2000</strong> <strong>Web</strong> <strong>Tutorial</strong> 1 70
Step 16: Static and Dynamic Analysis (Not Pushover)<br />
In this step we will set the analysis options for the static and dynamic analysis (not pushover)<br />
and run the analysis.<br />
1. From the Analyze menu select Set Options…. This will display the Analysis Options dialog<br />
box.<br />
2. In this dialog box:<br />
• Check the Dynamic Analysis check box.<br />
• Click on the Set Dynamic Parameters button. This will display the Dynamic Analysis<br />
Parameters dialog box.<br />
• In this dialog box:<br />
ä Type 6 in the Number Of Modes edit box<br />
ä In the Type of Analysis area select the Eigenvectors option.<br />
ä Accept the other default values in the dialog box.<br />
ä Click the OK button.<br />
• Check the Generate Output check box.<br />
Note: The Generate Output option creates output that will be stored in the *.out file<br />
where * represents your <strong>SAP2000</strong> filename.<br />
• Click on the Set Output Options button. This will display the Select Output Results<br />
dialog box.<br />
• In this dialog box:<br />
ä Check the Displacements check box<br />
ä Click on the Select/Show Loads button adjacent to the Displacements check box.<br />
This displays the Select Output dialog box.<br />
ä Click on the EQX load case to highlight it. Hold down the control key and click on<br />
the EQY load case to add it to the selection.<br />
ä Click the OK button to close the Select Output dialog box.<br />
ä Click the OK button to close the Select Output Results dialog box.<br />
• Click the OK button again to exit the Analysis Options dialog box:<br />
<strong>SAP2000</strong> <strong>Web</strong> <strong>Tutorial</strong> 1 71
Note: It is important to note that when displacements or force are specified to be<br />
printed in the *.out files using the Generate Output option, data for each and<br />
every joint or element is printed. You have no control over this. For larger<br />
problems this can lead to very large and unwieldy output files. See the notes at<br />
the ends of steps 18 and 19 for information on other printing options.<br />
Note: If you are running a large model, you may want/need to increase the memory<br />
allocated to <strong>SAP2000</strong> above the default 2000 Kb. You can do this in the Analysis options<br />
dialog box.<br />
3. Click the Run Analysis button on the main toolbar.<br />
Note: You can also click the Analyze menu and select Run or select Run Minimized to run<br />
the analysis. Run minimized will perform the execution in the background, i.e., it will<br />
allow you to minimize <strong>SAP2000</strong> while the analysis is being carried out. It also provides<br />
a Cancel button that allows you to stop a run that is in progress.<br />
4. A window is opened in which various phases of analysis are progressively reported. When<br />
the analysis is complete the screen will display as shown in Figure C-18.<br />
Figure C-18: Screen Message When Analysis Is Complete<br />
<strong>SAP2000</strong> <strong>Web</strong> <strong>Tutorial</strong> 1 72
5. Use the scroll bar to review the analysis messages and check for any error or warning<br />
messages (there should be none).<br />
Note: The information in the scrolling analysis window can also be found in the *.log file,<br />
where the * represents your filename.<br />
6. Click the OK button in the Analysis window to close it. Note that the 3-D window now<br />
shows the first mode shape.<br />
This completes the static and dynamic analysis.<br />
<strong>SAP2000</strong> <strong>Web</strong> <strong>Tutorial</strong> 1 73
Step 17: Reviewing Mode Shapes<br />
In this step we will review the mode shapes.<br />
1. Note that the first mode shape is currently displayed in the 3-D View window. Click on this<br />
window to make sure it is active. Note when the window is active, its title bar will be<br />
highlighted.<br />
2. Click the Display Mode Shape button on the main toolbar, (or select Show Mode<br />
Shape… from the Display menu). The Mode Shape dialog box appears.<br />
3. In this dialog box:<br />
• Set the mode number to 1 in the Mode Number area.<br />
• Set the scale factor to 1 in the Scale Factor area.<br />
• Select (i.e., check) the Wire Shadow and Cubic Curve options in the Options area.<br />
• Click the OK button to redisplay the first mode.<br />
4. Click the Start Animation button , located in the status bar at the bottom<br />
of the <strong>SAP2000</strong> window, to animate the mode shape.<br />
5. Click the Right Arrow button , located in the status bar at the bottom of the screen, to<br />
view the next mode shape.<br />
Note: When viewing mode shapes, the right and left arrow buttons, located in the status<br />
bar at the bottom of the screen, provide an easy way to view the next (right arrow), or<br />
previous (left arrow) mode shape.<br />
6. Using the Right Arrow button, review modes 2 through 6. Note that mode 1 is<br />
predominantly in the X-direction; we will use this information when creating pushover load<br />
cases.<br />
Note: Additional information on mode shapes including modal periods and frequencies,<br />
modal participation factors and modal participating mass ratios can be found in the<br />
*.OUT file.<br />
7. After viewing mode 6, click the Stop Animation button , located in the status<br />
bar at the bottom of the <strong>SAP2000</strong> window, to stop the mode shape animation.<br />
8. Click the Show Undeformed Shape button to clear the display of mode shapes.<br />
This completes the review of displaying mode shapes.<br />
<strong>SAP2000</strong> <strong>Web</strong> <strong>Tutorial</strong> 1 74
Step 18: Reviewing Deformed Shapes<br />
In this step we will demonstrate methods for reviewing the deformed shapes and displacements.<br />
1. Click in the window labeled 3-D View to make sure it is active. Note when the window is<br />
active, its title bar will be highlighted.<br />
2. Click the Display Static Deformed Shape button , (or select Show Deformed Shape…<br />
from the Display menu). The Deformed Shape dialog box appears.<br />
3. In this dialog box:<br />
• Select the EQX Load Case from the Load drop-down box.<br />
• Select the Auto scaling option in the Scaling area.<br />
• Check both the Wire Shadow and the Cubic curve boxes in the Options area.<br />
• Click the OK button to display the deformed shape.<br />
4. Click the Start Animation button , located in the status bar at the bottom<br />
of the <strong>SAP2000</strong> window, to animate the deformed shape.<br />
5. Click the Stop Animation button , located in the status bar at the bottom of<br />
the <strong>SAP2000</strong> window, to stop the deformed shape animation.<br />
6. Click the Right Arrow button , located in the status bar at the bottom of the screen, to<br />
view the next deformed shape, based on the EQY static load.<br />
Note: When viewing deformed shapes, the right and left arrow buttons, located in the<br />
status bar at the bottom of the screen, provide an easy way to view the next (right<br />
arrow), or previous (left arrow) deformed shape. You can easily cycle through all of<br />
the load cases in this manner.<br />
7. Right click on any joint in the 3-D view to bring up a dialog box with displacements for all<br />
six degrees of freedom (UX, UY, UZ, RX, RY, RZ) for that joint. When done viewing these<br />
displacements, right click another joint, or left click anywhere to close the dialog box.<br />
8. From the Display menu select Set Output Table Mode… to display the Select Output<br />
dialog box.<br />
9. All of the load cases in the Select Output dialog box should be selected (higlighted). If they<br />
are not, click on each one while holding down the Ctrl key to select them. Click the OK<br />
button to accept this selection.<br />
Note: If we wanted to, we could select only one, or a few load cases, instead of all of them.<br />
<strong>SAP2000</strong> <strong>Web</strong> <strong>Tutorial</strong> 1 75
10. Right click any joint to get a table of displacements for the joint. Note you can print this<br />
table by selecting Print from its associated File menu. When done viewing this table click<br />
the “X” in the upper right-hand corner to close it.<br />
Note: You can also right click a frame element or a shell element to get a table of forces for<br />
that element.<br />
Note: You can also print joint displacements from the graphic interface without<br />
having to first view them in a table. With this method you can control the elements for<br />
which the output is provided (printed). After the analysis has been run, select all of<br />
the joints for which you want displacement output. (Note that if you don’t select any<br />
elements, then this feature will give you output for all elements.) Then select Print<br />
Output Tables… from the File menu. Fill in the resulting Print Output Tables dialog<br />
box, remembering to select the load cases for which you want output, and click the<br />
OK button. Note that with the Print Output Tables feature you have the option of<br />
printing to the printer or to a file. If you print to a file, an ASCII file is created which<br />
you can review in a text editor or word processor.<br />
11. Click the Show Undeformed Shape button to clear the display of deformed shapes.<br />
This completes the review of deformed shapes and displacements.<br />
<strong>SAP2000</strong> <strong>Web</strong> <strong>Tutorial</strong> 1 76
Step 19: Reviewing Forces and Stresses<br />
In this step we will demonstrate methods for reviewing the forces and stresses in frame and shell<br />
elements.<br />
1. Click in the window labeled 3-D View to make sure it is active. Note when the window is<br />
active, its title bar will be highlighted.<br />
2. Click the Member Force Diagram for Frames button , (or select Show Element<br />
Forces/Stresses from the Display menu and then select Frames… from the submenu). The<br />
Member Force Diagram for Frames dialog box appears.<br />
3. In this dialog box:<br />
• Select the EQX Load Case from the Load drop-down box.<br />
• Select the Moment 3-3 option in the Component area.<br />
• Select the Auto scaling option in the Scaling area.<br />
• Check the Fill Diagram box.<br />
• Click the OK button to display the moment diagrams as filled shapes.<br />
4. Right click on any element to display a dialog box that allows you to see the moment at any<br />
point along the element. When done viewing, right click on another element or left click<br />
anywhere to close the dialog box.<br />
5. Click the Member Force Diagram for Frames button , again (or select Show Element<br />
Forces/Stresses from the Display menu and then select Frames… from the submenu). The<br />
Member Force Diagram for Frames dialog box appears.<br />
6. In this dialog box:<br />
• Uncheck the Fill Diagram box.<br />
• Check the Show Values on Diagram box.<br />
• Click the OK button to display the moment diagrams with critical values shown.<br />
7. Right click on any element to display a dialog box that allows you to see the moment at any<br />
point along the element. When done viewing, right click on another element or left click<br />
anywhere to close the dialog box.<br />
<strong>SAP2000</strong> <strong>Web</strong> <strong>Tutorial</strong> 1 77
8. Click the Element Force/Stress Contours for Shells button , (or select Show Element<br />
Forces/Stresses from the Display menu and then select Shells… from the submenu). The<br />
Element Force Stress/Contours for Shells dialog box appears.<br />
9. In this dialog box:<br />
• Select the EQX Load Case from the Load drop-down box.<br />
• Select the Forces option button.<br />
• Select the F12 component by checking its box.<br />
• Accept the rest of the default values.<br />
• Click the OK button to display the shell element forces.<br />
10. Suppose we now want to see the Y-direction force transferred from the roof diaphragm to<br />
joints 19, 23, 26 and 27 in static load case EQY. To do this we will use the Group Joint<br />
Force Sum feature. Click in the window labeled X-Y Plane @ Z=12 to make sure it is active.<br />
Note when the window is active, its title bar will be highlighted.<br />
11. Click the Up One Gridline button on the main toolbar to display the roof level plan at<br />
Z=24.<br />
12. Click the Set Elements button on the main toolbar (or select Set Elements… from the<br />
View menu). This displays the Set Elements Dialog box.<br />
13. In this dialog box check the Labels box in the Joints area, uncheck the Hide box in the Shells<br />
area if it is checked, check the Labels box in the Shells area and click the OK button. This<br />
will turn on the display of joint labels and shell labels.<br />
14. Click on joints 19, 23, 26 and 27 and on shells 2, 4 and 6.<br />
15. From the Assign menu choose Group Name…. This will display the Assign Group dialog<br />
box.<br />
16. In this dialog box:<br />
• Type ROOFSHR in the edit box at the top of the Groups area.<br />
• Click the Add New Group Name button to define a group named ROOFSHR.<br />
• Click the OK button to assign the selected elements to the group named ROOFSHR.<br />
17. From the Display menu select Set Output Table Mode… to display the Select Output<br />
dialog box.<br />
<strong>SAP2000</strong> <strong>Web</strong> <strong>Tutorial</strong> 1 78
18. All of the load cases in the Select Output dialog box should be selected (higlighted). If they<br />
are not, then click on each one while holding down the Ctrl key to select them. Click the OK<br />
button to accept this selection.<br />
Note: If we wanted to, we could select only one, or a few load cases, instead of all of them.<br />
19. From the Display menu select Show Group Joint Force Sums… to display the Select<br />
Groups dialog box.<br />
20. In that dialog box click on the ROOFSHR group to highlight it and click the OK button.<br />
Note: We could select more than one group at this time if we wanted to.<br />
21. The group joint force sum for the ROOFSHR group is displayed for each load case. The Y-<br />
direction force transferred from the roof diaphragm to joints 19, 23, 26 and 27 in static load<br />
case EQY is the FY force for load EQY.<br />
Note: We can use groups to define section cuts through shell elements (and frame elements)<br />
at any location and then use the Group Joint Force Sum feature to see the forces acting<br />
at that section cut. To do this, imagine a section cut through the structure. The section<br />
cut may be through the entire structure or through a portion of the structure. Select all of<br />
the elements that the section cut passes through, and select all of the joints connected to<br />
those elements on one side of the section cut. Note you must select both the shell and/or<br />
frame elements and the joints. Define a group that includes all of the selected items. Use<br />
the Show Group Joint Force Sum option on the Display menu to show the forces at the<br />
section cut.<br />
22. We can display the base shear using the BASE group we previously defined. From the<br />
Display menu select Show Group Joint Force Sums… to display the Select Groups dialog<br />
box. In that dialog box click on the BASE group to highlight it and click the OK button.<br />
23. Click the Set Elements button on the main toolbar (or select Set Elements… from the<br />
View menu). This displays the Set Elements Dialog box.<br />
24. In this dialog box uncheck the Labels box in the Joints area, uncheck the Labels box in the<br />
Shells area and click the OK button. This will turn off the display of joint labels and shell<br />
labels.<br />
25. We can display output tables of element forces on the screen.<br />
26. From the Display menu select Set Output Table Mode… to display the Select Output<br />
dialog box.<br />
<strong>SAP2000</strong> <strong>Web</strong> <strong>Tutorial</strong> 1 79
27. In the Select Output dialog box click on the EQX Load Case to highlight it and then hold<br />
down Ctrl key and click on the EQY Load Case to highlight it. Click the OK button to<br />
accept this selection.<br />
28. Right click any frame or shell element to get a table of forces for that element.<br />
Note: You can also right click a joint to get a table of joint displacements.<br />
Note: You can also print frame and shell element forces from the graphic interface<br />
without having to first view them in a table. With this method you can control the<br />
elements for which the output is provided (printed). After the analysis has been run,<br />
select all of the frame and/or shell elements for which you want force output. (Note<br />
that if you don’t select any elements, then this feature will give you output for all<br />
elements.) Then select Print Output Tables… from the File menu. Fill in the<br />
resulting Print Output Tables dialog box, remembering to select the load cases for<br />
which you want output, and click the OK button. Note that with the Print Output<br />
Tables feature you have the option of printing to the printer or to a file. If you print<br />
to a file, an ASCII file is created which you can review in a text editor or word<br />
processor.<br />
This completes the review of forces and stresses.<br />
<strong>SAP2000</strong> <strong>Web</strong> <strong>Tutorial</strong> 1 80
Step 20: Performing a Steel Design Stress Check<br />
Now we will perform a steel design stress check.<br />
1. From the Options menu, click Preferences… to display the Preferences dialog box.<br />
2. In this dialog box:<br />
Select the Steel tab.<br />
Click the Steel Design Code drop-down box to review the available options. Select the<br />
AISC-ASD89 option.<br />
Click the OK button to close the Preferences dialog box.<br />
3. Click on the Design menu. Note that the Steel Design option on the menu is checked<br />
indicating a steel design will be done.<br />
Note: Either the Steel Design or Concrete Design option can be checked on the Design<br />
menu, but not both at the same time.<br />
4. On the Design menu choose Select Design Combos. The Design Load Combinations<br />
Selection dialog box is displayed.<br />
Note: <strong>SAP2000</strong> automatically creates appropriate load combinations for the selected design<br />
code. For this model, using AISC-ASD89, these ten default load combinations will<br />
include DL, DL + LL, DL + LL + EQX, DL + LL - EQX, DL + LL + EQY, DL + LL –<br />
EQY, DL +EQX, DL – EQX, DL + EQY and DL – EQY.<br />
5. In this dialog box:<br />
Click on the DSTL1 combination in the Design Combos box to highlight it.<br />
Click the Show button to review the combination.<br />
Note: Clicking the Remove button when a Design Combo is highlighted will remove that<br />
combination from the Design Combo box and put it in the List of Combos box. Only<br />
the design combinations in the Design Combo box are in the design stress check.<br />
Note: You can also add your own combinations to the design combinations. To define a<br />
new load combination, click Load Combinations… on the Define menu. To add the<br />
new load combination to the design list, highlight the new load combination name,<br />
that will be in the List of Combos box in the Design Load Combinations Selection<br />
dialog box, and click the Add button.<br />
Review the other combinations in a similar manner.<br />
<strong>SAP2000</strong> <strong>Web</strong> <strong>Tutorial</strong> 1 81
Press the OK button twice to close all dialog boxes.<br />
6. Click in the window labeled 3-D View to make sure it is active.<br />
7. Click the Set Elements button on the main toolbar (or select Set Elements… from the<br />
View menu). This displays the Set Elements Dialog box.<br />
8. In this dialog box check the Hide box in the Shells area and click the OK button. This will<br />
turn off the display of shells.<br />
9. On the Design menu choose Start Design/Check of Structure. The design check of the<br />
structure proceeds.<br />
10. When the design is complete, the member stress ratios are displayed on the structure as<br />
shown in Figure C-19. Note that many of the beam stress ratios are quite high. This has<br />
occurred because by default <strong>SAP2000</strong> assumes that the beams are unsupported for their full<br />
length. For simplicity we will assume that the unsupported length for all beams is two feet,<br />
except for the roof beam at the braced frasme where it is one foot. This makes an unbraced<br />
length ratio of 0.0833 for all beams. We will make this change and rerun the design.<br />
Note: The assumption that the unsupported length for all beams is 2 feet may not be<br />
realistic in a real building.<br />
Figure C-19: Initial Member Stress Ratios<br />
<strong>SAP2000</strong> <strong>Web</strong> <strong>Tutorial</strong> 1 82
11. From the Select menu select Select and then Groups… from the submenu. This will display<br />
the Select Groups dialog box.<br />
12. Click on the group name ROOF once to highlight it, then, holding down the Ctrl key, click<br />
on the group named 2ND to add it to the selection. Click the OK button.<br />
13. On the Design menu choose Redefine Element Design Data. The Element Overwrite<br />
Assignments dialog box is displayed.<br />
14. In this dialog box:<br />
In the Assignment Options area check the box labeled Unbraced Length Ratio (Minor,<br />
LTB) and then type .0833 in the Unbraced Length Ratio (Minor, LTB) edit box.<br />
Click the OK button to close the Preferences dialog box.<br />
15. On the Design menu choose Start Design/Check of Structure. The second design check of<br />
the structure proceeds.<br />
16. When the design is complete, the member stress ratios are displayed on the structure as<br />
shown in Figure C-20.<br />
Figure C-20: Final Member Stress Ratios<br />
<strong>SAP2000</strong> <strong>Web</strong> <strong>Tutorial</strong> 1 83
17. Right click on any member to bring up the Steel Stress Check Information dialog box for that<br />
member. This dialog box shows details of the interaction ratio for each design load<br />
combination at each design station along the element.<br />
18 To get additional detail on any item in this dialog box, highlight the item and click the<br />
Details button. A detailed form with design information, similar to that shown in Figure C-<br />
21 will appear. Note you can print this form by clicking the associated File menu and<br />
selecting Print. Click the “X” in the upper right-hand corner of this detailed form to close it.<br />
Note: If this form is too big to fully fit on your screen, you may have to increase your screen<br />
resolution. Typically, it should fit if your resolution is 800 x 600 and you use small fonts<br />
or 1024 x 768 and you use large fonts.<br />
Figure C-21: Detailed Steel Stress Check Information<br />
19. Clicking on the Redesign button will take you to the Element Overwrite Assignments dialog<br />
box discussed in item 13.<br />
20. Click the OK button to close the Steel Stress Check Information dialog box.<br />
<strong>SAP2000</strong> <strong>Web</strong> <strong>Tutorial</strong> 1 84
21. Now we will confirm the unbraced length ratios that were used. From the Design menu,<br />
select Display Design Info… to display the Display Design Results dialog box.<br />
22. In this dialog box:<br />
Select the Design Input option.<br />
In the design input drop-down box select Unbraced L_ratios.<br />
Click the OK button to display the unsupported length ratios. They are displayed as<br />
Major Unbraced Length Ratio, Minor Unbraced Length Ratio.<br />
23. If you wanted to print a picture of the model with the unbraced length ratios displayed you<br />
could do so by selecting Print Graphics from the File menu now.<br />
24. If you wanted to print design information to the printer, or to a file, you could do so by<br />
selecting Print Design Tables… from the File menu and completing the resulting dialog<br />
box. Note that if you select members prior to entering this dialog box, you have the option of<br />
printing output for the selected members only.<br />
25. Click the Show Undeformed Shape button to clear the display of unsupported length<br />
ratios.<br />
26. Click the Set Elements button on the main toolbar (or select Set Elements… from the<br />
View menu). This displays the Set Elements Dialog box.<br />
27. In this dialog box uncheck the Hide box in the Shells area and click the OK button. This will<br />
turn the display of shells back on.<br />
The completes the review of performing a steel design stress check. This also completes Part 1<br />
of this tutorial.<br />
<strong>SAP2000</strong> <strong>Web</strong> <strong>Tutorial</strong> 1 85
D. <strong>Tutorial</strong> Part 2 – Pushover Analysis<br />
This portion of the tutorial explores the pushover analysis capabilities of <strong>SAP2000</strong>. It is<br />
assumed that you have basic knowledge of the pushover concept, and that you are familiar with<br />
the ATC-40 and FEMA-273 documents.<br />
If you did not complete part C of the tutorial, and thus create the basic model, then you should<br />
open the file named Sapwb01c.sdb that was supplied with this tutorial. Note that in a typical<br />
analysis you should have, at the very least, run and reviewed the results of a static analysis to<br />
verify the behavior of your model prior to running a pushover analysis.<br />
<strong>SAP2000</strong> has extensive online help for the pushover analysis. Press F1 from within a pushover<br />
related dialog box to get context sensitive help related to the dialog box. To see all of the help<br />
items related to pushover analysis, select Search For Help On... from the Help menu, select the<br />
Index Tab, highlight the Pushover index entry and click the Display button.<br />
Step 1: Defining Hinge Properties (Pushover)<br />
In this tutorial we will use the default hinge properties, so it is not necessary to define any new<br />
properties. In this step we will review the process of viewing already defined hinge properties,<br />
and will discuss the process of defining new hinge properties. This step can be skipped if you do<br />
not want to review the hinge properties.<br />
Background: There are three types of hinge properties in <strong>SAP2000</strong>. They are default<br />
hinge properties, user-defined hinge properties and generated hinge properties. Only<br />
default hinge properties and user-defined hinge properties can be assigned to frame<br />
elements. When these hinge properties are assigned to a frame element, the program<br />
automatically creates a different generated hinge property for each and every hinge.<br />
Default hinge properties can not be modified. They also can not be viewed because<br />
the default properties are section dependent. The default properties can not be fully<br />
defined by the program until the section that they apply to is identified. Thus to see<br />
the effect of the default properties, the default property should be assigned to a frame<br />
element, and then the resulting generated hinge property should be viewed. The<br />
built-in default hinge properties are typically based on FEMA-273 and/or ATC-40<br />
criteria.<br />
User-defined hinge properties can be either be based on default properties or they<br />
can be fully user-defined. When user-defined properties are based on default<br />
properties, the hinge properties can not be viewed because, again, the default<br />
properties are section dependent. When user-defined properties are not based on<br />
default properties, then the properties can be viewed and modified.<br />
The generated hinge properties are used in the analysis. They can be viewed, but<br />
they can not be modified. Generated hinge properties have an automatic naming<br />
convention of LabelH#, where Label is the frame element label, H stands for hinge,<br />
<strong>SAP2000</strong> <strong>Web</strong> <strong>Tutorial</strong> 1 86
and # represents the hinge number. The program starts with hinge number 1 and<br />
increments the hinge number by one for each consecutive hinge applied to the frame<br />
element. For example if a frame element label is F23, the generated hinge property<br />
name for the second hinge applied to the frame element is F23H2.<br />
The main reason for the differentiation between defined properties (in this context,<br />
defined means both default and user-defined) and generated properties is that<br />
typically the hinge properties are section dependent. Thus it would be necessary to<br />
define a different set of hinge properties for each different frame section type in the<br />
model. This could potentially mean that a very large number of hinge properties<br />
would need to be defined by the user. To simplify this process, the concept of default<br />
properties is used in <strong>SAP2000</strong>. When default properties are used, the program<br />
combines its built-in default criteria with the defined section properties for each<br />
element to generate the final hinge properties. The net effect of this is that you do<br />
significantly less work defining the hinge properties because you don’t have to define<br />
each and every hinge.<br />
1. From the Define menu choose Hinge Properties…. This will display the Define Frame<br />
Hinge Properties dialog box.<br />
2. Note there are four default hinge properties defined. They are Default-M3, Default-P,<br />
Default-PMM, and Default-V2. Highlight the Default-M3 property. Note that the<br />
Modify/Show Property button is inactive because you can not view or modify default hinge<br />
properties.<br />
3. Check the Show Generated Props check box. If there were generated hinge properties they<br />
would now appear in the Defined Hinge props list box. However, since we haven’t yet<br />
assigned any hinge properties, the program hasn’t generated any, and thus none appear in the<br />
list box.<br />
4. Highlight the Default-V2 hinge property and click on the Define New Property button. The<br />
Frame Hinge Property Data dialog box appears.<br />
Note: When you highlight a property in the Defined Hinge Props area of the Define<br />
Frame Hinge Properties dialog box, and then click the Define New Property button,<br />
the new property will default to being the same as the highlighted property.<br />
5. Note that the Hinge Type is Shear V2, and that the associated Default check box is checked.<br />
6. Type USER in the Property Name edit box.<br />
7. Click on the Default check box to uncheck it, and then click the Modify/Show For V2<br />
button. This displays the Frame Hinge Property Data For USER dialog box.<br />
8. In this dialog box:<br />
<strong>SAP2000</strong> <strong>Web</strong> <strong>Tutorial</strong> 1 87
• In the Force-Displacement spreadsheet and diagram area:<br />
ä Note that the symmetric check box is checked and that the hinge property forcedisplacement<br />
diagram is symmetric. In the diagram, the axes are shown in red. The<br />
horizontal axis is displacement and the vertical axis is force.<br />
Note: When the symmetric check box is<br />
checked, the upper portion (points<br />
B-, C-, D- and E-) of the input<br />
spreadsheet for the hinge forcedisplacement<br />
properties is gray.<br />
You can not edit these values; they<br />
are automatically picked up from<br />
symmetry with points B, C, D and E.<br />
ä Change the Force/Yield value for point<br />
C from 1.25 to 1.5 by typing 1.5 into the<br />
appropriate spreadsheet cell and then<br />
clicking in any other spreadsheet cell.<br />
Force<br />
A<br />
B<br />
D<br />
C<br />
Displacement<br />
E<br />
ä Note the change in shape of the force-displacement diagram. The diagram is scaled<br />
to fit within the plot area.<br />
ä Note that the Force/Yield value for point C- has changed also from -1.25 to -1.5.<br />
ä Uncheck the symmetric check box by clicking it. Note that points B- through E- are<br />
no longer gray. Also note that in the Acceptance Criteria area, the Negative column<br />
is no longer gray.<br />
ä Change the Force/Yield value for point C- from -1.5 to -2 and click in another<br />
spreadsheet cell. Again note the change in shape of the force-displacement diagram.<br />
• In the Scaling area note that the Calculate Yield Force and Calculate Yield Displacement<br />
check boxes are checked by default. This means that the program will automatically<br />
calculate these values. We could, for example, overwrite the yield force by unchecking<br />
the Calculate Yield Force check box and typing in an appropriate value in the Yield<br />
Moment edit box. For this tutorial we will accept the default and have the program<br />
calculate the yield values.<br />
• In the Acceptance Criteria area we will also accept the default values. Note that since the<br />
Symmetric box is not checked both Positive and Negative values are input. If the<br />
Symmetric box was checked, only Positive values would be input (the Negative column<br />
would be gray and inactive).<br />
Note: The acceptance criteria are input as the ratio of displacement over yield<br />
displacement, similar to the force-displacement spreadsheet.<br />
<strong>SAP2000</strong> <strong>Web</strong> <strong>Tutorial</strong> 1 88
• In the Type area select the Force-Displacement option. This controls whether the data in<br />
the spreadsheet and the acceptance criteria are interpreted by the program as forcedisplacement<br />
or stress-strain. The stress-strain option is only available for axial and shear<br />
hinges (uncoupled).<br />
Note: When the Type option is set to stress-strain, a hinge length must be input. The<br />
hinge length can be input as an absolute length or a relative length. The relative<br />
length is relative to the clear length of the frame element between rigid end<br />
offsets. If the stress-strain option is chosen, the program internally transforms the<br />
data into a force-displacement format for analysis. The force is calculated as the<br />
stress times the frame member axial area (σA) for axial hinges and the stress<br />
times the frame member shear area (σA V ) for shear hinges. The displacement is<br />
calculated as the strain times the hinge length (εL).<br />
• Click the OK button three times to accept the USER hinge property definition.<br />
• We will now delete the USER hinge property since we are not going to use it.<br />
• From the Define menu choose Hinge Properties…. This will display the Define Frame<br />
Hinge Properties dialog box.<br />
• Highlight the USER hinge property and click on the Delete Property button. Click the<br />
Yes button when the program asks if it is OK to delete Frame Hinge USER from list.<br />
• Click the OK button to accept the change in hinge properties and exit the Define Frame<br />
Hinge Properties dialog box.<br />
Note: If you click the Cancel button the property will not be deleted.<br />
This completes the review of defining hinge properties.<br />
<strong>SAP2000</strong> <strong>Web</strong> <strong>Tutorial</strong> 1 89
Step 2: Assigning Hinge Properties (Pushover)<br />
We will assign Default-PMM hinges to each end of the moment frame columns and the braced<br />
frame columns. We will assign Default-M3 hinges to each end of the moment frame beams. We<br />
will assign Default-P to the center of each brace.<br />
1. Click in the window labeled 3-D View to make sure it is active. Note when the window is<br />
active, its title bar will be highlighted.<br />
2. From the Select menu choose Select, and then Groups…from the submenu. This will<br />
display the Select Groups dialog box.<br />
3. Highlight the group named FRCOLS by clicking on it.<br />
4. Hold down the CTRL key and highlight the group named BRCOLS by clicking on it to add it<br />
to the selection.<br />
5. Click the OK button to select all of the elements in the FRCOLS and BRCOLS groups.<br />
6. From the Assign menu choose Frame, and then Hinges (Pushover)… from the submenu.<br />
This will display the Frame Hinges (Pushover) dialog box.<br />
7. In this dialog box:<br />
• Select Default-PMM in<br />
the Hinge Property<br />
drop-down box.<br />
• Type 0 in the Relative<br />
Distance edit box.<br />
Note: Relative<br />
distance is<br />
measured from the<br />
I-end of the beam,<br />
and is based on the<br />
clear length<br />
between rigid end<br />
offsets. A “0”<br />
relative distance<br />
indicates the hinge<br />
is at the I-end of the beam. A “1” relative distance indicates the hinge is at the j-<br />
end of the beam. Hinges may be located anywhere along the length of the beam.<br />
• Click the Add button to add a PMM hinge at the I-end (relative distance equals 0) end of<br />
the beam.<br />
<strong>SAP2000</strong> <strong>Web</strong> <strong>Tutorial</strong> 1 90
• Type 1 in the Relative Distance edit box.<br />
• Click the Add button to add a PMM hinge at the J-end (relative distance equals 1) end of<br />
the beam.<br />
• Click the OK button to assign the hinge properties. The model now appears as shown in<br />
Figure D-1.<br />
Figure D-1: Model After Assigning Default-PMM Hinges To Columns<br />
Note: Generated hinge properties have an automatic naming convention of LabelH#, where<br />
Label is the frame element label, H stands for hinge, and # represents the hinge number.<br />
The program starts with hinge number 1 and increments the hinge number by one for<br />
each consecutive hinge applied to the frame element. For example if a frame element<br />
label is F23, the generated hinge property name for the second hinge applied to the<br />
frame element is F23H2. These are the numbers shown on the screen. The item in<br />
parenthesis next to the hinge number is the defined hinge that the generated properties<br />
are based on. On the screen the Default-P, Default-V2, Default-V3, and Default-PMM<br />
are shortened to P, V2, V3 and PMM.<br />
8. From the Select menu choose Select, and then Groups… from the submenu. This will<br />
display the Select Groups dialog box.<br />
9. Highlight the group named FRMGIRD by clicking on it and click the OK button.<br />
<strong>SAP2000</strong> <strong>Web</strong> <strong>Tutorial</strong> 1 91
10. From the Assign menu choose Frame, and then Hinges (Pushover)… from the submenu.<br />
This will display the Frame Hinges (Pushover) dialog box.<br />
11. In this dialog box:<br />
• Select Default-M3 in the Hinge Property drop-down box.<br />
• Type 0 in the Relative Distance edit box.<br />
• Click the Add button.<br />
• Type 1 in the Relative Distance edit box.<br />
• Click the Add button.<br />
• Click the OK button to assign the hinge properties.<br />
12. From the Select menu choose Select, and then Groups…from the submenu. This will<br />
display the Select Groups dialog box.<br />
13. Highlight the group named BRACE1 by clicking on it.<br />
14. Hold down the CTRL key and highlight the group named BRACE2 by clicking on it to add it<br />
to the selection.<br />
15. Click the OK button to select all of the elements in the BRACE1 and BRACE2 groups.<br />
16. From the Assign menu choose Frame, and then Hinges (Pushover)… from the submenu.<br />
This will display the Frame Hinges (Pushover) dialog box.<br />
17. In this dialog box:<br />
• Select Default-P in the Hinge Property drop-down box.<br />
• Type .5 in the Relative Distance edit box.<br />
• Click the Add button to add a P hinge at the center (relative distance equals 0.5) of the<br />
beam.<br />
• Click the OK button to assign the hinge properties.<br />
18. From the Assign menu select Clear Display of Assigns to clear the display of hinge<br />
assignments.<br />
<strong>SAP2000</strong> <strong>Web</strong> <strong>Tutorial</strong> 1 92
19. Click the Save Model button on the main toolbar, or select Save from the File menu to<br />
save the file.<br />
This completes the assigning of pushover hinge properties.<br />
<strong>SAP2000</strong> <strong>Web</strong> <strong>Tutorial</strong> 1 93
Step 3: Viewing Generated Hinge Properties (Pushover)<br />
This section will demonstrate the process to view generated hinge properties. This step can be<br />
skipped if you do not want to view generated hinge properties.<br />
1. Click in the window labeled 3-D View to make sure it is active. Note when the window is<br />
active, its title bar will be highlighted.<br />
2. Click the Set Elements button on the main toolbar (or select Set Elements… from the<br />
View menu). This displays the Set Elements Dialog box.<br />
3. In this dialog box check the Rel / Hinge box in the Frames area and click the OK button.<br />
This will turn the display of hinges on.<br />
4. Note that the hinge at the top of column element 1 is labeled 1H2. (Column element 1 is a<br />
lower level column located at X=-24 ft, Y=-24 ft.) We will view the properties for this PMM<br />
hinge.<br />
Note: In the hinge label 1H2, the 1 indicates the hinge is applied to frame element 1, the<br />
H indicates it is a pushover hinge, and the 2 indicates it is the second hinge applied to<br />
that frame element. This is an automatic naming convention used by the program for<br />
generated hinges.<br />
5. From the Define menu choose Hinge Properties…. This will display the Define Frame<br />
Hinge Properties dialog box.<br />
6. Check the Show Generated Props check box. The generated hinge properties now appear in<br />
the Defined Hinge props list box.<br />
7. In the All Hinge Props area, click on the hinge labeled 1H2 to highlight it and then click the<br />
Modify/Show Property button. This will display the Frame Hinge Property Data dialog<br />
box.<br />
8. Note that since this is a default PMM hinge, the P-M2-M3 box is checked, but it is gray and<br />
inactive. The program also automatically checks the Axial P, Moment M2 and Moment M3<br />
boxes. All of these boxes are gray and inactive since the user can only view generated hinge<br />
properties not change them.<br />
9. Click the Modify/Show For PMM button to display the Frame Hinge Property Data For<br />
1H2 dialog box (see Figure D-2).<br />
10. In this dialog box:<br />
• You can not edit any of the values because this is a generated hinge.<br />
• The spreadsheet is filled with M/M Y and θ/θ Y values.<br />
<strong>SAP2000</strong> <strong>Web</strong> <strong>Tutorial</strong> 1 94
Figure D-2: Frame Hinge Property Data For Generated Pushover Hinge 1H2<br />
• The default hinge properties are symmetric.<br />
• In the scaling area the Yield Rotation is filled in and the Yield Moment is gray and<br />
inactive. TheYield Rotation was calculated by the program based on the associated<br />
frame section property. The Yield Moment is inactive because this is a PMM hinge and<br />
there is no single yield moment, there is a yield (interaction) surface instead. If this were<br />
just a moment hinge then there would be a value in the Yield Moment box.<br />
• The acceptance criteria are θ/θ Y values.<br />
• Click the Define/Show Interaction button to display the Frame Hinge Interaction<br />
Surface dialog box. In this dialog box which is mostly inactive because you are viewing<br />
a generated hinge property, note:<br />
ä The User Definition option is used.<br />
ä The Doubly Symmetric About M2 and M3 check box is checked.<br />
ä Five curves are used to define the interaction surface.<br />
<strong>SAP2000</strong> <strong>Web</strong> <strong>Tutorial</strong> 1 95
Note: The Number of Curves edit box indicates the number of equally spaced P-M<br />
curves that will be used to define the interaction surface. If the Doubly Symmetric<br />
About M2 and M3 box is checked, then the curves are equally spaced between 0<br />
and 90 degrees. If the Doubly Symmetric About M2 and M3 box is not checked,<br />
then the curves are equally spaced between 0 and 360 degrees.<br />
ä Click the Define/Show Surface button to display the Interaction Surface Definition<br />
dialog box.<br />
ä In this dialog box:<br />
À The spreadsheet shows normalized values of axial load, P, and moment, M.<br />
There is one P column and five M columns corresponding to the number entered<br />
in the Number of Curves edit box in the previous dialog box. Use the scroll bars<br />
to see the other M columns.<br />
Note: The axial load is normalized by the maximum axial load value. The<br />
moments are normalized by the maximum moment value for all of the moment<br />
curves. Thus the maximum value in the spreadsheet for both axial load and<br />
moment is 1.<br />
À The diagram shows the P versus M curves. Click in an M column in the<br />
spreadsheet to see that particular P versus M curve. The M curve at Angle 0<br />
corresponds to +M2 bending. The M curve at Angle 90 corresponds to +M3<br />
bending.<br />
À In the scaling area, the scale factors for both axial load, P, and moment, M, are<br />
shown. Note that the M scale factor applies to all of the M curves.<br />
Note: Since both P and M are normalized to 1, the P and M scale factors are the<br />
maximum values of P and M, respectively.<br />
11. Click the Cancel button five (5) times to exit all of the Hinge Property dialog boxes.<br />
<strong>SAP2000</strong> <strong>Web</strong> <strong>Tutorial</strong> 1 96
12. Click the Set Elements button on the main toolbar (or select Set Elements… from the<br />
View menu) to display the Set Elements Dialog box. In this dialog box uncheck the Rel /<br />
Hinge box in the Frames area and click the OK button to turn off the display of hinges.<br />
This completes the viewing of generated hinge properties.<br />
<strong>SAP2000</strong> <strong>Web</strong> <strong>Tutorial</strong> 1 97
Step 4: Defining Static Pushover Cases<br />
For this tutorial example we will define six static pushover cases. The first will apply the gravity<br />
load to the structure, and the other five will apply different distributions of lateral load to the<br />
structure.<br />
1. From the Define menu choose Static Pushover Cases…. This will display the Define Static<br />
Pushover Cases dialog box.<br />
2. Click the Add New Pushover button to display the Static Pushover Case Data dialog box.<br />
3. In this dialog box:<br />
• Type GRAV in the Pushover Case Name edit box.<br />
• In the Options Area select the Push To Load Level Defined By Pattern option button.<br />
Note: Typically the Push To Load Level Defined By Pattern option is used to apply<br />
gravity load, and the Push To Displacement Of option is used to apply lateral<br />
pushes.<br />
• In the Load Pattern do the following:<br />
ä Select DL from the Load drop-down box.<br />
ä Type 1 in the Scale Factor edit box.<br />
ä Click the Add button.<br />
ä Select LL from the Load drop-down box.<br />
ä Type 0.25 in the Scale Factor edit box.<br />
ä Click the Add button.<br />
• Accept all of the other default values. Note that the default Control Joint, joint 19, occurs<br />
at the roof. The dialog box appears as shown in Figure D-3.<br />
• Click the OK button to complete this pushover case definition.<br />
Note: There are five control parameters in the right-hand side of the Options area.<br />
These parameters are used to control the pushover analysis. For most analyses the<br />
default values are sufficient.<br />
The Minimum Saved Steps and Maximum Saved Steps provide control over the<br />
number of points actually saved in the pushover analysis. The default values are<br />
<strong>SAP2000</strong> <strong>Web</strong> <strong>Tutorial</strong> 1 98
Figure D-3: Static Pushover Case Data Dialog Box<br />
adequate in most cases. If the minimum number of steps saved is too small, you may<br />
not have enough points to adequately represent the pushover curve. If the minimum<br />
and maximum number of saved steps is too large, then the analysis may consume a<br />
considerable amount of disk space, and it may take an excessive amount of time to<br />
display results.<br />
The program automatically determines the spacing of pushover steps to be saved as<br />
follows. The maximum step length is equal to total force goal or total displacement<br />
goal divided by the specified Minimum Saved Steps. The program starts by saving<br />
steps at this increment. If a significant event occurs at a step length less than this<br />
increment, then the program will save the step too and pick up with the maximum<br />
increment from there. For example, suppose the Minimum Saved Steps and<br />
Maximum Saved Steps are set at 20 and 30 respectively, and the pushover is to be to<br />
a displacement of 10 inches. The maximum increment of saved steps will be 10 / 20 =<br />
0.5 inches. Thus, data is saved at 0.5, 1, 1.5, 2, 2.5 inches. Suppose that a significant<br />
event occurs at 2.7 inches. Then data is also saved at 2.7 inches, and continues on<br />
from there being saved at 3.2, 3.7, 4.2, 4.7, 5.2, 5.7, 6.2, 6.7, 7.2, 7.7, 8.2, 8.7, 9.2, 9.7<br />
and 10.0 inches.<br />
<strong>SAP2000</strong> <strong>Web</strong> <strong>Tutorial</strong> 1 99
The Maximum Saved Steps controls the number of significant events for which data<br />
will be saved. The program will always reach the force or displacement goal within<br />
the specified number of maximum saved steps, however, in doing so it could have to<br />
skip saving steps at later events. For example, suppose the Minimum Saved Steps is<br />
set to 20, the Maximum Saved Steps is set to 21, and the pushover is to be to a<br />
displacement of 10 inches. The maximum increment of saved steps will be 10 / 20 =<br />
0.5 inches. Thus, data is saved at 0.5, 1, 1.5, 2, 2.5 inches. Suppose that a significant<br />
event occurs at 2.7 inches. Then data is also saved at 2.7 inches, and continues on<br />
from there being saved at 3.2 and 3.7 inches. Suppose another significant event<br />
occurs at 3.9 inches. The program will not save the data at 3.9 inches because if it<br />
did it would not be able to limit the maximum increment to 0.5 inches and still get<br />
through the full pushover in no more than 21 steps. Note that if a second significant<br />
event occurred at 4.1 inches rather than 3.9 inches, then the program would be able<br />
to save the step and still meet the specified criteria for maximum increment and<br />
maximum number of steps.<br />
The Maximum Failed Steps is used, if necessary, to declare failure (i.e., nonconvergence)<br />
in a run before it reaches the specified force or displacement goal. The<br />
program may be unable to converge on a step when catastrophic failure occurs in the<br />
structure. There may also be instances where it is unable to converge on a step due<br />
to numerical sensitivity in the solution. The Maximum Failed Steps is a cumulative<br />
counter through the entire analysis. If the Maximum Failed Steps is reached, the<br />
analysis stops.<br />
The Event Force Tolerance and the Event Deformation Tolerance are ratios that are<br />
used to determine when an event actually occurs for a hinge. Consider the figure that<br />
shows the location of<br />
two hinges on their<br />
force-displacement<br />
plots. Hinge 1 has<br />
reached an event<br />
location. For hinge 2,<br />
if both the Event Force<br />
Tolerance and the<br />
Event Displacement<br />
Tolerance are met,<br />
then the hinge is within<br />
event tolerance and it<br />
too will be treated as<br />
part of the event. In<br />
Force<br />
A<br />
B<br />
Yield force<br />
Displacement<br />
the figure, if the Force Tolerance divided by the Yield Force is less than the Event<br />
Force Tolerance specified in the Static Pushover Case Data, and the Displacement<br />
Tolerance divided by the horizontal distance from B to C is less than the<br />
Displacement Event Tolerance specified in the Static Pushover Case Data, then hinge<br />
2 will be treated as part of the event. When determining the Force Tolerance Ratio,<br />
D<br />
C<br />
Assume hinge 2 is at this point<br />
on its force-displacement curve<br />
Assume hinge 1 is at this point<br />
on its force-displacement curve<br />
Force tolerance<br />
Displacement tolerance<br />
E<br />
<strong>SAP2000</strong> <strong>Web</strong> <strong>Tutorial</strong> 1 100
the denominator is always the yield force. When determining the Displacement<br />
Tolerance Ratio, the denominator is the horizontal length of the portion of the forcedisplacement<br />
curve that the hinge is currently on. In the figure, hinge 2 is on the B-C<br />
portion of the curve, thus we used the B-C horizontal length in the denominator of the<br />
Displacement Tolerance Ratio.<br />
4. Click the Add New Pushover button to display the Static Pushover Case Data dialog box.<br />
5. In this dialog box:<br />
• Accept the default Pushover Case Name, PUSH2.<br />
• In the Options area, select GRAV from the Start From Previous Pushover drop-down<br />
box.<br />
• In the Options area, check the Include P-Delta box if it is not already checked.<br />
• In the Options area, accept the Push to Displacement Of value of 0.96 feet.<br />
Note: The Push To Displacement Of value defaults to 0.04 times the Z coordinate of<br />
the highest joint in the model. Note that this may lead to very large displacements<br />
if the base of the model is not at Z=0. You can change this value, if necessary, by<br />
typing a new value in the edit box.<br />
• Accept all of the other default values in the Options Area.<br />
• In the Load Pattern do the following:<br />
ä Select PUSHPAT from the Load drop-down box.<br />
ä Type 1 in the Scale Factor edit box.<br />
ä Click the Add button.<br />
• Click the OK button to complete this pushover case definition.<br />
6. Click the Add New Pushover button to display the Static Pushover Case Data dialog box.<br />
7. In this dialog box:<br />
• Accept the default Pushover Case Name, PUSH3.<br />
• In the Options area, select GRAV from the Start From Previous Pushover drop-down<br />
box.<br />
• In the Options area, check the Include P-Delta box if it is not already checked.<br />
<strong>SAP2000</strong> <strong>Web</strong> <strong>Tutorial</strong> 1 101
• Accept all of the other default values in the Options Area.<br />
• In the Load Pattern do the following:<br />
ä Select acc dir X from the Load drop-down box.<br />
ä Type 1 in the Scale Factor edit box.<br />
ä Click the Add button.<br />
• Click the OK button to complete this pushover case definition.<br />
8. Click the Add New Pushover button to display the Static Pushover Case Data dialog box.<br />
9. In this dialog box:<br />
• Accept the default Pushover Case Name, PUSH4.<br />
• In the Options Area do the following:<br />
ä Type .5 in the Push To Displacement Of edit box.<br />
ä Select U2 from the Control Direction drop-down box.<br />
ä Select GRAV from the Start From Previous Pushover drop-down box.<br />
ä Accept all of the other default values in the Options Area.<br />
• In the Load Pattern do the following:<br />
ä Select acc dir Y from the Load drop-down box.<br />
ä Type 1 in the Scale Factor edit box.<br />
ä Click the Add button.<br />
• Click the OK button to complete this pushover case definition.<br />
10. Click the Add New Pushover button to display the Static Pushover Case Data dialog box.<br />
11. In this dialog box:<br />
• Accept the default Pushover Case Name, PUSH5.<br />
<strong>SAP2000</strong> <strong>Web</strong> <strong>Tutorial</strong> 1 102
• In the Options area, select GRAV from the Start From Previous Pushover drop-down<br />
box.<br />
• In the Options area, check the Include P-Delta box.<br />
• Accept all of the other default values in the Options Area.<br />
• In the Load Pattern do the following:<br />
ä Select MODE from the Load drop-down box.<br />
ä Type 1 in the Scale Factor edit box.<br />
ä Click the Add button. The Select Mode Number dialog box appears.<br />
ä Type in 1 for the mode number (corresponding to the first mode in the X-direction),<br />
and click the OK button.<br />
• Click the OK button to complete this pushover case definition.<br />
12. Click the Add New Pushover button to display the Static Pushover Case Data dialog box.<br />
13. In this dialog box:<br />
• Accept the default Pushover Case Name, PUSH6.<br />
• In the Options area, select GRAV from the Start From Previous Pushover drop-down<br />
box.<br />
• In the Options area, check the Include P-Delta box.<br />
• Accept all of the other default values in the Options Area.<br />
• In the Load Pattern do the following:<br />
ä Select acc dir X from the Load drop-down box.<br />
ä Type 1 in the Scale Factor edit box.<br />
ä Click the Add button.<br />
ä Select acc dir Y from the Load drop-down box.<br />
ä Type 1 in the Scale Factor edit box.<br />
ä Click the Add button.<br />
<strong>SAP2000</strong> <strong>Web</strong> <strong>Tutorial</strong> 1 103
• Click the OK button to complete this pushover case definition.<br />
14. Click the OK button to exit the Define Static pushover Cases dialog box.<br />
15. Click the Save Model button on the main toolbar.<br />
This completes the definition of static pushover cases.<br />
<strong>SAP2000</strong> <strong>Web</strong> <strong>Tutorial</strong> 1 104
Step 5: Running the Pushover Analysis<br />
1. On the Analyze menu select Run Static Pushover.<br />
Note: To run a pushover analysis, you must first have pushover hinges and pushover load<br />
cases defined, at least a static analysis run, and, if steel members with Auto sections, or<br />
concrete members whose reinforcing is to be designed by the program are included, you<br />
must have run the design portion of the program.<br />
2. A window is opened in which various phases of analysis are progressively reported. When<br />
the analysis is complete the screen will display as shown in Figure D-4.<br />
Note: Most of the information in the scrolling analysis window is appended to the *.log file<br />
that was created when the original analysis was run.<br />
Figure D-4: Screen Message When Pushover Analysis Is Complete<br />
3. Use the scroll bar to review the analysis messages and check for any error or warning<br />
messages (there should be none).<br />
Note: One of the items you will see in the scrolling window is labeled Analysis Complete. As<br />
each pushover load case is running you will see the value continually changing. It is a<br />
measure of what percent of your force or displacement goal you have reached. When the<br />
Analysis Complete reaches 1, you have reached your goal. Note that the analysis may<br />
not to reach its goal (i.e., an Analysis complete of 1) because the structure<br />
catastropically fails earlier or because of numerical sensitivities.<br />
4. Click the OK button in the Analysis window to close it.<br />
This completes running the pushover analysis.<br />
<strong>SAP2000</strong> <strong>Web</strong> <strong>Tutorial</strong> 1 105
Step 6: Displaying the Pushover Deformed Shape and the Sequence of Pushover Hinge<br />
Formation<br />
1. From the Options menu select Windows and the select One from the submenu. The display<br />
changes to one window.<br />
Note: With this option you can select to have from one to four windows on the screen at the<br />
same time. Each of the windows can be showing a completely different view.<br />
2. Click the 3-D View button on the main toolbar to show the default 3-D view.<br />
3. Click the Set Elements button on the main toolbar (or select Set Elements… from the<br />
View menu). This displays the Set Elements Dialog box. In this dialog box check the Hide<br />
box in the Shells area and click the OK button. This will turn off the display of shell<br />
elements.<br />
4. Click the Display Static Deformed Shape button , or from the Display menu select<br />
Show Deformed Shape... to display the Deformed Shape dialog box.<br />
5. In this dialog box:<br />
• Select Push2 Static Push from the Load drop-down box.<br />
• Select Auto in the Scaling area.<br />
• Check both the Wire Shadow and the Cubic Curve options in the Options area.<br />
• Click the OK button.<br />
6. The deformed shape will appear. Note that the title of the window includes the information<br />
“Deformed Shape (PUSH2 – Step 0)”. Thus we are currently viewing the deformed shape at<br />
the start of the pushover. Since the PUSH2 pushover was started from the GRAV pushover,<br />
we are also viewing the deformed shape at the end of the GRAV pushover.<br />
Note: Recall that the PUSH2 pushover load case is the PUSHPAT static load pattern.<br />
7. Right click on any second level or roof level joint to see the displacement for that joint. The<br />
displacements will be very small, as is expected when only the gravity load is applied.<br />
8. Click the Right Arrow button located on the right-hand side of the status bar at the<br />
bottom of the screen to view the deformed shape of the next step (Step 1) in the pushover.<br />
Note: When viewing the pushover deformed shape and sequence of hinge formation, the<br />
right and left arrow buttons, located in the status bar at the bottom of the screen,<br />
provide an easy way to view the deformed shape for the next (right arrow), or<br />
previous (left arrow) pushover step.<br />
<strong>SAP2000</strong> <strong>Web</strong> <strong>Tutorial</strong> 1 106
9. Note that the title of the window includes the information “Deformed Shape (PUSH2 – Step<br />
1)”, and the building moves slightly in the X-direction. You can again right-click on any<br />
joint to see its displacement. You can click the Left Arrow button to return to Step 0 of<br />
the pushover.<br />
10. Continue clicking the Right Arrow button<br />
until the first colored hinges appear. The first<br />
colored hinges should appear in Step 4, as<br />
illustrated in Figure D-5. The color of the hinges<br />
indicates the state of the hinge, i.e, where it is<br />
along its force displacement curve. The legend for<br />
the hinge colors is included at the bottom of the<br />
screen. The points B, IO, LS, CP, C, D and E are<br />
illustrated in the figure. When hinges first appear,<br />
they are at point B on the force-displacement<br />
curve.<br />
Force<br />
A<br />
B<br />
IO<br />
C<br />
LS<br />
CP<br />
D<br />
Displacement<br />
E<br />
Figure D-5: First Pushover Hinge Yielding<br />
<strong>SAP2000</strong> <strong>Web</strong> <strong>Tutorial</strong> 1 107
11. Continue clicking the Right Arrow button to step through the sequence of hinge<br />
formation in the pushover to the last step. Note how the colors of the hinges change as the<br />
pushover proceeds.<br />
Note: To change the color coding for the hinges, From the Options<br />
menu, select Colors, and then select the Output tab. The colorcoding<br />
for the pushover hinge state is controlled by the colors in<br />
the area labeled Contours. There are ten contour colors; these<br />
contour colors also are used in displaying stress contours for shell<br />
elements. Assume the color in the top box, next to the label<br />
“Min”, is designated “Box 1”, and the color in the bottom box,<br />
next to the label “Max”, is designated “Box 10”. Then the color<br />
coding for pushover hinge states is as defined in the table.<br />
Point Color Box<br />
B Box 2<br />
IO Box 3<br />
LS Box 4<br />
CP Box 5<br />
C Box 6<br />
D Box 7<br />
E Box 8<br />
12. At the last pushover step right click one of the roof level joints to see its displacement. It will<br />
be about 0.96 feet which is consistent with the displacement goal for the PUSH2 pushover<br />
load case.<br />
13. Click the Start Animation button , located in the status bar at the bottom<br />
of the <strong>SAP2000</strong> window, to animate the deformed shape at the last step. When done viewing<br />
the animation, click the Stop Animation button.<br />
Note: In this instance, the animation is only for the particular load step, not for the<br />
entire pushover. The purpose of the animation is to make the behavior at that<br />
particular load step more apparent. You can create a video of the entire pushover<br />
using the Create Video... option on the File menu, however, this option will not be<br />
available in the <strong>SAP2000</strong> 6.20 Beta version.<br />
14. Click the Display Static Deformed Shape button , or from the Display menu select<br />
Show Deformed Shape... to display the Deformed Shape dialog box.<br />
15. In this dialog box:<br />
• Select Push4 Static Push from the Load drop-down box. Recall this is the uniform<br />
acceleration in the Y-direction.<br />
• Click the OK button.<br />
16. Click the Right Arrow button to step through the entire sequence of hinge formation in<br />
the pushover. You will note that through the sequence of steps the deformation reverses<br />
directions several times. The reason for this is dicussed in the note below.<br />
Note: When a hinge reaches point C on its force-displacement curve (see figure below),<br />
that hinge must begin to drop load. Within the program, the way load is dropped<br />
from a hinge that has reached point C is that the pushover force (base shear) is<br />
reduced until the force in that hinge is consistent with the force at point D. As the<br />
<strong>SAP2000</strong> <strong>Web</strong> <strong>Tutorial</strong> 1 108
force is dropped, all elements unload, and the<br />
displacement is reduced. Once the yielded hinge<br />
reaches the Point D force level, the pushover<br />
force (base shear) is again increased and the<br />
displacement begins to increase again. This<br />
behavior is apparent when displaying the<br />
deformed shapes and force diagrams (moment,<br />
shear, etc.) for each step of the pushover, when<br />
viewing a video created for the pushover, and<br />
when displaying the force-displacement plot of<br />
the pushover.<br />
Force<br />
A<br />
B<br />
IO<br />
C<br />
LS<br />
CP<br />
D<br />
Displacement<br />
E<br />
17. Click the Show Undeformed Shape button to clear the display of deformed shape for<br />
the pushover.<br />
18. Click the Set Elements button on the main toolbar (or select Set Elements… from the<br />
View menu). This displays the Set Elements Dialog box.<br />
19. In this dialog box:<br />
• Uncheck the Shrink Elements box in the options area (if it is checked).<br />
• Click the OK button.<br />
This completes the review of the pushover deformed shape and the sequence of pushover hinge<br />
formation. You may want to step through the deformed shapes for the other pushover load cases<br />
before proceeding on to the next step.<br />
<strong>SAP2000</strong> <strong>Web</strong> <strong>Tutorial</strong> 1 109
Step 7: Displaying Frame Element Forces at Each Step of the Pushover<br />
1. Click the Member Force Diagram for Frames button , or from the Display menu select<br />
Show Element Forces/Stresses, and then Frames... to display the Member Force Diagram<br />
for Frames dialog box.<br />
2. In this dialog box:<br />
• Select Push2 Static Push from the Load drop-down box. Recall this is the PUSHPAT<br />
static load pattern.<br />
• In the Component area select the Moment 3-3 option.<br />
• In the Scaling area select the Auto option.<br />
• Check the Fill Diagram box. Note if the Show Values on Diagram box is checked, you<br />
will have to uncheck it before you can check the Fill Diagram box.<br />
Note: The frame element forces for each step of the pushover can be displayed either<br />
with the filled diagram or with the values shown on the diagram.<br />
• Click the OK button. The display appears as shown in Figure D-6.<br />
Figure D-6: Pushover Forces (M3-3) at Step 0<br />
<strong>SAP2000</strong> <strong>Web</strong> <strong>Tutorial</strong> 1 110
3. Note that the title of the window includes the information “Moment 3-3 Diagram (PUSH2 –<br />
Step 0)”. Thus we are currently viewing the M33 moments at the start of the pushover.<br />
Since the PUSH2 pushover was started from the GRAV pushover, we are also viewing the<br />
M33 moments at the end of the GRAV pushover.<br />
4. Note you can right click on any frame element for a detailed diagram. When done viewing a<br />
detailed diagram, right click on another element to view its detailed diagram, or left click<br />
anywhere to finish viewing detailed diagrams.<br />
5. Click the Right Arrow button located on the right-hand side of the status bar at the<br />
bottom of the screen to view the M-33 diagram at the next step (Step 1) of the pushover.<br />
Note: When viewing the pushover forces, the right and left arrow buttons, located in the<br />
status bar at the bottom of the screen, provide an easy way to view the forces for the<br />
next (right arrow), or previous (left arrow) pushover step.<br />
6. Continue clicking the Right Arrow button to step through the moment diagrams for<br />
each step of the pushover. You can right click an element at any step for a detailed diagram.<br />
7. Click the Show Undeformed Shape button to clear the display of element forces for the<br />
pushover.<br />
This completes the review of the frame element forces at each step of the pushover. You may<br />
want to step through the element forces for other force components and for other pushover load<br />
cases before proceeding on to the next step.<br />
<strong>SAP2000</strong> <strong>Web</strong> <strong>Tutorial</strong> 1 111
Step 8: Displaying Pushover and Capacity Spectrum Curves<br />
1. From the Display menu select Show Static Pushover Curve... to display the Pushover<br />
Curve dialog box.<br />
Note: If this dialog box does not fully fit on your screen then you may want to increase the<br />
resolution of your screen. The dialog box should fully fit on the screen if your resolution<br />
is 800 x 600 with small fonts, or 1024 x 768 with large fonts.<br />
2. If no plot is visible in the plot area, then click the Display button at the bottom of the form.<br />
Note: If at any time the plot area display is not visible in the Pushover curve dialog box,<br />
click the Display button.<br />
3. For practice, press the F1 key on the keyboard to see context sensitive on-line help pertaining<br />
to this dialog box.<br />
4. When finished with the online help click the “X” in the upper right-hand corner of the Help<br />
window to close it, or choose Exit from the File menu on the Help window.<br />
5. Notice that in the Plot Type area, the Base Shear vs Control Displacement option is selected.<br />
Note: The base shear that is plotted in the Base Shear vs Control Displacement plot is the<br />
resultant base shear. The displacement plotted is the displacement in the control<br />
direction (not resultant) at the control joint.<br />
6. The dialog box currently appears as shown in Figure D-7. Note the following:<br />
• The Demand Spectrum area and the Damping Parameters area are gray and inactive.<br />
These areas will become active when the Capacity Spectrum option is chosen in the Plot<br />
Type area.<br />
• There are four boxes just below the plot area. These boxes are the Cursor Location, the<br />
Performance Point (V, D), the Performance Point (Sa, Sd), the Performance Point (Teff,<br />
βeff). When the Base Shear vs Control Displacement option is chosen in the Plot Type<br />
area, only the Cursor Location box is active. Place the cursor (mouse pointer) anywhere<br />
over the plot and the coordinates of the pointer will appear in the Cursor Location box.<br />
The Performance Point boxes are only filled in when the Capacity Spectrum option is<br />
chosen in the Plot Type area.<br />
• If we wanted to include some notes with any printed graphic output, we could type those<br />
notes in the Additional Notes For printed Output edit box.<br />
<strong>SAP2000</strong> <strong>Web</strong> <strong>Tutorial</strong> 1 112
Figure D-7: Pushover Curve For Pushover Load Case PUSH2<br />
7. Suppose we want to change the color of the base shear versus displacement curve from the<br />
default green color to blue. To do this click on the green color box in the Plot Type area to<br />
open the Color dialog box.<br />
8. In this dialog box:<br />
• Click on one of the blue colored boxes.<br />
• Click the OK button to change the color.<br />
• If necessary, click the Display button to redisplay the plot.<br />
9. To change the curve color back to the default green, click the Reset Default Colors button.<br />
10. Now we will override the axis labels and range. The axis labels and range will appear on the<br />
screen and on any graphic output. Click the Override Axis Labels/Range button. The<br />
Override Axis Labels and Range dialog box appears.<br />
<strong>SAP2000</strong> <strong>Web</strong> <strong>Tutorial</strong> 1 113
11. In this dialog box:<br />
• In the Horizontal Range area type 2 in the Max edit box.<br />
• In the Axis Labels area type Control Joint Displacement in the Horizontal edit box.<br />
• In the Axis Labels area type Resultant Base Shear in the Vertical edit box.<br />
• Click the OK button to change the axis labels and range.<br />
12. Now we will reset the default axis labels and range. Click the Override Axis Labels/Range<br />
button. The Override Axis Labels and Range dialog box appears.<br />
13. In this dialog box:<br />
• Click the Reset Defaults button.<br />
• Click the OK button.<br />
14. Select PUSH3 from the Static Pushover Case drop-down box. The plot changes to that for<br />
PUSH3. Recall that PUSH3 is the uniform acceleration in the X-direction.<br />
Note: If at any time you want to check and see the definition of a pushover load case click<br />
the Done button to close the Pushover Curve dialog box. Then, from the Define menu<br />
select Static Pushover Cases..., and when the Define Static Pushover Cases dialog box<br />
appears, select the pushover case you are interested in, and click the Modify/Show<br />
Pushover button.<br />
15. Review the base shear versus control displacement curves for the other pushover load cases.<br />
16 Select PUSH2 from the Static Pushover Case drop-down box.<br />
17. Select the Capacity Spectrum option in the Plot Type area. As shown in Figure D-8, the plot<br />
changes and the Demand Spectrum area and the Damping Parameters area are now active.<br />
Note: When the capacity spectrum option is chosen, the pushover curve is displayed in<br />
ADRS (Acceleration-Displacement Response Spectrum) format. Refer to ATC-40 for a<br />
discussion of this format which is essentially a plot of spectral acceleration versus<br />
spectral displacement. In <strong>SAP2000</strong>, the force-displacement pushover curve is converted<br />
to the ADRS format by converting the resultant base shear to a spectral acceleration , Sa,<br />
and the control displacement in the control direction to a spectral displacement, Sd,<br />
generally based on equations 8-1 thru 8-4 in ATC-40.<br />
<strong>SAP2000</strong> <strong>Web</strong> <strong>Tutorial</strong> 1 114
Figure D-8: Capacity spectrum For Pushover Load Case PUSH2<br />
18. In the Demand Spectrum area note the following:<br />
• The Seismic Coefficient Ca and the Seismic Coefficient Cv both default to 0.4. Each of<br />
these values can be changed by typing a new value the appropriate edit box. These<br />
values control the shape of the 5% damped spectrum. Refer to ATC-40, Chapter 4, for a<br />
discussion of, and appropriate values for, Ca and Cv.<br />
• The Show Family of Demand Spectra check box is checked indicating that the family of<br />
demand spectra, with up to four different damping ratios, is shown on the plot. The color<br />
box adjacent to the Show Family of Demand Spectra check box is red (by default)<br />
indicating that the family of demand spectra is shown in red. You can change the color<br />
by clicking on the color box.<br />
• There are four edit boxes labeled Damping Ratios. The numbers entered in these boxes<br />
are 0.05, 0.1, 0.15 and 0.2. These are the default damping ratios for the family of demand<br />
spectra. You can change any of these values by typing a new value in the appropriate<br />
edit box. The damping values do not have to be input in order. If you leave a Damping<br />
Ratio box blank, or enter a zero (0), then that curve will not be plotted.<br />
<strong>SAP2000</strong> <strong>Web</strong> <strong>Tutorial</strong> 1 115
Note: The damping ratios must be between 0 and 1. A value of 5% of critical<br />
damping should be entered as 0.05, not 5.<br />
• The Show Single Demand Spectrum (Variable Damping) check box is checked indicating<br />
that the single demand spectrum is shown on the plot. The color box adjacent to the<br />
Show Family of Demand Spectra check box is yellow (by default) indicating that the<br />
single demand spectrum is shown in yellow. You can change the color by clicking on the<br />
color box.<br />
Note: The single demand spectrum (variable damping) curve is constructed by doing<br />
the following for each point on the ADRS pushover curve:<br />
1. Draw a radial line<br />
through the point<br />
on the ADRS<br />
pushover curve.<br />
This is a line of<br />
constant period.<br />
2. Calculate the<br />
damping<br />
associated with the<br />
point on the curve<br />
based on the area<br />
under the curve up<br />
to that point.<br />
Sa<br />
Sd<br />
Radial line has constant period<br />
Point on single demand spectrum<br />
(variable damping) associated with<br />
arbitrary point on pushover curve<br />
Pushover curve<br />
Demand spectrum plotted at same<br />
damping level as associated with<br />
arbitrary point on pushover curve<br />
Arbitrary point on pushover curve<br />
Damping based on area under pushover<br />
curve up to arbitrary point<br />
3. Construct the demand spectrum, plotting it for the same damping level as<br />
associated with the point on the pushover curve.<br />
4. The intersection point of the radial line and the associated demand<br />
spectrum represents a point on the Single Demand Spectrum (Variable<br />
Damping) curve.<br />
This method is similar to the method called Procedure B in Chapter 8 of ATC-40<br />
except it does not make the simplifying assumption that the post yield stiffness<br />
remains constant. It is essentially the method referred to as “exact” in the<br />
discussion of the method called Procedure C in Chapter 8 of ATC-40.<br />
• The Show Constant period Lines At check box is checked indicating that up to four<br />
different constant period lines are shown on the plot. The color box adjacent to the Show<br />
Constant period Lines At check box is gray (by default) indicating that the constant<br />
period lines are shown in gray. You can change the color by clicking on the color box.<br />
<strong>SAP2000</strong> <strong>Web</strong> <strong>Tutorial</strong> 1 116
Note: In the ADRS format, lines of constant period show up as straight lines<br />
radiating from the origin.<br />
• There are four edit boxes associated with the Show Constant period Lines At check box.<br />
The numbers entered in these boxes are 0.5, 1, 1.5 and 2. These are the default periods<br />
for the lines of constant period. You can change any of these values by typing a new<br />
value in the appropriate edit box. The periods do not have to be input in order. If you<br />
leave a Period box blank, or enter a zero (0), then that line will not be plotted.<br />
19. In the Damping Parameters area note the following:<br />
• The Inherent + Additional Damping box defaults to 0.05. This value can be changed by<br />
typing a new value in the edit box.<br />
Note: To help you understand what value to input in the Inherent + Additional<br />
Damping box, refer to ATC-40 equation 8-8. The β 0 term in this equation is<br />
automatically included by the <strong>SAP2000</strong> analysis method. The 5% inherent viscous<br />
damping term can be specified in the Inherent/Additional Damping edit box as<br />
0.05. If there is additional viscous damping provided in the structure, perhaps by<br />
viscous dampers that are not specifically included in the model, then this damping<br />
should also be included in the Inherent/Additional Damping edit box. Thus if the<br />
damping inherent in the structure is assumed to be 5% of critical damping, and<br />
dampers which provide an additional 7% of critical damping are assumed to be<br />
added to the structure (although they are not actually in the model), then the<br />
value input in the Inherent/Additional Damping edit box should be 0.12, since<br />
0.05 + 0.07 = 0.12.<br />
If dampers modeled with NLLink elements are included in the model, then for the<br />
pushover analysis, the program treats them as linear elements. Their stiffness is<br />
based on the linear effective stiffness (KE) and the damping is based on the linear<br />
effective damping coefficient (CE). The program uses the linear effective<br />
damping coefficient for the damper, together with the effective period to calculate<br />
damping which is internally added to the specified Inherent/Additional Damping<br />
term.<br />
• There are four Structural Behavior Type options: A, B, C and User. Structural Behavior<br />
type B, which should be currently selected, is the default. Structural Behavior Types A,<br />
B and C, which define a kappa (κ) factor that reduces the assumed damping, are taken<br />
directly from ATC-40. The User option allows input of other values of kappa (κ).<br />
Note: Refer to ATC-40 Section 8.2.2.1.1 for a discussion of structural behavior types.<br />
The structural behavior type is used to specify a kappa (κ) factor (see Figure 8-15<br />
in ATC-40) that modifies (reduces) the calculated area of the hysteresis loops to<br />
account for assumed pinching of the loops.<br />
<strong>SAP2000</strong> <strong>Web</strong> <strong>Tutorial</strong> 1 117
20. The performance point in Sa, Sd coordinates is shown in the Performance Point (Sa, Sd) box<br />
below the plot. The units for Sa are always g; the current units for Sd are feet. Note you<br />
could also estimate the value of the performance point by holding the mouse pointer over the<br />
performance point (intersection of the ADRS pushover curve and the single demand<br />
spectrum (variable damping)) and reading the value in the Cursor Location box.<br />
Note: The location of the mouse pointer is specified in the Cursor Location box as<br />
(Horizontal axis location, Vertical Axis location). Thus when looking at the<br />
Performance Point using the mouse pointer, you will read (Sd, Sa), which is<br />
switched from how it is specified in the Performance Point (Sa, Sd) box.<br />
21. In the Demand Spectrum area, type .6 into the Seismic Coefficient Cv edit box. Click the<br />
mouse somewhere on the pushover curve dialog box outside of the Seismic Coefficient Cv<br />
edit box to enter the change. Note how both the plot and the Performance Point information<br />
below the plot change. Note that the performance point in Sa, Sd coordinates changes.<br />
22. Type .4 into the Seismic Coefficient Cv edit box. Click the mouse on the plot to enter the<br />
change.<br />
23. Uncheck the Show Family of Demand Spectra box. The family of demand spectra are<br />
removed from the plot.<br />
24. Check the Show Family of Demand Spectra box to show the family of demand spectra again.<br />
25. In the Damping Ratios edit boxes, type .3 in the last box. Click the mouse on the plot to<br />
enter the change. Note that the lowest demand spectra got even lower when we increased the<br />
damping ratio from 0.2 to 0.3.<br />
26. Type .2 in the last Damping Ratios edit box and click the mouse on the plot to return the<br />
form to its original state.<br />
27. In the Damping Ratios edit boxes, delete the value in the second edit box and click the mouse<br />
on the plot to enter the change. Note that only three demand spectra now appear on the plot,<br />
one with 5% damping, one with 15% damping and one with 20% damping.<br />
28. Type .1 in the second Damping Ratios edit box and click the mouse on the plot to return the<br />
form to its original state.<br />
29. Uncheck the Show Single Demand Spectrum (Variable Damping) box. The single demand<br />
spectrum is removed from the plot.<br />
30. Check the Show Single Demand Spectrum (Variable Damping) box to show the single<br />
demand spectrum again.<br />
31. Uncheck the Show Constant Period Lines At box. The constant period lines are removed<br />
from the plot.<br />
<strong>SAP2000</strong> <strong>Web</strong> <strong>Tutorial</strong> 1 118
32. Check the Show Constant Period Lines At box to show the period lines again.<br />
33. In the fourth (and last) edit box below the Show Constant Period Lines At check box, type 3.<br />
Click the mouse on the plot to enter the change. Note that the last period line became flatter.<br />
34. Type 2 in the fourth edit box below the Show Constant Period Lines At check box and click<br />
the mouse on the plot to return the form to its original state.<br />
35. In the Damping Parameters area, type .2 in the Inherent + Additional Damping edit box.<br />
Click the mouse on the plot to enter the change. The relative location of the single demand<br />
spectrum (variable damping) curve changes and the performance point location changes.<br />
36. Type 0.05 in the Inherent + Additional Damping edit box and click the mouse on the plot to<br />
return the form to its original state.<br />
37. In the Damping Parameters area, click the Structural Behavior Type A option and observe<br />
the change in the relative location of the single demand spectrum (variable damping) curve<br />
and the performance point.<br />
38. Click the Structural Behavior Type C option again observing the change in the relative<br />
location of the single demand spectrum (variable damping) curve and the performance point.<br />
39. Click the Structural Behavior Type - User option, and note that the adjacent Modify/Show<br />
button becomes available. Click the Modify/Show button to display the Override Structural<br />
Behavior Type dialog box.<br />
40. In this dialog box:<br />
• In the Point 1 area type 20 in the Beta<br />
Sub Zero edit box and type .6 in the<br />
Kappa Factor edit box.<br />
• In the Point 2 area type 45 in the Beta<br />
Sub Zero edit box and type .6 in the<br />
Kappa Factor edit box.<br />
Kappa Factor, κ<br />
First segment<br />
Point 1<br />
Second segment<br />
Point 2<br />
Refer to ATC-40<br />
Section 8.2.2.1.1<br />
and Figure 8-15<br />
Third segment<br />
• Click the OK button and observe the<br />
BetaSubZero, β 0<br />
change in the relative location of the<br />
single demand spectrum (variable damping) curve and the performance point.<br />
41. Click the Structural Behavior Type B option to return the form to its original state.<br />
42. From the File menu at the top of the Pushover Curve dialog box select Display Tables. A<br />
table similar to that shown in Figure D-9 appears.<br />
<strong>SAP2000</strong> <strong>Web</strong> <strong>Tutorial</strong> 1 119
43. In this table note the following:<br />
Figure D-9: Table For Capacity Spectrum<br />
• Step identifies the step number in the pushover curve.<br />
• Teff is the effective period at the associated step.<br />
• βeff is the effective damping at the associated step.<br />
• Sd(C) and Sa(C) define a point on the ADRS capacity curve for the associated step.<br />
• Sd(D) and Sa(D) define a point on the single demand spectrum (variable damping) curve<br />
for the associated step.<br />
• Alpha is the factor used in converting the base shear to spectral acceleration at the<br />
associated step.<br />
• PF*φ is the factor used in converting the displacement to spectral displacement at the<br />
associated step.<br />
• To print this table, click on the File menu at the top of the table and select either Print<br />
Tables, to print to a printer, or Print Tables To File..., to print the table to a file.<br />
44. Click the “X” in the upper right-hand corner of the table to close it.<br />
45. Select the Base Shear vs Control Displacement option in the Plot Type area.<br />
<strong>SAP2000</strong> <strong>Web</strong> <strong>Tutorial</strong> 1 120
46. From the File menu at the top of the Pushover Curve dialog box select Display Tables. A<br />
table similar to that shown in Figure D-10 appears.<br />
47. In this table note the following:<br />
Figure D-10: Table For Pushover Curve<br />
• Step identifies the step number in the pushover curve.<br />
• Displacement and Base Shear define a point on<br />
the pushover curve for the associated step.<br />
B<br />
C<br />
• A-B, B-IO, IO-LS, LS-CP, CP-C, C-D, D-E, >E<br />
all identify the total number of hinges within<br />
each of these ranges on their associated forcedisplacement<br />
curves.<br />
Force<br />
IO<br />
LS<br />
CP<br />
D<br />
E<br />
• TOTAL is the total number of pushover hinges<br />
in the structure.<br />
A<br />
Displacement<br />
• To print this table, click on the File menu at the top of the table and select either Print<br />
Tables, to print to a printer, or Print Tables To File..., to print the table to a file.<br />
48. You can also print graphic plots of the pushover curve and/or capacity spectrum curve as<br />
follows:<br />
<strong>SAP2000</strong> <strong>Web</strong> <strong>Tutorial</strong> 1 121
• Set up the plot on the screen (either in Base Shear vs Control Displacement, or in<br />
Capacity Spectrum format) as you want to print it.<br />
• If you want to change the axis labels or the axis range, click the Override Axis<br />
Labels/Range button and make the desired changes.<br />
• If you want to have additional notes printed on the graphics plot, type those notes in the<br />
Additional Notes For Printed Output edit box.<br />
• To print the graphics, select Print Graphics from the File menu at the top of the<br />
Pushover Curve dialog box.<br />
Note: Another technique that can be used is to create a screen plot of the entire<br />
dialog box which you can then print from another program such as Paint,<br />
Microsoft Word for Windows, or any other program that supports graphics.<br />
To create the screen plot, press the Alt and Print Screen keys on your keyboard.<br />
This will send a copy of the active window to the clipboard. (Note that if you just<br />
press the Print Screen key, without the Alt key, you will send a picture of the<br />
entire screen to the clipboard.) Open your other program that supports graphics<br />
and paste the picture into that program. Usually the command to paste the<br />
picture is called Paste, and it can be found on a menu called Edit. Once you have<br />
pasted the picture into a file created in your program that supports graphics, you<br />
can print from there.<br />
49. Click the “X” in the upper right-hand corner of the table to close it.<br />
50. Click the Done button to close the Pushover Curve dialog box.<br />
This completes the review of displaying the pushover and capacity spectrum curves.<br />
<strong>SAP2000</strong> <strong>Web</strong> <strong>Tutorial</strong> 1 122
E. Final Comments<br />
This tutorial, together with the <strong>SAP2000</strong> online help provides extensive documentation of all of<br />
the pushover analysis features available in <strong>SAP2000</strong>. It is intended that you can use this tutorial<br />
as a continuing reference for <strong>SAP2000</strong> pushover analyses.<br />
As previously noted, you can obtain context-sensitive online help from within any pushover<br />
dialog box by pressing the F1 key while that dialog box is open. The names of each of the basic<br />
pushover analysis topics covered in the online help are listed below.<br />
• Nonlinear Static Pushover Analysis<br />
• Define Frame Hinge Properties<br />
• Frame Hinge Property Data<br />
• Frame Hinge Property Data For XXX<br />
• Frame Hinge Interaction Surface<br />
• Interaction Surface Definition<br />
• Define Static Pushover Cases<br />
• Static Pushover Case Data<br />
• Assign Frame Hinges (Pushover)<br />
• Pushover Curve<br />
• Override Axis Labels And Range<br />
• Override Structural Behavior Type<br />
The Nonlinear Static Pushover Analysis topic gives an overview of the <strong>SAP2000</strong> pushover<br />
analysis capabilities. The other topics provide context-sensitive help for dialog boxes of the<br />
same name.<br />
Finally, it is emphasized that the <strong>SAP2000</strong> documentation for the pushover is not intended to,<br />
and does not, document the pushover analysis method, but rather is intended to document the<br />
pushover analysis capabilities of <strong>SAP2000</strong>. For information regarding the pushover analysis<br />
method you should refer to the ATC-40 and FEMA-273 documents which are referenced below.<br />
ATC, 1996<br />
Seismic Evaluation and Retrofit of Concrete Buildings, Volume 1, ATC-40 Report, Applied<br />
Technology Council, Redwood City, California.<br />
FEMA, 1997<br />
NEHRP Guidelines for the Seismic Rehabilitation of Buildings, Developed by the Building<br />
Seismic Safety Council for the Federal Emergency Management Agency (Report No. FEMA<br />
273), Washington, D.C.<br />
<strong>SAP2000</strong> <strong>Web</strong> <strong>Tutorial</strong> 1 123


