

Indoor/Outdoor RECHARGEABLE LAMP
Indoor/Outdoor RECHARGEABLE LAMP
Indoor/Outdoor RECHARGEABLE LAMP

You also want an ePaper? Increase the reach of your titles
YUMPU automatically turns print PDFs into web optimized ePapers that Google loves.
VEC1376RL_Manual_030405 3/4/05 6:11 PM Page 2<br />
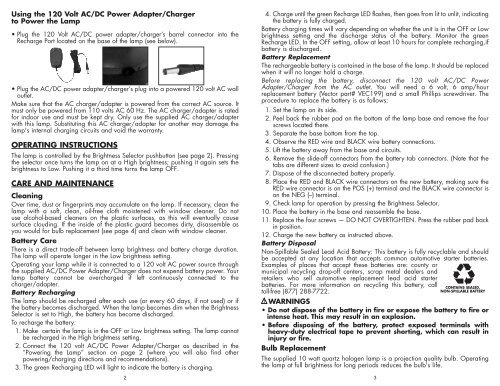
Using the 120 Volt AC/DC Power Adapter/Charger<br />
to Power the Lamp<br />
•Plug the 120 Volt AC/DC power adapter/charger’s barrel connector into the<br />
Recharge Port located on the base of the lamp (see below).<br />
• Plug the AC/DC power adapter/charger’s plug into a powered 120 volt AC wall<br />
outlet.<br />
Make sure that the AC charger/adapter is powered from the correct AC source. It<br />
must only be powered from 110 volts AC 60 Hz. The AC charger/adapter is rated<br />
for indoor use and must be kept dry. Only use the supplied AC charger/adapter<br />
with this lamp. Substituting this AC charger/adapter for another may damage the<br />
lamp's internal charging circuits and void the warranty.<br />
OPERATING INSTRUCTIONS<br />
The lamp is controlled by the Brightness Selector pushbutton (see page 2). Pressing<br />
the selector once turns the lamp on at a High brightness; pushing it again sets the<br />
brightness to Low. Pushing it a third time turns the lamp OFF.<br />
CARE AND MAINTENANCE<br />
Cleaning<br />
Over time, dust or fingerprints may accumulate on the lamp. If necessary, clean the<br />
lamp with a soft, clean, oil-free cloth moistened with window cleaner. Do not<br />
use alcohol-based cleaners on the plastic surfaces, as this will eventually cause<br />
surface clouding. If the inside of the plastic guard becomes dirty, disassemble as<br />
you would for bulb replacement (see page 4) and clean with window cleaner.<br />
Battery Care<br />
There is a direct trade-off between lamp brightness and battery charge duration.<br />
The lamp will operate longer in the Low brightness setting.<br />
Operating your lamp while it is connected to a 120 volt AC power source through<br />
the supplied AC/DC Power Adapter/Charger does not expend battery power. Your<br />
lamp battery cannot be overcharged if left continuously connected to the<br />
charger/adapter.<br />
Battery Recharging<br />
The lamp should be recharged after each use (or every 60 days, if not used) or if<br />
the battery becomes discharged. When the lamp becomes dim when the Brightness<br />
Selector is set to High, the battery has become discharged.<br />
To recharge the battery:<br />
1. Make certain the lamp is in the OFF or Low brightness setting. The lamp cannot<br />
be recharged in the High brightness setting.<br />
2. Connect the 120 volt AC/DC Power Adapter/Charger as described in the<br />
“Powering the Lamp” section on page 2 (where you will also find other<br />
powering/charging directions and recommendations).<br />
3. The green Recharging LED will light to indicate the battery is charging.<br />
2<br />
4. Charge until the green Recharge LED flashes, then goes from lit to unlit, indicating<br />
the battery is fully charged.<br />
Battery charging times will vary depending on whether the unit is in the OFF or Low<br />
brightness setting and the discharge status of the battery. Monitor the green<br />
Recharge LED. In the OFF setting, allow at least 10 hours for complete recharging,if<br />
battery is discharged.<br />
Battery Replacement<br />
The rechargeable battery is contained in the base of the lamp. It should be replaced<br />
when it will no longer hold a charge.<br />
Before replacing the battery, disconnect the 120 volt AC/DC Power<br />
Adapter/Charger from the AC outlet. You will need a 6 volt, 6 amp/hour<br />
replacement battery (Vector part# VEC199) and a small Phillips screwdriver. The<br />
procedure to replace the battery is as follows:<br />
1. Set the lamp on its side.<br />
2. Peel back the rubber pad on the bottom of the lamp base and remove the four<br />
screws located there.<br />
3. Separate the base bottom from the top.<br />
4. Observe the RED wire and BLACK wire battery connections.<br />
5. Lift the battery away from the base and circuits.<br />
6. Remove the slide-off connectors from the battery tab connectors. (Note that the<br />
tabs are different sizes to avoid confusion.)<br />
7. Dispose of the disconnected battery properly.<br />
8. Place the RED and BLACK wire connectors on the new battery, making sure the<br />
RED wire connector is on the POS (+) terminal and the BLACK wire connector is<br />
on the NEG (–) terminal.<br />
9. Check lamp for operation by pressing the Brightness Selector.<br />
10. Place the battery in the base and reassemble the base.<br />
11. Replace the four screws — DO NOT OVERTIGHTEN. Press the rubber pad back<br />
in position.<br />
12. Charge the new battery as instructed above.<br />
Battery Disposal<br />
Non-Spillable Sealed Lead Acid Battery: This battery is fully recyclable and should<br />
be accepted at any location that accepts common automotive starter batteries.<br />
Examples of places that accept these batteries are: county or<br />
municipal recycling drop-off centers, scrap metal dealers and<br />
retailers who sell automotive replacement lead acid starter<br />
batteries. For more information on recycling this battery, call<br />
toll-free (877) 288-7722.<br />
WARNINGS<br />
• Do not dispose of the battery in fire or expose the battery to fire or<br />
intense heat. This may result in an explosion.<br />
• Before disposing of the battery, protect exposed terminals with<br />
heavy-duty electrical tape to prevent shorting, which can result in<br />
injury or fire.<br />
Bulb Replacement<br />
The supplied 10 watt quartz halogen lamp is a projection quality bulb. Operating<br />
the lamp at full brightness for long periods reduces the bulb's life.<br />
3<br />
CONTAINS SEALED,<br />
NON-SPILLABLE BATTERY


