

Double Insulated Portable Electric Drills Instruction manual
Double Insulated Portable Electric Drills Instruction manual
Double Insulated Portable Electric Drills Instruction manual

You also want an ePaper? Increase the reach of your titles
YUMPU automatically turns print PDFs into web optimized ePapers that Google loves.
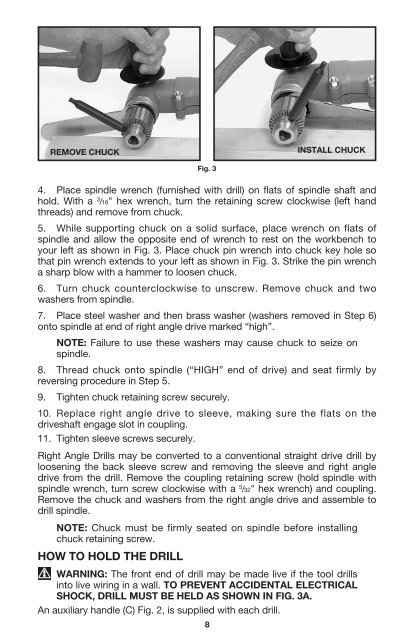
REMOVE CHUCK<br />
INSTALL CHUCK<br />
Fig. 3<br />
4. Place spindle wrench (furnished with drill) on flats of spindle shaft and<br />
hold. With a 3 /16" hex wrench, turn the retaining screw clockwise (left hand<br />
threads) and remove from chuck.<br />
5. While supporting chuck on a solid surface, place wrench on flats of<br />
spindle and allow the opposite end of wrench to rest on the workbench to<br />
your left as shown in Fig. 3. Place chuck pin wrench into chuck key hole so<br />
that pin wrench extends to your left as shown in Fig. 3. Strike the pin wrench<br />
a sharp blow with a hammer to loosen chuck.<br />
6. Turn chuck counterclockwise to unscrew. Remove chuck and two<br />
washers from spindle.<br />
7. Place steel washer and then brass washer (washers removed in Step 6)<br />
onto spindle at end of right angle drive marked “high”.<br />
NOTE: Failure to use these washers may cause chuck to seize on<br />
spindle.<br />
8. Thread chuck onto spindle (“HIGH” end of drive) and seat firmly by<br />
reversing procedure in Step 5.<br />
9. Tighten chuck retaining screw securely.<br />
10. Replace right angle drive to sleeve, making sure the flats on the<br />
driveshaft engage slot in coupling.<br />
11. Tighten sleeve screws securely.<br />
Right Angle <strong>Drills</strong> may be converted to a conventional straight drive drill by<br />
loosening the back sleeve screw and removing the sleeve and right angle<br />
drive from the drill. Remove the coupling retaining screw (hold spindle with<br />
spindle wrench, turn screw clockwise with a 5 /32" hex wrench) and coupling.<br />
Remove the chuck and washers from the right angle drive and assemble to<br />
drill spindle.<br />
NOTE: Chuck must be firmly seated on spindle before installing<br />
chuck retaining screw.<br />
HOW TO HOLD THE DRILL<br />
WARNING: The front end of drill may be made live if the tool drills<br />
into live wiring in a wall. TO PREVENT ACCIDENTAL ELECTRICAL<br />
SHOCK, DRILL MUST BE HELD AS SHOWN IN FIG. 3A.<br />
An auxiliary handle (C) Fig. 2, is supplied with each drill.<br />
8


