ICE 5500 Plus Installation Guide
ICE 5500 Plus Installation Guide
ICE 5500 Plus Installation Guide

Create successful ePaper yourself
Turn your PDF publications into a flip-book with our unique Google optimized e-Paper software.
<strong>ICE</strong> <strong>5500</strong><strong>Plus</strong> Terminal<br />
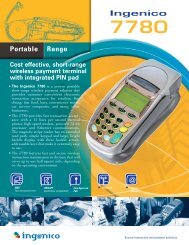
The Hypercom ® epic (ePOS-infocommerce) <strong>ICE</strong> <strong>5500</strong><strong>Plus</strong> combines the flexibility of a full<br />
featured, smart-card ready (HyperSmart) integrated POS terminal with the infrastructure to quickly<br />
and cost-effectively integrate new applications. This combination makes <strong>ICE</strong> (Interactive Consumer<br />
Enviroment) the simplest and most innovative POS solution available today. The <strong>ICE</strong> <strong>5500</strong><strong>Plus</strong><br />
incorporates the new integrated modem technology, Hypercom FastPOS. Operating at 9600 bps,<br />
FastPOS allows for lower transaction costs, new data-rich applications such as signature capture, and<br />
faster transactions.<br />
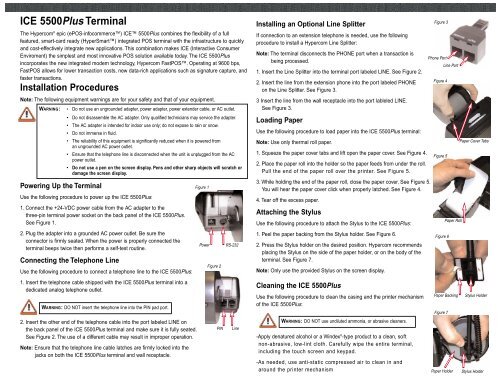
<strong>Installation</strong> Procedures<br />
Note: The following equipment warnings are for your safety and that of your equipment.<br />
WARNING: • Do not use an ungrounded adapter, power adapter, power extender cable, or AC outlet.<br />
Powering Up the Terminal<br />
• Do not disassemble the AC adapter. Only qualified technicians may service the adapter.<br />
• The AC adapter is intended for indoor use only; do not expose to rain or snow.<br />
• Do not immerse in fluid.<br />
• The reliability of this equipment is significantly reduced when it is powered from<br />
an ungrounded AC power outlet.<br />
• Ensure that the telephone line is disconnected when the unit is unplugged from the AC<br />
power outlet.<br />
• Do not use a pen on the screen display. Pens and other sharp objects will scratch or<br />
damage the screen display.<br />
Use the following procedure to power up the <strong>ICE</strong> <strong>5500</strong><strong>Plus</strong>:<br />
1. Connect the +24-VDC power cable from the AC adapter to the<br />
three-pin terminal power socket on the back panel of the <strong>ICE</strong> <strong>5500</strong><strong>Plus</strong>.<br />
See Figure 1.<br />
2. Plug the adapter into a grounded AC power outlet. Be sure the<br />
connector is firmly seated. When the power is properly connected the<br />
terminal beeps twice then performs a self-test routine.<br />
Connecting the Telephone Line<br />
Use the following procedure to connect a telephone line to the <strong>ICE</strong> <strong>5500</strong><strong>Plus</strong>:<br />
1. Insert the telephone cable shipped with the <strong>ICE</strong> <strong>5500</strong><strong>Plus</strong> terminal into a<br />
dedicated analog telephone outlet.<br />
WARNING: DO NOT insert the telephone line into the PIN pad port.<br />
2. Insert the other end of the telephone cable into the port labeled LINE on<br />
the back panel of the <strong>ICE</strong> <strong>5500</strong><strong>Plus</strong> terminal and make sure it is fully seated.<br />
See Figure 2. The use of a different cable may result in improper operation.<br />
Note: Ensure that the telephone line cable latches are firmly locked into the<br />
jacks on both the <strong>ICE</strong> <strong>5500</strong><strong>Plus</strong> terminal and wall receptacle.<br />
Figure 1<br />
Power<br />
Figure 2<br />
PIN<br />
RS-232<br />
Line<br />
Installing an Optional Line Splitter<br />
If connection to an extension telephone is needed, use the following<br />
procedure to install a Hypercom Line Splitter:<br />
Note: The terminal disconnects the PHONE port when a transaction is<br />
being processed.<br />
1. Insert the Line Splitter into the terminal port labeled LINE. See Figure 2.<br />
2. Insert the line from the extension phone into the port labeled PHONE<br />
on the Line Splitter. See Figure 3.<br />
3 Insert the line from the wall receptacle into the port lableled LINE.<br />
See Figure 3.<br />
Loading Paper<br />
Use the following procedure to load paper into the <strong>ICE</strong> <strong>5500</strong><strong>Plus</strong> terminal:<br />
Note: Use only thermal roll paper.<br />
1. Squeeze the paper cover tabs and lift open the paper cover. See Figure 4.<br />
2. Place the paper roll into the holder so the paper feeds from under the roll.<br />
Pull the end of the paper roll over the printer. See Figure 5.<br />
3. While holding the end of the paper roll, close the paper cover. See Figure 5.<br />
You will hear the paper cover click when properly latched. See Figure 4.<br />
4. Tear off the excess paper.<br />
Attaching the Stylus<br />
Use the following procedure to attach the Stylus to the <strong>ICE</strong> <strong>5500</strong><strong>Plus</strong>:<br />
1. Peel the paper backing from the Stylus holder. See Figure 6.<br />
2. Press the Stylus holder on the desired position. Hypercom recommends<br />
placing the Stylus on the side of the paper holder, or on the body of the<br />
terminal. See Figure 7.<br />
Note: Only use the provided Stylus on the screen display.<br />
Cleaning the <strong>ICE</strong> <strong>5500</strong><strong>Plus</strong><br />
Use the following procedure to clean the casing and the printer mechanism<br />
of the <strong>ICE</strong> <strong>5500</strong><strong>Plus</strong>:<br />
WARNING: DO NOT use undiluted ammonia, or abrasive cleaners.<br />
-Apply denatured alcohol or a Windex ® -type product to a clean, soft<br />
non-abrasive, low-lint cloth. Carefully wipe the entire terminal,<br />
including the touch screen and keypad.<br />
-As needed, use anti-static compressed air to clean in and<br />
around the printer mechanism<br />
Figure 3<br />
Phone Port<br />
Figure 4<br />
Figure 5<br />
Figure 6<br />
Paper Roll<br />
Paper Backing<br />
Figure 7<br />
Line Port<br />
Paper Holder<br />
Paper Cover Tabs<br />
Stylus Holder<br />
Stylus Holder
Using a Credit Card<br />
A credit card can be swiped bi-directionally (either toward or away from you):<br />
1. When holding the card, make sure the magnetic stripe is toward the body of the terminal<br />
(toward your left and down).<br />
2. Slide the card in the long slot on the right-side of the terminal, starting on either end, in one<br />
smooth stroke. See Figure 8.<br />
3. Follow standard operating procedures to complete the transaction.<br />
See the <strong>ICE</strong> <strong>5500</strong><strong>Plus</strong> HyperWare Retail and Restaurant Software<br />
Manual for more information or contact your bank or processor.<br />
Figure 8<br />
<strong>ICE</strong> <strong>5500</strong><strong>Plus</strong><br />
TERMINAL<br />
INSTALLATION<br />
GUIDE<br />
Using a Smart Card (Optional)<br />
Use the following procedure to insert a Smart Card:<br />
1. When holding the card, make sure the metallic contact is facing<br />
upward and toward the body of the terminal.<br />
2. Insert the card into the Smart Card slot on the right side of the<br />
<strong>ICE</strong> <strong>5500</strong><strong>Plus</strong>. See Figure 8. Remove the Smart Card when the<br />
terminal screen instructs you to do so.<br />
Credit Card Slot<br />
Smart Card Slot<br />
Supply Information<br />
If you are unable to purchase items such as paper through your bank or processor,<br />
contact Merchant Supplies at 800.522.8710.<br />
Compliance<br />
This equipment is compliant with one or more of the following:<br />
• FCC Part 15 (<strong>ICE</strong>S-003)<br />
• FCC Part 68 (CS-03)<br />
• CTR21<br />
• EN55022<br />
• EN55024<br />
• EN60950<br />
• CISPR 22<br />
• AS/NZS 3260<br />
• AS/NZS 3548<br />
Adding Value to Innovation<br />
World Headquarters<br />
2851 West Kathleen Road • Phoenix, AZ 85053<br />
602.504.5000 • 877.HYPERCOM within USA • Fax: 602.504.5166<br />
e-mail: info@hypercom.com • web: www.hypercom.com<br />
© Hypercom Corporation, 2002. Printed in the United States of America.<br />
940318-002 Rev. D 09/02