pdf-Datei - Erkodent
pdf-Datei - Erkodent
pdf-Datei - Erkodent

You also want an ePaper? Increase the reach of your titles
YUMPU automatically turns print PDFs into web optimized ePapers that Google loves.
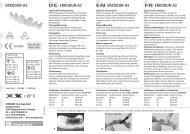
Erki-Technik<br />
Arbeitsmittel<br />
Erki-Set (270 000)<br />
Gummiringe Nachfüllpackung Ø 3,20 mm (270 001)<br />
Gummiringe Nachfüllpackung Ø 4,80 mm (270 002)<br />
Gummiringe Nachfüllpackung Ø 6,35 mm (270 003)<br />
Greif-Pinzette (270 005)<br />
Durchziehnadel (270 007)<br />
Überzugsschläuche (270 008)<br />
Erkis Nachfüllpackung (270 100)<br />
Klebe-Gel (270 504)<br />
Entfetter (270 507)<br />
Schleifstein<br />
Anleitung: Nagelkorrektur<br />
Tipps<br />
Tamponieren des Nagelfalzes.<br />
Nageloberfläche mit Schleifstein glätten.<br />
Während des Klebevorganges nur leicht andrücken.<br />
Während des Klebevorganges nicht verrutschen.<br />
Nagel und Erkis entfetten.<br />
Vor dem Ankleben nicht zu lange warten.<br />
Klebe-Gel reinigen und gut verschliessen.<br />
Alle Zahlen in Klammern sind Bestellnummern.<br />
ERKODENT Service-Telefon +49 (0)74 45/85 01-45<br />
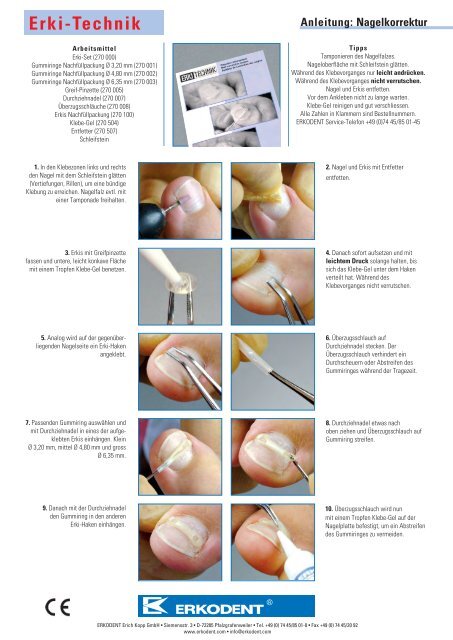
1. In den Klebezonen links und rechts<br />
den Nagel mit dem Schleifstein glätten<br />
(Vertiefungen, Rillen), um eine bündige<br />
Klebung zu erreichen. Nagelfalz evtl. mit<br />
einer Tamponade freihalten.<br />
2. Nagel und Erkis mit Entfetter<br />
entfetten.<br />
3. Erkis mit Greifpinzette<br />
fassen und untere, leicht konkave Fläche<br />
mit einem Tropfen Klebe-Gel benetzen.<br />
4. Danach sofort aufsetzen und mit<br />
leichtem Druck solange halten, bis<br />
sich das Klebe-Gel unter dem Haken<br />
verteilt hat. Während des<br />
Klebevorganges nicht verrutschen.<br />
5. Analog wird auf der gegenüberliegenden<br />
Nagelseite ein Erki-Haken<br />
angeklebt.<br />
6. Überzugsschlauch auf<br />
Durchziehnadel stecken. Der<br />
Überzugsschlauch verhindert ein<br />
Durchscheuern oder Abstreifen des<br />
Gummiringes während der Tragezeit.<br />
7. Passenden Gummiring auswählen und<br />
mit Durchziehnadel in eines der aufgeklebten<br />
Erkis einhängen. Klein<br />
Ø 3,20 mm, mittel Ø 4,80 mm und gross<br />
Ø 6,35 mm.<br />
8. Durchziehnadel etwas nach<br />
oben ziehen und Überzugsschlauch auf<br />
Gummiring streifen.<br />
9. Danach mit der Durchziehnadel<br />
den Gummiring in den anderen<br />
Erki-Haken einhängen.<br />
10. Überzugsschlauch wird nun<br />
mit einem Tropfen Klebe-Gel auf der<br />
Nagelplatte befestigt, um ein Abstreifen<br />
des Gummiringes zu vermeiden.<br />
®<br />
ERKODENT Erich Kopp GmbH • Siemensstr. 3 • D-72285 Pfalzgrafenweiler • Tel. +49 (0) 74 45/85 01-0 • Fax +49 (0) 74 45/20 92<br />
www.erkodent.com • info@erkodent.com
Erki-Technique<br />
Working materials<br />
Erki-Set (270 000)<br />
Rubber rings refill package Ø 3.20 mm (270 001)<br />
Rubber rings refill package Ø 4.80 mm (270 002)<br />
Rubber rings refill package Ø 6.35 mm (270 003)<br />
Special tweezers (270 005)<br />
Crochet needle (270 007)<br />
Protection tubes (270 008)<br />
Erkis refill package (270 100)<br />
Adhesive gel (270 504)<br />
Degreasing agent (270 507)<br />
Abrasive stone<br />
Instructions: nail correction<br />
Hints<br />
Tamponade nail fold.<br />
Smooth nail plate with abrasive stone.<br />
Only press lightly while glue is hardening.<br />
Do not let slip while glue is hardening.<br />
Remove all oil from nail and Erki hooks.<br />
Do not wait too long before applying.<br />
Clean adhesive tube and close tightly.<br />
All numbers in brackets are order numbers.<br />
<strong>Erkodent</strong> service: info@erkodent.com<br />
1. In the adhesive areas left and right<br />
smooth the nail with the abrasive stone<br />
(hollows, grooves) to achieve a flat fullsurface<br />
adhesion. Pack nail folds by<br />
tamponing if necessary.<br />
2. Remove oil from nail and Erkis with<br />
degreasing agent.<br />
3. Hold Erkis with tweezers and apply<br />
one drop of adhesive to the lower,<br />
lightly concave surface.<br />
4. Then immediately put on and hold<br />
with light pressure until the adhesive<br />
gel is well dispensed under the hook. Do<br />
not let slip while the adhesive is drying.<br />
5. In a similar way an Erki hook is glued<br />
onto the opposite side of the nail.<br />
6. Put the protection tube onto the<br />
needle. The protection tube prevents the<br />
rubber ring from being worn through or<br />
slid off while being worn.<br />
7. Chose the right size of rubber ring<br />
and hang it with the needle on one<br />
of the glued on Erkis. Sizes:<br />
small Ø 3.20 mm, medium Ø 4.80 mm<br />
and large Ø 6.35 mm.<br />
8. Pull the needle a little bit upwards<br />
and put the protection tube onto the<br />
rubber ring.<br />
9. Then use the needle to hang the<br />
rubber ring into the other Erki hook.<br />
ERKODENT Erich Kopp GmbH • Siemensstr. 3 • D-72285 Pfalzgrafenweiler • Phone +49 (0) 74 45/85 01-0 • Fax +49 (0) 74 45/20 92<br />
www.erkodent.com • info@erkodent.com<br />
®<br />
10. Protection tube is now fixed onto<br />
the nail plate with a drop of adhesive<br />
gel to prevent the rubber ring from<br />
sliding off.<br />
Copyright by ERKODENT • Printed in Germany • P-30-0414-02 • STEEB-DRUCK