Installation Instructions (PDF) - Lighting Solutions
Installation Instructions (PDF) - Lighting Solutions
Installation Instructions (PDF) - Lighting Solutions

You also want an ePaper? Increase the reach of your titles
YUMPU automatically turns print PDFs into web optimized ePapers that Google loves.
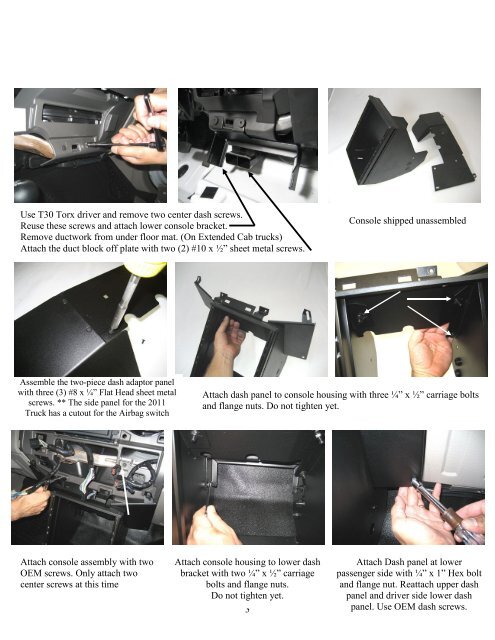
Use T30 Torx driver and remove two center dash screws.<br />
Reuse these screws and attach lower console bracket.<br />
Remove ductwork from under floor mat. (On Extended Cab trucks)<br />
Attach the duct block off plate with two (2) #10 x ½” sheet metal screws.<br />
Console shipped unassembled<br />
Assemble the two-piece dash adaptor panel<br />
with three (3) #8 x ¼” Flat Head sheet metal<br />
screws. ** The side panel for the 2011<br />
Truck has a cutout for the Airbag switch<br />
Attach dash panel to console housing with three ¼” x ½” carriage bolts<br />
and flange nuts. Do not tighten yet.<br />
Do<br />
Attach console assembly with two<br />
OEM screws. Only attach two<br />
center screws at this time<br />
Attach console housing to lower dash<br />
bracket with two ¼” x ½” carriage<br />
bolts and flange nuts.<br />
Do not tighten yet.<br />
3<br />
Attach Dash panel at lower<br />
passenger side with ¼” x 1” Hex bolt<br />
and flange nut. Reattach upper dash<br />
panel and driver side lower dash<br />
panel. C-VS-1100-F250-1_INST_8-10.docx<br />
Use OEM dash screws.