Installation of Snap/Lock Frame Aluminum Porch Panels
Installation of Snap/Lock Frame Aluminum Porch Panels
Installation of Snap/Lock Frame Aluminum Porch Panels

Create successful ePaper yourself
Turn your PDF publications into a flip-book with our unique Google optimized e-Paper software.
<strong>Installation</strong> <strong>of</strong> <strong>Snap</strong>/<strong>Lock</strong> <strong>Frame</strong><br />
<strong>Aluminum</strong> <strong>Porch</strong> <strong>Panels</strong><br />
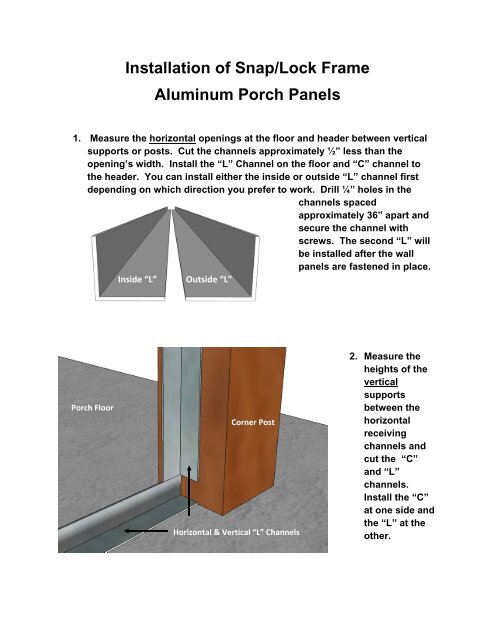
1. Measure the horizontal openings at the floor and header between vertical<br />
supports or posts. Cut the channels approximately ½” less than the<br />
opening’s width. Install the “L” Channel on the floor and “C” channel to<br />
the header. You can install either the inside or outside “L” channel first<br />
depending on which direction you prefer to work. Drill ¼” holes in the<br />
channels spaced<br />
approximately 36” apart and<br />
secure the channel with<br />
screws. The second “L” will<br />
be installed after the wall<br />
panels are fastened in place.<br />
Inside “L” Right “L” Outside “L”<br />
<strong>Porch</strong> Floor<br />
Corner Post<br />
Horizontal & Vertical “L” Channels<br />
2. Measure the<br />
heights <strong>of</strong> the<br />
vertical<br />
supports<br />
between the<br />
horizontal<br />
receiving<br />
channels and<br />
cut the “C”<br />
and “L”<br />
channels.<br />
Install the “C”<br />
at one side and<br />
the “L” at the<br />
other.
st<br />
3. When you have completely installed the perimeter channel, you can now<br />
snap the panels together and set them into the channels. Level the panels<br />
by shimming<br />
them at the<br />
bottom to the<br />
desired height.<br />
Make sure that<br />
the receiving<br />
channels do<br />
not cover the<br />
screen spline<br />
groove. Fasten<br />
the panels with<br />
Zip screws<br />
going through<br />
the channel<br />
and into the<br />
panel. At this time use the screws sparingly, just enough to hold the<br />
panels in place.<br />
4. When all frames are in place, install the second “L” channel which will act<br />
as a trim piece to finish <strong>of</strong>f the installation and hide the space between the<br />
panel and the post, beam or deck.<br />
5. Complete the installation <strong>of</strong> the Zip screws through the channels into the<br />
panels. The panels are shipped with the screening rolled loosely into the<br />
panel to avoid accidental tears. Remove the screen spline at the bottom<br />
and one side, pull the screen tight and replace the spline into the groove<br />
(this can be done prior to installation, if preferred).<br />
RELAX AND ENJOY !<br />
11801 Southwest Highway<br />
Palos Heights, IL 60463<br />
800-966-9261 * 708-931-5120 Fax