Swiftpage Online Editor
Swiftpage Online Editor
Swiftpage Online Editor

You also want an ePaper? Increase the reach of your titles
YUMPU automatically turns print PDFs into web optimized ePapers that Google loves.
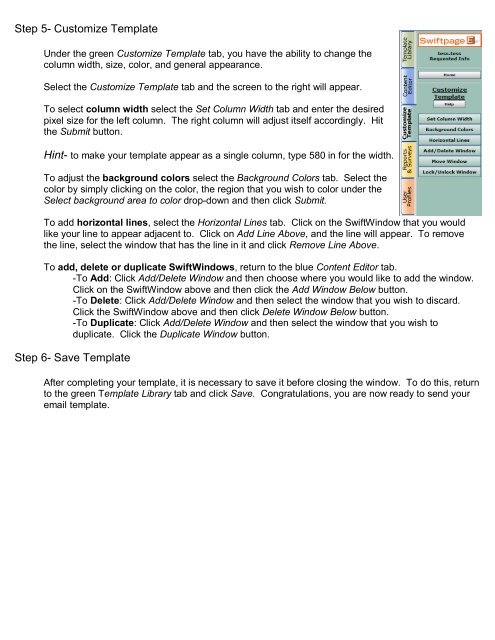
Step 5- Customize Template<br />
Under the green Customize Template tab, you have the ability to change the<br />
column width, size, color, and general appearance.<br />
Select the Customize Template tab and the screen to the right will appear.<br />
To select column width select the Set Column Width tab and enter the desired<br />
pixel size for the left column. The right column will adjust itself accordingly. Hit<br />
the Submit button.<br />
Hint- to make your template appear as a single column, type 580 in for the width.<br />
To adjust the background colors select the Background Colors tab. Select the<br />
color by simply clicking on the color, the region that you wish to color under the<br />
Select background area to color drop-down and then click Submit.<br />
To add horizontal lines, select the Horizontal Lines tab. Click on the SwiftWindow that you would<br />
like your line to appear adjacent to. Click on Add Line Above, and the line will appear. To remove<br />
the line, select the window that has the line in it and click Remove Line Above.<br />
To add, delete or duplicate SwiftWindows, return to the blue Content <strong>Editor</strong> tab.<br />
-To Add: Click Add/Delete Window and then choose where you would like to add the window.<br />
Click on the SwiftWindow above and then click the Add Window Below button.<br />
-To Delete: Click Add/Delete Window and then select the window that you wish to discard.<br />
Click the SwiftWindow above and then click Delete Window Below button.<br />
-To Duplicate: Click Add/Delete Window and then select the window that you wish to<br />
duplicate. Click the Duplicate Window button.<br />
Step 6- Save Template<br />
After completing your template, it is necessary to save it before closing the window. To do this, return<br />
to the green Template Library tab and click Save. Congratulations, you are now ready to send your<br />
email template.