Use Microsoft PowerPoint to Develop an Interactive Story
Use Microsoft PowerPoint to Develop an Interactive Story
Use Microsoft PowerPoint to Develop an Interactive Story

Create successful ePaper yourself
Turn your PDF publications into a flip-book with our unique Google optimized e-Paper software.
<strong>Use</strong> <strong>Microsoft</strong> <strong>PowerPoint</strong> <strong>to</strong> <strong>Develop</strong> <strong>an</strong> <strong>Interactive</strong> S<strong>to</strong>ry<br />
Home > Education Programs > Innovative Teachers > Class Tips Archive<br />
<strong>Use</strong> <strong>Microsoft</strong> <strong>PowerPoint</strong> <strong>to</strong> <strong>Develop</strong> <strong>an</strong> <strong>Interactive</strong> S<strong>to</strong>ry<br />
Updated: April 14, 2004<br />
Curriculum Area: L<strong>an</strong>guage arts/math/social studies/science<br />
Grade Level: 4 <strong>an</strong>d up<br />
Application: <strong>Microsoft</strong> <strong>PowerPoint</strong>® 2000<br />
Tip: <strong>Use</strong> the Outline view <strong>an</strong>d hyperlinks <strong>to</strong> design <strong>an</strong> interactive s<strong>to</strong>ry.<br />
Description: Students design <strong>an</strong> interactive s<strong>to</strong>ry using the Outline view <strong>an</strong>d<br />
hyperlinking features in <strong>PowerPoint</strong>. The goal is <strong>to</strong> let the reader decide which<br />
path <strong>to</strong> take when reading the s<strong>to</strong>ry in a slide show. Students c<strong>an</strong> work in small<br />
groups (or by themselves if they are older) <strong>to</strong> create their interactive s<strong>to</strong>ries.<br />
Students should first design the s<strong>to</strong>ry using a "s<strong>to</strong>ryboard." A s<strong>to</strong>ryboard<br />
contains sketches of all the scenes in a s<strong>to</strong>ry, including all the scenes that<br />
readers might possibly jump <strong>to</strong> while viewing the slide show. Students add<br />
hyperlinks in the form of action but<strong>to</strong>ns <strong>to</strong> each slide so that readers c<strong>an</strong> jump<br />
<strong>to</strong> whichever part of the s<strong>to</strong>ry they choose.<br />
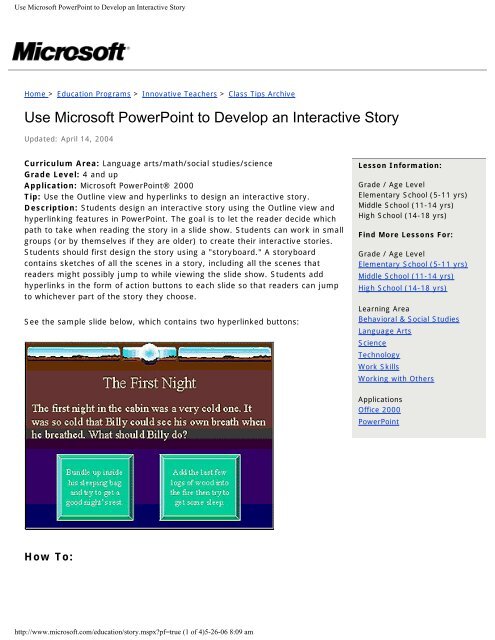
See the sample slide below, which contains two hyperlinked but<strong>to</strong>ns:<br />
Lesson Information:<br />
Grade / Age Level<br />
Elementary School (5-11 yrs)<br />
Middle School (11-14 yrs)<br />
High School (14-18 yrs)<br />
Find More Lessons For:<br />
Grade / Age Level<br />
Elementary School (5-11 yrs)<br />
Middle School (11-14 yrs)<br />
High School (14-18 yrs)<br />
Learning Area<br />
Behavioral & Social Studies<br />
L<strong>an</strong>guage Arts<br />
Science<br />
Technology<br />
Work Skills<br />
Working with Others<br />
Applications<br />
Office 2000<br />
<strong>PowerPoint</strong><br />
How To:<br />
http://www.microsoft.com/education/s<strong>to</strong>ry.mspx?pf=true (1 of 4)5-26-06 8:09 am
<strong>Use</strong> <strong>Microsoft</strong> <strong>PowerPoint</strong> <strong>to</strong> <strong>Develop</strong> <strong>an</strong> <strong>Interactive</strong> S<strong>to</strong>ry<br />
1.First, pl<strong>an</strong> your interactive s<strong>to</strong>ries on paper. A s<strong>to</strong>ryboard (that is, sketches of each page or slide) will help you<br />
keep track of the m<strong>an</strong>y possible scenes in your s<strong>to</strong>ry. Make sure you write down titles for each page because<br />
you'll use those titles when creating the presentation in <strong>PowerPoint</strong>. On your s<strong>to</strong>ryboard, draw lines between<br />
slides—almost like a path—<strong>to</strong> show the choices the reader c<strong>an</strong> make in following the s<strong>to</strong>ry.<br />
2.Start <strong>Microsoft</strong> <strong>PowerPoint</strong>, <strong>an</strong>d select Design Template. In the New Presentation box, choose the design<br />
template that will work best as a backdrop for your s<strong>to</strong>ry.<br />
3.In the New Slide box, choose Title Slide <strong>to</strong> design the layout of the first slide. Type the title of your s<strong>to</strong>ry <strong>an</strong>d<br />
<strong>an</strong>y subtitle (such as the names of the students writing the s<strong>to</strong>ry) on the title slide.<br />
4.Add a new "page" <strong>to</strong> the s<strong>to</strong>ry by clicking the New Slide but<strong>to</strong>n on the <strong>to</strong>olbar. A Bulleted List layout will most<br />
likely work best.<br />
5.Before typing <strong>an</strong>y text on Slide 2, click in the left side of the window, in the outline area. Here you will type all<br />
the titles for each page in your interactive s<strong>to</strong>ry.<br />
•<br />
Type the title for Slide 2 in the outline area, <strong>an</strong>d then press ENTER. Slide 3 will au<strong>to</strong>matically appear, waiting<br />
for the next title <strong>to</strong> be typed. Continue typing each slide's title, remembering <strong>to</strong> press ENTER after each one.<br />
6.Next, add the rest of the words <strong>to</strong> each slide. In the outline area, just click the title of the slide you w<strong>an</strong>t <strong>to</strong><br />
work on, <strong>an</strong>d then type the sentences on the slide that appears on the right.<br />
Tip: If you'd like <strong>to</strong> type sentences rather th<strong>an</strong> bullet points, click the Bullets but<strong>to</strong>n on the <strong>to</strong>olbar. Then<br />
select Ruler on the View menu <strong>to</strong> display the ruler. Drag the H<strong>an</strong>ging Indent marker (the bot<strong>to</strong>m tri<strong>an</strong>gle) back<br />
<strong>to</strong> the left so that the words don't indent when they wrap <strong>to</strong> the next line.<br />
Tip: Be careful not <strong>to</strong> fill up the entire space on a slide; you need <strong>to</strong> save some room for the action but<strong>to</strong>ns.<br />
Keep in mind that you c<strong>an</strong> always select a smaller font size if you need <strong>to</strong> fit a few more words on the page,<br />
but try not <strong>to</strong> make the font <strong>to</strong>o small. You w<strong>an</strong>t <strong>to</strong> make sure the words are easy <strong>to</strong> read during the slide<br />
show.<br />
7.Add some pictures <strong>to</strong> your slides <strong>to</strong> make the s<strong>to</strong>ry more enjoyable <strong>to</strong> look at <strong>an</strong>d read. But remember <strong>to</strong> leave<br />
room for your action but<strong>to</strong>ns.<br />
8.Add the action but<strong>to</strong>ns (hyperlinks) <strong>to</strong> each slide so the reader c<strong>an</strong> select his or her own path when reading the<br />
s<strong>to</strong>ry. To add the hyperlinks:<br />
•<br />
View the slide on which you w<strong>an</strong>t <strong>to</strong> add some hyperlinks, <strong>an</strong>d then select Action But<strong>to</strong>ns from the Slide<br />
Show menu. Click the blue bar above the action but<strong>to</strong>ns, <strong>an</strong>d drag the box off <strong>to</strong> the side of the screen so<br />
you c<strong>an</strong> get <strong>to</strong> the but<strong>to</strong>ns when adding hyperlinks <strong>to</strong> other slides.<br />
•<br />
Click the Cus<strong>to</strong>m action but<strong>to</strong>n (the first bl<strong>an</strong>k but<strong>to</strong>n), <strong>an</strong>d then click <strong>an</strong>d drag a small box on your slide in a<br />
good location for the but<strong>to</strong>n. When you release the mouse, a dialog box appears (see below) that lets you<br />
select where you w<strong>an</strong>t the but<strong>to</strong>n <strong>to</strong> hyperlink <strong>to</strong>. Select Hyperlink <strong>to</strong>. In the drop-down list, select Slide,<br />
<strong>an</strong>d then choose the specific slide you w<strong>an</strong>t the but<strong>to</strong>n <strong>to</strong> link <strong>to</strong>. Click OK twice.<br />
http://www.microsoft.com/education/s<strong>to</strong>ry.mspx?pf=true (2 of 4)5-26-06 8:09 am
<strong>Use</strong> <strong>Microsoft</strong> <strong>PowerPoint</strong> <strong>to</strong> <strong>Develop</strong> <strong>an</strong> <strong>Interactive</strong> S<strong>to</strong>ry<br />
•<br />
Now add words <strong>to</strong> the action but<strong>to</strong>n. Right-click inside the but<strong>to</strong>n, <strong>an</strong>d click Add Text. Type the words that<br />
you w<strong>an</strong>t the but<strong>to</strong>n <strong>to</strong> display, using whatever font <strong>an</strong>d size works best.<br />
Tip: You c<strong>an</strong> wrap words inside the but<strong>to</strong>n. First, double-click the but<strong>to</strong>n, <strong>an</strong>d then on the Text Box tab,<br />
select Word wrap text in Au<strong>to</strong>Shape. Click OK. Resize the but<strong>to</strong>n <strong>to</strong> fit your slide by clicking a corner box <strong>an</strong>d<br />
dragging <strong>to</strong> the appropriate size.<br />
http://www.microsoft.com/education/s<strong>to</strong>ry.mspx?pf=true (3 of 4)5-26-06 8:09 am
<strong>Use</strong> <strong>Microsoft</strong> <strong>PowerPoint</strong> <strong>to</strong> <strong>Develop</strong> <strong>an</strong> <strong>Interactive</strong> S<strong>to</strong>ry<br />
•<br />
To ch<strong>an</strong>ge the color of the but<strong>to</strong>n, double-click it. On the Colors <strong>an</strong>d Lines tab, choose the colors you w<strong>an</strong>t.<br />
9.Try out the new links by viewing the slide show. To do this, on the Slide Show menu, click View Show. Note<br />
that the hyperlinks don't work unless you are viewing a slide show.<br />
10.Add slide tr<strong>an</strong>sitions <strong>to</strong> spice up your slide show. To do this, choose Slide Tr<strong>an</strong>sition from the Slide Show<br />
menu.<br />
11.Save your s<strong>to</strong>ry, <strong>an</strong>d then have some friends in your class try it out. The paths should work each time<br />
someone reads your s<strong>to</strong>ry. Who knows which path each reader will take next time!<br />
Top of page<br />
Additional Tips:<br />
•<br />
You might w<strong>an</strong>t <strong>to</strong> try printing your s<strong>to</strong>ry so that other students c<strong>an</strong> see all of the possible scenes. This is a good<br />
way <strong>to</strong> proofread the s<strong>to</strong>ries <strong>an</strong>d <strong>to</strong> check whether there are <strong>an</strong>y dead ends. Try printing the s<strong>to</strong>ry as h<strong>an</strong>douts.<br />
To do this, on the File menu, click Print. In the Print dialog box, in the drop-down list under Print what, click<br />
H<strong>an</strong>douts. Try printing two, three, four, six, or nine slides per page.<br />
•<br />
Remember <strong>to</strong> include action but<strong>to</strong>ns on all slides so that the reader c<strong>an</strong> always choose which direction <strong>to</strong> go in<br />
the s<strong>to</strong>ry. Never leave a dead end on <strong>an</strong>y slide. You might even w<strong>an</strong>t <strong>to</strong> add a but<strong>to</strong>n on the last slide of each<br />
path that takes the reader back <strong>to</strong> the beginning, so that he or she c<strong>an</strong> read through the s<strong>to</strong>ry again, this time<br />
making different choices.<br />
Top of page<br />
Was this information useful?<br />
M<strong>an</strong>age Your Profile<br />
© 2006 <strong>Microsoft</strong> Corporation. All rights reserved. Terms of <strong>Use</strong> | Trademarks | Privacy Statement<br />
http://www.microsoft.com/education/s<strong>to</strong>ry.mspx?pf=true (4 of 4)5-26-06 8:09 am