Manual - Advanced Wireless Communications
Manual - Advanced Wireless Communications
Manual - Advanced Wireless Communications

You also want an ePaper? Increase the reach of your titles
YUMPU automatically turns print PDFs into web optimized ePapers that Google loves.
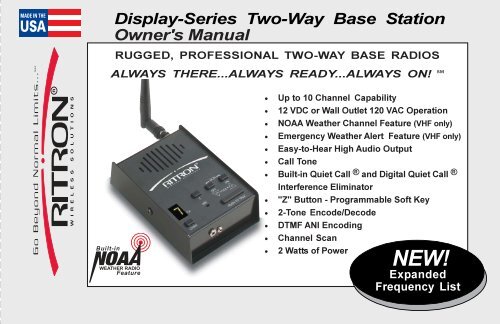
Display-Series Two-Way Base Station<br />
Owner's <strong>Manual</strong><br />
RUGGED, PROFESSIONAL TWO-WAY BASE RADIOS<br />
ALWAYS THERE...ALWAYS READY...ALWAYS ON! SM<br />
Built-in<br />
Feature<br />
• Up to 10 Channel Capability<br />
• 12 VDC or Wall Outlet 120 VAC Operation<br />
• NOAA Weather Channel Feature (VHF only)<br />
• Emergency Weather Alert Feature (VHF only)<br />
• Easy-to-Hear High Audio Output<br />
• Call Tone<br />
• Built-in Quiet Call ® and Digital Quiet Call ®<br />
Interference Eliminator<br />
• "Z" Button - Programmable Soft Key<br />
• 2-Tone Encode/Decode<br />
• DTMF ANI Encoding<br />
• Channel Scan<br />
• 2 Watts of Power<br />
NEW!<br />
Expanded<br />
Frequency List<br />
Have questions? Call 800-USA-1-USA (800-872-1872) or visit our website at www.ritron.com
ACCESSORIES<br />
JBSK-12<br />
12-Volt Adapter Kit<br />
RHD-6X<br />
Behind-the-ear Earset<br />
OPTIONAL / REPLACEMENT ACCESSORIES:<br />
TO ORDER CALL 800-USA-1-USA<br />
AFB-1545 .... Molded Flex, Dual-band Replacement Antenna<br />
RAM-1545 ... Magnet-mounted, Dual-band Antenna w/ BNC<br />
RPS-1A ....... Replacement 110 VAC Power Supply<br />
CCL-M ......... 12 VDC, Cigarette Lighter Adaptor<br />
JBSK-12 ...... 12 VDC, Adaptor Kit<br />
RHD-8X<br />
Single Earbud<br />
RSP-5<br />
5-Watt External Speaker<br />
RAM-1545<br />
Magnet-mounted, Dual-band Antenna<br />
RM-7<br />
Hand Microphone<br />
REP-2 .......... Low Profile Earphone<br />
RHD-1X ....... Single Ear Headset<br />
RHD-4X ....... Dual Ear Headset<br />
RHD-5X ....... Lightweight Over-the-ear Earset /w In-line PTT<br />
RHD-6X ....... Lightweight Behind-the-head Earset w/ In-line PTT<br />
RHD-8X ....... Lightweight Earbud w/mic and In-line PTT<br />
RSM-3X ...... Remote Speaker Microphone<br />
RM-7 ........... Hand Microphone & Hang-up Bracket<br />
RSP-5 ......... External Speaker w/5 Watt Audio Capability<br />
JBS-MMK ... Mobile Mounting Kit<br />
(Does not include screws to mount bracket to wall or vehicle)<br />
Call RITRON for a complete listing.<br />
ii<br />
Have questions? Call 800-USA-1-USA (800-872-1872) or visit our website at www.ritron.com
TABLE OF CONTENTS<br />
DESCRIPTION<br />
PAGE<br />
DESCRIPTION<br />
PAGE<br />
DESCRIPTION<br />
PAGE<br />
ACCESSORIES<br />
Optional Accessories ............................................................. ii<br />
INTRODUCTION<br />
"Display Series" Model Numbers .......................................... 1<br />
Basic Features ...................................................................... 1<br />
CONTROL & OPERATION ......................................................... 2<br />
FIG-1: Radio Controls and Connectors ............................... 2<br />
OPERATION<br />
FIG-2: Volume Level Indicator ............................................. 3<br />
ON-OFF/Volume Adjust ......................................................... 3<br />
Channel Selection .................................................................. 3<br />
Receive.................................................................................. 3<br />
QC and DQC Tone Codes<br />
(Interference Eliminator Codes) ........................................... 3<br />
Squelch Modes ....................................................................... 3<br />
Transmit ................................................................................. 4<br />
FIG-3: Transmit/Busy Lamp ................................................ 4<br />
Radio Alert Tones................................................................... 4<br />
Optional Alert Tones ............................................................... 4<br />
Channel Scan Operation ........................................................ 5<br />
2-Tone Decode Operation ...................................................... 5<br />
FIG-4: 2-Tone Call Alert ....................................................... 6<br />
"Z" Button - Programmable Soft Key ................................... 6<br />
NOAA WEATHER RADIO FEATURE<br />
How to Select Your Local NOAA Weather Frequency ......... 7<br />
FIG-5: Selecting Your Local NOAA Weather Frequency ... 8<br />
FIG-6: NOAA Frequencies ................................................... 8<br />
NOAA Weather Feature ......................................................... 8<br />
NOAA Weather Alert Feature ................................................ 8<br />
Using The "Z" Button To Access NOAA Weather................. 8<br />
RADIO PROGRAMMING<br />
FIG-7: How To Place the Radio in Program/<br />
Readout Mode ........................................................................ 9<br />
How to Readout Field Programmed Frequency & Tone<br />
Codes ..................................................................................... 9<br />
How to Field Program Frequency and Tone Codes ........... 10<br />
Table 1: Programmable Frequency Codes ........................ 11<br />
Table 2: Programmable QC Tone Codes ............................ 12<br />
Table 3: Programmable DQC Codes ................................. 12<br />
How to Field Program Radio Feature Codes ..................... 12<br />
Table 4: Radio Feature Codes ........................................... 12<br />
How to Delete a Channel .................................................... 12<br />
PC Programmable Features ................................................ 12<br />
!! CAUTIONS — ALL RADIOS !!<br />
Observe Caution in the Following Environments to Maximize<br />
the Life of Your Radio Equipment ...................................... 13<br />
Exposure to Radio Frequency Energy ............................... 13<br />
TROUBLESHOOTING ............................................................. 14<br />
SPECIAL APPLICATION<br />
How To Field Program 2-Tone Encode Codes for GateGuard<br />
Applications, go to www.ritron.com/gg_04.pdf ....................15<br />
How To Send A 2-Tone Code............................................15<br />
TABLE 5: Programmable 2-Tone Encode Codes...................15<br />
FCC & IC LICENSE REQUIRED<br />
FCC Regulations ................................................................. 16<br />
How to Obtain an FCC Radio License ............................... 16<br />
Industry Canada Regulations ............................................. 16<br />
Service ................................................................................. 16<br />
LIMITED WARRANTY ........................................... BACK COVER<br />
FIGURES:<br />
1. Radio Controls and Connectors ..................................... 2<br />
2. Volume Level indicator ................................................... 3<br />
3. Transmit/Busy Lamp ...................................................... 4<br />
4. 2-Tone Call Alert .............................................................. 6<br />
5. Selecting Your Local NOAA Weather Frequency .......... 8<br />
6. NOAA Frequencies ......................................................... 8<br />
7. How To Place the Radio in Program/Readout<br />
Mode ................................................................................ 9<br />
INSPECTION<br />
Make sure the package includes:<br />
• "Display Series" base radio<br />
• Antenna<br />
• RPS-1A Wall Mounted Power Supply<br />
• Owner's <strong>Manual</strong><br />
Examine the equipment immediately after delivery<br />
and report any damage to your shipping company.<br />
Have questions? Call 800-USA-1-USA (800-872-1872) or visit our website at www.ritron.com
THANK YOU FOR CHOOSING RITRON<br />
Congratulations on your purchase of the "Display<br />
Series" base station. Your new radio is the result of<br />
Ritron's 25+ years history of designing,<br />
manufacturing, and supplying reliable, professional<br />
wireless communication products. Ritron wireless<br />
products will improve the operation, safety, and<br />
profitability of any organization by providing instant<br />
voice communications between employees<br />
throughout the workplace.<br />
"DISPLAY SERIES" MODEL NUMBERS<br />
VHF MODELS: JOBCOM & PATRIOT<br />
JBS-146D (Jobcom) (2-W, 10 Ch)<br />
PBS-146D (Patriot) (2-W, 10 Ch)<br />
JBS-146D-BC (Jobcom) (2-W, 10 Ch)<br />
PBS-146D-BC (Patriot) (2-W, 10 Ch)<br />
JBS-146D-CANADA (Jobcom) (2-W, 10 Ch)<br />
PBS-146D-CANADA (Patriot) (2-W, 10 Ch)<br />
UHF MODELS: JOBCOM & PATRIOT<br />
JBS-446D (Jobcom) (2-W, 10 Ch)<br />
PBS-446D (Patriot) (2-W, 10 Ch)<br />
JBS-446D-CANADA (Jobcom) (2-W, 10 Ch)<br />
PBS-446D-CANADA (Patriot) (2-W, 10 Ch)<br />
The model number located on the back of the radio<br />
case indicates its operating band.<br />
VHF radios are designed to operate on up to ten<br />
channels within the 12 MHz band between factory<br />
standard 150 and 162 MHz.<br />
Built-in<br />
Feature<br />
INTRODUCTION<br />
UHF radios are designed to operate on up to ten channels<br />
within the 20 MHz band between factory standard 450 and<br />
470 MHz.<br />
BASIC FEATURES<br />
This manual covers Ritron JBS/PBS "Display Series" base<br />
stations. A rugged, programmable two-way desktop base<br />
station designed to operate in a professional FM<br />
communications band (VHF or UHF business available). Each<br />
radio is equipped with these features:<br />
• Push-button Operating Controls. The Push-To-Talk<br />
(PTT), Channel, On/ Volume Up, Volume Down/ Off and the<br />
special feature "Z" button controls are conveniently<br />
located on the face of the radio.<br />
• Channel Display. The LED display will show the current<br />
operating channel, and contains a transmit/busy lamp. The<br />
display is also used to indicate volume level and paging<br />
decode status on radios programmed for 2-Tone paging<br />
operation.<br />
• 10-channel Capability. Up to 10 channels can be<br />
programmed to contain a unique set of operating<br />
frequencies and options.<br />
• QC (Quiet Call) and DQC (Digital Quiet Call)<br />
Intereference Eliminator Codes. Each channel can be<br />
programmed from a list of 50 QC sub-audible or 104 DQC<br />
digital privacy codes.<br />
• Channel Scanning. Channel Scan allows scanning of all<br />
channels programmed into the radio, and can be turned<br />
On and Off through Field programming. The scan channel<br />
has many features, including Priority Scanning and Busy<br />
Channel Blocking.<br />
• Weather Channel. VHF models can be programmed to receive your local NOAA weather radio<br />
broadcast. The Weather channel can be turned On and Off through Field Programming.<br />
• Weather Alert. VHF models can be programmed to alert you when the National Weather<br />
Service detects threatening weather conditions. The Weather Alert feature can be turned On<br />
and Off through Field Programming.<br />
• Special Feature "Z' button. The “Z” button is<br />
capable of performing one of a variety of functions.<br />
These functions can be PC programmed by your<br />
dealer OR certain functions (in bold) can also be<br />
assigned to the "Z" button by the end user. “Z” button<br />
function options: Channel Scan, Weather<br />
Channel, Monitor, Send 2-Tone Code*, Send<br />
Call Tone, Send DTMF ANI (PC programmable by<br />
your Ritron dealer).<br />
These features require special PC programming:<br />
See your Ritron dealer or contact Ritron directly for PC<br />
programming of these optional features.<br />
• 2-Tone Decode. Each channel can be programmed<br />
for 2-Tone paging decode within a frequency range<br />
of 300-1500 Hz. Additional 2-tone paging features<br />
include Group Call, All Call, automatic reset, and<br />
transpond alert.<br />
• 2-Tone Encode. Each channel can be programmed<br />
for 2-Tone paging encode within a frequency range<br />
of 300-1500 Hz. (See page 15)<br />
• DTMF ANI. Each channel can be programmed to<br />
transmit a unique DTMF ANI string with the "Z" button<br />
programmed for DTMF ANI.<br />
• Wide or Narrow Band Operation. Each channel is<br />
programmable for wide or narrow band operation.<br />
• Squelch Adjustment. Squelch sensitivity can be<br />
programmed on a per channel basis to meet your<br />
specific needs.<br />
• Alert Tones. Each channel is programmable for a<br />
variety of alert tones that include RX courtesy beep,<br />
TX clear to talk beep, busy channel lockout alert, last<br />
active channel marker, and channel scanning<br />
indicator.<br />
* See page 15.<br />
page 13 RITRON, Have INC. questions? 1-800-USA-1-USA Call 800-USA-1-USA (1-800-872-1872) (800-872-1872) or visit our website at www.ritron.com
CONTROL & OPERATION<br />
1 CHANNEL DISPLAY<br />
The channel display will indicate the current operating channel. When the Scan Channel is selected<br />
the display will rapidly flash the channels being scanned, and will stop when a channel is received.<br />
The channel display also indicates the volume level between 0-9 whenever a volume control is<br />
pressed.<br />
2 CHANNEL SELECTOR<br />
Press the Channel Selector button and the radio will advance the channel. The Channel Beep will<br />
be heard any time Channel 1 is selected. When the Scan Channel is selected the radio will sound<br />
the Scan Beep and begin scanning.<br />
3 AUDIO ACCESSORY JACK<br />
The audio accessory jack is used to plug in earphone options, and, in conjunction with the microphone<br />
jack, to connect an optional remote speaker/ microphone or a single- or dual-ear headset. This jack<br />
is also used for PC programming.<br />
4 MICROPHONE JACK<br />
The microphone jack is used to connect optional external microphones and, in conjunction with the<br />
audio accessory jack, to connect an optional remote speaker/ microphone or a single- or dual-ear<br />
headset.<br />
5 POWER CONNECTOR (TOP END OF CASE)<br />
The power connector on the top end of the radio is used to connect power to the unit, either an external<br />
12 VDC supply or the RPS-1A cube power supply included with the radio.<br />
6 SPEAKER<br />
The speaker allows you to hear calls on your channel.<br />
7 ANTENNA<br />
The flexible antenna radiates and receives radio signals. The antenna connects to a BNC type<br />
connector located on the top end of the radio.<br />
NOTE: The AFB-1545 antenna furnished with the radio will work with VHF and UHF radios.<br />
8 "Z" BUTTON - PROGRAMMABLE SOFT KEY<br />
The “Z” button is capable performing one of a variety of functions. These functions can be PC<br />
programmed by your Ritron dealer OR certain functions (in bold) can also be assigned to the<br />
"Z" button by the end user. Function options: Channel Scan, Weather Channel, Monitor, Send<br />
2-Tone Code, Send Call Tone, Send DTMF ANI (PC programmable by your Ritron dealer).<br />
9 VOLUME DOWN/ OFF<br />
Press the Volume Down/ Off button to decrease volume. The channel display will indicate the volume<br />
level as long as the Volume Down/ Off button is pressed. To turn Off the unit, press and hold this<br />
button until the speaker sounds a double beep.<br />
10 ON/ VOLUME UP<br />
To turn the unit On, press the On/ Volume Up button; the speaker will sound the<br />
Channel Beep. If the radio turns on to the Scan Channel it will sound the Scan Beep.<br />
Once the radio is On, press this button to increase volume. The channel display<br />
will indicate the volume level as long as the On/ Volume Up button is pressed.<br />
11 PUSH-TO-TALK SWITCH (PTT)<br />
Press and hold the PTT when transmitting; release it to receive.<br />
12 MICROPHONE<br />
The microphone allows your voice to be heard in transmissions to other radios.<br />
Speak in a normal tone; shouting does not improve your listener's reception.<br />
Have questions? Call 800-USA-1-USA (800-872-1872) or visit our website at www.ritron.com<br />
1<br />
2<br />
3<br />
4 12<br />
FIG-1:<br />
5<br />
RADIO CONTROLS & CONNECTORS<br />
6<br />
7<br />
8<br />
9<br />
10<br />
11<br />
page 2
As long as the Volume Up button is held<br />
down the volume will increase and the<br />
display will indicate the volume level as a<br />
number between 0 and 9.<br />
When the Volume Down button is held down the<br />
volume will decrease and the display will indicate the<br />
volume level as a number between 9 and 0.<br />
FIG-2:<br />
VOLUME LEVEL INDICATOR<br />
ON-OFF / VOLUME ADJUST<br />
To turn on the radio - press the On/Volume Up button.<br />
The radio will sound the Channel Beep. If the radio turns<br />
on to the Scan Channel it will emit the Scan Beep. The<br />
radio will turn on to the channel that was selected when<br />
it was last turned off.<br />
To adjust the volume - press the volume up or the volume<br />
down button until you reach the desired level. The<br />
display will show the volume level on a 0-9 scale as long<br />
as the volume button is pressed, and you will hear any<br />
received broadcasts on the channel.<br />
To turn off the radio - press and hold the Off/Volume<br />
Down button until a two tone "turn-off" beep is heard.<br />
For instant turn-off, press the PTT button while holding<br />
the Off/Volume Down button.<br />
OPERATION<br />
If the Scan Channel is selected - the radio will sound the<br />
Scan Beep and the Channel Display will rapidly flash the<br />
channel numbers as they are scanned. If a signal is<br />
received the channel display will indicate the channel<br />
number, and when the received signal is removed the<br />
radio will wait briefly, sound the Scan Beep, then<br />
scanning will resume as normal.<br />
If the Weather Channel is selected - on a VHF radio the<br />
display will light a single segment of the display that<br />
indicates which of the seven NOAA frequencies is<br />
monitored. See the "NOAA Weather Radio" section on<br />
page 7 for details.<br />
RECEIVE<br />
To hear calls from other users - adjust the volume as<br />
desired. The radio can only receive broadcasts while the<br />
Push-To-Talk button is not being pressed. Whether or<br />
not you hear these broadcasts depends upon the<br />
squelch settings.<br />
There are three standard squelch modes that can be<br />
used in the JBS/PBS "D-Series" base station.<br />
• Carrier Squelch lets you hear all broadcasts on<br />
your channel strong enough for the radio to detect,<br />
and silences noise.<br />
When Carrier or Tone Squelch is selected by the<br />
user, all channels will operate in that mode. The JBS/PBS<br />
"D-Series" base station will operate in tone squelch mode<br />
when it is first turned on.<br />
QC AND DQC TONE CODES<br />
Tone codes filter out static, noise and reduce<br />
unwanted "chatter" on radio channels. When you<br />
operate on a frequency with a tone code, you<br />
screen out most interference. This allows you to<br />
communicate with less interference and to hear<br />
only those users in your radio group.<br />
IMPORTANT! All radios in the talk group must<br />
operate on the same frequency and tone code.<br />
SQUELCH MODES<br />
To activate Tone Squelch or Carrier Squelch and to<br />
Monitor the channel - you may either simultaneously press<br />
both the On/Up and Down/Off volume buttons and hold<br />
briefly before releasing or if the "Z" button is set for the<br />
monitor function (see page 12), then press the "Z" button and<br />
release. To advance to the next squelch mode simultaneously<br />
press both volume buttons or the "Z" button.<br />
1. If the base station emits a SINGLE beep, then Tone<br />
Squelch is turned ON and you will only hear radio<br />
transmissions on that channel with the same QC or<br />
DQC tone codes as your base station.<br />
• Tone Squelch uses the QC or DQC "tone squelch”<br />
format available on the JBS/PBS. This allows you to<br />
screen out “on-channel” broadcasts that do not carry<br />
CHANNEL SELECTION<br />
the correct code programmed for the radio.<br />
To change channels - press and release the Channel • 2-Tone Paging can be used in conjunction with<br />
Selector button. The radio will increment the channel, and either carrier or tone squelch to block out all calls<br />
the Channel Display will show the new operating except those sent specifically to your radio. When<br />
channel. If the highest channel number is selected and the unique 2-tone sequence programmed into the<br />
you press the Channel Selector button, the radio resets radio is decoded, the radio will emit a series of ring<br />
to channel 1 and the Channel Beep is heard on the tones similar to a telephone.<br />
speaker.<br />
page 3<br />
RITRON, Have INC. questions? 1-800-USA-1-USA Call 800-USA-1-USA (1-800-872-1872) (800-872-1872) or visit our website at www.ritron.com<br />
2. If the base station emits a DOUBLE beep, then you are<br />
in Carrier Squelch and you can Monitor all<br />
broadcasts on the channel. To exit Carrier<br />
Squelch press and hold both volume buttons until<br />
you hear the SINGLE beep.
OPERATION<br />
3. If the base station emits a TRIPLE beep, then you are<br />
in 2-TONE DECODE. You will only hear broadcasts that<br />
first send your two unique paging tones. If you are<br />
unable to set the base station, you have selected a<br />
channel that is not programmed for 2-Tone Decode.<br />
If you are unable to activate Carrier Squelch - the base<br />
station has been programmed for Monitor Lockout.<br />
See your Ritron dealer or contact Ritron directly to<br />
disable this option.<br />
Using the "Z" button for Monitor - the JBS/PBS<br />
"D-Series" base station "Z" button can be programmed<br />
for Monitor mode.<br />
To use the "Z" button for Monitor see "How<br />
To Field Program Radio Feature Codes" on<br />
page 12.<br />
Note:<br />
It is possible that the beginning of a call<br />
might be missed while the base station is in<br />
battery saver mode. If this happens, ask<br />
the caller to repeat the message.<br />
TRANSMIT<br />
Normally, you should monitor the channel before transmitting<br />
and talk only when the channel is clear.<br />
To transmit - hold down the Push-To-Talk button and,<br />
with the radio at least 6 inches away, talk into the microphone.<br />
Speak in a normal tone, since talking louder will<br />
not improve the listener’s reception.<br />
Keep talk times as short and infrequent as possible to<br />
allow others to use the channel.<br />
FIG-3:<br />
A Transmit / Busy Lamp in the lower<br />
right corner of the Channel Display<br />
lights whenever the transmitter is<br />
activated and blinks when the channel<br />
is busy.<br />
TRANSMIT/BUSY LAMP<br />
RADIO ALERT TONES<br />
The base station responds to certain instructions by<br />
sounding a beep or series of tones. These tones can tell<br />
you that the radio is working as you expect.<br />
Power On/Self Check “OK”<br />
When it is first turned on, the base station runs a quick<br />
“self test” to confirm basic functions. When complete the<br />
base station will emit the Channel Beep and the Channel<br />
Display will show the operating channel. The base<br />
station is then ready to use.<br />
Error Tones<br />
However, if the “self test” detects a diagnostic error, an<br />
error tone sounds. The error tone indicates the base<br />
station frequency synthesizer is malfunctioning. Turn off<br />
the radio and try again. The error tone will also sound if a<br />
channel has been programmed for an invalid frequency.<br />
A long, low-pitched tone means the battery voltage is too<br />
low to operate the base station. If you cannot correct<br />
the problem, consult an authorized Ritron service center<br />
or Ritron directly.<br />
Squelch Mode<br />
When you press and hold both Volume buttons at the<br />
same time, a SINGLE beep will sound to indicate that<br />
tone squelch is on. A DOUBLE beep means that carrier<br />
squelch is on. If the channel is programmed for 2-Tone<br />
Code, a TRIPLE beep indicates that the base station is in<br />
2-Tone Decode mode.<br />
Transmitter Time Out<br />
A low tone followed by a higher-pitched tone sounds<br />
and the transmitter automatically shuts off if you hold<br />
down the PTT button longer than 60 seconds.<br />
Battery Alert Tone<br />
In battery powered installations: Once the battery<br />
voltage drops below the required "operating voltage" the<br />
radio emits a long, low tone and turns itself off.<br />
OPTIONAL ALERT TONES<br />
The "Display Series" base station can be programmed<br />
using the RITRON PC Programmer for optional alert tones.<br />
See your Ritron dealer or contact Ritron directly for<br />
programming of these options.<br />
Courtesy Beep<br />
A short tone sounds at the end of each received transmission<br />
to indicate that the channel is clear and you may<br />
transmit.<br />
Busy Channel TX Inhibit<br />
If a user is transmitting on your radio frequency without<br />
your tone, you will not be allowed to transmit. The base<br />
station will beep a series of long, low tones while the<br />
PTT is held down (like a busy signal).<br />
Transmit Clear To Talk Beep<br />
A short tone sounds after the PTT has been pressed to<br />
indicate that the base station is ready for you to begin<br />
talking.<br />
Have questions? Call 800-USA-1-USA (800-872-1872) or visit our website at www.ritron.com page 4
CHANNEL SCAN OPERATION<br />
Channel scanning allows you to listen to broadcasts on<br />
your radio channels. The JBS/PBS "Display-Series" base<br />
station will scan all channels programmed into the radio<br />
except the NOAA Weather Channel.<br />
How Scanning Works<br />
Using the Channel Selector button, select the Scan<br />
channel. The base station sounds the Scan Beep, and<br />
then repeatedly checks each channel in the scan list.<br />
The channel display will show the channel numbers as<br />
they are scanned.<br />
When receiving a call on a channel being scanned, the<br />
base station will stop scanning to let you hear<br />
communications on that channel. After the transmission<br />
has ended the base station will pause before it resumes<br />
scanning to allow you time to respond.<br />
When transmitting from the Scan channel, the base<br />
station will go to the last channel on which a signal was<br />
received, then transmit. After you release the PTT the<br />
base station will pause to allow time for a response, and<br />
then resume scanning.<br />
Temporary Busy Channel Blocking<br />
If one of the channels in the scan list is so busy that you<br />
want to temporarily block it out, press the Channel<br />
Selector button while the base station is stopped on the<br />
channel to be blocked and hold it until scanning resumes.<br />
The blocked channel will now be skipped in the scan list.<br />
The blocked channel will be returned to the scan list if<br />
the base station is turned off and then back on again, or<br />
when the radio channel is changed using the Channel<br />
Selector button. The first channel in the scan list cannot<br />
be blocked.<br />
OPERATION<br />
Last Channel Scanned Alert Tone<br />
When changing channels with the Channel Selector<br />
button, an alert tone will sound to indicate the last<br />
channel that received a message when the radio was<br />
scanning. This will identify the channel on which the last<br />
message was received, and allow uninterrupted<br />
transmission on that channel without the constraints of<br />
scanning. You can then press the Channel Selector<br />
button to return to the scan channel.<br />
Using The "Z" Button For Scan<br />
The special feature "Z" button can be programmed to<br />
initiate scanning. The UHF PBS-446D and JBS-446D base<br />
stations are programmed for "Z" button Scan channel<br />
operation from the factory.<br />
To select the Scan Channel, press the "Z" button. The<br />
radio sounds the Scan Beep, and scanning operation is<br />
initiated. The Scan channel will not be accessible with<br />
the Channel Selector button when the base station is<br />
programmed for "Z" button Scan channel operation.<br />
To return to normal channel operation, press the<br />
Channel Selector button and the base station will return<br />
to channel 1.<br />
To temporarily block a busy channel while scanning,<br />
press the "Z" button while the base station is stopped on<br />
the channel to be blocked and hold it until scanning<br />
resumes. The blocked channel will now be skipped in the<br />
scan list.<br />
Priority Scanning (Optional)<br />
The "Display Series" base station can be optionally<br />
programmed for priority scanning. Priority Scan allows<br />
you to periodically monitor a Priority Channel, even if the<br />
base station has stopped on another channel. This will<br />
prevent missed calls on the primary operating channel<br />
when in scan mode.<br />
With Priority Scan enabled:<br />
• The first channel in the scan list is the Priority<br />
Channel.<br />
• The radio checks the Priority Channel every two<br />
seconds to check for activity. This time is<br />
programmable and can be set for 1 - 8 seconds.<br />
• The base station can be programmed to transmit only<br />
on the Priority Channel when scanning.<br />
• The base station can be programmed to sound a<br />
Priority Channel Beep whenever the base station<br />
receives on the Priority Channel when scanning.<br />
See your Ritron dealer or contact Ritron directly for PC<br />
programming of this option.<br />
2-TONE DECODE OPERATION<br />
To use 2-Tone Decode the "Display Series" base<br />
station must be PC programmed for this option,<br />
the radio does not operate with 2-Tone decoding as it is<br />
received from the factory. See your Ritron dealer or<br />
contact Ritron directly for PC programming of this option.<br />
This feature allows the base station to act as a monitor<br />
receiver.<br />
To activate 2-Tone Decode you must first select a radio<br />
channel that has been PC programmed for 2-Tone<br />
Decode. The factory default setting will automatically<br />
activate 2-Tone Decode any time the 2-Tone Decode<br />
channel is selected. If not, simultaneously press both of<br />
the volume buttons and hold briefly before releasing. The<br />
radio sounds three beeps when 2-Tone Decode is<br />
turned on.<br />
If you are unable to set the base station, you have<br />
selected a channel that is not programmed for 2-Tone<br />
Decode.<br />
To turn Channel Scan On/Off see "How To<br />
Field Program Radio Feature Codes" on<br />
page 12.<br />
page 53 RITRON, Have INC. questions? 1-800-USA-1-USA Call 800-USA-1-USA (1-800-872-1872) (800-872-1872) or visit our website at www.ritron.com
OPERATION<br />
When the base station decodes an incoming 2-Tone<br />
signal it will emit a "ring" tone similar to a telephone and<br />
the display will show a "C" to indicate that a call has<br />
been received. You can now proceed with normal twoway<br />
communication until the 2-Tone Decode feature has<br />
been reset. The "ring" tone will sound every time a<br />
2-Tone signal is decoded.<br />
The display will show a "C" to indicate that<br />
a 2-Tone call has been received.<br />
FIG-4:<br />
2-TONE CALL ALERT<br />
To reset 2-Tone Decode after receiving a call,<br />
simultaneously press both of the volume buttons and<br />
hold briefly before releasing. The base station sounds<br />
three beeps when 2-Tone Decode is reset and the<br />
display will show the channel number. The base station<br />
can be optionally programmed to automatically reset if a<br />
call is not answered within 15 seconds.<br />
2-Tone Decode channels can be programmed to:<br />
• Automatically set the base station for 2-Tone Decode<br />
mode whenever the channel is selected.<br />
• Automatically reset if a 2-Tone Decode is not<br />
answered within 15 seconds.<br />
• Automatically place the receiver into carrier squelch<br />
"monitor" mode whenever a 2-Tone Decode has been<br />
decoded.<br />
• Send a transpond tone back to the transmitting station<br />
to confirm that the 2-Tone signal has been received.<br />
• Decode an All Call tone.<br />
• Decode a Group Call if the first tone is sent for an<br />
extended period of time.<br />
"Z" BUTTON - PROGRAMMABLE SOFT KEY<br />
The “Z” button is capable performing one of a variety<br />
of functions. These functions can be PC programmed<br />
by your dealer OR certain functions (in bold) can<br />
also be assigned to the "Z" button by the end user.<br />
Function options: Channel Scan, Weather Channel,<br />
Monitor, Send 2-Tone Code, Send Call Tone, Send<br />
DTMF ANI (PC programmable by your Ritron dealer).<br />
Refer to the Dealer PC programmer HELP file for<br />
specific "Z" button programming instructions.<br />
To assign the "Z" Button for one of these<br />
features:<br />
• Scan<br />
• Weather<br />
• Monitor<br />
• Call Tone<br />
• Pre-set 2-Tone Encode<br />
see "How To Field Program Radio Feature<br />
Codes" on page 12.<br />
SCAN<br />
The UHF PBS-446D and JBS-446D base stations are<br />
programmed for "Z" button Channel Scan operation from<br />
the factory.<br />
See "Using The "Z" Button For Scan" on<br />
page 5.<br />
WEATHER<br />
The "Z" button on the VHF PBS-146D and JBS-146D<br />
base stations are programmed for Weather Channel<br />
operation from the factory. This option is only available<br />
on VHF band radios.<br />
See "Using The "Z" Button For Weather<br />
Channel" on page 8.<br />
MONITOR<br />
The "Z" button can be programmed to function as a<br />
MONITOR button. See page 12 to select this option.<br />
See "Squelch Modes" To Set Carrier, Tone,<br />
or 2-Tone Paging Functions on page 3.<br />
CALL TONE<br />
When the "Z" button is pressed the radio transmits a Call<br />
Tone on the channel currently selected. If you continue<br />
to hold the "Z" button down, the transmitter will remain<br />
active and voice communications can be made after the<br />
Call Tone has been sent.<br />
This feature is helpful when the receiving base station is<br />
in a high noise environment and may not hear a voice<br />
transmission.<br />
2-TONE ENCODE OPERATION<br />
Pressing the "Z" button causes the base station to<br />
transmit a unique 2-Tone Code that can be programmed<br />
seperately for each channel. The 2-Tone Code will be<br />
heard on the speaker, and if you continue to hold the "Z"<br />
button down, the transmitter will remain active and voice<br />
communications will be possible after the 2-Tone Code<br />
has been sent.<br />
Use the PTT button to transmit messages without the<br />
2-Tone Code.<br />
If a channel is not programmed to encode a 2-Tone<br />
signal the "Z" button will function as a PTT button.<br />
See Special Application for Field Programming<br />
the 9 Pre-set 2-Tone Codes on page 15.<br />
Have questions? Call 800-USA-1-USA (800-872-1872) or visit our website at www.ritron.com<br />
page 6
OPERATION<br />
NOAA WEATHER RADIO FEATURE<br />
DTMF ANI ON TRANSMIT<br />
This feature must be PC Programmed by your Ritron<br />
dealer.<br />
Pressing the "Z" button causes the radio to transmit a<br />
unique DTMF ANI string that can be programmed<br />
seperately for each channel. The DTMF string will be<br />
heard on the speaker, and if you continue to hold the "Z"<br />
button down, the transmitter will remain active and voice<br />
communications will be possible after the DTMF ANI<br />
string has been sent.<br />
Built-in<br />
Feature<br />
NOAA Weather Radio (NWR) is a nationwide network<br />
of radio stations broadcasting continuous weather<br />
information direct from a nearby National Weather Service<br />
office. NWR broadcasts National Weather Service<br />
warnings, watches, forecasts and other hazard<br />
information 24 hours a day.<br />
Working with the Federal Communication Commission’s<br />
(FCC) Emergency Alert System, NWR is an “all hazards”<br />
radio network, making it your single source for<br />
comprehensive weather and emergency information.<br />
NWR also broadcasts warning and post-event<br />
information for all types of hazards—both natural (such<br />
as earthquakes and volcano activity) and environmetal<br />
(such as chemical releases or oil spills).<br />
Known as the “Voice of the National Weather Service,”<br />
NWR is provided as a public service by the National<br />
Oceanic & Atmospheric Administration (NOAA), part of<br />
the Department of Commerce. NWR includes more than<br />
750 transmitters, covering all 50 states, adjacent coastal<br />
waters, Puerto Rico, the U.S. Virgin Islands, and the U.S.<br />
Pacific Territories. NWR requires a special radio receiver<br />
or scanner capable of picking up the signal. Broadcasts<br />
are found in the public service band at these<br />
seven frequencies (MHz): 162.400, 162.425,<br />
162.450, 162.475, 162.500, 162.525, 162.550.<br />
HOW TO SELECT YOUR LOCAL NOAA<br />
WEATHER FREQUENCY<br />
(VHF MODELS ONLY)<br />
The base station is shipped from the factory without a NOAA<br />
frequency selected. You must first select your local<br />
NOAA frequency to activate NOAA weather features.<br />
Follow steps 1-7 below.<br />
VHF models of the JBS/PBS "Display Series" base station can<br />
hear weather forecasts from the National Weather Service<br />
which are broadcast on one of the seven NOAA weather<br />
frequencies. In some areas you may be able to receive more<br />
than one broadcast.<br />
1. Follow the steps in FIG-5 on page 8 to place the radio<br />
into the Weather Frequency Select mode.<br />
2. The base station will scan to the first NOAA frequency<br />
where a broadcast is present. The display will light a<br />
single segment to indicate the NOAA frequency per<br />
FIG-6 on page 8.<br />
3. Monitor the channel for a few minutes to be sure it is the<br />
broadcast for your local area.<br />
4. Press the "Z" button to scan for the presence of any<br />
other NOAA broadcasts, monitoring each broadcast<br />
and noting the frequency as indicated by the display.<br />
5. Using the "Z" button, select the local NOAA frequency<br />
you would like your radio to operate on.<br />
6. Turn the base station off by pressing the Volume Down/<br />
Off button.<br />
7. When the base station is turned back on all weather<br />
features will operate on the selected NOAA frequency.<br />
NOTE: If the base station is moved, for example, to another<br />
state you must re-train your base station with a<br />
new local NOAA frequency.<br />
page 73 RITRON, Have INC. questions? 1-800-USA-1-USA Call 800-USA-1-USA (1-800-872-1872) (800-872-1872) or visit our website at www.ritron.com
NOAA WEATHER RADIO FEATURE<br />
1. PRESS & HOLD UNTIL<br />
THE "RADIO OFF"<br />
TONES ARE HEARD,<br />
THEN RELEASE.<br />
2. PRESS & HOLD<br />
THE "Z"<br />
BUTTON.<br />
FIG-5: SELECTING YOUR LOCAL<br />
NOAA WEATHER FREQUENCY<br />
FIG-6:<br />
3<br />
162.475 MHz<br />
162.500 MHz<br />
162.450 MHz<br />
162.525 MHz<br />
3. PRESS & RELEASE -<br />
THE RADIO WILL<br />
START BEEPING.<br />
4. CONTINUE HOLDING THE "Z"<br />
BUTTON UNTIL THE BEEPING<br />
STOPS, THEN RELEASE IT &<br />
LISTEN.<br />
5. TO FIND THE NEXT ACTIVE<br />
WEATHER CHANNEL, PRESS &<br />
RELEASE THE "Z" BUTTON.<br />
162.425 MHz<br />
162.400 MHz<br />
162.550 MHz<br />
NOAA FREQUENCIES<br />
NOAA WEATHER FEATURE<br />
After you have selected a NOAA weather frequency on<br />
your VHF model base station, an extra channel is automatically<br />
created exclusively for listening to National Weather<br />
Service broadcasts.<br />
Repeatedly pressing the Channel button advances through<br />
your base station talk channels. NOAA Weather will be your<br />
last channel, and the display will light the segment representing<br />
the selected NOAA frequency.<br />
If you do not want the NOAA Weather feature, it can be<br />
turned off through Field Programming.<br />
To turn NOAA Weather On/Off see "How To<br />
Field Program Radio Feature Codes" on<br />
page 12.<br />
NOAA WEATHER ALERT FEATURE<br />
Once a NOAA weather frequency has been selected on<br />
your VHF model base station it will listen for emergency<br />
broadcasts from the National Weather Service, regardless<br />
of which channel you are on.<br />
An alert tone will sound in the speaker, the<br />
display will show an "A" (as shown), and<br />
the National Weather Service emergency<br />
broadcast will be heard - advising you of<br />
threatening weather conditions.<br />
NOTE:<br />
NOAA sends a test alert tone<br />
once each week. Your base station<br />
will respond to this alert.<br />
To turn Weather NOAA Alert On/Off see "How<br />
To Field Program Radio Feature Codes" on<br />
page 12.<br />
Pressing the Channel button will return you to your normal<br />
talk channel.<br />
If you do not want the NOAA Weather Alert feature, it can<br />
be turned off through Field Programming, refer to page 12.<br />
USING THE "Z" BUTTON TO ACCESS NOAA<br />
WEATHER<br />
The VHF PBS-146D and JBS-146D base stations are<br />
programmed for "Z" button NOAA Weather operation from<br />
the factory. This option is only available on VHF band<br />
base stations.<br />
To select NOAA Weather, press the "Z" button. The base<br />
station will scan to the 1st NOAA frequency where a<br />
broadcast is present. The display will light a single<br />
segment to indicate the NOAA frequency per FIG-6 on<br />
page 7. If the base station has been pre-set for your<br />
local NOAA weather frequency, the base station will go<br />
directly to that frequency when the "Z" button is 1st<br />
pressed.<br />
With any subsequent press of the "Z" button the base<br />
station will scan to the next active NOAA frequency.<br />
When the "Z" button is programmed to access NOAA<br />
Weather, the feature will no longer be accessible with<br />
the Channel Selector button.<br />
To return to a normal talk channel operation, press the<br />
Channel Selector button. The base station will return to<br />
the last talk channel you operated on.<br />
Have questions? Call 800-USA-1-USA (800-872-1872) or visit our website at www.ritron.com<br />
page 8
RADIO PROGRAMMING<br />
IMPORTANT<br />
To talk to other users in your group, all<br />
radios must be set to the same frequency<br />
and Interference Eliminator codes.<br />
1. PRESS & HOLD UNTIL<br />
THE "RADIO OFF"<br />
TONES ARE HEARD,<br />
THEN RELEASE.<br />
2. PRESS & HOLD<br />
THE PUSH-TO-<br />
TALK BUTTON.<br />
FIG-7:<br />
3. PRESS & RELEASE -<br />
THE RADIO WILL<br />
START BEEPING<br />
RAPIDLY.<br />
4. CONTINUE HOLDING THE PUSH-TO-<br />
TALK BUTTON UNTIL THE BEEPING<br />
STOPS, THEN RELEASE IT.<br />
5. THE RADIO WILL EMIT A TRIPLE<br />
TONE: IT IS NOW IN PROGRAM/<br />
READOUT MODE.<br />
HOW TO PLACE THE RADIO IN<br />
PROGRAM/READOUT MODE<br />
HOW TO READOUT FIELD PROGRAMMABLE FREQUENCY & TONE CODES<br />
In our example channel 3 of a UHF radio is programmed to operate on the "Brown Dot" frequency of 464.500<br />
MHz (Frequency code "04") with 100.0 Hz tone (Tone code "12").<br />
CHANNEL RADIO IDENTIFICATION<br />
FREQUENCY &<br />
TONE CODES<br />
If more than 5 digits<br />
are displayed, refer<br />
! to page 15.<br />
1. Place the radio into Program/ Readout Mode by following the instructions in FIG-<br />
7 at left. A "P" will appear on the LED display as you enter program mode.<br />
2. Release the Push-to-talk button after the beeping has stopped. The radio will<br />
display a series of six characters for Radio Identification, with each character<br />
separated by a hyphen. The 1st two characters indicate the model number, the<br />
3rd and 4th characters indicate the radio type, and the 5th and 6th characters<br />
indicate the firmware revision.<br />
In this example: Model: 27<br />
Radio Type: 16<br />
Firmware Revision: 01<br />
NOTE: Radio models wih firmware revisions prior to 16.01 do not display the<br />
Radio Identification sequence.<br />
3. After the Radio Identification has been displayed the digit 1 will appear,<br />
followed by a hyphen, and the radio will emit a triple beep indicating that the<br />
radio is in program mode and channel 1 is selected.<br />
4. Press the Channel Selector button to select the channel to be read out. The<br />
channel number will appear briefly on the display as you step through the<br />
channels. When you have settled on a channel a hyphen will appear across the<br />
center of the display to indicate that it is ready for readout..<br />
5. Press and release the On/Volume Up button. The radio will begin to display a<br />
series of four digits; with each digit seperated by a hyphen.<br />
The 1st and 2nd digits indicate the frequency code; see Table 1 on page 11.<br />
The 3rd and 4th digits indicate the tone code; see Table 2 on page 12.<br />
If a 5th digit is diplayed, the channel has been programmed for DQC and the last<br />
three digits indicate the DQC code; see Table 3 on page 12.<br />
6. If the channel is PC-programmed for any frequency not listed in Table 1 on page<br />
11, an error tone will sound and an "E" will appear on the display.<br />
7. To readout another channel, repeat steps 4 through 6.<br />
8. Turn the radio OFF and then ON again—the radio is now ready to use.<br />
page 93 RITRON, Have INC. questions? 1-800-USA-1-USA Call 800-USA-1-USA (1-800-872-1872) (800-872-1872) or visit our website at www.ritron.com
HOW TO FIELD PROGRAM FREQUENCY & TONE CODES<br />
To match other radios, the owner can select Frequency and Tone Codes from Tables<br />
1, 2, and 3 on pages 11 and 12.<br />
In our example we will program channel 3 of a UHF radio to operate on the "Brown Dot"<br />
frequency of 464.500 MHz (Frequency code "04") with 100.0 Hz tone (Tone code "12").<br />
SELECT CHANNEL RADIO IDENTIFICATION<br />
04<br />
12<br />
1. Refer to Table 1 on page 11 to determine the two digit<br />
frequency code and write it down.<br />
2. Refer to Table 2 on page 12 to determine the two digit<br />
tone code for 100.0 Hz and write it down.<br />
3. Place the radio into Program/ Readout Mode by<br />
following the instructions in FIG-7 on page 9. A "P" will<br />
appear on the LED display as you enter program mode.<br />
4. Release the Push-to-talk button after the beeping has<br />
stopped. The radio will display a series of six<br />
characters for Radio Identification, with each character<br />
separated by a hyphen. The 1st two characters<br />
indicate the model number, the 3rd and 4th charaters<br />
indicate the radio type, and the 5th and 6th characters<br />
indicate the firmware revision.<br />
In this example: Model: 27<br />
Radio Type: 16<br />
Firmware Revision: 01<br />
NOTE: Radio models with firmware revisions prior to<br />
16.01 do not display the Radio Identification sequience.<br />
5. After the Radio Identification has been displayed the<br />
digit 1 will appear, followed by a hyphen, and the radio<br />
will emit a triple beep indicating that the radio is in<br />
program mode and channel 1 is selected.<br />
6. Press the Channel Selector button to select the channel<br />
to be programmed. The channel number will show<br />
briefly on the channel display as you step through the<br />
channels. When you have settled on a channel the<br />
display will show a hyphen to indicate that it is ready<br />
for programming.<br />
RADIO PROGRAMMING<br />
7. Enter the 1st digit of the frequency code by clicking the PTT button<br />
until the channel display shows the desired number. Pause - the<br />
radio will sound a low tone and show a hyphen across the center of<br />
the display to indicated that it is ready to accept the next digit.<br />
8. Enter the 2nd digit of the frequency code by clicking the PTT button<br />
until the channel display shows the desired number. Pause - the<br />
radio will sound a low tone and show a hyphen across the center of<br />
the display to indicated that it is ready to accept the next digit.<br />
9. Enter the 1st digit of the tone code (or 1st digit of the DQC code) by<br />
clicking the PTT button until the channel display shows the desired<br />
number. Pause - the radio will sound a low tone and show a hyphen<br />
on the display to indicated that it is ready to accept the next digit.<br />
10. Enter the 2nd digit of the tone code (or 2nd digit of the DQC code) by<br />
clicking the PTT button until the channel display shows the desired<br />
number. Pause - the radio will sound a low tone and show a hyphen<br />
on the display to indicated that it is ready to accept the next digit.<br />
11. FOR DQC CODES ONLY - Enter the 3rd digit of the DQC code by<br />
clicking the PTT button until the channel display shows the desired<br />
number. Pause - the radio will sound a low tone and show a hyphen<br />
on the display to indicate that it is ready to accept the next digit.<br />
12. Press and release the On/ Volume Up to SAVE your programming<br />
Refer to page entry. The LED display will briefly show the channel number you<br />
15 for 2-Tone have just programmed and the radio will sound a triple beep to<br />
!programming. indicate that programming was successful.<br />
NOTE: An error tone will sound if you attempt to save an incorrect<br />
code and an "E" will appear on the display. Turn the radio OFF, check<br />
the digits you are attempting to enter, then start over.<br />
13. To program another channel, repeat steps 6 through 12.<br />
14. Turn the radio OFF and then ON again—the radio is now ready to<br />
NOTES:<br />
use.<br />
a. YOU MUST enter "44" to enter "No Code" interference eliminator to match radios<br />
not having tone codes. Refer to Table 2 on page 12.<br />
b. If the radio does not sound a confirming triple tone when you attempt to enter<br />
Program/ Readout Mode, the radio was factory or dealer customized to disable<br />
programming. Consult the radio owner or your dealer.<br />
FREQUENCY CODE<br />
TONE CODE<br />
Have questions? Call 800-USA-1-USA (800-872-1872) or visit our website at www.ritron.com<br />
page 10
VHF MURS **<br />
Code MHz Color Band<br />
No. Dot Width<br />
RADIO PROGRAMMING<br />
TABLE 1: PROGRAMMABLE FREQUENCY CODES<br />
UHF Business Band<br />
UHF Business Band<br />
Code MHz Color Band Code MHz Color Band<br />
No. Dot Width No. Dot Width<br />
UHF Business Band<br />
Code MHz Color Band<br />
No. Dot Width<br />
01 154.6000 Green Dot 25<br />
02 154.5700 Blue Dot 25<br />
19 151.8200 MURS 12.5<br />
20 151.8800 MURS 12.5<br />
21 151.9400 MURS 12.5<br />
22 154.6000 MURS/Green 12.5<br />
23 154.5700 MURS/Blue 12.5<br />
00 DELETE Code*<br />
VHF Business Band<br />
Code MHz Color Band<br />
No. Dot Width<br />
03 151.6250 Red Dot 25<br />
04 151.9550 Purple Dot 25<br />
05 151.9250 25<br />
06 154.5400 25<br />
07 154.5150 25<br />
08 154.6550 25<br />
09 151.6850 25<br />
10 151.7150 25<br />
11 151.7750 25<br />
12 151.8050 25<br />
13 151.8350 25<br />
14 151.8950 25<br />
15 154.4900 25<br />
16 151.6550 25<br />
17 151.7450 25<br />
18 151.8650 25<br />
24 151.7000 12.5<br />
25 151.7600 12.5<br />
26 152.7000 25<br />
00 DELETE Code *<br />
01 467.7625 J 25<br />
02 467.8125 K25<br />
03 464.5500 Yellow Dot 25<br />
04 464.5000 Brown Dot 25<br />
05 467.8500 Silver Star 25<br />
06 467.8750 Gold Star 25<br />
07 467.9000 Red Star 25<br />
08 467.9250 Blue Star 25<br />
09 469.2625 25<br />
10 462.5750 White Dot 25<br />
11 462.6250 Black Dot 25<br />
12 462.6750 Orange Dot 25<br />
13 464.3250 25<br />
14 464.8250 25<br />
15 469.5000 25<br />
16 469.5500 25<br />
17 463.2625 25<br />
18 464.9125 25<br />
19 464.6000 25<br />
20 464.7000 25<br />
21 462.7250 25<br />
22 464.5000 Brown Dot 12.5<br />
23 464.5500 Yellow Dot 12.5<br />
24 467.7625 J 12.5<br />
25 467.8125 K 12.5<br />
26 467.8500 Silver Star 12.5<br />
Canadian Frequency Codes<br />
Canada VHF Business Band Models<br />
Code Frequency Color Dot BW<br />
01 151.055 25<br />
02 151.115 25<br />
27 467.8750 Gold Star 12.5<br />
28 467.9000 Red Star 12.5<br />
29 467.9250 Blue Star 12.5<br />
30 461.0375 12.5<br />
31 461.0625 12.5<br />
32 461.0875 12.5<br />
33 461.1125 12.5<br />
34 461.1375 12.5<br />
35 461.1625 12.5<br />
36 461.1875 12.5<br />
37 461.2125 12.5<br />
38 461.2375 12.5<br />
39 461.2625 12.5<br />
40 461.2875 12.5<br />
41 461.3125 12.5<br />
42 461.3375 12.5<br />
43 461.3625 12.5<br />
44 462.7625 12.5<br />
45 462.7875 12.5<br />
46 462.8125 12.5<br />
47 462.8375 12.5<br />
48 462.8625 12.5<br />
49 462.8875 12.5<br />
50 462.9125 12.5<br />
51 464.4875 12.5<br />
52 464.5125 12.5<br />
Canada UHF Business Band Models<br />
Code Frequency Color Dot BW<br />
01 458.6625 25<br />
02 469.2625 25<br />
Per FCC rules and regulations, a<br />
given radio must not be<br />
* 2-digit Frequency placeholder code (Refer to "How to Delete a Channel" on page 12)<br />
programmed to contain a mix of<br />
both VHF Business Band and ** MURS frequencies - The 5 MURS frequencies do not require an FCC license. All other<br />
VHF MURS frequencies.<br />
frequencies require an FCC license. See page 15 for license information.<br />
page 311<br />
RITRON, Have INC. questions? 1-800-USA-1-USA Call 800-USA-1-USA (1-800-872-1872) (800-872-1872) or visit our website at www.ritron.com<br />
53 464.5375 12.5<br />
54 464.5625 12.5<br />
55 466.0375 12.5<br />
56 466.0625 12.5<br />
57 466.0875 12.5<br />
58 466.1125 12.5<br />
59 466.1375 12.5<br />
60 466.1625 12.5<br />
61 466.1875 12.5<br />
62 466.2125 12.5<br />
63 466.2375 12.5<br />
64 466.2625 12.5<br />
65 466.2875 12.5<br />
66 466.3125 12.5<br />
67 466.3375 12.5<br />
68 466.3625 12.5<br />
69 467.7875 12.5<br />
70 467.8375 12.5<br />
71 467.8625 12.5<br />
72 467.8875 12.5<br />
73 467.9125 12.5<br />
74 469.4875 12.5<br />
75 469.5125 12.5<br />
76 469.5375 12.5<br />
77 469.5625 12.5<br />
00 DELETE Code *<br />
British Columbia VHF Models<br />
Code Frequency Color Dot BW<br />
01 154.100 25<br />
02 158.940 25
TABLE 2: INTERFERENCE ELIMINATOR<br />
PROGRAMMABLE QC TONE<br />
Code No. Hz Code CODES No. Hz Code No. Hz<br />
01 67.0 18 123.0 35 225.7<br />
02 71.9 19 127.3 36 233.6<br />
03 74.4 20 131.8 37 241.8<br />
04 77.0 21 136.5 38 250.3<br />
05 79.7 22 141.3 39 69.4<br />
06 82.5 23 146.2 40 159.8<br />
07 85.4 24 151.4 41 165.5<br />
08 88.5 25 156.7 42 171.3<br />
09 91.5 26 162.2 43 177.3<br />
10 94.8 27 167.9 44 No Tone<br />
11 97.4 28 173.8 45 183.5<br />
12 100.0 29 179.9 46 189.9<br />
13 103.5 30 186.2 47 196.6<br />
14 107.2 31 192.8 48 199.5<br />
15 110.9 32 203.5 49 206.5<br />
16 114.8 33 210.7 50 229.1<br />
17 118.8 34 218.1 51 254.1<br />
00 Delete<br />
TABLE 3: DIGITAL INTERFERENCE ELIMINATOR<br />
PROGRAMMABLE DQC CODES<br />
023<br />
025<br />
026<br />
031<br />
032<br />
036<br />
043<br />
047<br />
051<br />
053<br />
054<br />
065<br />
071<br />
072<br />
073<br />
074<br />
114<br />
115<br />
116<br />
122<br />
125<br />
131<br />
132<br />
134<br />
143<br />
145<br />
152<br />
155<br />
156<br />
162<br />
Code Numbers<br />
261<br />
263<br />
265<br />
266<br />
271<br />
274<br />
306<br />
311<br />
315<br />
325<br />
331<br />
332<br />
343<br />
346<br />
351<br />
165<br />
172<br />
174<br />
205<br />
212<br />
223<br />
225<br />
226<br />
243<br />
244<br />
245<br />
246<br />
251<br />
252<br />
255<br />
356<br />
364<br />
365<br />
371<br />
411<br />
412<br />
413<br />
423<br />
431<br />
432<br />
445<br />
446<br />
452<br />
454<br />
455<br />
462<br />
464<br />
465<br />
466<br />
503<br />
506<br />
516<br />
523<br />
532<br />
546<br />
565<br />
606<br />
612<br />
624<br />
627<br />
631<br />
632<br />
645<br />
654<br />
662<br />
664<br />
703<br />
712<br />
723<br />
731<br />
732<br />
734<br />
743<br />
754<br />
RADIO PROGRAMMING<br />
HOW TO FIELD PROGRAM RADIO FEATURE<br />
CODES<br />
1. Follow the instructions in FIG-7 on page 9 to place<br />
the base station in the Program/ Readout Mode.<br />
2. Using the PTT (push-to-talk) button and the LED<br />
display, enter the single digit code from Table 4<br />
below for the option to be programmed.<br />
3. Pause—the display will change and show a hyphen,<br />
you will also hear a short low tone.<br />
4. Press and release the On/Volume Up to SAVE your<br />
programming entry. The base station will sound a<br />
triple beep to indicate that programming was<br />
successful.<br />
5. Turn the base station OFF and then ON again—the<br />
base station is now ready to use.<br />
TABLE 4: RADIO FEATURE CODES<br />
OPTION CODE NO.<br />
Turn Channel Scan ON 1<br />
Turn Channel Scan OFF 2<br />
Turn Weather Channel ON 3<br />
Turn Weather Channel OFF 4<br />
Turn Weather Alert ON 5<br />
Turn Weather Alert OFF 6<br />
Assign SCAN option to Z Button 7<br />
Assign WEATHER option to Z Button 8<br />
Assign MONITOR option to Z Button 9<br />
Assign CALL TONE option to Z Button 0<br />
HOW TO DELETE A CHANNEL<br />
Following the instructions in "How to Field Program<br />
Frequency & Tone Codes" on page 10, enter a<br />
Frequency Code of "00" and a Tone Code of "00". Once<br />
a channel has been deleted it is no longer available with<br />
the Channel Selector.<br />
A deleted channel can be added back at any time. To add<br />
a deleted channel back, follow the instructions in "How<br />
to Field Program Frequency & Tone Codes" on page 10.<br />
PC PROGRAMMABLE FEATURES<br />
The "Display Series" base station has many features that<br />
are only available through PC programming. See your<br />
Ritron dealer or contact Ritron directly for PC programming<br />
of these option.<br />
Receive and Transmit Frequency on any channel<br />
can be programmed to any valid frequency within it's<br />
designated band. (See "Display Series Model Numbers"<br />
for frequency bands)<br />
Squelch Tightener on any channel can adjust carrier<br />
squelch UP to block distant signals or DOWN to hear<br />
more distant signals.<br />
Wide or Narrow Band on any channel.<br />
Monitor Lock Out can be set on any channel to<br />
prevent monitoring of the channel, only broadcasts with<br />
the correct QC or DQC code can be heard.<br />
Transmit Inhibit on Busy Channel can be set on any<br />
channel to prevent transmitting when a broadcast is<br />
present on the receiver that does not carry the correct<br />
code. This feature is usually used in conjunction with<br />
Monitor Lock Out.<br />
Transmit Time Out time can be changed.<br />
NOTES:<br />
1. If Code 7 is selected Codes 1 & 2 have no effect<br />
2. If Code 8 is selected Codes 3 & 4 have no effect Power Saver "sleep" time can be set, or power saver<br />
3. Code 0 is entered by pressing the PTT 10 times can be disabled.<br />
Have questions? Call 800-USA-1-USA (800-872-1872) or visit our website at www.ritron.com page 12
PROGRAMMING<br />
!! CAUTIONS — ALL RADIOS !!<br />
Courtesy Beep sounds a short tone at<br />
the end of each received transmission to<br />
indicate that the channel is clear and you<br />
may transmit.<br />
Transmit Clear To Talk Beep Any<br />
channel can be set to sound a short tone<br />
after the PTT has been pressed to indicate<br />
that the base station is ready for you to<br />
begin talking.<br />
Disable Field Programming to allow<br />
only PC programming.<br />
Channel Scan can be programmed or<br />
edited to include any of the radio channels,<br />
even channels that are not selected with<br />
the Channel Selector button. Other<br />
programmable scan features include scan<br />
resume delay time, busy channel blocking,<br />
last active channel beeps, and priority<br />
scanning options.<br />
2-Tone Paging Decode can be set on<br />
any channel. Programmable options include<br />
the setting of the 2-Tone frequencies and<br />
duration, All Call, Group Call, Call<br />
Transpond, automatic setting of 2-Tone<br />
decode when the channel is selected,<br />
automatic reset of the 2-Tone Decode if a<br />
call is not answered within 15 seconds,<br />
and automatically set the base station to<br />
carrier squelch mode after a 2-Tone signal<br />
is received.<br />
* Each channel can be programmed with a<br />
diffferent 2-Tone Code. Pressing the "Z"<br />
button will send the 2-Tone Code.<br />
* A unique DTMF ANI string can be<br />
programmed separately for each channel.<br />
* Note: A channel can not be programmed to<br />
do both DTMF ANI and 2-Tone Encode.<br />
OBSERVE CAUTION IN THE<br />
FOLLOWING ENVIRONMENTS TO<br />
MAXIMIZE THE LIFE OF YOUR RADIO<br />
EQUIPMENT:<br />
LOCATION: Be aware that this radio and/or<br />
antenna may create interference with, or be<br />
interfered with, by nearby electronic<br />
equipment such as computers, monitors,<br />
keyboards, electronic telephones and other<br />
sensitive devices. Either move the equipment<br />
or use a remote antenna to separate<br />
components sufficiently to stop or reduce<br />
interference.<br />
MOISTURE: "Display Series" base radios are<br />
not waterproof. DO NOT directly expose<br />
them to rain or excessive moisture.<br />
CHEMICALS: Detergents, alcohol, aerosol<br />
sprays or petroleum products can damage<br />
the radio case. DO NOT use petroleum solvents<br />
of any kind; use a soft cloth moistened<br />
with water to clean the case.<br />
EXTREME HEAT: High temperatures can<br />
damage the radio and its components. DO<br />
NOT expose the units to extreme heat or<br />
leave them in direct sunlight.<br />
EXCESSIVE TRANSMISSIONS: DO NOT hold<br />
the Push-To-Talk switch down longer than<br />
necessary during transmission intervals.<br />
VIBRATION/ SHOCK: Although your "Display<br />
Series" base radio is designed to be rugged,<br />
it will not survive excessive abuse. Avoid<br />
dropping the radio.<br />
EXPOSURE TO RADIO FREQUENCY ENERGY:<br />
These product generates radio frequency (RF) energy when the PTT button on<br />
the front of the unit is depressed. The product has been evaluated for<br />
compliance with the maximum permissible exposure limits for RF energy at the<br />
maximum power rating of the unit when using antennas available from RITRON.<br />
Antennas other than the those mentioned below have not been tested for<br />
compliance and may or may not meet the exposure limits at the distances given.<br />
Higher gain antennas are capable of generating higher fields in the strongest part<br />
of their field and would, therefore, require a greater separation from the antenna.<br />
JBS-/PBS-146D: To comply with the General Population/Uncontrolled limits, all<br />
persons must be at least 7.9 inches (20 cm) from the AFB-1545 antenna which<br />
is supplied by RITRON to be attached directly to the rear of the unit. For the<br />
RITRON RAM-1545 magnet mount antenna which can be located away from the<br />
unit, all persons must remain at least 10.8 inches (28 cm) from the antenna.<br />
JBS-/PBS-446D: To comply with the General Population/Uncontrolled limits, all<br />
persons must be at least 8.7 inches (22 cm) from the AFB-1545 antenna which is<br />
supplied by RITRON to be attached directly to the rear of the unit. For the RITRON<br />
RAM-1545 magnet mount antenna, at the 20 cm (7.9 inches) minimum expected<br />
separation distance and greater, the maximum RF exposure is well below the General<br />
Population/Uncontrolled limits. This product is not to be used by the general public in<br />
an uncontrolled environment unless compliance with the Uncontrolled/General<br />
Population limits for RF exposure can be assured.<br />
To limit exposure to RF energy to levels below the limit, please observe the<br />
following:<br />
• Use only the antenna(s) available from RITRON for these models. DO NOT<br />
operate the radio without an antenna.<br />
• Keep talk times as short and infrequent as possible. DO NOT depress the PTT<br />
button when not actually wishing to transmit. These radios are equipped with<br />
an internal timer to limit continuous transmit times.<br />
• When transmitting, make certain that the distance limits for the particular model<br />
in use are observed.<br />
• DO NOT allow children to operate the radio.<br />
page 13 3 RITRON, Have INC. questions? 1-800-USA-1-USA Call 800-USA-1-USA (1-800-872-1872) (800-872-1872) or visit our website at www.ritron.com
NOTES<br />
1. • Reception can often be improved if you<br />
relocate by a short distance. This effect is<br />
more noticeable inside buildings.<br />
• The range of the "Display Series" base<br />
radio is approximately two miles, line-ofsight.<br />
2. If your radio does not detect calls from other<br />
radios on the channel, turn off Quiet Call by<br />
pressing and holding both volume buttons at the<br />
same time—a double beep indicates Quiet Call is<br />
off.<br />
3. • Without use of a repeater: To hear a call, select a<br />
channel programmed to receive the caller's<br />
transmit frequency. To call another unit, select a<br />
channel programmed to transmit the other radio's<br />
receive frequency.<br />
• Using a repeater: A radio channel can hold two<br />
separate operating frequencies, one for receive<br />
and one for transmit. Your channel must work<br />
with the repeater's transmit and receive<br />
frequencies.<br />
• NOTE: A dealer must program the radio for<br />
repeater operation.<br />
4. • An optional RM-7 Remote Speaker/<br />
Microphone and headset, plus the CCL-M<br />
12 VDC Adapter, allow operation in a<br />
vehicle. See page ii for accessories.<br />
5. • To "talk" with each other, radios must be<br />
programmed identically for Quiet Call code, as<br />
well as frequency. Each code is unique; radios<br />
respond only to the code programmed.<br />
• Press and hold both volume buttons at the same<br />
time.<br />
A single beep indicates Quiet Call squelch is on.<br />
A double beep indicates Quiet Call squelch is off.<br />
TROUBLESHOOTING<br />
CHART<br />
If you have trouble operating the base radio, review the Control & Operation, pages 2 through 7.<br />
If you think the base radio is malfunctioning, check the list below.<br />
Problem<br />
Possible Solutions<br />
GENERAL<br />
The radio does not work at all. • Make sure the 120 VAC outlet is active and the RPS-1A power supply is<br />
connected.<br />
Operating features do not work • The radio has been dealer programmed for customized operation.<br />
exactly as expected.<br />
(Consult dealer.)<br />
Reception is poor. • Move to a different location. (See Note 1.)<br />
• Confirm the proper antenna is connected to the radio.<br />
• Use an optional high-gain antenna. See page ii, Optional Accessories.<br />
You cannot hear calls from • Turn off Quiet Call (coded) squelch. (See Note 2.)<br />
other radios. • Ensure radio receives the same frequency the caller transmits. (See Note 3.)<br />
Your calls cannot be heard in • Make sure that your radio transmits on the receive frequency of the radio(s) you<br />
other radios. want to call. (See Note 3.)<br />
ERROR TONES<br />
An error tone sounds when the • See "Error Tones" on page 4.<br />
radio is first switched on.<br />
An error tone occurs while • Refer to "Transmitter Time-Out," page 4.<br />
transmitting.<br />
QUIET CALL<br />
You cannot screen out calls • Make sure that the channel is programmed with Quiet Call.<br />
from users outside of your Quiet • Activate coded squelch. (See Note 5.)<br />
Call group.<br />
You cannot hear Quiet Call • Confirm that the channel is programmed to detect the same code as the calling<br />
messages while in Quiet Call radio(s) transmits. (See Note 5.)<br />
(coded) squelch.<br />
Others in your Quiet Call group • Verify that you transmit the same code as the radio(s) you call are<br />
cannot hear your Quiet Call programmed to detect. (See Note 5.)<br />
messages.<br />
SCAN<br />
The radio constantly stops on • Skip over the interfering channel when scanning.<br />
a busy channel, preventing you See "Temporary Busy Channel Blocking" on page 5.<br />
from hearing calls on other<br />
channels.<br />
Have questions? Call 800-USA-1-USA (800-872-1872) or visit our website at www.ritron.com page 14
SPECIAL APPLICATION<br />
HOW TO FIELD PROGRAM 2-TONE ENCODE CODES<br />
For special applications, it is possible to use your Ritron portable radio or base station for<br />
remote control applications; such as opening or closing a gate remotely (see Ritron<br />
GateGuard at www.ritron.com/gg_04.pdf). This application requires you to program the<br />
radio(s) that will be sending the command for 2-Tone Encode operation. And radio(s) that<br />
will be receiving the command (e.g. Ritron Callbox) for 2-Tone Decode operation. The 2-Tone<br />
Codes must match.<br />
The user can field program each channel with one of the 9 pre-set 2-Tone Codes specified<br />
in Table 5. These codes correspond to field programmable 2-Tone Codes available in the<br />
Ritron 6-Series OUTPOST Callbox. In our example we will program a UHF radio to operate<br />
with 2-Tone Code #94.<br />
Important Note:<br />
You can ADD a 2-Tone Code to a channel if the Frequency Code and Tone Code<br />
are not changed. Changing the Frequency Code or Tone Code of a channel will<br />
ERASE any 2-Tone Code programmed on that channel. You must FIRST re-program<br />
the channel to the desired Frequency Code and Tone Code and then SAVE<br />
the entry by pressing the On/Volume Up button, then you may enter your 2-Tone<br />
Code, remember you must also SAVE this entry by pressing the On/Volume Up<br />
button.<br />
1. Refer to Table 5 to determine the 2 digit, 2-Tone Code(s) you wish<br />
to program into each specific channel.<br />
2. Follow the instructions in Fig 7, page 9 to place the radio in the<br />
“Program/Readout Mode”.<br />
6. After you have entered both digits, press and release the On/Volume<br />
Up button to SAVE the entry. The LED display will briefly show the<br />
channel number you have just programmed and then a hyphen, the<br />
radio will sound a triple beep to indicate that programming was successful.<br />
An ERROR tone will sound if you attempt to save an incorrect code,<br />
an “E” will appear on the LED display. Check the digits you are attempting<br />
to program and start over.<br />
7. You may program each channel with the same or a different 2-Tone Code<br />
by repeating steps 3-6.<br />
8. Turn the radio OFF and then ON again for normal operation. The "Z" button is<br />
used to send the 2-Tone Code. See HOW TO SEND A 2-TONE CODE.<br />
!<br />
Readout<br />
Sequence<br />
If more than 5 digits are displayed during readout, the radio has been<br />
programmed for 2-Tone Encode. The frequency and tone codes will be<br />
displayed, followed by a “C”, then the radio will display the 2-Tone<br />
Code; see Table 5. In this example a UHF radio was programmed to<br />
operate on the “Brown Dot” Frequency Code 04 (464.500 MHz) with<br />
Tone Code 12 (100.0 Hz) and 2-Tone Encode Code 94.<br />
Frequency Code Tone Code 2-Tone Code<br />
2-TONE CODE<br />
3. Using the channel button and the LED display on the radio, select<br />
the channel number you want to program a 2-Tone Code into.<br />
4. Enter the 1 st digit of the 2-Tone code by clicking the PTT button<br />
until the program display shows the desired number. Pause—the<br />
radio will sound a low tone and show a hyphen across the<br />
display to indicate that it is ready to accept the next digit.<br />
5. Enter the 2 nd digit of the 2-Tone code by clicking the PTT button<br />
until the program display shows the desired number. Pause—the<br />
radio sounds a low tone and will show a hyphen across the<br />
display.<br />
HOW TO SEND A 2-TONE CODE<br />
1. Select a channel that has been programmed with a 2-Tone Code.<br />
2. Press the "Z" button to send the 2-Tone Code programmed for that specific<br />
channel.<br />
TABLE 5: PROGRAMMABLE 2-TONE ENCODE CODES<br />
Code No Code No Code No<br />
91 94 97<br />
92 95 98<br />
93 96 99<br />
page 3 RITRON, INC. 1-800-USA-1-USA (1-800-872-1872)<br />
Have questions? Call 800-USA-1-USA (800-872-1872) or visit our website at www.ritron.com<br />
page 15
FCC & IC LICENSE REQUIRED<br />
FCC REGULATIONS<br />
LICENSING<br />
The FCC requires the owners of the radios to obtain a<br />
station license before using them.<br />
The station licensee is responsible for ensuring that<br />
transmitter power, frequency and deviation are within<br />
the limits specified by the station license. The station<br />
licensee is also responsible for proper operation and<br />
maintenance of the radio equipment. This includes<br />
checking the transmitter frequency and deviation<br />
periodically, using appropriate methods.<br />
To get a FCC license for VHF or UHF frequencies,<br />
submit FCC application Form 600 as indicated in the<br />
block at right. Your Ritron dealer can help you with this<br />
process.<br />
SAFETY STANDARDS<br />
The FCC (with its action in General Docket 79-144,<br />
March 13, 1985) has adopted a safety standard for<br />
human exposure to radio frequency electromagnetic<br />
energy emitted by FCC regulated equipment. Ritron<br />
observes these guidelines and recommends that you<br />
do also:<br />
• DO NOT hold the radio so that the antenna is<br />
very close to or touching exposed parts of the<br />
body, especially the face or eyes, while transmitting.<br />
Keep the radio vertical, four inches<br />
away while talking into the front panel.<br />
• DO NOT press the Push-To-Talk except when<br />
you intend to transmit.<br />
• DO NOT operate radio equipment near electrical<br />
blasting caps or in an explosive atmosphere.<br />
• DO NOT allow children to play with any radio<br />
equipment that contains a transmitting device.<br />
• Repair of Ritron products should be performed<br />
only by Ritron authorized personnel.<br />
HOW TO OBTAIN AN FCC RADIO LICENSE<br />
Federal <strong>Communications</strong> Commission (FCC)<br />
Licensing Information<br />
Because your Ritron radio operates on Private Land<br />
Mobile frequencies, it is subject to the Rules and<br />
Regulations of the FCC, which requires all operators of<br />
these frequencies to obtain a station license before<br />
operating their equipment. Make application for your<br />
FCC license on FCC Forms 600 and 159.<br />
To have forms and instructions faxed to you by<br />
the FCC, call the FCC Fax-On-Demand system<br />
at 202-418-0177 from your fax machine; request<br />
Document 000600 & Form 159.<br />
To have Document 000600 & Form 159 mailed to<br />
you, call the FCC Forms Hotline at 800-418-FORM<br />
(800-418-3676).<br />
For help with questions concerning the license<br />
application, contact the FCC at 888-CALL-FCC<br />
(888-225-5322).<br />
You must decide which radio frequency(ies) you<br />
can operate on before filling out your application.<br />
For help determining your frequencies, call<br />
Ritron at 800-USA-1-USA (800-872-1872).<br />
INDUSTRY CANADA REGULATIONS<br />
Industry Canada requires the owners of the radios to<br />
obtain a radio license before using them. Application<br />
forms can be obtained from the nearest Industry<br />
Canada District office.<br />
INDUSTRY CANADA LICENSE APPLICATION<br />
1. Fill in the items per the instructions. If you need<br />
additional space for any item, use the reverse side<br />
of the application.<br />
2. Use a typewriter or print legibly.<br />
3. Make a copy for your files.<br />
4. Prepare a check or money order to “Receiver<br />
General for Canada”, for the amount listed on the<br />
following schedule for each radio purchased.<br />
(Licenses are renewed annually on April 1st.<br />
Refer to the following schedule for application fees<br />
for each month.)<br />
5. Mail the completed application, along with your<br />
check or money order, to the closest Industry<br />
Canada District Office.<br />
Note:<br />
Month of Initial Month of Initial<br />
Application Fee Application Fee<br />
April $52 October $33<br />
May $50 November $29<br />
June $46 December $26<br />
July $43 January $23<br />
August $40 February $20<br />
September $36 March $16<br />
Fees are subject to change without notice.<br />
The annual renewal fee is $41.<br />
SERVICE<br />
Federal law prohibits you from making any internal<br />
adjustments to the transmitter, and/ or from changing<br />
transmit frequencies unless you are specifically<br />
designated by the licensee.<br />
If your radio equipment fails to operate properly, or<br />
you wish to have the radio programmed, contact your<br />
authorized dealer or Ritron.<br />
U.S. Manufacturer:<br />
RITRON, INC., Repair Department<br />
505 West Carmel Drive, Carmel, IN 46032 USA<br />
Phone: 317-846-1201<br />
FAX: 317-846-4978<br />
Canadian Representative:<br />
Lenbrook <strong>Communications</strong>, 633 Granite Court<br />
Pickering, ON L1W 3K1<br />
Phone: 905-831-6555<br />
FAX: 905-831-6936<br />
Have questions? Call 800-USA-1-USA (800-872-1872) or visit our website at www.ritron.com page 16
RITRON, INC. LIMITED WARRANTY<br />
WHAT THIS WARRANTY COVERS<br />
RITRON, INC. ("RITRON") provides the following warranty against defects in materials and/or workmanship<br />
in RITRON Radios and Accessories under normal use and service during the applicable warranty period (as<br />
stated below). "Accessories" means antennas, holsters, chargers, earphones, speaker/microphones and items<br />
contained in the programming and programming/service kits.<br />
WHAT IS COVERED FOR HOW LONG WHAT RITRON WILL DO<br />
"Display Series" Base 1 year* During the first year after date of purchase,<br />
Station Radios<br />
RITRON will repair or replace the defective<br />
product, at RITRON's option, parts and<br />
labor included at no charge.<br />
Accessories 90 days* *After date of purchase<br />
WHAT THIS WARRANTY DOES NOT COVER:<br />
• Any technical information provided with the covered product or any other RITRON products;<br />
• Installation, maintenance or service of the product, unless this is covered by a separate written agreement<br />
with RITRON;<br />
• Any products not furnished by RITRON which are attached or used with the covered product, or defects or<br />
damage from the use of the covered product with equipment that is not covered (such as defects or damage<br />
from the charging or use of batteries other than with covered product);<br />
• Defects or damage, including broken antennas, resulting from:<br />
- misuse, abuse, improper maintenance, alteration, modification, neglect, accident or act of God,<br />
- the use of covered products other than in normal and customary manner or,<br />
- improper testing or installation;<br />
• Defects or damages from unauthorized disassembly, repair or modification, or where unauthorized<br />
disassembly, repair or modification prevents inspection and testing necessary to validate warranty claims;<br />
• Defects or damages in which the serial number has been removed, altered or defaced.<br />
• Batteries if any of the seals are not intact.<br />
WHO IS COVERED BY THIS WARRANTY<br />
This warranty is given only to the purchaser or lessee of covered products when acquired for use, not resale.<br />
This warranty is not assignable or transferable.<br />
IMPORTANT<br />
This warranty sets forth the full extent of RITRON’s express responsibilities regarding the covered products,<br />
and is given in lieu of all other express warranties. What RITRON has agreed to do at left is your sole and<br />
exclusive remedy. No person is authorized to make any other warranty to you on behalf of RITRON.<br />
Warranties implied by state law, such as implied warranties of merchantability and fitness for a particular<br />
purpose, are limited to the duration of this limited warranty as it applies to the covered product. Incidental<br />
and consequential damages are not recoverable under this warranty (this includes loss of use or time,<br />
inconvenience, business interruption, commercial loss, lost profits or savings). Some states do not allow<br />
the exclusion or limitation of incidental or consequential damages, or limitation on how long an<br />
implied warranty lasts, so the above limitations or exclusions may not apply to you. Because each<br />
covered product system is unique, RITRON disclaims liability for range, coverage, or operation of<br />
the system as a whole under this warranty.<br />
HOW TO GET WARRANTY SERVICE<br />
To receive warranty service, you MUST deliver or send the defective product, delivery costs and insurance<br />
prepaid, within the applicable warranty period, to RITRON, INC., 505 West Carmel Drive, Carmel, Indiana<br />
46032, Attention: Warranty Department.<br />
Please point out the nature of the defect in as much detail as you can. You MUST retain your sales or lease<br />
receipt (or other written evidence of the date of purchase) and deliver it along with the product. If<br />
RITRON chooses to repair or replace a defective product, RITRON may replace the product or any part or<br />
component with reconditioned product, parts or components. Replacements are covered for the balance of the<br />
original applicable warranty period. All replaced covered products, parts or components become RITRON’s<br />
property.<br />
RIGHTS TO SOFTWARE RETAINED<br />
Title and all rights or licenses to patents, copyrights, trademarks and trade secrets in any RITRON software<br />
contained in covered products are and shall remain in RITRON. RITRON nevertheless grants you a limited<br />
non-exclusive, transferable right to use the RITRON software only in conjunction with covered products. No<br />
other license or right to the RITRON software is granted or permitted.<br />
YOUR RIGHTS UNDER STATE LAW<br />
This warranty gives you specific legal rights, and you may also have other rights which vary from state to state.<br />
WHERE THIS WARRANTY IS VALID<br />
This warranty is valid only within the United States, the District of Columbia and Puerto Rico.<br />
505 West Carmel Drive • Carmel, IN 46032<br />
Pub. 14500045 REV. B 10-04<br />
P. O. Box 1998 • Carmel, IN 46082-1998<br />
COPYRIGHT© 1999-2004 RITRON, INC. • ALL RIGHTS RESERVED<br />
Ph: 317-846-1201 • Fax: 317-846-4978 • Email: ritron@ritron.com<br />
RITRON, page JOBCOM, 3 RITRON, QUICK ASSIST,<br />
Have INC. and QUIET<br />
questions? 1-800-USA-1-USA CALL ARE REGISTERED TRADEMARKS<br />
Call 800-USA-1-USA (1-800-872-1872)<br />
OF RITRON, INC. Website: www.ritron.com<br />
(800-872-1872) or visit our website at www.ritron.com