Lewmar shifter manua.. - Marlow-Hunter, LLC
Lewmar shifter manua.. - Marlow-Hunter, LLC
Lewmar shifter manua.. - Marlow-Hunter, LLC

Create successful ePaper yourself
Turn your PDF publications into a flip-book with our unique Google optimized e-Paper software.
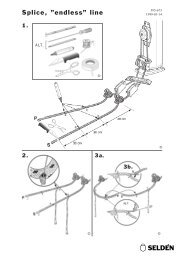
LEWMAR NON-MAGNETIC SINGLE LEVER ENGINE CONTROL<br />
Installation and operation<br />
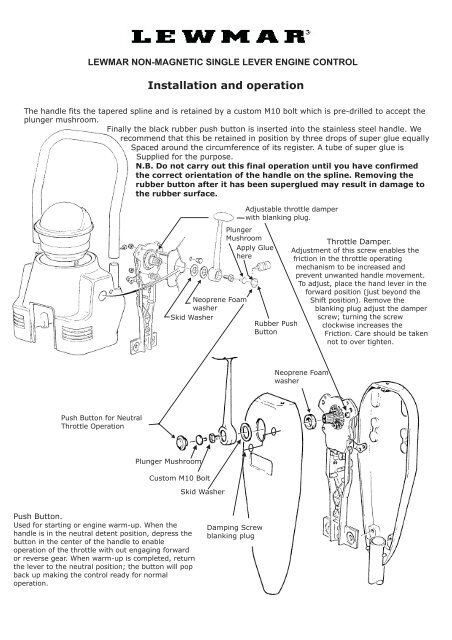
The handle fits the tapered spline and is retained by a custom M10 bolt which is pre-drilled to accept the<br />
plunger mushroom.<br />
Finally the black rubber push button is inserted into the stainless steel handle. We<br />
recommend that this be retained in position by three drops of super glue equally<br />
Spaced around the circumference of its register. A tube of super glue is<br />
Supplied for the purpose.<br />
N.B. Do not carry out this final operation until you have confirmed<br />
the correct orientation of the handle on the spline. Removing the<br />
rubber button after it has been superglued may result in damage to<br />
the rubber surface.<br />
Neoprene Foam<br />
washer<br />
Skid Washer<br />
Adjustable throttle damper<br />
with blanking plug.<br />
Plunger<br />
Mushroom<br />
Apply Glue<br />
here<br />
Rubber Push<br />
Button<br />
Throttle Damper.<br />
Adjustment of this screw enables the<br />
friction in the throttle operating<br />
mechanism to be increased and<br />
prevent unwanted handle movement.<br />
To adjust, place the hand lever in the<br />
forward position (just beyond the<br />
Shift position). Remove the<br />
blanking plug adjust the damper<br />
screw; turning the screw<br />
clockwise increases the<br />
Friction. Care should be taken<br />
not to over tighten.<br />
Neoprene Foam<br />
washer<br />
Push Button for Neutral<br />
Throttle Operation<br />
Plunger Mushroom<br />
Custom M10 Bolt<br />
Skid Washer<br />
Push Button.<br />
Used for starting or engine warm-up. When the<br />
handle is in the neutral detent position, depress the<br />
button in the center of the handle to enable<br />
operation of the throttle with out engaging forward<br />
or reverse gear. When warm-up is completed, return<br />
the lever to the neutral position; the button will pop<br />
back up making the control ready for normal<br />
operation.<br />
Damping Screw<br />
blanking plug
LEWMAR NON-MAGNETIC SINGLE LEVER ENGINE CONTROL<br />
Cable Installation and Maintenance Instruction Sheet<br />
Use Morse 33C<br />
Cables or equivalent..<br />
PLEASE NOTE<br />
Refer to Engine Manufacturers handbook for throttle and gear direction and adjustments.<br />
“Push” and “Pull” refer to the direction of the cable motion to shift into Forward or to Open throttle.<br />
Hole numbers in the diagrams below refer to the numbers stamped on the levers and the control mechanism chassis.<br />
Cables & Wiring should be pre-installed on control before final mounting is made.<br />
PULL TO GO FORWARDS<br />
PUSH TO GO FORWARDS<br />
Right-hand operation<br />
shown. Left-hand<br />
opposite<br />
FORWARD SHIFT<br />
Right-hand operation<br />
shown. Left-hand<br />
opposite<br />
FORWARD SHIFT<br />
“PULL”<br />
SIDE<br />
3<br />
4<br />
“PUSH”<br />
SIDE<br />
5<br />
6<br />
7<br />
8<br />
PULL TO OPEN<br />
THROTTLE<br />
Right-hand operation<br />
shown. Left-hand<br />
opposite<br />
FORWARD<br />
THROTTLE<br />
PUSH TO OPEN<br />
THROTTLE<br />
Right-hand operation<br />
shown. Left-hand<br />
opposite<br />
FORWARD<br />
THROTTLE<br />
1<br />
“PULL”<br />
SIDE<br />
2<br />
“PUSH”<br />
SIDE<br />
2<br />
1
LEWMAR NON-MAGNETIC SINGLE LEVER ENGINE CONTROL<br />
Cable Terminal and Cable Hub Connections to Control<br />
Snap-on cover<br />
to retain cables<br />
Split pin<br />
Clip for cable<br />
0.125<br />
(3mm)<br />
Pivot<br />
Throttle arm or<br />
shift arm reference<br />
Flat head<br />
screw<br />
Swivel<br />
bearing<br />
Cable rod end should<br />
extend approx 0.125in(3.175mm)<br />
through pivot arm.<br />
Nut<br />
Throttle Cable Connection - Engine End<br />
CAUTION:<br />
The throttle cable must be disconnected from the motor before making motor idle adjustments. Adjustment of the motor<br />
Idle while the throttle cable is still connected to the motor may cause a jamming action against the Idle stop. As a result,<br />
the control may not function properly and damage to the control, the cable and/or motor could result.<br />
Engine Lever<br />
Throttle Cable<br />
terminal<br />
Make sure the control is in Netural Detent.<br />
The fuel lever should rest lightly against the<br />
Idle stop.<br />
Connect the throttle Cable to the fuel lever.<br />
NOTE ~ Throttle cable must be free when<br />
fuel lever is in the idle position to prevent<br />
hard shifting<br />
Idle Stop<br />
Minimum Pressure<br />
here
LEWMAR NON-MAGNETIC SINGLE LEVER ENGINE CONTROL<br />
Electrical Connections<br />
Neutral Safety Switch<br />
The control is provided with a Neutral Safety Switch. This switch is used to prevent the engine from<br />
starting in gear. Use a battery-powered Test light or test meter to check continuity.<br />
1. With the control in NEUTRAL connect one wire of the tester to the common terminal, and one wire to<br />
the “NO” (Normally open) Terminal. The test light MUST Light.<br />
2. Connect the Neutral Safety Switch between the Ignition switch (start Lead) and the starter solenoid<br />
(See diagram below).<br />
CAUTION:<br />
Check to make sure that there is electrical continuity only when the control is in neutral. There must not be<br />
any electrical continuity otherwise.<br />
Safety Switch<br />
On<br />
Start<br />
Common<br />
Normally Open<br />
Neutral Safety<br />
switch leads<br />
Off<br />
Solenoid<br />
Starter<br />
Common connection<br />
“NO” normally open<br />
connection<br />
Maintenance<br />
Periodically check head mechanism for loose fasteners and signs of wear of moving parts. Keep these<br />
moving parts well lubricated with a moisture displacing lubricant such as WD40 or Marine grease.<br />
Periodically check the cables and engine connections for signs of wear and corrosion replace as<br />
necessary.<br />
REVISION 3<br />
CREATED BY N.SEAMARKS<br />
APPROVED BY D.WORTHINGTON<br />
DATE 06.11.2006