The National Locksmith (PDF)
The National Locksmith (PDF)
The National Locksmith (PDF)

You also want an ePaper? Increase the reach of your titles
YUMPU automatically turns print PDFs into web optimized ePapers that Google loves.
stays open when a fingerprint or<br />
code is entered. That is roughly<br />
about five seconds. However, if<br />
you wait too long and it relocks,<br />
you only need to close the cover<br />
and slide it back up again to<br />
open. You may need to wait a few<br />
seconds after closing the cover<br />
before reopening it. To enable or<br />
disable passage mode, press: * +<br />
* + MASTER CODE + #. Doing<br />
this will toggle the unit back and<br />
forth from one condition to the<br />
other. If it is already in passage<br />
mode, doing this will set it back<br />
to regular operating mode and<br />
vice versa.<br />
I mentioned earlier that fingerprint<br />
users with user ID’s can<br />
be removed individually without<br />
affecting any other users. To delete<br />
a fingerprint user in this way,<br />
press: 2 + # + MASTER CODE +<br />
USERS 3 DIGIT ID + USERS 3<br />
DIGIT ID (again) + #. If you wish<br />
to delete ALL fingerprint users,<br />
you can do it all in one process.<br />
This deletes all fingerprint users,<br />
both those that have and don’t<br />
have user ID’s. To accomplish<br />
this, press: 3 + # + MASTER<br />
CODE + #.<br />
If you wish to delete individual<br />
pass codes, press: 2 + * + MAS-<br />
TER CODE + USERS 3 DIGIT ID<br />
+ USERS 3 DIGIT ID (again) + #.<br />
To delete ALL pass code users,<br />
press: 3 + * + MASTER CODE +<br />
#.<br />
In the first part of this article<br />
when I was describing the installation,<br />
I made reference to a reset<br />
button on the back surface of<br />
the front lock body. I have just<br />
described how to delete individual<br />
fingerprint and pin users,<br />
and also how to delete either all<br />
fingerprint users or all pin code<br />
users. If you decide that you want<br />
to restore the lock to factory<br />
settings, you can not only delete<br />
all users, but you can also restore<br />
the factory default master code.<br />
In order to do this, you will need<br />
to remove the lock from the door.<br />
With the back side of the front<br />
lock body in view, first make sure<br />
that the power cable is attached<br />
to the battery pack. Because the<br />
plug end of the cable will also<br />
attach to a 9 volt battery, you can<br />
use such a battery for resetting.<br />
Never use a 9 volt battery to power<br />
the lock for everyday use, but<br />
you can use it to reset to factory<br />
defaults. With power connected,<br />
press and hold the reset button.<br />
While holding the reset button<br />
down, use your other hand to lift<br />
the slide cover up. After about 15<br />
to 20 seconds, you should hear a<br />
long beep. That indicates that the<br />
lock has been reset. To verify this<br />
has been accomplished, slide the<br />
cover up and enter the default<br />
master code: 11111111. It should<br />
open the lock.<br />
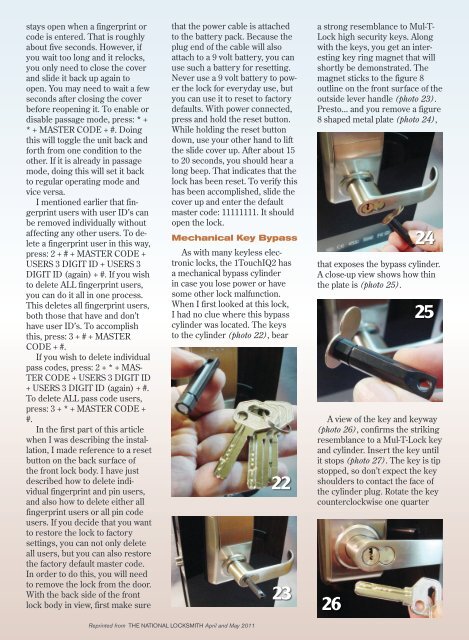
Mechanical Key Bypass<br />
As with many keyless electronic<br />
locks, the 1TouchIQ2 has<br />
a mechanical bypass cylinder<br />
in case you lose power or have<br />
some other lock malfunction.<br />
When I first looked at this lock,<br />
I had no clue where this bypass<br />
cylinder was located. <strong>The</strong> keys<br />
to the cylinder (photo 22), bear<br />
22<br />
23<br />
a strong resemblance to Mul-T-<br />
Lock high security keys. Along<br />
with the keys, you get an interesting<br />
key ring magnet that will<br />
shortly be demonstrated. <strong>The</strong><br />
magnet sticks to the figure 8<br />
outline on the front surface of the<br />
outside lever handle (photo 23).<br />
Presto... and you remove a figure<br />
8 shaped metal plate (photo 24),<br />
24<br />
that exposes the bypass cylinder.<br />
A close-up view shows how thin<br />
the plate is (photo 25).<br />
25<br />
A view of the key and keyway<br />
(photo 26), confirms the striking<br />
resemblance to a Mul-T-Lock key<br />
and cylinder. Insert the key until<br />
it stops (photo 27). <strong>The</strong> key is tip<br />
stopped, so don’t expect the key<br />
shoulders to contact the face of<br />
the cylinder plug. Rotate the key<br />
counterclockwise one quarter<br />
26<br />
Reprinted from THE NATIONAL LOCKSMITH April and May 2011