Connecting an ICC metal chimney to an 8x12 masonry chimney
Connecting an ICC metal chimney to an 8x12 masonry chimney
Connecting an ICC metal chimney to an 8x12 masonry chimney

Create successful ePaper yourself
Turn your PDF publications into a flip-book with our unique Google optimized e-Paper software.
RR 5 Shawville Québec J0X 2Y0<br />
Voice 819.647.5092<br />
Fax 819.647.6082<br />
email mheat@heatkit.com<br />
www.heatkit.com<br />
Fax Tr<strong>an</strong>smittal<br />
Tuesday, 27 September, 2005<br />
Attention:<br />
From:<br />
Norbert Senf<br />
Regarding:<br />
Total Pages 7<br />
<strong>ICC</strong> <strong>chimney</strong> t<strong>an</strong>sition<br />
Attached please find technical documentation from <strong>ICC</strong> on the application of their <strong>an</strong>chor plate for<br />
adapting a <strong>masonry</strong> <strong>chimney</strong> <strong>to</strong> their ULC listed <strong>chimney</strong>.<br />
For a <strong>masonry</strong> heater <strong>chimney</strong>, the installation is equivalent <strong>to</strong> the <strong>to</strong>p right illustration on page 11<br />
“Typical Masonry Chimney Extensions”. In other words, there will be <strong>an</strong> existing <strong>masonry</strong> <strong>chimney</strong>, <strong>an</strong>d<br />
it is getting extended with <strong>metal</strong> <strong>chimney</strong>.<br />
On page 12, it states:<br />
“When the original clay tile liner being extended is close <strong>to</strong> the same size <strong>an</strong>d shape as the RIS <strong>chimney</strong><br />
it is generally sufficient <strong>to</strong> construct a smooth, h<strong>an</strong>d laid, refrac<strong>to</strong>ry cement tr<strong>an</strong>sition”.<br />
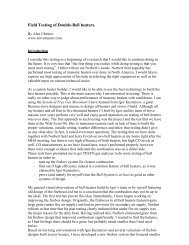
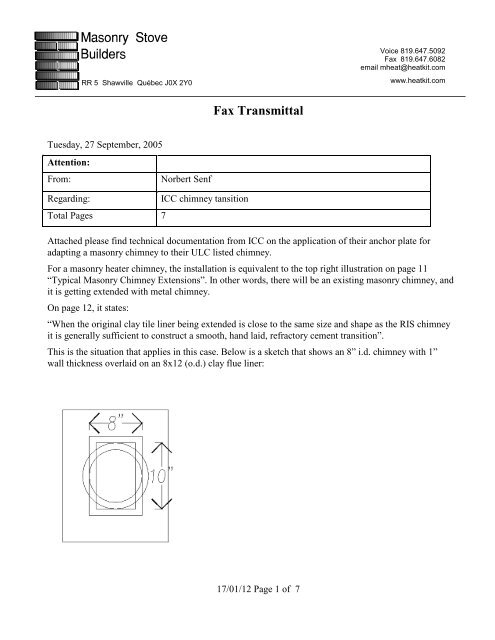
This is the situation that applies in this case. Below is a sketch that shows <strong>an</strong> 8” i.d. <strong>chimney</strong> with 1”<br />
wall thickness overlaid on <strong>an</strong> <strong>8x12</strong> (o.d.) clay flue liner:<br />
17/01/12 Page 1 of 7
The cross sectional area of <strong>an</strong> 8” round is 50.25 sq.in. , <strong>an</strong>d a typical <strong>8x12</strong> o.d. clay liner is around 6x10<br />
inside, or 60 sq. in.<br />
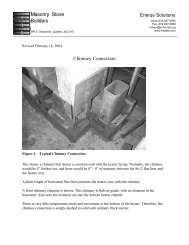
The pho<strong>to</strong> above shows a castable refrac<strong>to</strong>ry tr<strong>an</strong>sition parged in<strong>to</strong> place, before cle<strong>an</strong>up <strong>an</strong>d sponging<br />
smooth.<br />
After sponging.<br />
In this case, we used Excel <strong>chimney</strong> with <strong>an</strong> <strong>ICC</strong> <strong>an</strong>chor plate. Installation on a <strong>chimney</strong> would be<br />
similar, except for the brick <strong>to</strong>pping cap.<br />
The installation will be on br<strong>an</strong>d new <strong>masonry</strong>. Therefore the <strong>ICC</strong> precautions for deteriorated<br />
<strong>chimney</strong>s (bond beams, etc.) are not required. I would suggest letting the brickwork cure for at least a<br />
couple of days before <strong>an</strong>choring tapcons in<strong>to</strong> it.<br />
17/01/12 Page 2 of 7
<strong>ICC</strong>’s reference <strong>to</strong> “refrac<strong>to</strong>ry cement” is not spelled out. Normal clay based refrac<strong>to</strong>ry mortar or<br />
refrac<strong>to</strong>ry cement would not be suitable, because it will shrink <strong>an</strong>d crack in a thick appliction. “Heat<br />
S<strong>to</strong>p” may work, but we have not tried it. We have found ordinary brick mortar suitable, because<br />
portl<strong>an</strong>d cement has a service limit of 600F, <strong>an</strong>d in a <strong>masonry</strong> heater application, this <strong>chimney</strong> will see a<br />
maximum, intermittent, flue temperature of 450 F. If required, we c<strong>an</strong> supply some “Kast Set” refrac<strong>to</strong>ry<br />
castable, which would be bullet proof in this application.<br />
17/01/12 Page 3 of 7
17/01/12 Page 4 of 7
1A. If the RIS <strong>chimney</strong> is being used <strong>to</strong> extend a damaged <strong>chimney</strong> read the information on page 7<br />
regarding repairs of earthquake damaged <strong>chimney</strong>s carefully. There is no substitute for a thorough <strong>an</strong> site<br />
examination of the existing <strong>chimney</strong> by a qualified contrac<strong>to</strong>r. The pamphlet "Repair Of Earthquake<br />
Damaged Masonry Chimneys Using New Metal Chimneys" by the City of Los Angeles Department of<br />
Building <strong>an</strong>d Safety provides specific instructions on how <strong>to</strong> determine a suitable location <strong>to</strong> adapt from<br />
<strong>masonry</strong> <strong>to</strong> <strong>metal</strong>, This pamphlet also recommends specific steel bracing which must be fastened <strong>to</strong> the<br />
roof <strong>to</strong> provide lateral support for the existing <strong>masonry</strong>. See drawings of typical installations on page 11.<br />
2. Pour a concrete bond beam <strong>to</strong> provide a suitable surface <strong>to</strong> fasten the <strong>an</strong>chor plate <strong>an</strong>d seal the <strong>to</strong>p of<br />
the existing <strong>masonry</strong>. Read the section on <strong>masonry</strong> tr<strong>an</strong>sitions carefully before installing the a bond beam<br />
or <strong>an</strong>chor plate (see page 12).<br />
3, Apply silicone <strong>to</strong> the <strong>to</strong>p surface of the <strong>masonry</strong> prior <strong>to</strong> bolting the <strong>an</strong>chor plate down.<br />
4. Bolt the <strong>an</strong>chor plate <strong>to</strong> the <strong>to</strong>p of the existing <strong>masonry</strong> using 3/8" or larger <strong>metal</strong> <strong>an</strong>chors solidly<br />
fastened in<strong>to</strong> the existing <strong>masonry</strong>.<br />
5, Screw the first section of <strong>chimney</strong> <strong>to</strong> the <strong>an</strong>chor plate using one fac<strong>to</strong>ry supplied stainless steel screw<br />
through each pre-punched hole,<br />
6. Carefully caulk the bot<strong>to</strong>m of the <strong>chimney</strong> section with silicone where it contacts the <strong>an</strong>chor plate <strong>to</strong><br />
prevent water from entering between the <strong>an</strong>chor plate <strong>an</strong>d the <strong>chimney</strong>, At the same time insure that the<br />
perimeter of the <strong>an</strong>chor plate is thoroughly caulked where it contacts the <strong>masonry</strong>.<br />
7. Install additional components as required, Be sure <strong>to</strong> maintain the required clear<strong>an</strong>ce <strong>to</strong> combustible<br />
materials.<br />
8. The maximum height of un-braced or un-guyed <strong>chimney</strong> above a roof is 5 ft.<br />
9. The maximum height above <strong>an</strong> <strong>an</strong>chor plate without a lateral support is 5'.<br />
10<br />
17/01/12 Page 5 of 7
17/01/12 Page 6 of 7
Extending a <strong>masonry</strong> <strong>chimney</strong> lined with a <strong>metal</strong> <strong>chimney</strong> liner<br />
RIS may be used <strong>to</strong> extend a <strong>masonry</strong> <strong>chimney</strong> which has been lined with <strong>an</strong> approved <strong>chimney</strong> liner. This<br />
type of repair is generally found where the original flue tile has been damaged by <strong>chimney</strong> fire or moisture<br />
<strong>an</strong>d in cases where the flue has been relined <strong>to</strong> reduce its cross section. The RIS <strong>an</strong>chor plate has a<br />
single wall connec<strong>to</strong>r section designed <strong>to</strong> allow a <strong>metal</strong> <strong>chimney</strong> liner <strong>to</strong> be screwed directly <strong>to</strong> It.<br />
Masonry Tr<strong>an</strong>sitions<br />
Masonry flue liners are typically rect<strong>an</strong>gular, oval, or square, <strong>an</strong>d they are rarely consistent in size. When<br />
installing <strong>an</strong> RIS <strong>chimney</strong> <strong>to</strong> extend a day tile liner the new round <strong>chimney</strong> must have a cross sectional<br />
area equivalent <strong>to</strong> the original <strong>masonry</strong> flue. In some cases this requires a dramatic ch<strong>an</strong>ge in the shape<br />
of the flue (e g: a 6 X 12 flue adapted <strong>to</strong> 10" round).<br />
When the original clay tile liner being extended is close <strong>to</strong> the same size <strong>an</strong>d shape as the RIS <strong>chimney</strong> it<br />
is generally sufficient <strong>to</strong> construct a smooth, h<strong>an</strong>d laid, refrac<strong>to</strong>ry cement tr<strong>an</strong>sition<br />
When the original clay tile liner is subst<strong>an</strong>tially different in size or shape from the RIS <strong>chimney</strong> it is<br />
recommended <strong>to</strong> install a locally fabricated stainless steel tr<strong>an</strong>sition section between the two systems in<br />
order <strong>to</strong> Insure smooth gas flow. It is not possible for <strong>ICC</strong> <strong>to</strong> offer tr<strong>an</strong>sition sections as a s<strong>to</strong>ck item<br />
because of the variations in flue tile size - even a "st<strong>an</strong>dard size" flue tile varies quite a bit from piece <strong>to</strong><br />
piece. We recommend that this tr<strong>an</strong>sition be locally constructed using the following procedure (see the<br />
drawing on page 11)<br />
• Make a paper template of the existing tile liner<br />
• Have a local sheet <strong>metal</strong> fabrica<strong>to</strong>r make a rect<strong>an</strong>gular <strong>to</strong> round tapered tr<strong>an</strong>sition having the following<br />
properties:<br />
• Constructed of .025 (22 gauge) or heavier type 304 or 316 stainless steel<br />
• The rect<strong>an</strong>gular section should correspond as closely as possible <strong>to</strong> the shape of the<br />
• template <strong>an</strong>d should have a I" fare at the end <strong>to</strong> allow it <strong>to</strong> seat squarely on <strong>to</strong>p of the<br />
• existing <strong>chimney</strong> - see drawing.<br />
• The single wall connec<strong>to</strong>r on the RIS <strong>an</strong>chor plate should fit snugly inside the round secion of the<br />
tr<strong>an</strong>sition.<br />
• For radical shape ch<strong>an</strong>ges the tapered section should be 6-8 inches long - this will require a thicker<br />
bond beam.<br />
The tr<strong>an</strong>sition section should be wrapped with 1" of mineral fibre insulation prior <strong>to</strong> pouring the bond beam.<br />
This allows for exp<strong>an</strong>sion <strong>an</strong>d contraction <strong>an</strong>d creates a thermal break between the <strong>metal</strong> <strong>an</strong>d <strong>masonry</strong>.<br />
12<br />
17/01/12 Page 7 of 7