Pitched warm roofs utilising over-rafter rigid foam ... - FastenMaster
Pitched warm roofs utilising over-rafter rigid foam ... - FastenMaster
Pitched warm roofs utilising over-rafter rigid foam ... - FastenMaster

You also want an ePaper? Increase the reach of your titles
YUMPU automatically turns print PDFs into web optimized ePapers that Google loves.
Specifier's Guide<br />
Warm roof installations<br />
<strong>utilising</strong> HeadLok ®<br />
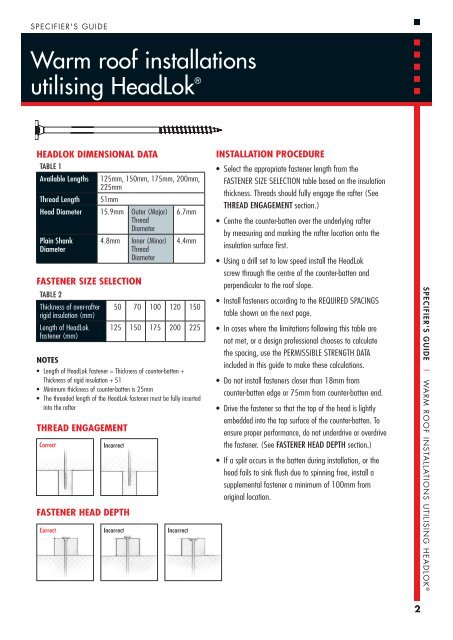
HEADLOK DIMENSIONAL DATA<br />
TABLe 1<br />
Available Lengths<br />
Thread Length<br />
125mm, 150mm, 175mm, 200mm,<br />
225mm<br />
51mm<br />
Head Diameter 15.9mm Outer (Major)<br />
Thread<br />
Diameter<br />
Plain Shank<br />
Diameter<br />
4.8mm<br />
FASTENER SIZE SELECTION<br />
TABLe 2<br />
Thickness of <strong>over</strong>-<strong>rafter</strong><br />
<strong>rigid</strong> insulation (mm)<br />
Length of HeadLok<br />
fastener (mm)<br />
Inner (Minor)<br />
Thread<br />
Diameter<br />
6.7mm<br />
4.4mm<br />
50 70 100 120 150<br />
125 150 175 200 225<br />
NOTES<br />
• Length of HeadLok fastener = Thickness of counter-batten +<br />
Thickness of <strong>rigid</strong> insulation + 51<br />
• Minimum thickness of counter-batten is 25mm<br />
• The threaded length of the HeadLok fastener must be fully inserted<br />
into the <strong>rafter</strong><br />
Thread Engagement<br />
Correct<br />
Incorrect<br />
Fastener Head Depth<br />
Correct Incorrect Incorrect<br />
INSTALLATION PROCEDURE<br />
• Select the appropriate fastener length from the<br />
FASTENER SIZE SELECTION table based on the insulation<br />
thickness. Threads should fully engage the <strong>rafter</strong> (See<br />
THREAD ENGAGEMENT section.)<br />
• Centre the counter-batten <strong>over</strong> the underlying <strong>rafter</strong><br />
by measuring and marking the <strong>rafter</strong> location onto the<br />
insulation surface first.<br />
• Using a drill set to low speed install the HeadLok<br />
screw through the centre of the counter-batten and<br />
perpendicular to the roof slope.<br />
• Install fasteners according to the REQUIRED SPACINGS<br />
table shown on the next page.<br />
• In cases where the limitations following this table are<br />
not met, or a design professional chooses to calculate<br />
the spacing, use the PERMISSIBLE STRENGTH DATA<br />
included in this guide to make these calculations.<br />
• Do not install fasteners closer than 18mm from<br />
counter-batten edge or 75mm from counter-batten end.<br />
• Drive the fastener so that the top of the head is lightly<br />
embedded into the top surface of the counter-batten. To<br />
ensure proper performance, do not underdrive or <strong>over</strong>drive<br />
the fastener. (See FASTENER HEAD DEPTH section.)<br />
• If a split occurs in the batten during installation, or the<br />
head fails to sink flush due to spinning free, install a<br />
supplemental fastener a minimum of 100mm from<br />
original location.<br />
Specifier's Guide | Warm roof installations <strong>utilising</strong> HeadLok ®<br />
2