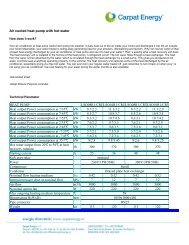
WM-1000 WIND TURBINE Operation Manual - Carpat Energy
WM-1000 WIND TURBINE Operation Manual - Carpat Energy
WM-1000 WIND TURBINE Operation Manual - Carpat Energy

You also want an ePaper? Increase the reach of your titles
YUMPU automatically turns print PDFs into web optimized ePapers that Google loves.
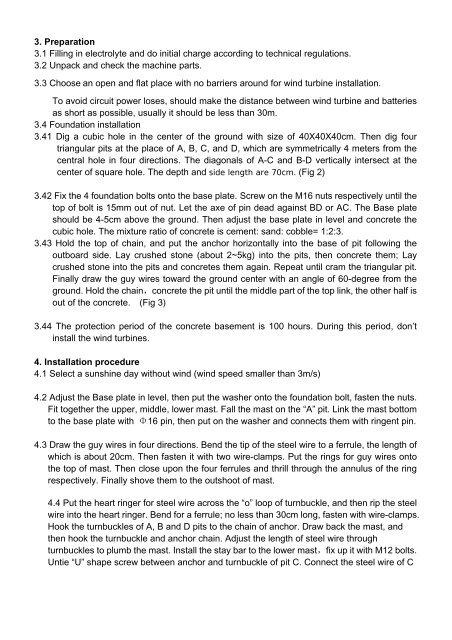
3. Preparation<br />
3.1 Filling in electrolyte and do initial charge according to technical regulations.<br />
3.2 Unpack and check the machine parts.<br />
3.3 Choose an open and flat place with no barriers around for wind turbine installation.<br />
To avoid circuit power loses, should make the distance between wind turbine and batteries<br />
as short as possible, usually it should be less than 30m.<br />
3.4 Foundation installation<br />
3.41 Dig a cubic hole in the center of the ground with size of 40X40X40cm. Then dig four<br />
triangular pits at the place of A, B, C, and D, which are symmetrically 4 meters from the<br />
central hole in four directions. The diagonals of A-C and B-D vertically intersect at the<br />
center of square hole. The depth and side length are 70cm. (Fig 2)<br />
3.42 Fix the 4 foundation bolts onto the base plate. Screw on the M16 nuts respectively until the<br />
top of bolt is 15mm out of nut. Let the axe of pin dead against BD or AC. The Base plate<br />
should be 4-5cm above the ground. Then adjust the base plate in level and concrete the<br />
cubic hole. The mixture ratio of concrete is cement: sand: cobble= 1:2:3.<br />
3.43 Hold the top of chain, and put the anchor horizontally into the base of pit following the<br />
outboard side. Lay crushed stone (about 2~5kg) into the pits, then concrete them; Lay<br />
crushed stone into the pits and concretes them again. Repeat until cram the triangular pit.<br />
Finally draw the guy wires toward the ground center with an angle of 60-degree from the<br />
ground. Hold the chain,concrete the pit until the middle part of the top link, the other half is<br />
out of the concrete. (Fig 3)<br />
3.44 The protection period of the concrete basement is 100 hours. During this period, don’t<br />
install the wind turbines.<br />
4. Installation procedure<br />
4.1 Select a sunshine day without wind (wind speed smaller than 3m/s)<br />
4.2 Adjust the Base plate in level, then put the washer onto the foundation bolt, fasten the nuts.<br />
Fit together the upper, middle, lower mast. Fall the mast on the “A” pit. Link the mast bottom<br />
to the base plate with Φ16 pin, then put on the washer and connects them with ringent pin.<br />
4.3 Draw the guy wires in four directions. Bend the tip of the steel wire to a ferrule, the length of<br />
which is about 20cm. Then fasten it with two wire-clamps. Put the rings for guy wires onto<br />
the top of mast. Then close upon the four ferrules and thrill through the annulus of the ring<br />
respectively. Finally shove them to the outshoot of mast.<br />
4.4 Put the heart ringer for steel wire across the “o” loop of turnbuckle, and then rip the steel<br />
wire into the heart ringer. Bend for a ferrule; no less than 30cm long, fasten with wire-clamps.<br />
Hook the turnbuckles of A, B and D pits to the chain of anchor. Draw back the mast, and<br />
then hook the turnbuckle and anchor chain. Adjust the length of steel wire through<br />
turnbuckles to plumb the mast. Install the stay bar to the lower mast,fix up it with M12 bolts.<br />
Untie “U” shape screw between anchor and turnbuckle of pit C. Connect the steel wire of C