Durastone Panels Installation Instructions - Entre Prises Climbing ...
Durastone Panels Installation Instructions - Entre Prises Climbing ...
Durastone Panels Installation Instructions - Entre Prises Climbing ...

You also want an ePaper? Increase the reach of your titles
YUMPU automatically turns print PDFs into web optimized ePapers that Google loves.
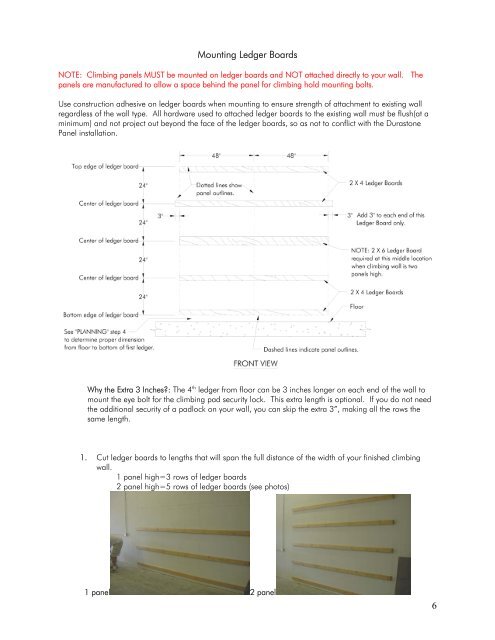
Mounting Ledger Boards<br />
NOTE: <strong>Climbing</strong> panels MUST be mounted on ledger boards and NOT attached directly to your wall. The<br />
panels are manufactured to allow a space behind the panel for climbing hold mounting bolts.<br />
Use construction adhesive on ledger boards when mounting to ensure strength of attachment to existing wall<br />
regardless of the wall type. All hardware used to attached ledger boards to the existing wall must be flush(at a<br />
minimum) and not project out beyond the face of the ledger boards, so as not to conflict with the <strong>Durastone</strong><br />
Panel installation.<br />
Why the Extra 3 Inches?: The 4 th ledger from floor can be 3 inches longer on each end of the wall to<br />
mount the eye bolt for the climbing pad security lock. This extra length is optional. If you do not need<br />
the additional security of a padlock on your wall, you can skip the extra 3”, making all the rows the<br />
same length.<br />
1. Cut ledger boards to lengths that will span the full distance of the width of your finished climbing<br />
wall.<br />
1 panel high=3 rows of ledger boards<br />
2 panel high=5 rows of ledger boards (see photos)<br />
1 panel 2 panel<br />
6