Download - Arbor Day Foundation
Download - Arbor Day Foundation
Download - Arbor Day Foundation

Create successful ePaper yourself
Turn your PDF publications into a flip-book with our unique Google optimized e-Paper software.
Step1<br />
Discover how trees conserve energy<br />
BASIC ACTIVITY<br />
Classroom Activity:<br />
• Design an Energy Wise Community Using<br />
Trees<br />
Objectives:<br />
Students will be able to:<br />
• describe several ways appropriately placed<br />
and planted trees can conserve energy<br />
• demonstrate best planting locations for<br />
different types of trees to conserve or<br />
produce energy<br />
Time Recommended:<br />
• One 60 minute or two 30 minute class periods<br />
Materials Needed:<br />
• Fan<br />
• Water in mist bottle or bucket<br />
• 2 thermometers (optional)<br />
• 11" x 17" or larger sheet of paper and pencils<br />
(one per child or group)<br />
• Handout of Rubric and Vocabulary on<br />
page 13<br />
• Photocopies of the Planting Trees for Energy<br />
Conservation Handout (one per student or<br />
group) on pages 14 and 15<br />
National Science Education Standards Correlation:<br />
As a result of the activity, students should<br />
develop an understanding of:<br />
• populations, resources, and environments<br />
• diversity and adaptations of organisms<br />
• designing a solution or product in light of<br />
information at hand<br />
National Social Studies Education Standards<br />
Correlation:<br />
As a result of the activity students should be<br />
able to:<br />
• explore the causes, consequences<br />
and possible solutions to persistent,<br />
contemporary, and emerging issues<br />
(Global Connections)<br />
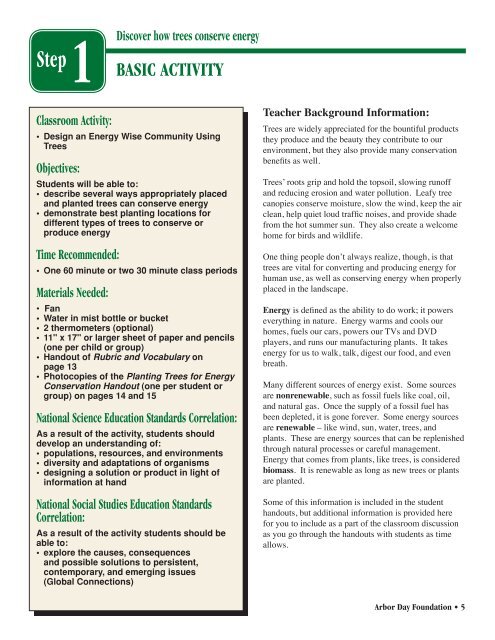
Teacher Background Information:<br />
Trees are widely appreciated for the bountiful products<br />
they produce and the beauty they contribute to our<br />
environment, but they also provide many conservation<br />
benefits as well.<br />
Trees’ roots grip and hold the topsoil, slowing runoff<br />
and reducing erosion and water pollution. Leafy tree<br />
canopies conserve moisture, slow the wind, keep the air<br />
clean, help quiet loud traffic noises, and provide shade<br />
from the hot summer sun. They also create a welcome<br />
home for birds and wildlife.<br />
One thing people don’t always realize, though, is that<br />
trees are vital for converting and producing energy for<br />
human use, as well as conserving energy when properly<br />
placed in the landscape.<br />
Energy is defined as the ability to do work; it powers<br />
everything in nature. Energy warms and cools our<br />
homes, fuels our cars, powers our TVs and DVD<br />
players, and runs our manufacturing plants. It takes<br />
energy for us to walk, talk, digest our food, and even<br />
breath.<br />
Many different sources of energy exist. Some sources<br />
are nonrenewable, such as fossil fuels like coal, oil,<br />
and natural gas. Once the supply of a fossil fuel has<br />
been depleted, it is gone forever. Some energy sources<br />
are renewable – like wind, sun, water, trees, and<br />
plants. These are energy sources that can be replenished<br />
through natural processes or careful management.<br />
Energy that comes from plants, like trees, is considered<br />
biomass. It is renewable as long as new trees or plants<br />
are planted.<br />
Some of this information is included in the student<br />
handouts, but additional information is provided here<br />
for you to include as a part of the classroom discussion<br />
as you go through the handouts with students as time<br />
allows.<br />
<strong>Arbor</strong> <strong>Day</strong> <strong>Foundation</strong> • 5
Concept: Trees Can Help Conserve Energy<br />
Most people living in cities and towns don’t have enough available land to<br />
grow their own individual biomass plantations to produce energy. Biomass<br />
is a homegrown source of energy. Wood, animal waste, crops, and even<br />
garbage can be used as a biomass energy source. Agricultural biomass crops<br />
like corn and soybeans can be burned directly or turned into other liquid<br />
fuels. However, by properly locating and planting a few trees around their<br />
home, people can conserve energy, lessen the use of nonrenewable fossil<br />
fuels, save money, increase property value, and help the environment. Proper<br />
landscaping with trees and shrubs is often the best long-term investment<br />
for reducing heating and cooling costs while also bringing improvements<br />
to the home and the community. Planting trees that incorporate practices<br />
from the three Guidelines described below can have a significant impact on<br />
conserving energy resources and money.<br />
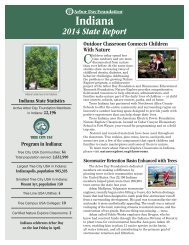
GUIDELINE 1: Plant Trees to Shade Your Home<br />
Carefully positioned trees can save up to 25% of a household’s energy needs for heating and cooling. According to the<br />
U.S. Department of Energy, this can save the average household between $100 and $250 in energy costs each year. What<br />
could your family do for fun with the money saved from cutting energy costs?<br />
A lack of trees around houses means less comfort and higher<br />
energy costs.<br />
Carefully planned trees annually save money and add comfort<br />
to a home.<br />
6 • <strong>Arbor</strong> <strong>Day</strong> <strong>Foundation</strong>
The most energy savings and the best use of shade generally<br />
come from deciduous, broadleaf trees planted about 10<br />
to 20 feet from the walls to the west, east, or northwest of<br />
the house, depending on species. These trees shade the<br />
house and air conditioning unit during the summer, reducing<br />
the energy needed for air conditioning and increasing the<br />
efficiency of the unit by as much as 10%. When they lose<br />
their leaves in the winter, trees correctly planted allow the<br />
sun to reach and warm the houses, making maximum use of<br />
winter solar heat, and thus saving energy for heating.<br />
Broadleaf trees have leaves that are flat and thin.<br />
They are usually deciduous, shedding their leaves annually.<br />
Oak, ash, and maple are several examples of<br />
broadleaf trees. Broadleaf trees generally provide the<br />
best summer shade.<br />
Deciduous, Broadleaf Tree<br />
Because the sun is more directly overhead at midday during<br />
the summer months, planting shade trees on the south is<br />
discouraged. Trees on the south will not shade the house<br />
unless planted very close to it and they will make unwanted<br />
shade in the winter when the sun is at a lower angle. Trees<br />
planted to the south of a home may also block beneficial<br />
summer breezes.<br />
In Summer<br />
In Winter<br />
Select broadleaf species trees that are right for your site<br />
considerations.<br />
Because the sun is more directly overhead in summer, trees<br />
planted on the south will not provide shade unless planted<br />
very close. Trees planted on the south also block beneficial<br />
summer breezes. Trees planted on the east, west, and<br />
northwest sides of a house provide the best shade during the<br />
summer mornings and afternoons.<br />
Summer<br />
In the winter, trees planted on the south side of a house may<br />
produce unwanted shade. Trees planted on the east, west<br />
and northwest sides minimize unwanted winter shade.<br />
Winter<br />
<strong>Arbor</strong> <strong>Day</strong> <strong>Foundation</strong> • 7
GUIDELINE 2:<br />
Plant Trees to Shade Paved Areas<br />
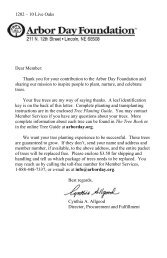
Trees shading paved areas, like driveways and asphalt parking lots, will greatly decrease surface heat.<br />
In the summer, a city with trees shading paved areas can be 12 degrees cooler than one without trees.<br />
Summer Heat<br />
Air temperature 98°<br />
Asphalt driveway<br />
surface 115°<br />
4ft above<br />
unshaded<br />
sidewalk 100°<br />
4ft above<br />
shaded<br />
sidewalk 90°<br />
Cities with unshaded stretches of concrete streets and<br />
parking lots are sometimes referred to as “heat islands”<br />
that are 5-12 degrees hotter than surrounding areas. Planting<br />
trees on rooftop gardens in these areas helps alleviate<br />
the heat island effect – which saves both energy and<br />
money.<br />
The net cooling effect of a young, healthy tree is equivalent<br />
to ten room-sized air conditioners operating 20 hours<br />
a day. In the process of transpiration, water escapes<br />
from small openings in a tree’s leaves. This water evaporates<br />
in hot weather. The evaporated moisture cools the air<br />
around the tree. Since cool air is heavier than hot air, this<br />
cool air moves toward the ground making us feel cooler.<br />
(The evaporation activity you may choose to do with your<br />
students on p.12, Step 5, illustrates how this works.)<br />
Heat Island Effect<br />
If it seems hotter downtown<br />
than in the suburbs, and<br />
cooler in the park than in your<br />
backyard, it is not simply your<br />
imagination. Cities are heat<br />
islands – zones of summer air<br />
temperatures that can be as<br />
much as 12 degrees Fahrenheit<br />
higher than surrounding areas.<br />
8 • <strong>Arbor</strong> <strong>Day</strong> <strong>Foundation</strong>
GUIDELINE 3:<br />
Plant Trees as Protection from Hot<br />
or Cold Winds<br />
Windbreaks are barriers used to reduce and redirect wind.<br />
Planting a windbreak around a home can provide an energy<br />
savings of up to 30 percent and reduce blowing snow,<br />
noise, and dust. Since most homes in the United States<br />
are heated by natural gas or electricity generated from<br />
burning coal, this energy savings means a reduction in fossil<br />
fuel use as well.<br />
An effective windbreak should be planted at a right angle<br />
(perpendicular) to prevailing winds. In the southern<br />
United States, hot, drying winds can erode soil and increase<br />
energy demands for cooling. Hot winds often come<br />
from the south or southwest, so an effective windbreak<br />
would be planted to the south and/or west of the home or<br />
housing development. In the northern United States, bitter<br />
cold winds can dramatically increase heating costs. Winter<br />
winds are often from the north or northwest, so an effective<br />
windbreak would be planted to the north and/or west<br />
of the home or housing development.<br />
Since winds vary, multiple legs of windbreaks, or windbreak<br />
systems often provide the best protection and greatest<br />
energy savings.<br />
Evergreen conifers with branches close to the ground<br />
form the best windbreaks. Pine, red cedar, and Douglasfir<br />
are species often used in windbreak plantings. Choose<br />
trees adapted to your region.<br />
Protected<br />
Area<br />
Windbreak Design<br />
Protected<br />
Area<br />
Two-sided windbreaks offer protection over a larger area for greater<br />
energy conservation.<br />
The effectiveness of the windbreak also depends on the<br />
density of the windbreak and its height. Three or more<br />
continuous rows of trees in staggered formation provide<br />
the best wind protection, but even a single row of trees<br />
will have an effect. Trees, bushes, and shrubs are often<br />
planted together to better block the wind from ground level<br />
to the treetops. The tallest row of trees is often planted<br />
in the center. Trees should be planted fairly close together.<br />
Spacing between rows should be about 12 feet.<br />
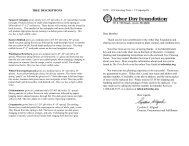
Windbreaks offer protection for a distance of up to 8 to 10<br />
times the height of the mature trees. Snow and stagnant air<br />
can collect in the area directly behind a windbreak so, in<br />
regions that receive lots of snow, buildings to be protected<br />
should be located no closer than 100 feet from the<br />
windward row (front row facing the wind). A good rule of<br />
thumb is that the area to be protected should be within a<br />
downwind distance of 2 to 5 times the expected height of<br />
the tallest windbreak row. (For planning purposes, 20 feet<br />
is often used as the height of the tallest trees.)<br />
If open wind speed is 35 miles per hour<br />
(mph), the windbreak reduces wind<br />
speed to:<br />
Snow drifts form here,<br />
away from buildings<br />
Wind speed about<br />
10 mph here<br />
Wind speed about<br />
15 mph here<br />
Wind speed<br />
about 35 mph<br />
Winter wind<br />
direction 0 ft 100 ft 200 ft<br />
(windward row)<br />
<strong>Arbor</strong> <strong>Day</strong> <strong>Foundation</strong> • 9
Conifers bear cones and have needle-like or scale-like<br />
leaves. Most conifers are evergreens since they do not lose<br />
all their leaves at once. Pines, firs, cedars, and spruces are<br />
conifers. Conifers generally provide the most effective buffer<br />
in windbreaks.<br />
The greater the number of trees in<br />
a neighborhood, the more effective<br />
the trees are in reducing the wind.<br />
New housing developments benefit<br />
from windbreak plantings that<br />
border the neighborhood.<br />
Wind direction<br />
A well-placed windbreak can protect several homes or an entire development<br />
from chilling winter winds and drifting snow.<br />
A WINDBREAK can lower heating bills 10-20%<br />
Many FLOWERING<br />
TREES also<br />
produce food<br />
for wildlife<br />
NUT TREES can be incorporated into windbreaks or<br />
serve as shade trees and benefit wildlife<br />
SHADE TREES planted east and west of your home<br />
can cut cooling costs up to 25%.<br />
STREET TREES shade the concrete and help cool<br />
the entire neighborhood<br />
10 • <strong>Arbor</strong> <strong>Day</strong> <strong>Foundation</strong><br />
An Energy Wise example of trees well-planted<br />
around a home that incorporates all three<br />
guidelines.
Activity<br />
Instructional Sequence<br />
Step 1. Begin by asking students what comes to mind<br />
when they hear the word “tree.” Record responses on the<br />
board without comment. Remind students of additional<br />
things trees do for the environment, if they are not already<br />
listed, then continue discussion by asking if energy should<br />
also be included on the list. After student discussion,<br />
explain that trees are vital for converting and producing<br />
energy for human use, as well as conserving energy when<br />
properly placed in the landscape.<br />
Step 2. Write the words “renewable energy” and “nonrenewable<br />
energy” on the board. Have students think<br />
of sources of energy and work together to determine into<br />
which of the two categories each energy source falls. Tell<br />
them that most of the energy used today for transportation<br />
and in factories, offices, and homes comes from fossil fuels.<br />
Fossil fuels such as coal, oil, and natural gas take millions<br />
of years to form and are nonrenewable. Sun, wind,<br />
trees, and water are renewable energy resources because<br />
supplies are not limited and with proper management we<br />
can always grow trees.<br />
Review the “What you should know” information in<br />
Guideline #1.<br />
Ask …Now look at the bottom two pictures in this section.<br />
If you know that north is marked at the top of each<br />
picture, which sides of the house are the trees planted on?<br />
Draw a compass on the board<br />
with the cardinal directions<br />
(north, south, east, and west)<br />
to help students gain orientation.<br />
Then review the “What<br />
you can do” information<br />
with students, referring to the<br />
visual examples as you go<br />
through the text.<br />
When you get to the term “deciduous, broadleaf trees” direct<br />
student attention to the illustration examples of broadleaves<br />
and conifers. Ask students to comment on the trees’<br />
differences. Ask what kinds of trees they see around their<br />
school? In their neighborhood? Explain that both kinds of<br />
trees play important roles in creating an ENERGY WISE<br />
community.<br />
Step 3. Pass out the two-page Tree Planting for Energy<br />
Conservation Guidelines Handout (pg 14 & 15). Explain<br />
that this Handout has three important guidelines. Each<br />
guideline describes both what they should know and what<br />
they can do to conserve energy by planting trees in specific<br />
locations. They will need to understand this information<br />
to do the activity. As you review each of the energy<br />
conservation guidelines, incorporate additional material<br />
provided in the Background Information section into the<br />
discussion.<br />
Step 4. Start with Guideline #1: Plant Trees to Shade<br />
Your Home.<br />
Ask … Look at the thermometer on the two top pictures.<br />
Which home is cooler?<br />
Why do you think that is?<br />
Which home looks more appealing to live in?<br />
<strong>Arbor</strong> <strong>Day</strong> <strong>Foundation</strong> • 11
Step 5. Explain that trees not only provide shade from<br />
the sun, they also transpire (release water vapor) through<br />
their leaves. This is an additional cooling benefit. Tell<br />
them you’ll show them how this works. Have students<br />
line up and file by the bucket of water. Ask each student<br />
to dip just one hand in the water to wet it, then hold both<br />
hands briefly in front of the fan. After all children have<br />
tried this, ask which hand felt cooler. Explain that the<br />
warmth of your skin and the air from the fan caused the<br />
water to evaporate. That process cools your skin. Nature<br />
uses evaporative cooling everyday. When we sweat, our<br />
perspiration evaporates, cooling us off. When a tree transpires,<br />
releasing moisture, that moisture evaporates, cooling<br />
the air. Tell students that the net cooling effect of just<br />
one young, healthy tree is equivalent to ten room-sized air<br />
conditioners operating 20 hours a day. Amazing!<br />
Step 6. Introduce Guideline #2: Plant Trees to Shade<br />
Paved Areas<br />
Review the content. Ask students what temperature differences<br />
they notice in the different areas of the illustration.<br />
You might wish to add information about heat islands<br />
from the background information.<br />
If the sun is out, have students go outside and measure the<br />
temperature difference between the sidewalk areas and the<br />
area in the shade. Discuss results.<br />
Step 7. Introduce Guideline # 3: Plant Trees as Protection<br />
from Hot or Cold Winds.<br />
To illustrate how a windbreak works, have one student<br />
stand about 8 feet from the fan and ask if he or she can<br />
feel the air movement. Then have other students come up<br />
and stand as a windbreak between the first student and the<br />
fan. Ask the first student the difference he or she feels.<br />
Ask students what direction the prevailing winds come<br />
from in their area…in the summer and in the winter.<br />
See a great teacher idea at<br />
www.arborday.org/teacheridea.<br />
Step 8: The Activity<br />
Determine if you wish to have students work individually<br />
or in small groups. Pass out the Vocabulary and Assessment<br />
Rubric Handout and review with students (page 13).<br />
Give each student or student group a large sheet of paper.<br />
Tell students to imagine they are community planners or<br />
landscapers. They are going to have an opportunity to<br />
design a new neighborhood development. Their job is to<br />
design & draw a landscape plan that shows some important<br />
community features (a school, several homes, a small<br />
business) and also incorporates tree planting that will help<br />
the home owners and the neighborhood conserve energy.<br />
Tell students they should refer to the Tree Planting for<br />
Energy Conservation Guidelines Handout to determine<br />
the best tree planting locations…both around the neighborhood<br />
AND around the homes and school. An optional<br />
worksheet can be found on p. 16 or downloaded at<br />
www.arborday.org/reproducibles.<br />
Remind students it is important to indicate north, south,<br />
east, and west on their design so they can know where<br />
to properly place trees for best energy conservation and<br />
windbreak protection. They should also indicate on the<br />
plan which trees are broadleaf trees and which trees are<br />
coniferous trees. Remind them of the direction of prevailing<br />
winds in their area. Review the assessment details in<br />
the rubric with students before they begin.<br />
When the landscaping projects are complete have students<br />
explain their plans and their choice of tree locations to the<br />
class. Provide the opportunity for peer review and redesign.<br />
Authentic Assessment<br />
Have students use the Tree Planting for Energy Conservation<br />
Guidelines Handout to evaluate real plantings<br />
around the school building, area homes, or business sites.<br />
Have them determine if efficient use of tree planting was<br />
made to conserve energy. They could select areas on<br />
the grounds where new trees might be planted on <strong>Arbor</strong><br />
<strong>Day</strong>. If available, they can observe and comment on areas<br />
where windbreaks have been planted.<br />
Alternative Assessment<br />
Make an enlarged photocopy of the Energy Wise example<br />
on page 10 and have students point out energy conserving<br />
features.<br />
Other Ideas!<br />
1. Take a field trip to a tree farm<br />
2. Invite a landscape architect to speak to the class<br />
3. Build a 3-D model of an energy wise neighborhood<br />
4. For additional outdoor activities, visit natureexplore.org.<br />
12 • <strong>Arbor</strong> <strong>Day</strong> <strong>Foundation</strong>
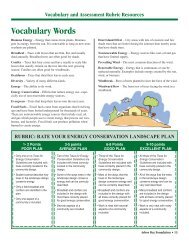
Vocabulary and Assessment Rubric Resources<br />
Vocabulary Words<br />
Biomass Energy – Energy that comes from plants. Biomass<br />
gets its energy from the sun. It is renewable as long as new trees<br />
or plants are planted.<br />
Broadleaf – Trees with leaves that are thin, flat, and usually<br />
shed annually. Broadleaf trees are often good for shade.<br />
Conifer – Trees that bear cones and have needle or scale like<br />
leaves that usually remain on the tree into the next growing<br />
season. Conifers are often good for windbreaks.<br />
Deciduous – Trees that shed their leaves each year.<br />
Diversity – Variety of many different kinds.<br />
Energy – The ability to do work.<br />
Energy Conservation – Efforts that reduce energy use...especially<br />
use of non-renewable energy sources.<br />
Evergreen – Trees that keep their leaves into the next year.<br />
Fossil Fuels – Fossil fuels come from organisms that lived long<br />
ago and have been buried underground for thousands of years.<br />
These are nonrenewable energy sources that include coal, oil,<br />
and gas which people use to create energy that powers our cars,<br />
homes, and factories. Fossil fuels can produce pollution when<br />
burned to create energy.<br />
Heat Island Effect – City areas with lots of concrete and few<br />
shade trees that are hotter during the summer than nearby areas<br />
that have shade trees.<br />
Nonrenewable Energy – Energy sources like coal, oil and gas<br />
that have limited supply.<br />
Prevailing Wind – The most common direction of the wind.<br />
Renewable Energy – Energy that is continuous or can be<br />
replaced naturally. Examples include energy created by the sun,<br />
wind, or biomass.<br />
Windbreak – Rows of trees planted to slow the force of the wind.<br />
Windward Row – The front row of trees facing the wind in a<br />
windbreak.<br />
RUBRIC: RATE YOUR ENERGY CONSERVATION LANDSCAPE PLAN<br />
1- 2 Points<br />
3-5 points<br />
6-8 Points<br />
9-10 points<br />
POOR RUBRIC: PLANGRADE YOUR AVERAGE ENERGY PLAN CONSERVATION GOOD PLAN LANDSCAPE EXCELLENT PLAN PLAN<br />
• Only one or no Trees for<br />
Energy Conservation<br />
Guidelines are included with<br />
trees correctly located in the<br />
community design.<br />
• Two of the Trees for Energy<br />
Conservation Guidelines are<br />
included with trees correctly<br />
located in the community<br />
design.<br />
• Three of the Trees for<br />
Energy Conservation<br />
Guidelines are included with<br />
trees correctly placed in the<br />
community design.<br />
• All three of the Trees for<br />
Energy Conservation<br />
Guidelines are included with<br />
trees correctly placed in the<br />
community design.<br />
• Student cannot describe how<br />
trees in the landscape design<br />
conserve energy.<br />
• Only a few broadleaf and<br />
conifers are identified in the<br />
plan.<br />
• Only one aspect of a<br />
community is included.<br />
• Some of the ways trees in the<br />
landscape design conserve<br />
energy and can be correctly<br />
described.<br />
• Broadleaf and conifers are<br />
included in the design with<br />
most trees correctly placed<br />
for good energy conservation.<br />
• Several aspects of a<br />
community are included.<br />
• Most of the ways that the<br />
trees in the landscape<br />
design conserve energy and<br />
can be correctly described.<br />
• Broadleaf and conifers are<br />
included in the design with<br />
all trees correctly placed for<br />
good energy conservation.<br />
• Work is neat with several<br />
aspects of a community<br />
included.<br />
• All of the ways that the trees<br />
in the landscape design<br />
conserve energy and can be<br />
very well described.<br />
• Many broadleaf and conifers<br />
are included in the design<br />
with all trees correctly placed<br />
for good energy conservation.<br />
• Work is very neat with many<br />
aspects of a community<br />
included.<br />
<strong>Arbor</strong> <strong>Day</strong> <strong>Foundation</strong> • 13
Tree Planting for Energy Conservation Guidelines - Handout - Page 1<br />
Guideline #1: Plant Trees<br />
to Shade Your Home<br />
What you should know – Trees<br />
shading a home can reduce the need<br />
for air conditioning. Carefully placed<br />
trees can save up to 25 percent of an<br />
average household’s energy needs for<br />
cooling - up to 65 percent in the case<br />
of mobile homes. According to the<br />
U.S. Department of Energy, proper<br />
placement of only three trees can save<br />
the average household up to $250 in<br />
energy costs each year. Think about<br />
what fun things your family could do<br />
with that extra money!<br />
What you can do – The most energy<br />
savings and the best use of shade<br />
generally comes from deciduous,<br />
broadleaf trees planted about 10 to 20<br />
feet from the walls to the west, east or<br />
south of the house, depending on the<br />
species. These trees shade the house<br />
during the summer, reducing the energy<br />
needed for air conditioning. When they<br />
lose their leaves in the winter, trees<br />
correctly planted allow the sun to reach<br />
and warm the house, saving energy for<br />
heating as well.<br />
A lack of trees around houses means<br />
less comfort and higher energy costs.<br />
2 Main Types of Trees<br />
Different kinds of trees can be part of an energy wise plan.<br />
Broadleaf trees have leaves that are flat and thin. They are usually<br />
deciduous, shedding their leaves annually. Oak, ash, and maple<br />
are several examples of broadleaf trees. Broadleaf trees generally<br />
provide the best summer shade.<br />
Conifers bear cones and have needle-like leaves. Most conifers are<br />
evergreen since they do not lose all their leaves at once. Pines, firs,<br />
cedars, and spruces are conifers. Conifers generally provide the most<br />
effective buffer in windbreaks.<br />
Summer<br />
Carefully planned trees annually save<br />
money and add comfort to a home.<br />
Summer<br />
Broadleaf<br />
Conifer<br />
Winter<br />
Winter<br />
Guideline #2: Plant Trees to Shade Paved Areas<br />
What you should know<br />
– Trees shading concrete<br />
or asphalt driveways and<br />
parking lots will greatly<br />
decrease surface heat. In<br />
the summer, a city area<br />
with trees shading paved<br />
areas can be 12 degrees<br />
cooler than one without<br />
trees.<br />
Summer Heat<br />
Air temperature 98°<br />
Asphalt driveway<br />
surface 115°<br />
4ft above<br />
unshaded<br />
sidewalk 100°<br />
4ft above<br />
shaded<br />
sidewalk 90°<br />
What you can do – Plant broadleaf trees near, but not right against, sidewalks and driveways. Create areas in large<br />
parking lots or along city streets where trees can be planted for shade. Plant rooftop gardens.<br />
14 • <strong>Arbor</strong> <strong>Day</strong> <strong>Foundation</strong>
Tree Planting for Energy Conservation Guidelines - Handout - Page 2<br />
Guideline #3: Plant Trees to Break the Wind and Reduce Blowing Snow and Dust<br />
What you should know - Windbreaks are rows of trees<br />
used to reduce the force and direction of the wind. Planting<br />
a windbreak around a home or housing development<br />
can provide an energy savings of up to 30 percent and<br />
reduce blowing snow, noise, and dust.<br />
Windbreaks should be planted in an L-shape (right angle)<br />
toward the common wind direction. For best protection,<br />
windbreaks may be planted on more than one side of the<br />
property. Effectiveness of the windbreak also depends on<br />
the density (thickness) of the windbreak and its height.<br />
Three or more rows of trees in staggered formation provide<br />
the best wind protection. Conifers generally form the best<br />
windbreaks but some windbreaks include a few broadleaf<br />
trees as well. Windbreaks are effective for a distance of up<br />
to 8 to 10 times the height of the mature fully grown trees.<br />
A well-placed windbreak can<br />
protect several homes or<br />
an entire development from<br />
chilling winter winds and<br />
drifting snow.<br />
Wind direction<br />
What you can do – Plant conifers several rows deep in<br />
a continuous line facing prevailing winds. Since snow<br />
and stale air can collect in the area directly behind a<br />
windbreak, buildings to be protected should be located<br />
no closer than 100 feet from the windward row (front<br />
Snow drifts form here,<br />
away from buildings<br />
row facing the wind). The area to be protected should be<br />
within a downwind distance of 2 to 5 times the expected<br />
height of the tallest windbreak row. (For planning purposes,<br />
20 feet is often used as the height of the tallest trees.)<br />
Wind speed about<br />
10 mph here<br />
If open wind speed is 35 miles per hour (mph),<br />
the windbreak reduces wind speed to:<br />
Wind speed about<br />
15 mph here<br />
Wind speed<br />
about 35 mph<br />
Winter wind<br />
direction 0 ft<br />
(windward row)<br />
100 ft 200 ft<br />
DIRECTIONS- Imagine you are a city planner or landscaper. Using the “Tree Planting for Energy<br />
Conservation Guidelines” in this handout, design a new, energy saving neighborhood development plan. Draw<br />
in homes and a school. Indicate north, east, south, and west on your plan. Remember to think about what<br />
sides of the homes to plant trees on for the best energy savings. Consider carefully where to plant deciduous,<br />
broadleaf trees and where to plant conifers . In your plan, draw in the best kind of trees to shade each<br />
home, to shade streets and driveways, and to serve as a neighborhood windbreak. Then describe why you<br />
planted trees where you did to be energy wise.<br />
<strong>Arbor</strong> <strong>Day</strong> <strong>Foundation</strong> • 15
Name:<br />
Design an Energy Wise Community Using Trees - Student Worksheet<br />
Directions: Imagine you are a city planner or landscaper. Using the “Tree Planting for Energy Conservation<br />
Guidelines” you have just reviewed, plant (draw) trees into the design for this new neighborhood to save<br />
energy. Plant trees in this development plan to shade homes, paved areas, and serve as a windbreak. In your<br />
plan, consider carefully where to plant deciduous, broadleaf trees and where to plant conifers .<br />
Remember to think about what sides of the homes to plant trees on for the best energy savings. Then, in the<br />
space below, describe why you planted trees where you did to be energy wise.<br />
Wind direction<br />
Describe your tree planting plan here:<br />
16 • <strong>Arbor</strong> <strong>Day</strong> <strong>Foundation</strong>
Step1<br />
How Trees Produce and Conserve Energy<br />
EXTENSION ACTIVITY #1<br />
Classroom Activity:<br />
• Conduct temperature and transpiration<br />
experiments to show how trees shade and<br />
cool their surroundings<br />
Objectives:<br />
Students will:<br />
• Make predictions about how trees affect<br />
temperature<br />
• Set up a scientific experiment<br />
• Measure the difference in temperature in tree<br />
shaded and unshaded areas<br />
• Demonstrate the process of transpiration<br />
Time Recommended:<br />
• Two 30 minute class periods<br />
Materials Needed:<br />
• Several plastic baggies with twist ties<br />
• 2 or more different kinds of leafy plants if<br />
there are no available leafed-out broadleaf<br />
trees<br />
• Grow light or sun lamp<br />
(if no access to a sunny location)<br />
• Two or more thermometers with same scale<br />
(F or C)<br />
• Pencil and Paper<br />
• Fan and container of water (optional)*<br />
• Several microscopes<br />
• Microscope slides and cover glass<br />
• Lettuce leaf<br />
• Iodine stain<br />
• Eyedropper<br />
• Forceps or tweezers<br />
National Science Education Standards Correlation:<br />
As a result of the activity students should<br />
develop an understanding of:<br />
• nature of science<br />
• populations and ecosystems<br />
• abilities necessary to do scientific inquiry<br />
• understanding about scientific inquiry<br />
Building off the knowledge gained in the Basic<br />
Activity, these experiments are designed to show<br />
how trees can cool their surrounding spaces. If you<br />
choose to just do these Extension Activities rather<br />
than the Basic Activity, you may wish to include the<br />
evaporative cooling demonstration from the Basic<br />
Activity (page 11) here.<br />
Background Information:<br />
Temperature is a measurement of hotness or coldness. It<br />
is measured on a standard Fahrenheit or Celsius scale.<br />
Transpiration is the process by which water evaporates<br />
from plant tissues, primarily leaves. Most plants in<br />
temperate climates transpire about 99 percent of the<br />
water taken in by the roots. The other one percent is<br />
incorporated into the plant’s structure. The vast majority<br />
of the water transpired by trees escapes through small<br />
openings on the underside of the leaf, the side away<br />
from the sun. Different species of trees and plants<br />
transpire at different rates depending on temperature,<br />
wind, light, and humidity. Plants in arid climates need<br />
to retain the limited moisture they take in, so their<br />
transpiration rate is much less than plants in more<br />
temperate climates.<br />
<strong>Arbor</strong> <strong>Day</strong> <strong>Foundation</strong> • 17
Anticipatory Set: The students will be setting up<br />
experiments using the scientific method. If students<br />
have not done any experiments it will be important to<br />
review some of those terms with them. Write the words<br />
hypothesis, variable, and constant on the board.<br />
Tell students they are going to do two simple experiments.<br />
Explain that scientists have guidelines they follow when<br />
they set up experiments. They start with a question, then<br />
they make a prediction (educated guess) about what the<br />
answer might be. That prediction is called a hypothesis.<br />
Next scientists determine the ONE specific thing they<br />
need to test and compare to prove their hypothesis. For<br />
example, a scientist may wish to see if corn grows faster<br />
using fertilizer. To test that, the scientist will plant corn.<br />
Half of the corn planted would not have any fertilizer<br />
while the other half of the corn would have fertilizer.<br />
The ONE thing that changes, or is different, is called the<br />
experiment variable. The one thing in this example that<br />
is different is fertilizer. Everything else in the experiment<br />
needs to be the same or constant.<br />
Using this same experiment example, ask students what<br />
things would need to be constant. List these things on<br />
the board. (Same brand of corn seed, same kind of soil,<br />
equal amounts of water, equal amounts of sunlight, same<br />
temperature, similar location area, same planting date.)<br />
Remind students that to prove that fertilizer makes a<br />
difference, everything else that affects the corn must be<br />
the same.<br />
Temperature Experiment<br />
Tell students they are going to get to conduct experiments<br />
to see if trees do make a difference in temperature of<br />
an area. Assign them to groups and help each group<br />
develop an experiment that has one variable involving<br />
temperature. One group might compare the temperature<br />
of grass in the sun to the temperature of grass in the<br />
shade. Another group might compare the temperature of<br />
a sidewalk surface in the sun to the sidewalk surface in<br />
the shade. A third group might measure the difference in<br />
temperature of asphalt in the sun to asphalt in the shade.<br />
(In each location, the variable is sun/shade.) Have each<br />
student make a prediction about what they think their own<br />
group results might be.<br />
Remind students that everything else in their experiment<br />
needs to be constant. Have them brainstorm a list of what<br />
those constants need to be. The list might include time<br />
of day temperature is taken, amount of time they leave<br />
the thermometer before reading the temperature, the<br />
location site for each group...group one – grass; group 2 –<br />
sidewalk; group 3 – asphalt, etc.<br />
Go outside and find a spot for each group where there is<br />
the appropriate mix of sun and shade. Each group must<br />
record the temperature after a specified amount of time.<br />
(10 minutes is plenty.) When tests are complete, ask the<br />
groups to describe the results of their investigations to the<br />
whole class.<br />
Transpiration Experiment<br />
Using a transparent bag, have each group wrap a leaf on<br />
the potted plant or a small portion of a leafy broadleaf tree<br />
branch that is exposed to full sun. Seal the end of the bag<br />
as tightly as possible. Do this on several kinds of plants<br />
or trees.<br />
Have students check on the leaf periodically making<br />
notes on what they see. Ask them to indicate how long it<br />
takes for water droplets to form inside the bag and record<br />
results. Compare results from the experiment. Do different<br />
kinds of leaves transpire at different rates?<br />
As students are waiting to check their leaves, discuss the<br />
process of transpiration with them. If you have not done<br />
the evaporative cooling demonstration with the fan and<br />
water from the Basic Activity, you may wish to do that<br />
here. If you have done that, remind students of how the<br />
water that transpires from the leaves evaporates like the<br />
water on their hand, cooling the air around it.<br />
Explain that plant leaves have tiny openings, called<br />
stoma or stomates. These little openings are where carbon<br />
dioxide enters the leaf and oxygen and water moisture<br />
leave the leaf. Surrounding each stomate are guard cells<br />
that open and close the stomate. Guard cells are shaped<br />
like two tiny green jelly beans on each side of the stomate.<br />
Tell students they will have a chance to see a stomate and<br />
the surrounding guard cells through a microscope.<br />
If there are enough microscopes in the class for each<br />
group to use, you may wish to have each group prepare<br />
18 • <strong>Arbor</strong> <strong>Day</strong> <strong>Foundation</strong>
their own slide. Otherwise prepare the slide using the<br />
following procedure and allow each group a chance to<br />
come look at the slide.<br />
Procedure:<br />
1) Put one drop of iodine stain on the center of the slide.<br />
2) Break the lettuce leaf and pull off the thinnest layer of<br />
epidermis possible.<br />
3) Carefully spread out this thin layer in the iodine on<br />
the slide making sure it is flat and not folded over on<br />
itself.<br />
4) Carefully place a cover slip over the epidermis, trying<br />
to avoid any air bubbles.<br />
5) Carefully and slowly bring the slide into focus. Move<br />
the slide around until you find some stomates and<br />
guard cells.<br />
6) Change the lens to high power to observe the stomates<br />
in more detail.<br />
7) If time permits, draw a picture of what you see.<br />
Authentic Assessment:<br />
After students evaluate the two experiment results, they<br />
will determine what other experiments they might like<br />
to do related to trees. Each student will describe their<br />
experiment idea, list a hypothesis, constants, variable,<br />
materials needed, and outline the procedure they<br />
would use.<br />
Looking inside a leaf<br />
Guard cells<br />
Palisade Cells<br />
with Chlorplasts<br />
Photosynthesis<br />
occurs in<br />
chloroplasts.<br />
Stoma<br />
Carbon dioxide<br />
in air enters<br />
through tiny<br />
pores (stomas).<br />
Intercellular Spaces<br />
Stoma<br />
Water is released into<br />
the air from transpiration<br />
through the stomas.<br />
Vein<br />
Phloem cells in<br />
leaf veins take<br />
manufactured<br />
sugars to living<br />
cells throughout<br />
the tree and to<br />
the roots, while<br />
they bring water<br />
from the xylem.<br />
Oxygen is released<br />
into the air through<br />
the stomas.<br />
<strong>Arbor</strong> <strong>Day</strong> <strong>Foundation</strong> • 19
Step1<br />
Discover How Trees Produce Energy<br />
EXTENSION ACTIVITY #2<br />
Objectives:<br />
Students will be able to:<br />
• trace the flow of energy in various forms,<br />
from plants to humans, by creating an<br />
energy chain<br />
• describe several ways trees provide energy<br />
for human use<br />
Time Recommended:<br />
• One 30 minute class period<br />
Materials Needed:<br />
• Photocopied Trees Produce Energy<br />
handout (one per child) on page 21<br />
• Pencil and Paper<br />
• Neighborhood Design Plan created in<br />
Basic Activity<br />
National Science Education Standards<br />
Correlation:<br />
As a result of the activity students should<br />
develop an understanding of<br />
• transfer of energy<br />
• populations, resources, and environments<br />
Introduction: This activity can be used to enrich and<br />
expand on the Basic Activity. It helps students understand<br />
that trees can produce, as well as conserve, energy.<br />
This activity will use the neighborhood design plans that<br />
students create in the Basic Activity.<br />
Instructional Sequence:<br />
Discussion: Ask students how they would define the word<br />
“energy.” Allow student responses. Let them know<br />
energy is defined as the ability to do work; it powers everything<br />
in nature. Energy warms and cools our homes,<br />
fuels our cars, powers our TVs, and runs our manufacturing<br />
plants. It takes energy for us to walk, talk, digest<br />
our food, and even breathe.<br />
Tell them that in the previous activity they learned how<br />
well-planted trees can play a key role in energy conservation.<br />
In this activity they will learn how trees and<br />
other plants can produce energy in ways that also benefit<br />
the environment.<br />
Pass out the Trees Produce Energy Handout and review<br />
the content with students.<br />
• As you discuss Concept 1, review the illustration<br />
“Energy Food Chain.” Ask students to come up with<br />
other examples of energy food chains.<br />
• As you discuss Concept 2, you may wish to include<br />
some of the Additional Information shown below.<br />
Additional Information: Two hundred years ago wood<br />
accounted for over 90% of the world’s energy/heating<br />
needs. Today some nations still use wood as an important<br />
fuel source for cooking and heating, but in the<br />
United States wood and other plant-based biomass fuels<br />
account for less than 5% of the fuel used for energy<br />
production. The United States depends heavily on fossil<br />
fuels, which will eventually run out.<br />
Only through wise use and proper forest management<br />
can wood and other biomass fuels be considered<br />
a renewable resource. Trees must be replanted as they<br />
are used. According to the National Renewable Energy<br />
Laboratory, more than 36 million acres of land in the<br />
United States, considered unfit to grow food, could be<br />
used to grow energy crops.<br />
“Each generation takes the Earth as trustees. We ought to bequeath to posterity as many<br />
forests and orchards as we have exhausted and consumed.”<br />
20 • <strong>Arbor</strong> <strong>Day</strong> <strong>Foundation</strong><br />
<strong>Arbor</strong> <strong>Day</strong> Founder, J. Sterling Morton
Trees Produce Energy - Handout<br />
Energy is defined as the ability to do work; it powers everything in nature. Energy warms and cools our homes, fuels our<br />
cars, powers our TVs and DVD players, and runs our manufacturing plants. It takes energy for us to walk, talk, digest our<br />
food, and even breathe. The following two concepts will help you understand how you can plant trees to produce energy.<br />
Concept 1: Plant Trees to Produce Food Energy for People and Wildlife<br />
What you should know – Trees and other green plants are<br />
the source of energy for all animal life to live and grow.<br />
Through the process of photosynthesis, plants change light<br />
energy from the sun into chemical energy that is stored in<br />
the plant as carbohydrates (sugars) as it grows. All animal<br />
life, including human life, depends on that stored energy.<br />
When you eat an apple, the chemical energy stored in the<br />
fruit becomes the energy “fuel” that allows you to work,<br />
play, run, and grow. Every living animal either gets its<br />
energy directly from plants or depends on other animals<br />
that depend on plants for food.<br />
What you can do – Plant many different kinds of trees<br />
that have high food value. This will increase healthy food<br />
energy for people as well as provide food and habitat for<br />
many kinds of wildlife. Plant fruit and nut trees that will<br />
grow in the climate where you live. Trees or shrubs with<br />
high-energy food value for people or wildlife can include:<br />
apple, orange, cherry, peach, oak, hazelnut, plum, etc.<br />
Energy Food Chain<br />
Concept 2: Grow Trees as an Energy Crop<br />
What you should know – While the fruits, seeds, and nuts<br />
of trees provide fuel (either directly or indirectly) to run<br />
our bodies, the wood from trees can be burned to release<br />
energy for heat to keep us warm or power to make things<br />
run. This homegrown source of energy is referred to as<br />
biomass energy...it is energy you can grow. Wood, animal<br />
waste, crops, and even garbage can be used as a biomass<br />
energy source. Agricultural biomass crops like corn and<br />
soybeans can be burned directly or turned into other liquid<br />
fuels (ethanol, methanol, and biodiesel) that can be used to<br />
power vehicles or machinery. When not burned efficiently,<br />
wood and other biomass products can cause air pollution.<br />
However, modern heating/cooling systems, and even<br />
efficient wood burning stoves, burn the biomass at such a<br />
high temperature and so completely that there is often<br />
less pollution with it than with conventional fuels like oil<br />
and coal.<br />
Wood manufacturing waste and wood from street tree<br />
Types of Biomass<br />
Crops Garbage Wood<br />
trimmings can also be burned for fuel, which saves fossil<br />
fuels and landfill space. Biomass not only produces energy,<br />
but it is good for the environment too.<br />
What you can do – Plant trees or other biomass energy<br />
crops on land that is considered unfit to grow food crops.<br />
Plant new trees when trees are cut down. Take care of the<br />
soil in which our crops grow. With careful management,<br />
wood and other biomass fuels will always be a renewable<br />
resource.<br />
Activity Directions: Research what tree species will grow in your community. Look at the Neighborhood Design<br />
Plan you created in the last activity. Add trees to your plan that will produce either food or biomass energy. Label<br />
your tree species. Discuss how these changes benefit the neighborhood.<br />
<strong>Arbor</strong> <strong>Day</strong> <strong>Foundation</strong> • 21