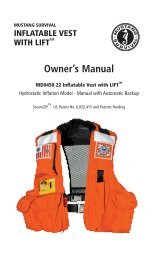
Owner's Manual - Mustang Survival
Owner's Manual - Mustang Survival
Owner's Manual - Mustang Survival

You also want an ePaper? Increase the reach of your titles
YUMPU automatically turns print PDFs into web optimized ePapers that Google loves.
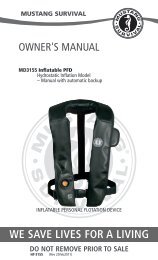
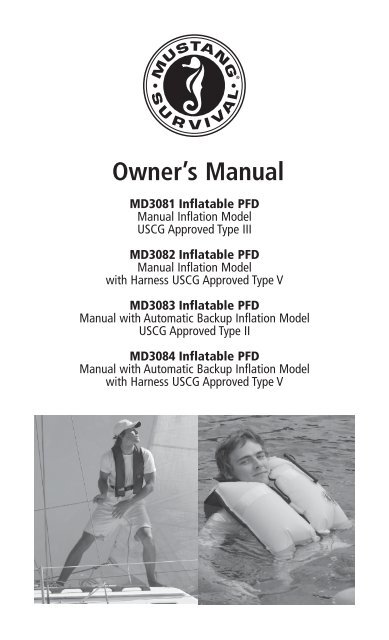
Owner’s <strong>Manual</strong><br />
MD3081 Inflatable PFD<br />
<strong>Manual</strong> Inflation Model<br />
USCG Approved Type III<br />
MD3082 Inflatable PFD<br />
<strong>Manual</strong> Inflation Model<br />
with Harness USCG Approved Type V<br />
MD3083 Inflatable PFD<br />
<strong>Manual</strong> with Automatic Backup Inflation Model<br />
USCG Approved Type II<br />
MD3084 Inflatable PFD<br />
<strong>Manual</strong> with Automatic Backup Inflation Model<br />
with Harness USCG Approved Type V
CONTENTS<br />
Page 1 Approval Conditions and Carriage Regulations<br />
2 What is an Inflatable PFD?<br />
2 Instructions for Use<br />
2 Component Inspection Instructions<br />
3 Readiness Checklist<br />
4 Sizing and Fit<br />
4 Donning Instructions<br />
5 Inflating Your Inflatable PFD<br />
6 Special Considerations for Automatic Devices (MD3083<br />
and MD3084)<br />
7 Deflating the Inflatable PFD<br />
8 Usage Below Freezing<br />
8 Re-arming Your PFD (MD3081 and MD3082)<br />
10 Re-arming Your PFD (MD3083 and MD3084)<br />
13 Repacking<br />
14 Sailing Harness<br />
15 Is Your PFD in Good and Servicable Condition?<br />
15 Care and Maintenance Instructions<br />
16 Cleaning and Storing of Your Inflatable PFD (MD3081<br />
and MD3082)<br />
17 Cleaning and Storing of Your Inflatable PFD (MD3083<br />
and MD3084)<br />
17 Why are PFDs Required Safety Equipment?<br />
17 How and Why to Test Your PFD<br />
18 Models MD3083 and MD3084<br />
18 How Do You Test Your PFD Using the Automatic Inflator?<br />
(MD3083 and MD3084)<br />
19 How Do You Test Your PFD Using the <strong>Manual</strong> Inflator?<br />
19 How Do You Test Your PFD Using the Oral Inflator?<br />
20 Wear Your PFD<br />
20 Hypothermia<br />
22 Each of These Devices is Intended to Help You Save Your Own<br />
Life<br />
22 Inflatable PFD Safety Accessories<br />
23 Additional Information<br />
Inflatable PFD Owner’s <strong>Manual</strong><br />
i
DO NOT REMOVE PRIOR TO SALE.<br />
APPROVAL CONDITIONS AND CARRIAGE REGULATIONS<br />
This Inflatable PFD is approved by the U.S. Coast Guard (USCG) for use as<br />
a Type III (Model MD3081), Type V (Model MD3082) Personal Flotation<br />
Device (PFD), Type II (Model MD3083), and Type V (Model MD3084)<br />
Personal Flotation Device (PFD). Models MD3082 and MD3084 have<br />
Type III and Type II performance respectively but are approved as Type<br />
V PFDs because they have built-in safety harnesses that can cause injury<br />
if not properly used. A separate section titled “SAILING HARNESS” (p.<br />
13) discusses requirements and features on the MD3082 and MD3084<br />
only. USCG approval does not apply to the sailing harness because some<br />
of the risks associated with its use have not been evaluated. It is not<br />
approved for water skiing or other high impact, high-speed activities.<br />
This Inflatable PFD was designed to be more comfortable and less<br />
restrictive to wear than inherently buoyant PFDs. When worn, used, and<br />
serviced according to this owner’s manual, this Inflatable PFD can greatly<br />
increase your chances of survival in the water. Not recommended for<br />
non-swimmers or weak swimmers. Users of inflatable PFDs must be at<br />
least 16 years old.<br />
MANDATORY CARRIAGE REQUIREMENTS<br />
Federal regulations in 33 CFR 175-1993 require you to carry Coast Guard<br />
approved personal flotation devices (PFDs) legibly marked with the Coast<br />
Guard approval number which are in good and serviceable condition<br />
and are the correct size for each person on board. To be considered<br />
serviceable, this Inflatable PFD shall not exhibit deterioration that could<br />
diminish its performance such as broken or deformed hardware, detached<br />
webbing, rotted structural components, air leaks, or nonfunctional oral<br />
inflation tube. Unless worn inflated, this Inflatable PFD must also be<br />
properly armed with a full CO 2 cylinder, inflation system status indicator,<br />
and an accessible manual inflation lanyard. A PFD which is “approved<br />
only when worn” or “required to be worn” must be worn under the<br />
specified conditions.<br />
1 Inflatable PFD Owner’s <strong>Manual</strong>
WHAT IS AN INFLATABLE PFD?<br />
While traditional PFDs are inherently buoyant, inflatable PFDs, rely<br />
entirely on inflation for buoyancy. Uninflated, the Inflatable PFD is a<br />
comfortable slim collar that can be inflated at any time with a 33-gram<br />
CO 2 gas cylinder. The Inflatable PFD is designed to offer maximum<br />
mobility with minimum bulk. The Inflatable PFD (MD3081 and MD3082)<br />
can be inflated either manually by jerking a pull-tab, or orally (by<br />
mouth). The Inflatable PFD (MD3083 and MD3084) can be inflated either<br />
automatically during water immersion, manually by jerking a pull-tab, or<br />
orally by mouth. It is recommended that you familiarize yourself with the<br />
procedures outlined in INSTRUCTIONS FOR USE (p. 2).<br />
INSTRUCTIONS FOR USE<br />
This manual supplies instructional, maintenance and safety information<br />
for all models (MD3081, MD3082, MD3083, and MD3084) unless<br />
specified otherwise. The model number is listed on the underside label.<br />
Congratulations on your Inflatable PFD purchase.<br />
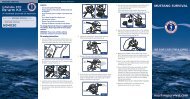
Component Inspection Instructions<br />
1) Examine the service indicator through the window panel (Figs. 1 and<br />
2). Ensure the service indicator is green. If the service indicator is red,<br />
the mechanism has been fired or is incorrectly fitted (see Re-arming<br />
Your PFD (for your model)).<br />
NOTE: The service indicator must be green before proceeding.<br />
2) Undo the Velcro strips along both sides of the PFD.<br />
Figure 1<br />
<strong>Manual</strong> Inflator<br />
MD3081 and MD3082 Service Indicator<br />
Inflatable PFD Owner’s <strong>Manual</strong> 2
Figure 2<br />
Automatic Inflator<br />
MD3083 and MD3084 Service Indicator<br />
3) Ensure the oral-inflation dust cap is in the stowed position (Fig. 7).<br />
4) Ensure the service indicator is green and the pull-tab lanyard is<br />
hanging on the outside; secure the Velcro strips on both sides of<br />
the Inflatable PFD.<br />
5) For the MD3083 and MD3084 only - Ensure the bobbin is valid. The<br />
PFD, or bobbin, must have been purchased within the last three (3)<br />
years. If the purchase date is unknown, check the date printed on the<br />
bobbin and replace if older than three (3) years (see Re-arming Your<br />
PFD (MD3083 and MD3084), p. 10).<br />
Readiness Checklist<br />
Check your Inflatable PFD and ensure all of the checkpoints listed below<br />
are true before use.<br />
n Service indicator is green.<br />
n No rips, tears or holes; all seams are securely sewn; and the fabric,<br />
straps and hardware are still strong.<br />
n All Velcro are securely fastened.<br />
n Inflatable PFD is not twisted.<br />
n Oral-inflation dust cap is in the stowed position.<br />
n For the MD3083 and MD3084 only - Ensure the bobbin is valid. The<br />
PFD, or bobbin, must have been purchased within the last three (3)<br />
years. If the purchase date is unknown, check the date printed on<br />
the bobbin and replace if older than three (3) years (see Re-arming<br />
Your PFD (MD3083 and MD3084), p. 10).<br />
3 Inflatable PFD Owner’s <strong>Manual</strong>
Your Inflatable PFD is ready for use if all applicable boxes are checked.<br />
NOTE: Contact your <strong>Mustang</strong> Dealer if you have any concerns<br />
about the readiness of your Inflatable PFD.<br />
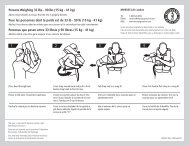
Sizing and Fit<br />
This PFD provides a minimum of 33.7 lbs of buoyancy when inflated and<br />
is designed for wearers over 16 years of age, with a chest range of 30-52<br />
inches (76-132 cm) weighing over 80 pounds (36 kg).<br />
Donning Instructions<br />
It is important that the Inflatable PFD is properly adjusted to fit the<br />
person wearing it. An incorrect fit or improper fastening of attachments<br />
could impede its effectiveness.<br />
1) All belts and straps are already threaded correctly and only need to<br />
be adjusted for fit.<br />
For the non-harness models MD3081 and MD3083, the belt should<br />
fit below your rib cage adjusted to a tight personal fit.<br />
For the harness models MD3082 and MD3084, the bottom of the belt<br />
must always be worn at least 2 inches (5 cm) above the lowest rib<br />
and adjusted to a tight personal fit.<br />
2) Put the Inflatable PFD on just like a jacket (Fig. 3) and fasten the<br />
front buckle. Adjust the waist belt using the side buckle on the belt<br />
and secure the belt’s loose end in the belt loop.<br />
WARNING: Do not wear Inflatable PFDs under clothing as the<br />
inflation could be restricted or you could be injured.<br />
Figure 3<br />
Inflatable PFD Owner’s <strong>Manual</strong> 4
Inflating Your Inflatable PFD<br />
It is recommended that the following procedures be followed to inflate<br />
your Inflatable PFD:<br />
1) <strong>Manual</strong> Inflation<br />
Activate the inflation system by jerking firmly downward on the pulltab<br />
(Fig. 4). The Inflatable PFD should fully inflate within 5 seconds.<br />
Figure 4<br />
<strong>Manual</strong> Inflator<br />
Automatic Inflator<br />
MD3081 and MD3082<br />
MD3083 and MD3084<br />
2) Automatic Backup Inflation (MD3083 and MD3084)<br />
Inflation will occur automatically within 10 seconds after the inflator<br />
is immersed in water. The water-sensing bobbin will disintegrate,<br />
triggering a spring-loaded plunger, which punctures the CO 2 cylinder<br />
(Figs. 9 and 11) to inflate the Inflatable PFD.<br />
Information<br />
When inflated, the carbon dioxide (CO 2 gas) used to inflate the PFD<br />
will slowly escape through the fabric over time. A slight reduction<br />
of pressure will be observed after several hours of inflation. Topping<br />
up by oral inflation may be required in the event of very prolonged<br />
immersion.<br />
IMPORTANT: See Special Considerations for Automatic Devices<br />
3) Oral Inflation<br />
Properly armed and inspected Inflatable PFDs will inflate when<br />
manually or automatically activated. However, you can fully inflate<br />
the Inflatable PFD by mouth (Fig. 5) should inflation not occur, or if<br />
you are in a non-emergency situation. To orally inflate the Inflatable<br />
5 Inflatable PFD Owner’s <strong>Manual</strong>
PFD, first locate the oral inflation tube by opening the wearer ’s left<br />
front panel of the Inflatable PFD. Remove the dust cap from the end<br />
of the oral tube and blow into the tube until the Inflatable PFD is<br />
fully inflated.<br />
WARNING: Avoid double inflation (CO 2 cylinder inflation after<br />
full oral inflation) as it could damage the PFD.<br />
Figure 5<br />
Special Considerations for Automatic Devices<br />
(MD3083 and MD3084)<br />
The Inflatable PFD might not be armed when needed, either knowingly<br />
or unknowingly. Premature automatic inflation causes several risks<br />
that you must address to avoid drowning. Much less common but also<br />
important are:<br />
WARNING: Avoid double inflation (CO 2 cylinder inflation after<br />
full oral inflation) as it could damage the PFD.<br />
1) Inflation when stored in a tight space could damage the PFD, and<br />
2) The PFD could inflate when you are in an awkward place or position.<br />
Premature inflation may occur in certain conditions, including when<br />
the device is subjected to: heavy splashing, high humidity, heavy fog,<br />
and heavy rain.<br />
Care and attention should be taken to ensure that when the device<br />
is used in these types of conditions, auto-inflation does not occur<br />
prematurely.<br />
Inflatable PFD Owner’s <strong>Manual</strong> 6
If this PFD should inflate prematurely, a re-arm kit (MA7202) is<br />
required to re-arm the device.<br />
IMPORTANT: The Inflatable PFD should be re-armed according<br />
to the instructions (Re-arming Your PFD (MD3083 and<br />
MD3084) p. 10).<br />
Deflating the Inflatable PFD<br />
1) To deflate the Inflatable PFD, reverse the oral-inflation tube dust cap<br />
and insert it into the valve or depress valve with fingertip. The dust<br />
cap will not lock in the deflate position so it is necessary to hold it in<br />
place (Fig. 6).<br />
2) Gently squeeze the Inflatable PFD until all air or gas has been<br />
expelled. To avoid damage; do not wring or twist the Inflatable PFD.<br />
Put the inflation tube dust cap back in its stowed position on the<br />
oral inflation tube (Fig. 7).<br />
3) Examine the service indicator (Figs. 1 and 2). If the service indicator<br />
is red, the mechanism has been fired or is incorrectly fitted and the<br />
inflator requires service (see Re-arming your PFD (for your model)).<br />
NOTE: The service indicator must be green before proceeding.<br />
4) Your device is ready to be repacked (see Repacking p. 13).<br />
Figure 6<br />
Figure 7<br />
Oral Inflator<br />
Cap In<br />
Deflate<br />
Position<br />
Dust cap<br />
in stowed<br />
position<br />
Dust cap<br />
position for<br />
deflation<br />
7 Inflatable PFD Owner’s <strong>Manual</strong>
Usage Below Freezing<br />
When the temperature is below freezing, a fully discharged cylinder may<br />
not adequately inflate your Inflatable PFD. Under these conditions use<br />
the oral inflator to adequately top-up the PFD.<br />
WARNING: CO 2 inflation could over-pressurize and damage your<br />
Inflatable PFD if already orally inflated.<br />
Re-arming Your PFD (MD3081 and MD3082)<br />
NOTE: A re-arm kit (MA7203) is required for this procedure.<br />
IMPORTANT: Follow instructions in the exact sequence below.<br />
1) Unpack or open the Inflatable PFD so that the manual inflator is<br />
exposed (Fig. 8).<br />
2) Remove the cylinder/bayonet assembly by rotating counter-clockwise<br />
and then pull out. Discard the used cylinder/bayonet assembly.<br />
3) Check the new cylinder/bayonet assembly to ensure the o-ring is in<br />
place and the sensor ring is attached (Fig. 8). Ensure that the CO 2<br />
cylinder has not been pierced (Fig. 11).<br />
Inflatable PFD Owner’s <strong>Manual</strong> 8
Figure 8<br />
MD3081 and MD3082 <strong>Manual</strong> Inflator<br />
Cylinder<br />
Step 2<br />
Sensor Ring<br />
Step 3<br />
Bayonet<br />
Tab<br />
Step 4<br />
O-Ring<br />
Step 3<br />
Service<br />
Indicator<br />
Step 5<br />
Lever<br />
4) Raise, and hold, the lever into the inflator housing. Install a new<br />
cylinder/bayonet assembly by engaging bayonet tabs in housing,<br />
pushing in then turning clockwise 1/8 turn to a full stop (Fig. 9).<br />
WARNING: PFD WILL ONLY INFLATE IF CYLINDER IS<br />
TURNED TO A FULL STOP.<br />
9 Inflatable PFD Owner’s <strong>Manual</strong>
Figure 9<br />
MD3081 and MD3082 <strong>Manual</strong> Inflator<br />
Tab<br />
Cylinder<br />
Piercing Pin<br />
Service Indicator<br />
1/8 Turn<br />
Lever<br />
5) Examine the service indicator (Fig. 9) and ensure it is GREEN. If<br />
the service indicator is red, the mechanism has been fired or is<br />
incorrectly fitted and<br />
MD3081<br />
the inflator<br />
and MD3082<br />
requires<br />
<strong>Manual</strong><br />
service.<br />
Inflator<br />
See Re-arming Your<br />
PFD (MD3081 and MD3082) Tab p. 8.<br />
Cylinder<br />
NOTE: The service indicator must be green before proceeding.<br />
Piercing Pin<br />
6) Refold the Inflatable PFD in accordance with the Repacking section<br />
(p. 13).<br />
Service<br />
Indicator<br />
YOUR INFLATABLE PFD (MD3081 1/8 and Turn MD3082) IS NOW READY FOR<br />
MANUAL USE<br />
Lever<br />
Re-arming Your PFD (MD3083 and MD3084)<br />
NOTE: A re-arm kit (MA7202) with a valid bobbin install-by-date<br />
(check re-arm kit packaging) is required for this procedure.<br />
IMPORTANT: Follow instructions in the exact sequence below.<br />
1) Unpack or open the Inflatable PFD so that the manual/automatic<br />
inflator is exposed (Fig. 10).<br />
2) Remove the cylinder/bayonet assembly by rotating counter-clockwise<br />
and then pull out. Discard the used cylinder/bayonet assembly.<br />
NOTE: You will damage the sensor ring if the bobbin and cap<br />
are not installed first.<br />
3) Remove cap by turning counter-clockwise. (Fig. 10).<br />
4) Remove bobbin from cap or housing unit. Discard bobbin.<br />
NOTE: The yellow bobbin may remain in the housing or in the<br />
cap assembly when you remove the cap. The bobbin must be<br />
Inflatable PFD Owner’s <strong>Manual</strong> 10
emoved prior to re-arming.<br />
5) Check the housing to be sure it is clear and dry. If necessary, rinse<br />
the inflator with fresh water to remove dirt and salt. Let dry before<br />
going to step 6.<br />
Figure 10<br />
MD3083 and MD3084 Automatic Inflator<br />
Cylinder /<br />
Bayonet<br />
Assembly<br />
Step 2<br />
CO2<br />
Cylinder<br />
Step 2<br />
Sensor Ring<br />
Step 9<br />
Bayonet<br />
Tab<br />
Step 9<br />
O-ring<br />
Step 9<br />
Pins<br />
Lever<br />
Step 10<br />
Cap<br />
Step 3<br />
Yellow Bobbin<br />
(white side up)<br />
Step 4<br />
HOUSING**<br />
Step 4<br />
Housing<br />
Shoulder<br />
Step 8<br />
Service<br />
Indicator<br />
Step 11<br />
Pull-Tab<br />
6) Inspect the bobbin. If the bobbin has been fired or damaged, replace<br />
it! Ensure the new bobbin is valid, it must have been purchased<br />
within the last three (3) years. If the bobbin purchase date is<br />
11 Inflatable PFD Owner’s <strong>Manual</strong>
unknown, check the date printed on the bobbin and replace if<br />
older than three (3) years (see Re-arming Your PFD (MD3083 and<br />
MD3084), p. 10).<br />
7) IMPORTANT! Bobbin (yellow) must be installed into the HOUSING<br />
(**see figure 10), white side up, aligning the slots on the bobbin<br />
with the ridges inside the threaded housing. The bobbin will slide in<br />
easily if installed correctly.<br />
8) Install cap by screwing clockwise until it meets the housing shoulder.<br />
9) Check the new cylinder/bayonet assembly to ensure the o-ring is in<br />
place and the sensor ring is attached (Figs. 10 and 11). Ensure that<br />
the CO 2 cylinder has not been pierced (Fig. 11).<br />
Figure 11<br />
Solid<br />
Cylinder<br />
Top<br />
Attached<br />
Sensor<br />
Ring<br />
Pierced<br />
Cylinder<br />
Top<br />
Broken<br />
Sensor<br />
Ring<br />
Caution: Do not use<br />
the cylinder/bayonet<br />
assembly if either<br />
the o-ring or sensor<br />
ring is broken,<br />
missing or damaged.<br />
IMPORTANT: You will damage the sensor ring if bobbin and<br />
cap are not installed first.<br />
10) Push, and hold, the lever into the inflator housing. The pull-cord<br />
should be situated in the groove (Fig. 12). Install a new cylinder/<br />
bayonet assembly by engaging bayonet tabs in housing, pushing in<br />
then turning clockwise 1/8 turn to a full stop (Fig. 12).<br />
WARNING: PFD WILL ONLY INFLATE IF CYLINDER IS<br />
TURNED TO A FULL STOP.<br />
11) Examine the service indicator (Fig. 10) and ensure it is GREEN. If<br />
the service indicator is red, the mechanism has been fired or is<br />
incorrectly fitted and the inflator requires service. See<br />
Re-arming Your PFD (MD3083 and MD3084) (p. 10).<br />
NOTE: The service indicator must be green before proceeding.<br />
Inflatable PFD Owner’s <strong>Manual</strong> 12
12) Refold the Inflatable PFD in accordance with the Repacking section<br />
(p. 13).<br />
YOUR INFLATABLE PFD (MD3083 and MD3084) IS NOW READY FOR<br />
MANUAL USE WITH AUTOMATIC BACKUP<br />
Figure 12<br />
MD3083 and MD3084 Automatic Inflator<br />
Tab<br />
Piercing<br />
Pin<br />
Service<br />
Indicator<br />
Groove<br />
Pull-cord<br />
Cylinder<br />
1/8 Turn<br />
Repacking<br />
Gently squeeze the Inflatable PFD until all air or gas has been expelled<br />
(Fig. 6). Do not wring or twist the Inflatable PFD. Put the inflation tube<br />
dust cap back in its stowed position on the oral inflation tube (Fig. 7).<br />
NOTE: Before following the repacking sequence, be sure to<br />
properly re-arm your Inflatable PFD.<br />
1) Fold side (A) inward along the full length of the dotted line (Fig. 14).<br />
2) Fold lapel (B) inward along dotted lines. Fasten along the full length<br />
of the Velcro. Ensure that the Inflatable PFD is tucked under the<br />
Velcro strip.<br />
3) Repeat steps 1 and 2 with side (C) and lapel (D). Your Inflatable PFD<br />
will look as illustrated in Fig. 15.<br />
4) Fold down the collar (E) along the dotted line (Fig. 15).<br />
5) Fold the cover (F) up over the collar and fasten with (3) Velcro tabs<br />
(Fig. 15 inset).<br />
6) Ensure the pull-tab is on the outside of the folded Inflatable PFD. Fig.<br />
16 depicts a correctly folded Inflatable PFD.<br />
Note: Ensure that all Velcro strips and tabs are fastened.<br />
13 Inflatable PFD Owner’s <strong>Manual</strong>
E<br />
F<br />
F<br />
A<br />
B<br />
D<br />
C<br />
Figure 13<br />
A<br />
B<br />
D<br />
C<br />
Figure 15<br />
Figure 14 Figure 16<br />
Pull-tab<br />
Sailing Harness<br />
Models with a sailing harness (MD3082 and MD3084) are designed to<br />
prevent the user from falling overboard when used with a tether with<br />
an under-load quick-release hook and have been designed and tested<br />
in accordance with Offshore Racing Council (ORC) requirements. Care<br />
and attention must be taken to ensure that the harness is used and<br />
maintained correctly. The harness is designed to be worn by persons at<br />
least 5 feet 5 inches tall (165 cm). The harness should be worn as high<br />
on the chest as possible, but in all cases, at least 2 inches (5 cm) above<br />
the lowest rib measured from the bottom of the belt and should not be<br />
used if it does not fit in this manner. Adjust the harness using the strap<br />
adjuster so that the harness is as snug as tolerable.<br />
Failure to adjust the harness properly could result in injury.<br />
When attached to the boat use a tether of less than 6 feet 6 inches (2 m)<br />
in length with quick-release under-load hardware (Fig. 17).<br />
Ensure that a tether is secured to both D-rings. When not in use, the<br />
D-rings can be pushed under the lapels.<br />
Warning: Use of a sailing harness to prevent falls overboard<br />
presents several risks. In case of capsizing or sinking, the boat<br />
may take you down. As such, ensure that any tether used has<br />
Inflatable PFD Owner’s <strong>Manual</strong> 14
quick-release under-load hardware. This harness has not been<br />
designed for fall arrest, lifting or climbing and should not be<br />
relied upon in any of these instances.<br />
US Coast Guard approval does not apply to this harness and the<br />
potential for injury has not been assessed.<br />
Figure 17<br />
Chest Buckle<br />
D-Ring<br />
Tether<br />
Webbing<br />
Chest Belt Webbing<br />
Quick Release Lanyard<br />
IS YOUR PFD IN GOOD AND SERVICEABLE<br />
CONDITION?<br />
Check your Inflatable PFD between outings to be sure that it is properly<br />
armed; that it is free of rips, tears or holes; that all seams are securely<br />
sewn; and that the fabric, straps and hardware are still strong (See<br />
Readiness Checklist, p. 3). Inspect the inflatable portion of the Inflatable<br />
PFD in accordance with the CARE AND MAINTENANCE INSTRUCTIONS.<br />
CARE AND MAINTENANCE INSTRUCTIONS<br />
Check the following at the intervals listed below.<br />
1) Each Use: Examine the service indicator through the window panel,<br />
ensuring it is green. If the service indicator is red, the mechanism has<br />
been fired or is incorrectly fitted. See Re-arming Your PFD (for your<br />
model).<br />
2) Every Three (3) Months: Leak Test: Every three months the Inflatable<br />
PFD should be tested for general leakage by orally inflating your<br />
Inflatable PFD until firm and let stand overnight. A leaking Inflatable<br />
PFD will not hold its firmness and should be replaced. If your<br />
Inflatable PFD leaks, take it to your <strong>Mustang</strong> dealer for evaluation<br />
and/or servicing. Repack the Inflatable PFD as outlined in the<br />
15 Inflatable PFD Owner’s <strong>Manual</strong>
Repacking section (p.13).<br />
3) Annually - Perform the following at the beginning of each boating<br />
season, after cell inflation, or whenever the integrity of the inflatable<br />
cell is in doubt:<br />
i) Check all components for dirt or corrosion. Clean or replace.<br />
ii) Visually examine your Inflatable PFD for damage or excessive<br />
abrasion, wear, tear or contamination. Particular attention must be<br />
paid to the stitching. If in doubt, send it to your <strong>Mustang</strong> dealer for<br />
evaluation and/or servicing.<br />
iii) To check the oral inflation valve, fully inflate the Inflatable PFD<br />
and hold valve under water. If bubbles appear, deflate and re-inflate<br />
to test again. Should the leak persist, take your Inflatable PFD to<br />
your <strong>Mustang</strong> dealer for evaluation and/or servicing.<br />
iv) Check that the CO 2 cylinder/bayonet assembly has not been<br />
pierced. Ensure the o-ring is in place and the sensor ring is intact<br />
on the bayonet (Fig. 10). If necessary, replace with 33-gram CO 2<br />
cylinder/bayonet assembly (contained in appropriate re-arm kit).<br />
v) Record as an "Annual" inspection in permanent ink on the Care<br />
and Storage label, in the Maintenance Date column.<br />
Re-assemble inflation system parts and repack the Inflatable PFD as<br />
outlined in the Repacking section (p.13).<br />
Warning: If you are not confident in the self-inspection and<br />
servicing of your Inflatable PFD in accordance with these<br />
instructions, take your Inflatable PFD to a <strong>Mustang</strong> dealer<br />
for professional servicing or contact <strong>Mustang</strong> <strong>Survival</strong> (see<br />
contact information on back of manual).<br />
Cleaning and Storing of Your Inflatable PFD<br />
(MD3081 and MD3082)<br />
To clean your Inflatable PFD, remove the CO 2 cylinder/bayonet assembly.<br />
Hand wash or sponge down the Inflatable PFD in warm, soapy water<br />
and rinse with clean water. Hang to dry on a plastic coat hanger. Be<br />
sure to replace CO 2 cylinder/bayonet assembly. See Re-arming your PFD<br />
(MD3081 and MD3082) (p. 8).<br />
Inflatable PFD Owner’s <strong>Manual</strong> 16
Always store your Inflatable PFD in a warm, dry place out of direct<br />
sunlight.<br />
Cleaning and Storing of Your Inflatable PFD<br />
(MD3083 and MD3084)<br />
To clean your Inflatable PFD, remove the CO 2 cylinder/bayonet assembly,<br />
cap and bobbin. Keep the bobbin dry. Hand wash or sponge down the<br />
Inflatable PFD in warm, soapy water. Rinse the PFD and inflator with<br />
clean water. Hang the Inflatable PFD to dry on a plastic coat hanger.<br />
Ensure the inflator is thoroughly dry before installing the bobbin. Be<br />
sure to replace CO 2 cylinder/bayonet assembly, cap and bobbin (see<br />
Re-arming your PFD (MD3083 and MD3084), p. 10).<br />
Always store your Inflatable PFD in a warm, dry place out of direct<br />
sunlight.<br />
WHY ARE PFDS REQUIRED SAFETY EQUIPMENT?<br />
Drownings are the leading cause of fatalities involving recreational<br />
boating. A PFD provides flotation to help keep your head above water,<br />
help you to stay face up in the water, and increase your chances for<br />
survival and rescue. Most adults only need an extra 7 to 12 pounds (3.2<br />
to 5.5 kg) of flotation to keep their heads above water. The proper size<br />
PFD will properly support the weight of the wearer.<br />
Since this Inflatable PFD does not have inherent buoyancy, it provides<br />
flotation only when inflated. Familiarize yourself with the use of this<br />
Inflatable PFD so you know what to do in an emergency.<br />
HOW AND WHY TO TEST YOUR PFD<br />
Inflate your Inflatable PFD and try it out in the water to:<br />
· Make sure it floats you:<br />
• Comfortably (when worn properly)<br />
• Adequately for expected wave conditions (body shapes/<br />
densities affect performance)<br />
· Make sure it works:<br />
• A flow of bubbles should not appear (see CARE AND<br />
17 Inflatable PFD Owner’s <strong>Manual</strong>
MAINTENANCE INSTRUCTIONS for leak tests p. 14). It should<br />
inflate quick and easily.<br />
· Learn how it works by:<br />
• Activating the CO 2 inflation system<br />
• Re-arming the CO 2 inflation system<br />
• Using the oral inflator tube<br />
To check the manual inflation system (with CO 2 cylinder/bayonet<br />
assembly removed); determine that the CO 2 cylinder piercing pin moves<br />
freely when pushing up on the lever arm by pushing down on the pins<br />
and releasing the pins followed by the lever arm (for MD3081 and<br />
MD3082 see Fig. 9 and for MD3083 and MD3084 see Fig. 12). Repeat<br />
this several times to check the manual inflation system.<br />
MODELS MD3083 and MD3084<br />
The U.S.Coast Guard recommends that you purchase two automatic<br />
re-arming kits (MA7202). One kit is to be used immediately in testing<br />
the automatic inflation system (see HOW DO YOU TEST YOUR PFD USING<br />
THE AUTOMATIC INFLATOR?, p. 18) and the other to carry on board as a<br />
spare.<br />
The U.S. Coast Guard recommends you test the automatic inflation<br />
system in the water at the beginning of each boating season. By<br />
doing this, you demonstrate that the automatic inflation system is still<br />
working properly and reduce the likelihood of premature inflation and its<br />
associated dangers.<br />
HOW DO YOU TEST YOUR PFD USING THE<br />
AUTOMATIC INFLATOR? (MD3083 and MD3084)<br />
1) To test your Inflatable PFD, you will need your fully armed Inflatable<br />
PFD, and re-arming kit (MA7202) approved for your Inflatable PFD<br />
2) Put on the Inflatable PFD.<br />
3) Get into shallow water, just deep enough that you can stand with<br />
your head above the surface. Once the inflator is underwater the<br />
Inflatable PFD should fully inflate automatically within 10 seconds.<br />
4) See if the Inflatable PFD will float you on your back or just slightly<br />
back of vertical. In a relaxed floating position, verify that your mouth<br />
Inflatable PFD Owner’s <strong>Manual</strong> 18
is well above the water’s surface. Note the effect of where you hold<br />
your legs on how you float.<br />
5) Get out of the water and remove the Inflatable PFD. Remove the<br />
used CO 2 cylinder/bayonet assembly and the used bobbin from the<br />
Inflatable PFD inflator.<br />
Deflate the Inflatable PFD by depressing the oral inflator valve (see<br />
Deflating the Inflatable PFD p. 7).<br />
6) Let the Inflatable PFD dry thoroughly. Re-arm and Repack the PFD (p.<br />
13).<br />
HOW DO YOU TEST YOUR PFD USING THE<br />
MANUAL INFLATOR?<br />
1) To test your Inflatable PFD, you will need your fully armed Inflatable<br />
PFD, and re-arming kit approved for your Inflatable PFD: MA7203<br />
for models MD3081 and MD3082, MA7202 for models MD3083 and<br />
MD3084.<br />
2) Put on the Inflatable PFD.<br />
3) Actuate the inflation system by jerking firmly downward on the<br />
pull-tab. The Inflatable PFD should fully inflate within 5 seconds.<br />
4) Get into shallow water, just deep enough that you can stand with<br />
your head above the surface.<br />
5) See if the Inflatable PFD will float you on your back or just slightly<br />
back of vertical. In a relaxed floating position, verify that your mouth<br />
is well above the water’s surface. Note the effect of where you hold<br />
your legs and how you float.<br />
6) Get out of the water and remove the Inflatable PFD. Completely<br />
deflate the Inflatable PFD using the oral inflator (see Deflating the<br />
Inflatable PFD p. 7). Remove the CO 2 cylinder/bayonet assembly from<br />
the inflator.<br />
7) Let the Inflatable PFD dry thoroughly. Re-arm and Repack the PFD (p.<br />
13).<br />
HOW DO YOU TEST YOUR PFD USING THE ORAL<br />
INFLATOR?<br />
19 Inflatable PFD Owner’s <strong>Manual</strong>
1) No spare parts or re-arming kits are needed to test an Inflatable PFD.<br />
2) Remove the CO 2 cylinder/bayonet assembly to prevent inadvertent<br />
inflation, which could potentially damage the Inflatable PFD. Inspect<br />
the cylinder to confirm it is unused (Fig. 11). Unscrew and remove<br />
the cap and the bobbin (MD3083 and MD3084 only). Otherwise the<br />
bobbin will disintegrate during water immersion.<br />
3) Put on the Inflatable PFD.<br />
4) Get into shallow water, just deep enough that you can stand with<br />
your head above the surface.<br />
5) If you are a weak swimmer or non-swimmer, inflate the Inflatable<br />
PFD partially so that you are supported well enough to be able<br />
to complete inflation without touching bottom, either orally or<br />
manually. Note this level of inflation because it is the minimum<br />
needed for you to safely use this Inflatable PFD.<br />
6) Fully inflate the Inflatable PFD using the oral inflator.<br />
7) See if the Inflatable PFD will float you on your back or just slightly<br />
back of vertical. In a relaxed floating position, verify that your mouth<br />
is well above the water’s surface. Note the effect of where you hold<br />
your legs on how you float.<br />
8) Get out of the water and remove the Inflatable PFD. Completely<br />
deflate the Inflatable PFD using the oral inflator.<br />
9) Let the Inflatable PFD dry thoroughly. Re-arm (for your model) and<br />
Repack the PFD (p. 13).<br />
WEAR YOUR PFD<br />
In approximately 80 percent of all boating fatalities, the victims were not<br />
wearing a PFD. Most fatal accidents happen on calm sunny days. This<br />
Inflatable PFD is much more comfortable to wear than other PFD types.<br />
Get into the habit of wearing this Inflatable PFD.<br />
Non-swimmers and children especially should wear a hybrid or non-<br />
Inflatable PFD at all times when on or near the water.<br />
HYPOTHERMIA<br />
Prolonged exposure to cold water causes a condition known as<br />
Inflatable PFD Owner’s <strong>Manual</strong> 20
hypothermia - a substantial loss of body heat, which leads to exhaustion<br />
and unconsciousness. Most drowning victims first suffer from<br />
hypothermia. The following chart shows the effects of hypothermia: how<br />
hypothermia affects most adults.<br />
How hypothermia affects most adults<br />
Water Exhaustion or Expected<br />
Temperature ˚C (˚F) Unconsciousness Time of <strong>Survival</strong><br />
0.3 (32.5) Under 15 min. Under 15–45 min.<br />
0.3–4 (32.5–40) 15–30 min. 30–90 min.<br />
4–10 (40–50) 30–60 min. 1–3 hrs<br />
10–16 (50–60) 1–2 hrs. 1–6 hrs.<br />
16–21 (60–70) 2–7 hrs. 2–40 hrs.<br />
21–27 (70–80) 2–12 hrs. 3 hrs. to Indefinite<br />
over 27 (over 80) Indefinite Indefinite<br />
PFDs can increase survival time because they allow you to float without<br />
using energy treading water and because of their insulating properties.<br />
Naturally, the warmer the water, the less insulation you will require.<br />
When operating in cold waters [below 60°F (15.6°C)] you should<br />
consider using a coat or jacket style PFD or a Type V Thermal Protective<br />
PFD as they cover more of the body than the vest or belt style PFDs.<br />
Some Points to Remember About Hypothermia Protection:<br />
1) Always wear your Inflatable PFD. Even if you become incapacitated<br />
due to hypothermia, the Inflatable PFD will keep you afloat and<br />
greatly improve your chances of rescue.<br />
2) Do not attempt to swim unless it is to reach a nearby craft, fellow<br />
survivor, or a floating object on which you can lean or climb.<br />
Swimming increases the rate of body heat loss. In cold water, drownproofing<br />
methods that require putting your head in the water are<br />
not recommended. Keep your head out of the water. This will greatly<br />
lessen heat loss and increase your survival time.<br />
3) Use the standard H.E.L.P. position when wearing an Inflatable PFD,<br />
drawing the legs up to a seated position, because doing so will help<br />
you conserve body heat (Fig. 18).<br />
4) Keep a positive attitude about your survival and rescue. This will<br />
improve your chances of extending your survival time until rescued.<br />
21 Inflatable PFD Owner’s <strong>Manual</strong>
Your will-to-live does make a difference!<br />
5) If there is more than one person in the water, huddling is<br />
recommended while waiting to be rescued. This action tends to<br />
reduce the rate of heat loss and thus increase the survival time.<br />
Figure 18<br />
HELP Position<br />
EACH OF THESE DEVICES IS INTENDED TO HELP<br />
YOU SAVE YOUR OWN LIFE<br />
For your Inflatable PFD to function properly, follow these suggestions to<br />
verify that it fits, floats, and remains in good condition.<br />
1) Check the inflation mechanism status indicators before each use.<br />
2) Get in the habit of re-arming the inflation mechanism right after<br />
each inflation.<br />
3) Try your wearable Inflatable PFD on and adjust it until it fits<br />
comfortably in and out of the water.<br />
4) Mark your Inflatable PFD with your name if you are the only wearer.<br />
5) Do not alter your Inflatable PFD. If it doesn’t fit properly, get one that<br />
does. An altered device is no longer Coast Guard approved.<br />
6) Your Inflatable PFD is not intended for use as a fender or kneeling<br />
pad.<br />
7) If your Inflatable PFD is wet, allow it to dry thoroughly before storing<br />
it. Store it in a well-ventilated area.<br />
8) Do not dry your Inflatable PFD in front of a radiator or other source<br />
of direct heat.<br />
Inflatable PFD Safety Accessories<br />
Inflatable PFD Owner’s <strong>Manual</strong> 22
For the MD3081 and MD3082 - MA7203 Re-arm Kit – Contains 33-gram<br />
replacement CO 2 cylinder/bayonet assembly for the manual inflator.<br />
For the MD3083 and MD3084 - MA7202 Re-arm Kit – Contains 33-gram<br />
replacement CO 2 cylinder/bayonet assembly and bobbin for the auto<br />
inflator.<br />
ADDITIONAL INFORMATION<br />
If you need more information about PFDs and safe boating, contact your<br />
state boating authority, U.S. Coast Guard Auxiliary, U.S. Power Squadron,<br />
Red Cross, or your nearest unit of the U.S. Coast Guard. To find out about<br />
free boating courses in your area call 1-800-336-BOAT (in Virginia, call<br />
800-245-BOAT).<br />
DO NOT ATTACH PFDs TO YOUR BOAT<br />
Each PFD has straps, hooks, buckles, or other means for securing the<br />
device in place on the wearer. Some PFDs also incorporate decorative<br />
d-rings or tabs. Such items are not to be used to attach the device<br />
to the boat. Attaching the device to the boat will not permit it to perform<br />
as intended.<br />
NOTE: Models MD3082 and MD3084 have built-in sailing<br />
harnesses intended for attaching to boats with quick-release<br />
under-load tethers secured to both d-rings (see Sailing Harness p.<br />
14). Do not attach the MD3082 and MD3084 to boats using any<br />
other means.<br />
AIRLINE OPERATOR POLICY ON CARRIAGE OF<br />
INFLATABLE PFDS AND CO 2 CARTRIDGES<br />
Please be aware that the following regulations apply to the air transport<br />
of this product. According to U.S. Research and Special Programs<br />
Administration Regulations Title 49 CFR 75.10(a)(25): With the approval<br />
of the aircraft operator, one small carbon dioxide cylinder fitted into<br />
a self-inflating jacket, plus one spare cartridge, may be carried by a<br />
passenger or crew in checked or carry-on baggage.<br />
Please refer to the governing body’s documentation, found online at<br />
http://hazmat.dot.gov.<br />
23 Inflatable PFD Owner’s <strong>Manual</strong>
we save lives for a living<br />
mustangsurvival.com<br />
TOLL FREE 1.800.526.0532 | EMAIL custserv@mustangsurvival.com<br />
<strong>Mustang</strong> <strong>Survival</strong> and seahorse design is a registered trademark of <strong>Mustang</strong> <strong>Survival</strong> Corp.<br />
Our commitment to quality has earned our Burnaby facilities ISO 9001 registration,<br />
the highest of all international standards. This is our guarantee you’re receiving the ultimate<br />
in design and manufacturing.<br />
HT1090<br />
(Rev 09Aug2011)