PD01-29/15002-Mini Dynafile II - Dynabrade Inc.
PD01-29/15002-Mini Dynafile II - Dynabrade Inc.
PD01-29/15002-Mini Dynafile II - Dynabrade Inc.

You also want an ePaper? Increase the reach of your titles
YUMPU automatically turns print PDFs into web optimized ePapers that Google loves.
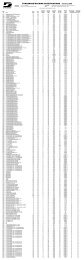
Disassembly/Assembly Instructions - <strong>Mini</strong>-<strong>Dynafile</strong> ® <strong>II</strong><br />
Important: Manufacturer’s warranty is void if tool is disassembled before warranty expires.<br />
Notice: <strong>Dynabrade</strong> strongly recommends the use of their 52<strong>29</strong>6 Repair Collar (sold separately) during assembly/disassembly activities. Failure to<br />
use this collar will highly increase the risk of damage to the valve body of this tool. Please refer to parts breakdown for part identification.<br />
To Disassemble:<br />
1. Remove Belt Guard, abrasive belt and contact arm assembly.<br />
Motor Disassembly:<br />
1. Separate 04115 Air Motor from tool assembly (<strong>15002</strong>, 15003 or 15006) by loosening 01788 Motor lock screw with a 95266, 3 mm hex key.<br />
2. Hold 01546 Housing in a vise by using 52<strong>29</strong>6 Repair Collar or padded jaws.<br />
Note: Be careful not to over tighten vise which could damage 01546 Housing<br />
3. Use 50791 Lock Ring Wrench or an adjustable 3 mm pin wrench to remove the 15106 Exhaust Cover (turn counterclockwise). Remove Silencer.<br />
4. Pull motor assembly from housing.<br />
5. Fasten a bearing separator around the 01476 Cylinder (end nearest the 02673 Rear Bearing Plate).<br />
6. Place the bearing separator on the table of the 96232 Arbor press so that the motor spindle points toward the floor.<br />
7. Use a 3/16" diameter drive punch as a press tool and press the rear portion of the 01475 Rotor out of the 02696 Rear Bearing.<br />
8. With the motor now disassembled, secure 01475 Rotor in a soft aluminum or bronze jaw vise, and remove 15118 Drive Wheel with a 95262 14 mm<br />
Wrench or pipe wrench.<br />
9. Remove 01478 Front Bearing Plate, 02649 Front Bearing, shims and 01479 Spacer, these are a slip fit onto the rotor.<br />
10. Remove 02679 Shield from 02696 Rear Bearing, and press 02696 Rear Bearing from 02673 Rear Bearing Plate (96210 Bearing Removal<br />
Tool is available).<br />
Motor disassembly complete.<br />
Valve Body Disassembly:<br />
1. Position valve body in a vise by using 52<strong>29</strong>6 Repair collar so that air inlet points up..<br />
2. Secure 01578 Inlet Adapter with a wrench to prevent it from turning. While holding the inlet adapter stationary remove the air fitting by turning it counterclockwise.<br />
Important: 01578 inlet Adapter must be secured before attempting to remove the air fitting so as to avoid damaging the valve body housing.<br />
3. Remove 01578 inlet Adapter.<br />
4. Remove 95711 Retaining Ring from inlet adapter. Remove 01486 Felt Silencer (4), and 01379 Bronze Muffler.<br />
5. Remove 01564 Air Control Ring from the valve body housing. Use needle nose pliers and remove 01468 Spring, 01472 Tip Valve and 01464 Seal.<br />
6. Use a 2.5 mm drive punch to remove 12132 Pin and 01448 or 01462 Throttle Lever.<br />
7. Remove 95558 Retaining Ring and push 01469 Regulator from the valve body housing.<br />
Valve Body disassembly complete.<br />
Optional: To disassemble valve body from motor housing, peel back 01558 Collar to expose 01461 Lock Nut. Unscrew lock nut/valve body from motor<br />
housing (left hand thread).<br />
To Assemble:<br />
Important: Make sure parts are clean and in good condition before assembling.<br />
Motor Assembly:<br />
1. Place 01475 Rotor in soft aluminum or bronze jaw vise with threaded spindle pointing upwards.<br />
2. Slip 01479 Spacer onto rotor.<br />
3. Place a .002" shim into 01478 Front Bearing Plate as an initial spacing and slip 02649 Bearing into plate (Note: Shim Pak contains .001" and<br />
.002" shims.)<br />
4. Install bearing/bearing plate assembly onto rotor.<br />
5. Insert silencers into 15106 Exhaust Cover and slide over rotor.<br />
6. Tighten 15118 Drive Wheel onto Rotor (torque to 17 N•m/150 in. - lbs.).<br />
7. Check clearance between rotor and bearing plate by using a .001" feeler gauge. Clearance should be at .001" to .0015". Adjust clearance by repeating<br />
steps1-5 with different shim if necessary.<br />
8. Once proper rotor/gap clearance is achieved, install well lubricated 01480 Blades (4) into rotor slots. <strong>Dynabrade</strong> recommends their air lube P/N 95842.<br />
9. Install cylinder over rotor. Be sure air inlet holes of cylinder face away from bearing plate and that the 50767 Pin in the front bearing plate aligns<br />
correctly with the pin-hole in the cylinder.<br />
10. Press 02696 Rear Bearing into 02673 Rear Bearing Plate. Press bearing/bearing plate assembly onto rotor. Be sure that pin and air inlet holes line-up<br />
with pin slot and air inlet holes in cylinder. Important: Fit must be snug between bearing plates and cylinder. A loose fit will not achieve the proper<br />
preload of motor bearings. If too tight, rotor will not turn freely and must then be lightly tapped at press fit end so it will turn freely while still<br />
maintaining a snug fit.<br />
11. Apply a dab of grease onto 02673 Bearing and place 02679 Shield over 02673 Bearing.<br />
12. Secure housing in vise using 52<strong>29</strong>6 Repair Cover or padded jaws so motor cavity faces upwards.<br />
13. Install motor assembly into housing. Be sure motor drops all the way into housing.<br />
14. Tighten exhaust cover onto motor housing by using 50971 Lock Ring Wrench (torque 28 N•m/250 in. - lbs.).<br />
(<strong>PD01</strong>•<strong>29</strong>)<br />
4