Insert a Page Break Insert Tab >> Pages Group ... - Indiastudychannel
Insert a Page Break Insert Tab >> Pages Group ... - Indiastudychannel
Insert a Page Break Insert Tab >> Pages Group ... - Indiastudychannel
You also want an ePaper? Increase the reach of your titles
YUMPU automatically turns print PDFs into web optimized ePapers that Google loves.
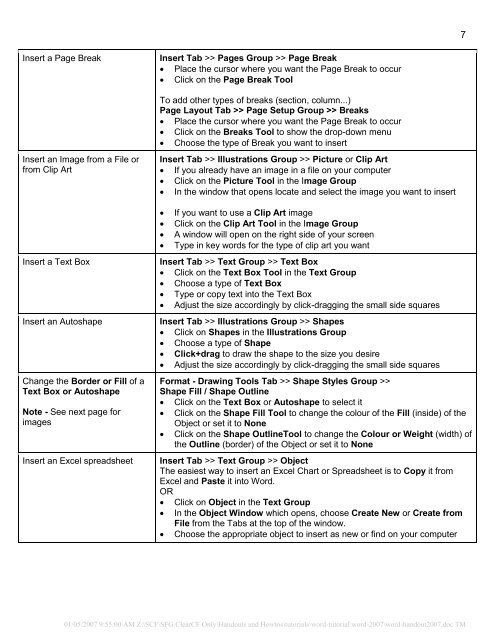
<strong>Insert</strong> a <strong>Page</strong> <strong>Break</strong><br />
<strong>Insert</strong> an Image from a File or<br />
from Clip Art<br />
<strong>Insert</strong> <strong>Tab</strong> >> <strong>Page</strong>s <strong>Group</strong> >> <strong>Page</strong> <strong>Break</strong><br />
� Place the cursor where you want the <strong>Page</strong> <strong>Break</strong> to occur<br />
� Click on the <strong>Page</strong> <strong>Break</strong> Tool<br />
To add other types of breaks (section, column...)<br />
<strong>Page</strong> Layout <strong>Tab</strong> >> <strong>Page</strong> Setup <strong>Group</strong> >> <strong>Break</strong>s<br />
� Place the cursor where you want the <strong>Page</strong> <strong>Break</strong> to occur<br />
� Click on the <strong>Break</strong>s Tool to show the drop-down menu<br />
� Choose the type of <strong>Break</strong> you want to insert<br />
<strong>Insert</strong> <strong>Tab</strong> >> Illustrations <strong>Group</strong> >> Picture or Clip Art<br />
� If you already have an image in a file on your computer<br />
� Click on the Picture Tool in the Image <strong>Group</strong><br />
� In the window that opens locate and select the image you want to insert<br />
� If you want to use a Clip Art image<br />
� Click on the Clip Art Tool in the Image <strong>Group</strong><br />
� A window will open on the right side of your screen<br />
� Type in key words for the type of clip art you want<br />
<strong>Insert</strong> a Text Box <strong>Insert</strong> <strong>Tab</strong> >> Text <strong>Group</strong> >> Text Box<br />
� Click on the Text Box Tool in the Text <strong>Group</strong><br />
� Choose a type of Text Box<br />
� Type or copy text into the Text Box<br />
� Adjust the size accordingly by click-dragging the small side squares<br />
<strong>Insert</strong> an Autoshape <strong>Insert</strong> <strong>Tab</strong> >> Illustrations <strong>Group</strong> >> Shapes<br />
� Click on Shapes in the Illustrations <strong>Group</strong><br />
� Choose a type of Shape<br />
� Click+drag to draw the shape to the size you desire<br />
� Adjust the size accordingly by click-dragging the small side squares<br />
Change the Border or Fill of a<br />
Text Box or Autoshape<br />
Note - See next page for<br />
images<br />
Format - Drawing Tools <strong>Tab</strong> >> Shape Styles <strong>Group</strong> >><br />
Shape Fill / Shape Outline<br />
� Click on the Text Box or Autoshape to select it<br />
� Click on the Shape Fill Tool to change the colour of the Fill (inside) of the<br />
Object or set it to None<br />
� Click on the Shape OutlineTool to change the Colour or Weight (width) of<br />
the Outline (border) of the Object or set it to None<br />
<strong>Insert</strong> an Excel spreadsheet <strong>Insert</strong> <strong>Tab</strong> >> Text <strong>Group</strong> >> Object<br />
The easiest way to insert an Excel Chart or Spreadsheet is to Copy it from<br />
Excel and Paste it into Word.<br />
OR<br />
� Click on Object in the Text <strong>Group</strong><br />
� In the Object Window which opens, choose Create New or Create from<br />
File from the <strong>Tab</strong>s at the top of the window.<br />
� Choose the appropriate object to insert as new or find on your computer<br />
01/05/2007 9:55:00 AM Z:\SCF\SFG ClearCF Only\Handouts and Howtos\tutorials\word-tutorial\word-2007\word-handout2007.doc TM<br />
7
Where are the Editing Tools for Images and Objects?<br />
The Tools for editing Images and Objects are found in several "hidden" Ribbon <strong>Tab</strong>s<br />
� There are several types of Special Ribbons such as<br />
o Format Picture Tools, Format Drawing Tools, Format Text Box<br />
� These Ribbon <strong>Tab</strong>s only appear when you<br />
1. Select an Image, Text Box, Autoshape, or other Object<br />
o Click on an Image or Object<br />
2. An extra Ribbon <strong>Tab</strong> will appear at the right end of the Ribbon <strong>Tab</strong>s<br />
3. Click on this new Ribbon <strong>Tab</strong> to access the Format Tools for that Image, Object<br />
Finding Extra Ribbon <strong>Tab</strong>s<br />
Format - Drawing Tools <strong>Tab</strong><br />
Format - Picture Tools <strong>Tab</strong><br />
01/05/2007 9:55:00 AM Z:\SCF\SFG ClearCF Only\Handouts and Howtos\tutorials\word-tutorial\word-2007\word-handout2007.doc TM<br />
8
Resize an image or object Format - Picture or Drawing Tools <strong>Tab</strong> >> Size <strong>Group</strong> >> Height / Width<br />
� Click on the Image or Object and you will see the<br />
Format Picture or Drawing Tools <strong>Tab</strong> at the end of the Ribbon <strong>Tab</strong><br />
� You can adjust the size of an Image or Object using the Height and Width<br />
Tools in the Size <strong>Group</strong><br />
� If you type in a new value for one value, the other will change accordingly<br />
� This method s for precision size adjustments<br />
Layer several Images or<br />
Objects over each other<br />
Arranging Objects that are<br />
In Front of Text<br />
You can also adjust the Size of an Image or Object by click+dragging any of the<br />
small square handles at the corners of the object<br />
� Select one of the corner squares and hold the mouse button down<br />
� Move the mouse and the object will grow or shrink accordingly<br />
� To preserve the ratio of the dimensions of the object<br />
o Hold the Shift Key down<br />
o Then click on a corner handle of the object and move it<br />
� To change the shape of the object, choose a handle in the centre of one of the<br />
sides to increase/decrease the width or height<br />
Format - Picture Tools >> Arrange <strong>Group</strong> >> Position / Text Wrapping<br />
When you first insert an image, its position is<br />
In Line with Text meaning that it is treated like another text character. Other<br />
position options are:<br />
Square - allows text to flow around the image This is useful for inserting an image in<br />
a paper or article<br />
In Front of Text - places image so that it floats over the text and blocks it. This is<br />
useful for Layering images and objects to create more complex objects. Objects In<br />
Front of Text can be moved freely on the page by click+dragging on their borders.<br />
To change the Position of an image or object relative to the text on the page:<br />
� Click on the image<br />
� You will see a new Ribbon <strong>Tab</strong> appear at the end of the Ribbon <strong>Tab</strong>s called<br />
Format. Above this it will say Picture Tools<br />
� Click on this Ribbon <strong>Tab</strong> to get the Picture Tools Ribbon<br />
� In the Arrange <strong>Group</strong>, click on Position or Text Wrapping and choose a<br />
position for your image from the drop-down list.<br />
Text Boxes are always In Front of Text, but can be arranged over or under other<br />
objects that are In Front of Text<br />
Format - Picture Tools >> Arrange <strong>Group</strong> >> Bring to Front / Send to Back<br />
Objects that are positioned In Front of Text can be arranged to overlap each other.<br />
If you have 2 overlapping objects and you would like the one that is behind to move<br />
in front of the other:<br />
� Click on the Object/Image and choose the Format - Picture Tools Ribbon<br />
� In the Arrange <strong>Group</strong> click on Bring to Front or Send to Back until the objects<br />
are arranged in the order you desire.<br />
01/05/2007 9:55:00 AM Z:\SCF\SFG ClearCF Only\Handouts and Howtos\tutorials\word-tutorial\word-2007\word-handout2007.doc TM<br />
9


