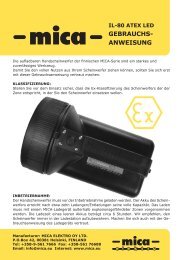
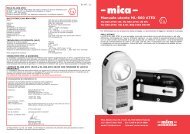
ML-800 ATEX ENGL_2- 2008 _FINAL.FH11 - Mica Elektro OY Ltd
ML-800 ATEX ENGL_2- 2008 _FINAL.FH11 - Mica Elektro OY Ltd
ML-800 ATEX ENGL_2- 2008 _FINAL.FH11 - Mica Elektro OY Ltd

You also want an ePaper? Increase the reach of your titles
YUMPU automatically turns print PDFs into web optimized ePapers that Google loves.
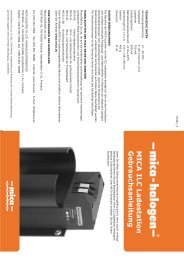
TAKING INTO USE<br />
1. Mounting the quick charger stand MICA <strong>ML</strong>C<br />
- Choose a suitable installation place and mount the <strong>ML</strong>C charging stand with two<br />
screws. The stand may not be placed on a platform manufactured of a highly<br />
flammable material.<br />
- Connect the power feed wire (use either a vehicle battery or a MICA IL-2 AC/DC<br />
adapter) in the charging stand’s round quick coupling. Alternatively, you can connect<br />
the feed wire in the screw terminals on the back of the stand (be sure to connect<br />
the plus and the minus poles correctly and finally tighten the cable clamp; the plus<br />
wire (+) is marked with red). Please see the figure!<br />
- The red light L1 will come on when the feed wire is connected, at the same time<br />
lights L2 and L3 will flash.<br />
- Feed voltage to the charging stand must be continuous and it may not be disconnected<br />
by using a timer or a similar device.<br />
2. Charge the lamp before using it<br />
- The battery of a new lamp is never charged and it must be charged very carefully prior to taking the<br />
lamp into use.<br />
- Please note that the lamp will not offer its full operating time until after it has been charged and<br />
discharged ca. 5 – 10 times.<br />
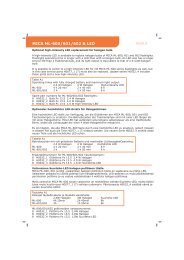
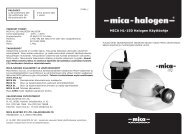
LAMP PARTS<br />
A = Switch<br />
B = Type plate<br />
C = High power LED<br />
D = Belt clip<br />
E = LED indicator for battery charge<br />
CHARGING ON MICA <strong>ML</strong>C CHARGING STAND<br />
The <strong>ML</strong>C charging/holding stand is to be used with <strong>ML</strong> lamps only. The battery will be charged from<br />
empty to full in approximately two hours. The smart charging technology guarantees optimal and safe<br />
charging in any situation. Feed voltage must be taken from a MICA IL-1 AC/DC adapter or a 12/24 V<br />
vehicle battery.<br />
1. The red light L1 will be lit when the charging stand is attached to proper feed voltage (12- 24V).<br />
2. The <strong>ML</strong> lamp must be placed on the <strong>ML</strong>C charging stand. When charging begins, orange light L2<br />
marked “charging” will come on. The lamp will be automatically turned off when it is placed in the <strong>ML</strong>C<br />
charging stand. The <strong>ML</strong>-<strong>800</strong> <strong>ATEX</strong> lamp can be charged under temperature of 0°C ... +40°C only.<br />
3. When the battery is fully charged, the green light L3 marked “ready” will be lit (and the light L2 will<br />
be turned off). At that time, the lamp is ready to be used and the charging stand will switch to the<br />
maintenance charging mode.<br />
4. The lamp must always be stored in the charging stand in order for it to be ready for use at all times.<br />
The MICA <strong>ML</strong>C quick charging stand will not overcharge the battery of the lamp.<br />
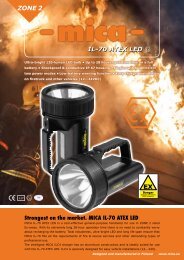
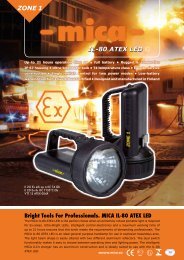
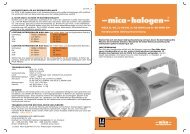
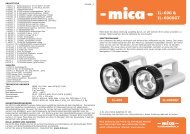
USING MICA <strong>ML</strong>-<strong>800</strong> <strong>ATEX</strong> LAMP<br />
A fully charged battery will allow you to work for approximately 7h 15min with 1W LED and 3h with 3W<br />
LED. If the lamp is used for shorter periods of time, the total operating time will be slightly longer.<br />
Approximately 30 minutes before the battery is empty, the light will begin to flash on and off in intervals<br />
of 15 seconds. When the operation time left is only approximately 5 minutes, the electronics will make<br />
the light flicker clearly faster.<br />
Control electronics will automatically turn off the lamp prior to deep discharge of the battery. When the<br />
lamp is not in use, it must be stored in the MICA <strong>ML</strong>C charging stand. The LED bulb’s service life is<br />
extremely long and there is no need to maintain it in any way.<br />
REPLACING BATTERY<br />
It is time to replace the battery when the operating time remains clearly shorter than that given here.<br />
The <strong>ML</strong>-<strong>800</strong> <strong>ATEX</strong> lamp consists of two parts: A plastic frame including the battery and an aluminum<br />
back cover. All of the plastic parts must be replaced as one unit. When preparing to replace the battery,<br />
first open the three hexagonal socket-head screws on the back cover and detach the back cover with<br />
its electronics card from the frame. Then detach the battery from the electronics card on the cover and<br />
remove the aluminum back cover. After this, open the screws holding in place the reflector attachment<br />
plate and remove the reflector, the lens and the gasket. Attach these parts to the new battery unit,<br />
connect the battery wire to the electronics card on the cover and attach the back cover to the new<br />
battery unit. Please make sure that no wires are clamped between the parts and check the gasket<br />
surfaces prior to assembly.<br />
A used battery is classified as hazardous waste! Please make sure that the battery is properly disposed<br />
of in accordance with instructions from the authorities. Do not dispose of the battery by burning it.<br />
E<br />
D<br />
A<br />
C<br />
B<br />
L2<br />
L3<br />
L1<br />
ACCESSORIES<br />
1. -Wire for connecting to a cigarette lighter (01112)<br />
2. -IL-2 AC/DC adaptor 230 VAC / 12VDC (11274)<br />
3. -IL-5 automatic changer for five charging stands (11310)<br />
4. -CR-15 charging ramp for up to ten <strong>ML</strong>C charging stands (11324)<br />
SAFETY INSTRUCTIONS FOR MICA <strong>ML</strong>-<strong>800</strong> <strong>ATEX</strong> LAMP<br />
Taking lamp into use:<br />
- The lamp must always be cleaned and otherwise prepared prior to moving into an<br />
explosive atmosphere.<br />
- The charging stand must not be placed in an explosive atmosphere. The battery may<br />
not be charged in an explosive atmosphere.<br />
Using lamp:<br />
- The only approved power source for a <strong>ML</strong>-<strong>800</strong> <strong>ATEX</strong> lamp is the original battery.<br />
- The battery may not be charged in an explosive atmosphere.<br />
- The battery may be charged with a MICA <strong>ML</strong>C charging stand only.<br />
- Please check that your facility’s classification corresponds to the lamp’s device marking.<br />
Lamp maintenance:<br />
- A <strong>ML</strong>-<strong>800</strong> <strong>ATEX</strong> lamp may not be opened or serviced in an explosive atmosphere.<br />
- Spare parts included in the spare part list of the user manual only are to be used in a<br />
<strong>ML</strong>-<strong>800</strong> <strong>ATEX</strong> lamp.<br />
- You may not attempt to service the electronics units of a <strong>ML</strong>-<strong>800</strong> <strong>ATEX</strong> lamp yourself.<br />
- In case of a malfunction of a <strong>ML</strong>-<strong>800</strong> <strong>ATEX</strong> lamp, please read the user manual and<br />
contact the retailer of the device.<br />
1<br />
1<br />
SPARE PARTS MICA <strong>ML</strong>C<br />
H0085_2 Plastic cover and top bolt<br />
H0086_1 Back plate and receptacle<br />
H0087_1 Bottom bolt<br />
H0088_2 Printed circuit board<br />
2<br />
4<br />
3<br />
5<br />
6<br />
SPARE PARTS MICA <strong>ML</strong>-<strong>800</strong> <strong>ATEX</strong><br />
1. H0150_1 <strong>ML</strong>-<strong>800</strong> <strong>ATEX</strong> replacement battery unit<br />
2. H0074_1 Lens and gasket<br />
3. H0175_2 Reflector and installation plate with screws<br />
4. H0151_1 Switch and protective switch hood<br />
5. H0152_1 1W circuit board with switch<br />
H0152_2 1W EM circuit board with switch<br />
H0152_3 3W circuit board with switch<br />
H0152_4 3W EM circuit board with switch<br />
6. H0153_1 1W LED unit<br />
H0153_2 3W LED unit<br />
7. H0154_1 Back cover with screws and gaskets<br />
8. H0155_1 Belt clip with screws<br />
NOTICE: Do not mix 1W and 3W parts (circuit boards and LED units)!<br />
7<br />
8