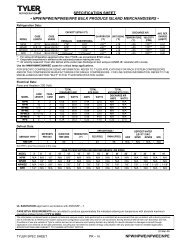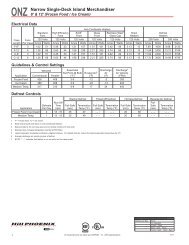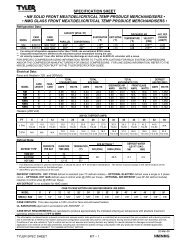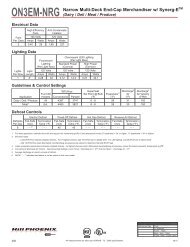
Installation & Service Manual - Hill Phoenix
Installation & Service Manual - Hill Phoenix
Installation & Service Manual - Hill Phoenix

You also want an ePaper? Increase the reach of your titles
YUMPU automatically turns print PDFs into web optimized ePapers that Google loves.
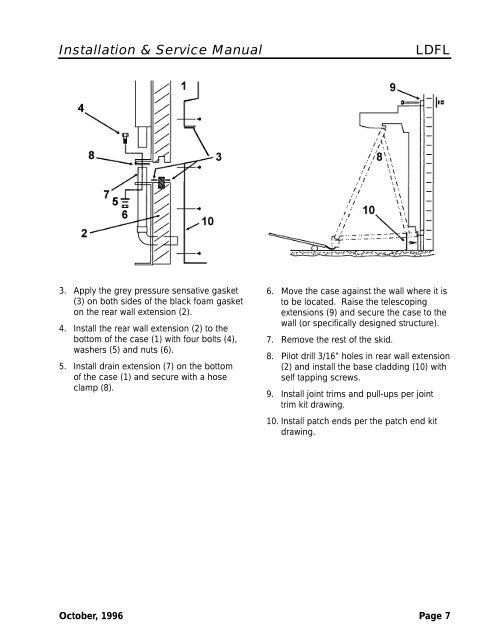
<strong>Installation</strong> & <strong>Service</strong> <strong>Manual</strong><br />
LDFL<br />
3. Apply the grey pressure sensative gasket<br />
(3) on both sides of the black foam gasket<br />
on the rear wall extension (2).<br />
4. Install the rear wall extension (2) to the<br />
bottom of the case (1) with four bolts (4),<br />
washers (5) and nuts (6).<br />
5. Install drain extension (7) on the bottom<br />
of the case (1) and secure with a hose<br />
clamp (8).<br />
6. Move the case against the wall where it is<br />
to be located. Raise the telescoping<br />
extensions (9) and secure the case to the<br />
wall (or specifically designed structure).<br />
7. Remove the rest of the skid.<br />
8. Pilot drill 3/16” holes in rear wall extension<br />
(2) and install the base cladding (10) with<br />
self tapping screws.<br />
9. Install joint trims and pull-ups per joint<br />
trim kit drawing.<br />
10. Install patch ends per the patch end kit<br />
drawing.<br />
October, 1996 Page 7